Skip to Content

Odoo Affiliate Manager

Run a full affiliate and referral program inside Odoo eCommerce. Track clicks
and sales. Set commission by custom rate, group, tier, or product. Catch fraud
automatically. Pull back money on refunds. Pay everyone in one monthly bill
run - all through a branded portal your affiliates log into themselves.

Here is a detailed explanation about all the features of this module.

Module installation and setup

What you need before you start
Odoo 19.0 (Community or Enterprise) - the module only works on this version.
The website shop and Odoo's coupon/loyalty apps already installed.
The accounting app - payouts are real vendor bills.
A python package called rlPyCairo, so the referral QR codes can be drawn.
Install the Python package : on your Odoo server, run pip install rlPyCairo.
Copy the module : copy affiliate_management folder into your addons path, then restart Odoo.
Turn on developer mode : only if the apps list isn't showing new modules: Settings > General Settings > Developer Tools.
Update the Apps list : go to apps, click the ⋮ menu, then update apps list.
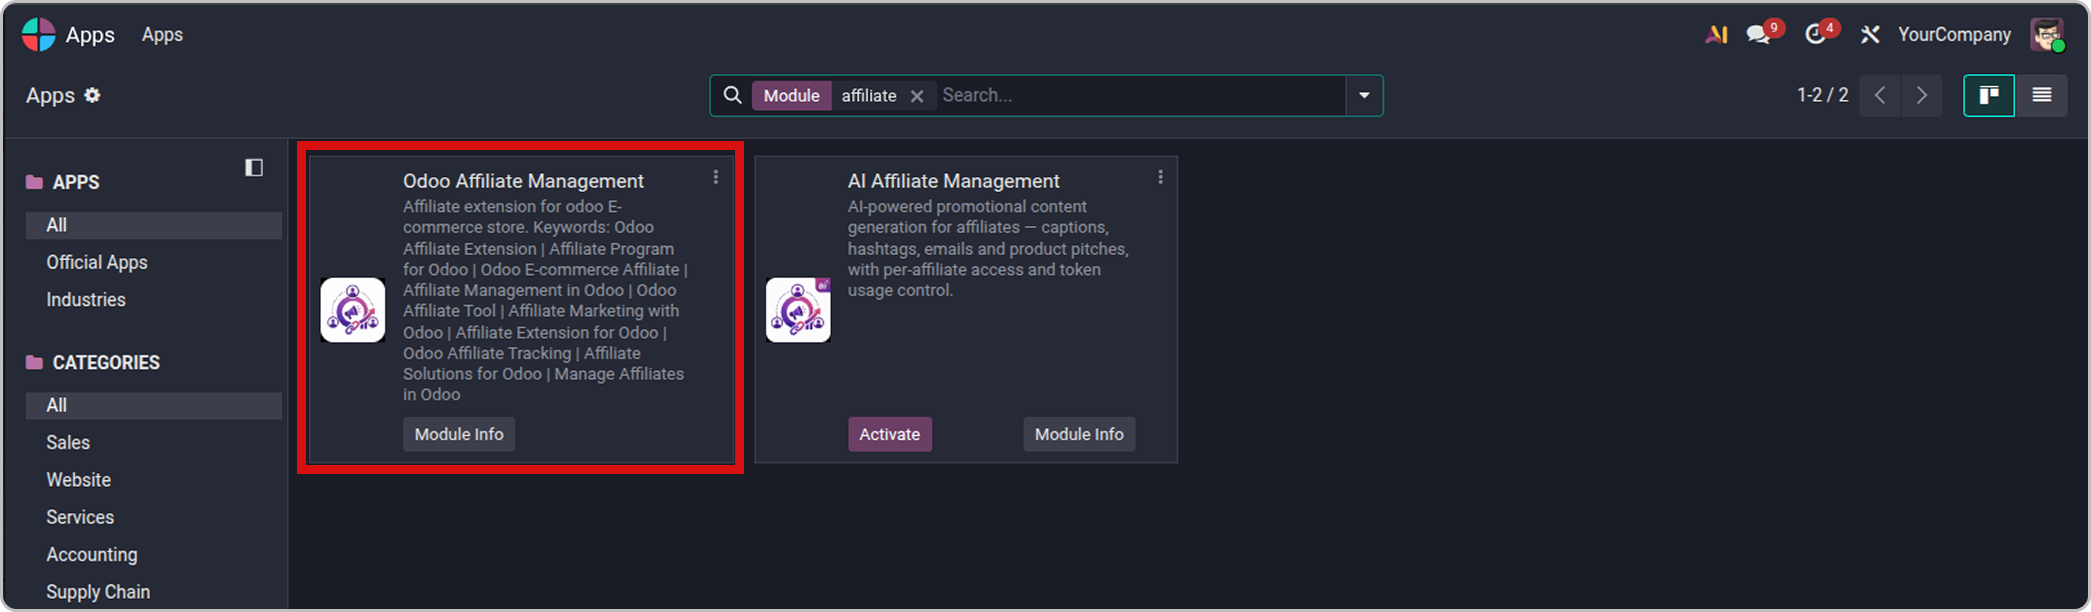
Activate the module : search for Odoo Affiliate Management and click Activate.
Click on image to Zoom out.

Trying it with sample data

Installing with demo data fills in some sample affiliates and commissions so you can look around before setting up your own. Use a test database for this, not your real one.
Where to find things afterwards

A new affiliate manager menu appears. Inside it :-

Affiliate program : pending applications and your approved affiliates.
Reports : sale commissions, click commissions, and a pivot view.
Invoicing : the payout bills.
Configuration : settings, banner images, promo text, and commission rates.
Quick setup - six things to set

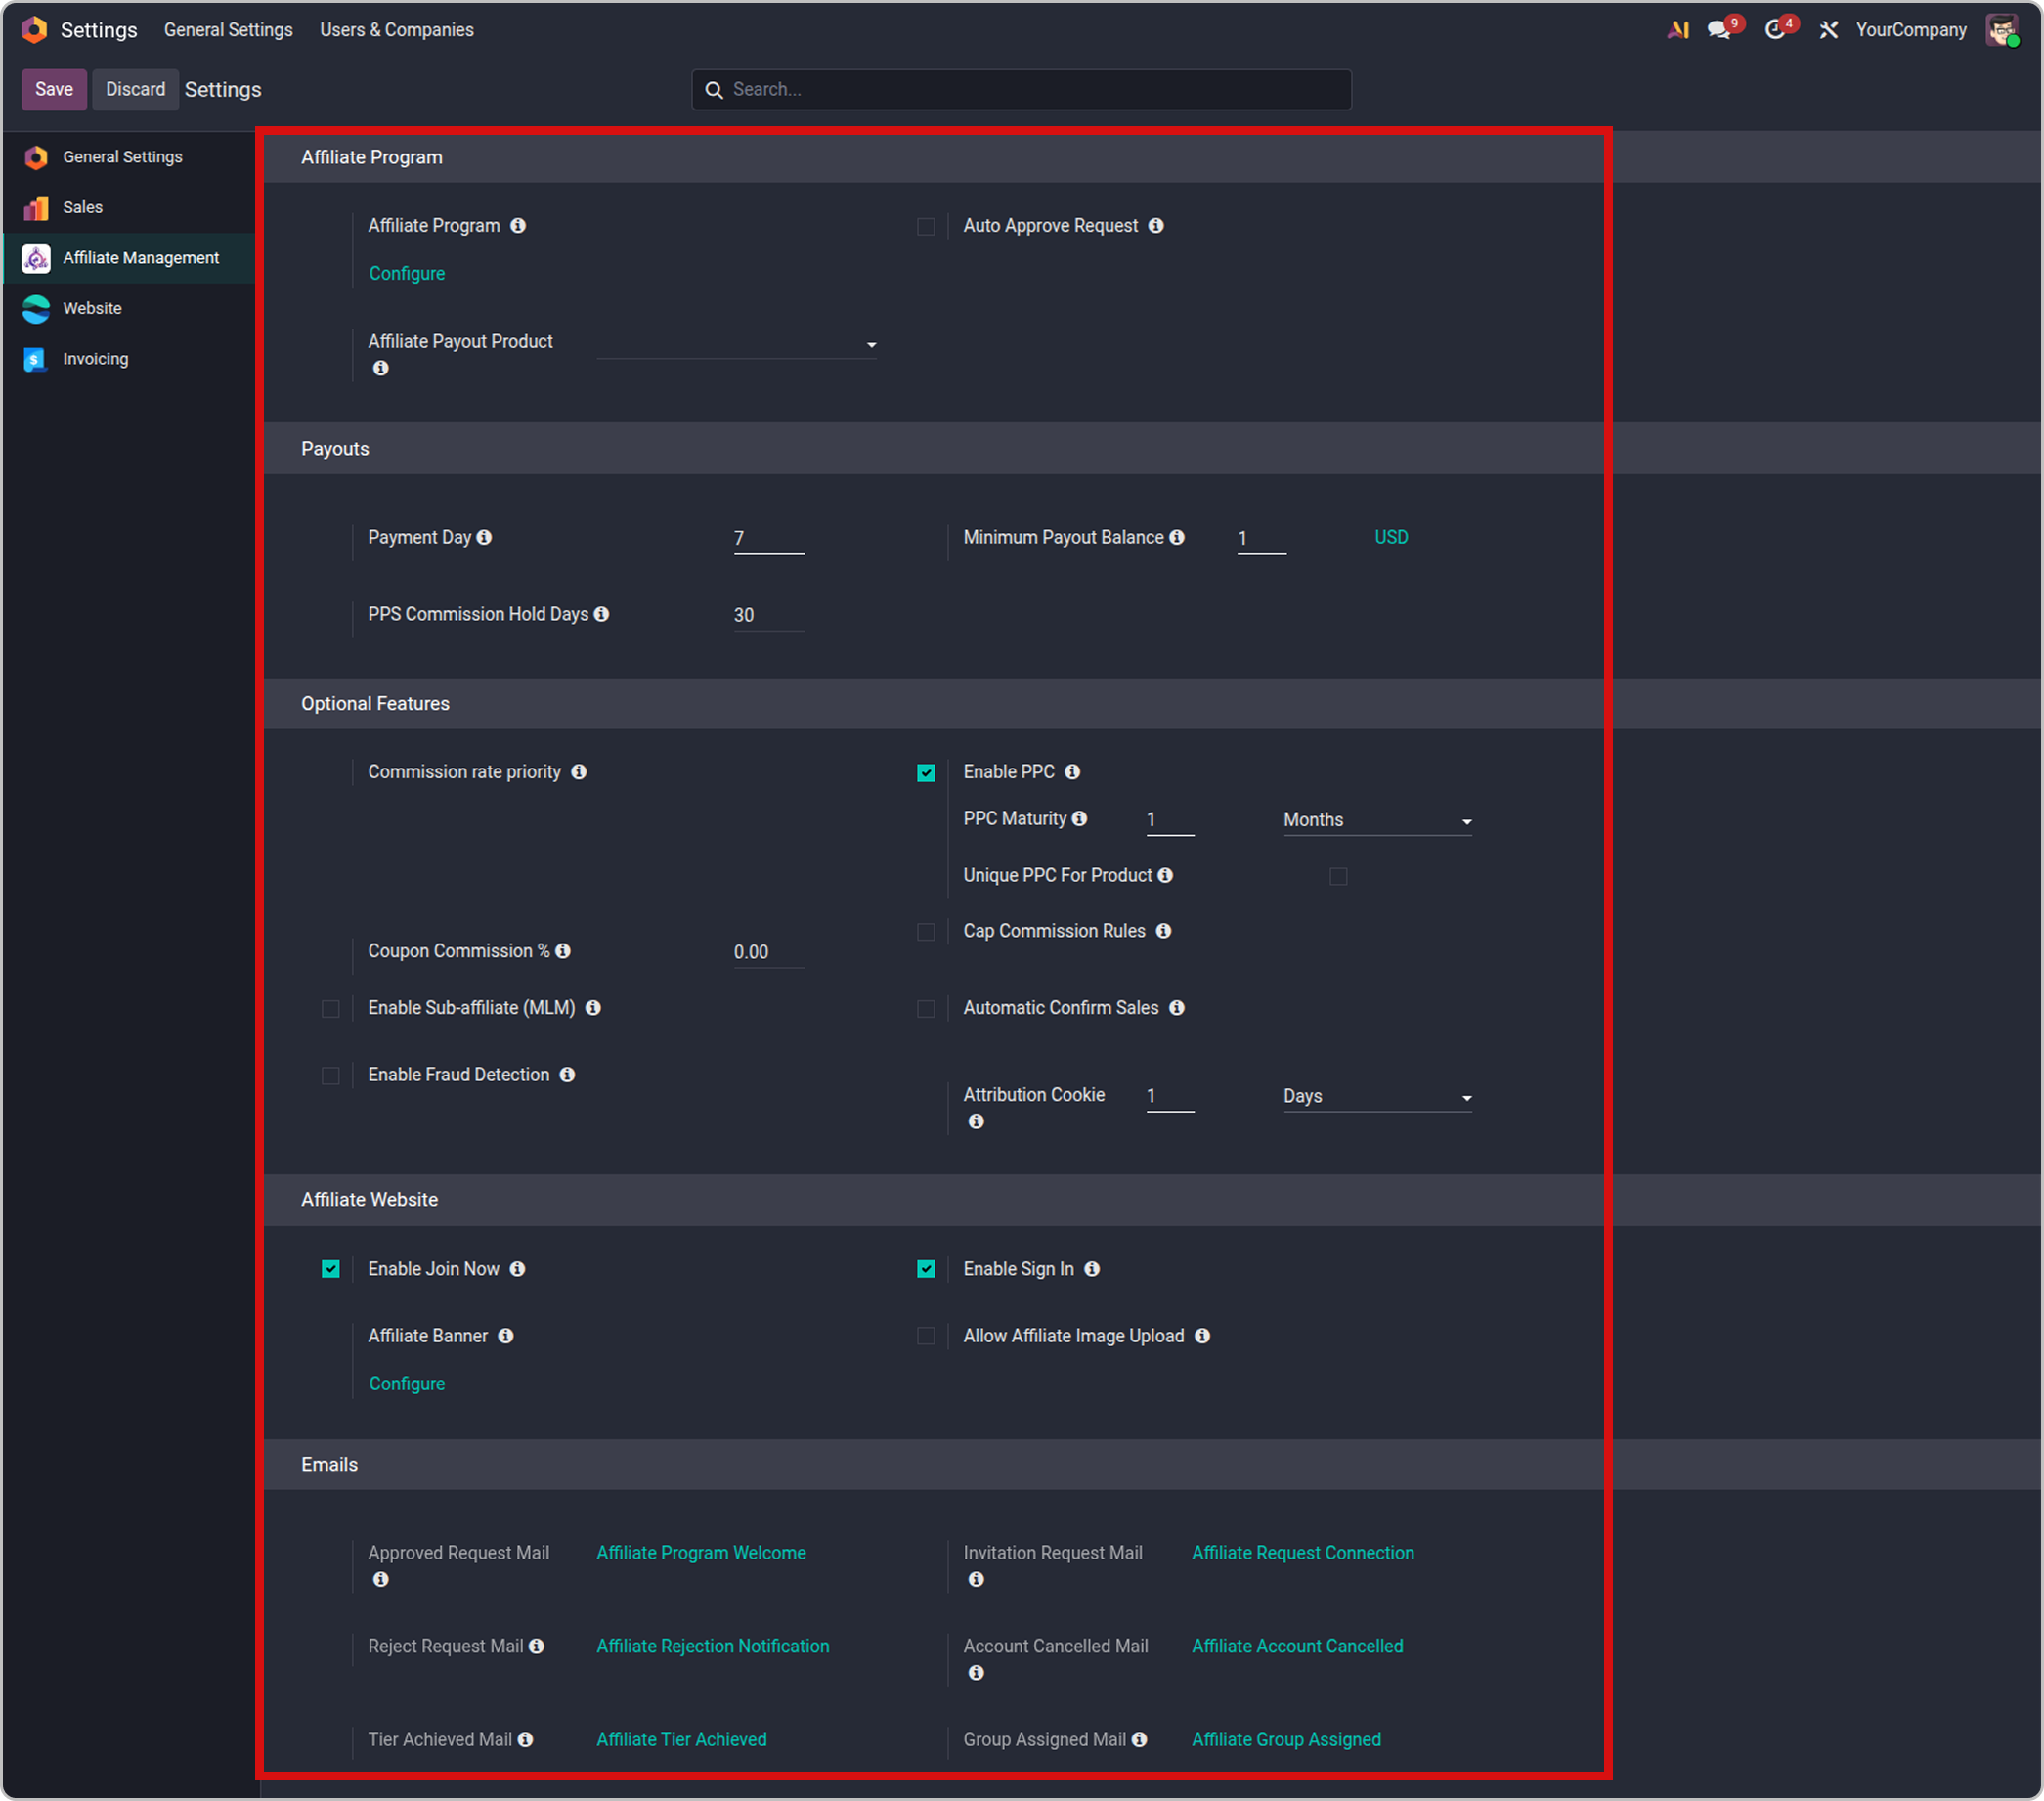
Open Affiliate Manager > Configuration > Settings. These six settings get you a working program.

Pick a payout product :- Set affiliate payout product - this is the line item that appears on every affiliate's bill. If you don't have one, create a simple service product called affiliate commission.

Required

Without this, the monthly payout can't create bills.
Set the payment day :- Payment day is the day of the month payouts run - pick any day from 1 to 28, so it works every month including February.
Set a minimum payout balance :- Minimum payout balance is how much an affiliate needs to have earned before you'll bother billing them. Below it, their balance just rolls into next month.
Set the refund hold window :- PPS commission hold days is how long a commission waits - in case of a refund - before it can be paid out.
Physical products
Customers can return items after delivery. Keep a real hold window.

Set to 30 days (a sensible default)

Digital products
No returns to worry about, so there's no reason to hold the money back.

Set to 0 (no hold)

Selling both? Pick the number that matches your slower-moving line - usually physical.

Decide how applications are handled :- Leave auto approve request off while you're starting out, so you can check applicants by hand in affiliate program > pending requests.
Set the attribution window :- Under optional features, attribution cookie controls how long a click is remembered so a later sale can still be credited. 30 days is standard.

Click Save. Your program skeleton is ready - next, give it commission rates.
Click on image to Zoom out.

Module installation and setup

Rates live on the commission plan: Configuration > Commission > Commission Plans.

The simple way

Set PPS Type to simple, pick fixed (a flat amount per sale) or percentage, and enter the number. Done.

Rates that climb (tiers)

Turn on tiered commission and build a ladder - each rung has a name, a sales threshold, and a rate.
Example:

Level - Starter
Sales needed - 0
Rate - 5%
Level - Bronze
Sales needed - 10
Rate - 8%
Level - Silver
Sales needed - 50
Rate - 12%
Level - Gold
Sales needed - 150
Rate - 15%

Affiliates see the whole ladder on their dashboard, with a progress bar. Moving up a rung sends them an email - but only once, and never for the starting run.
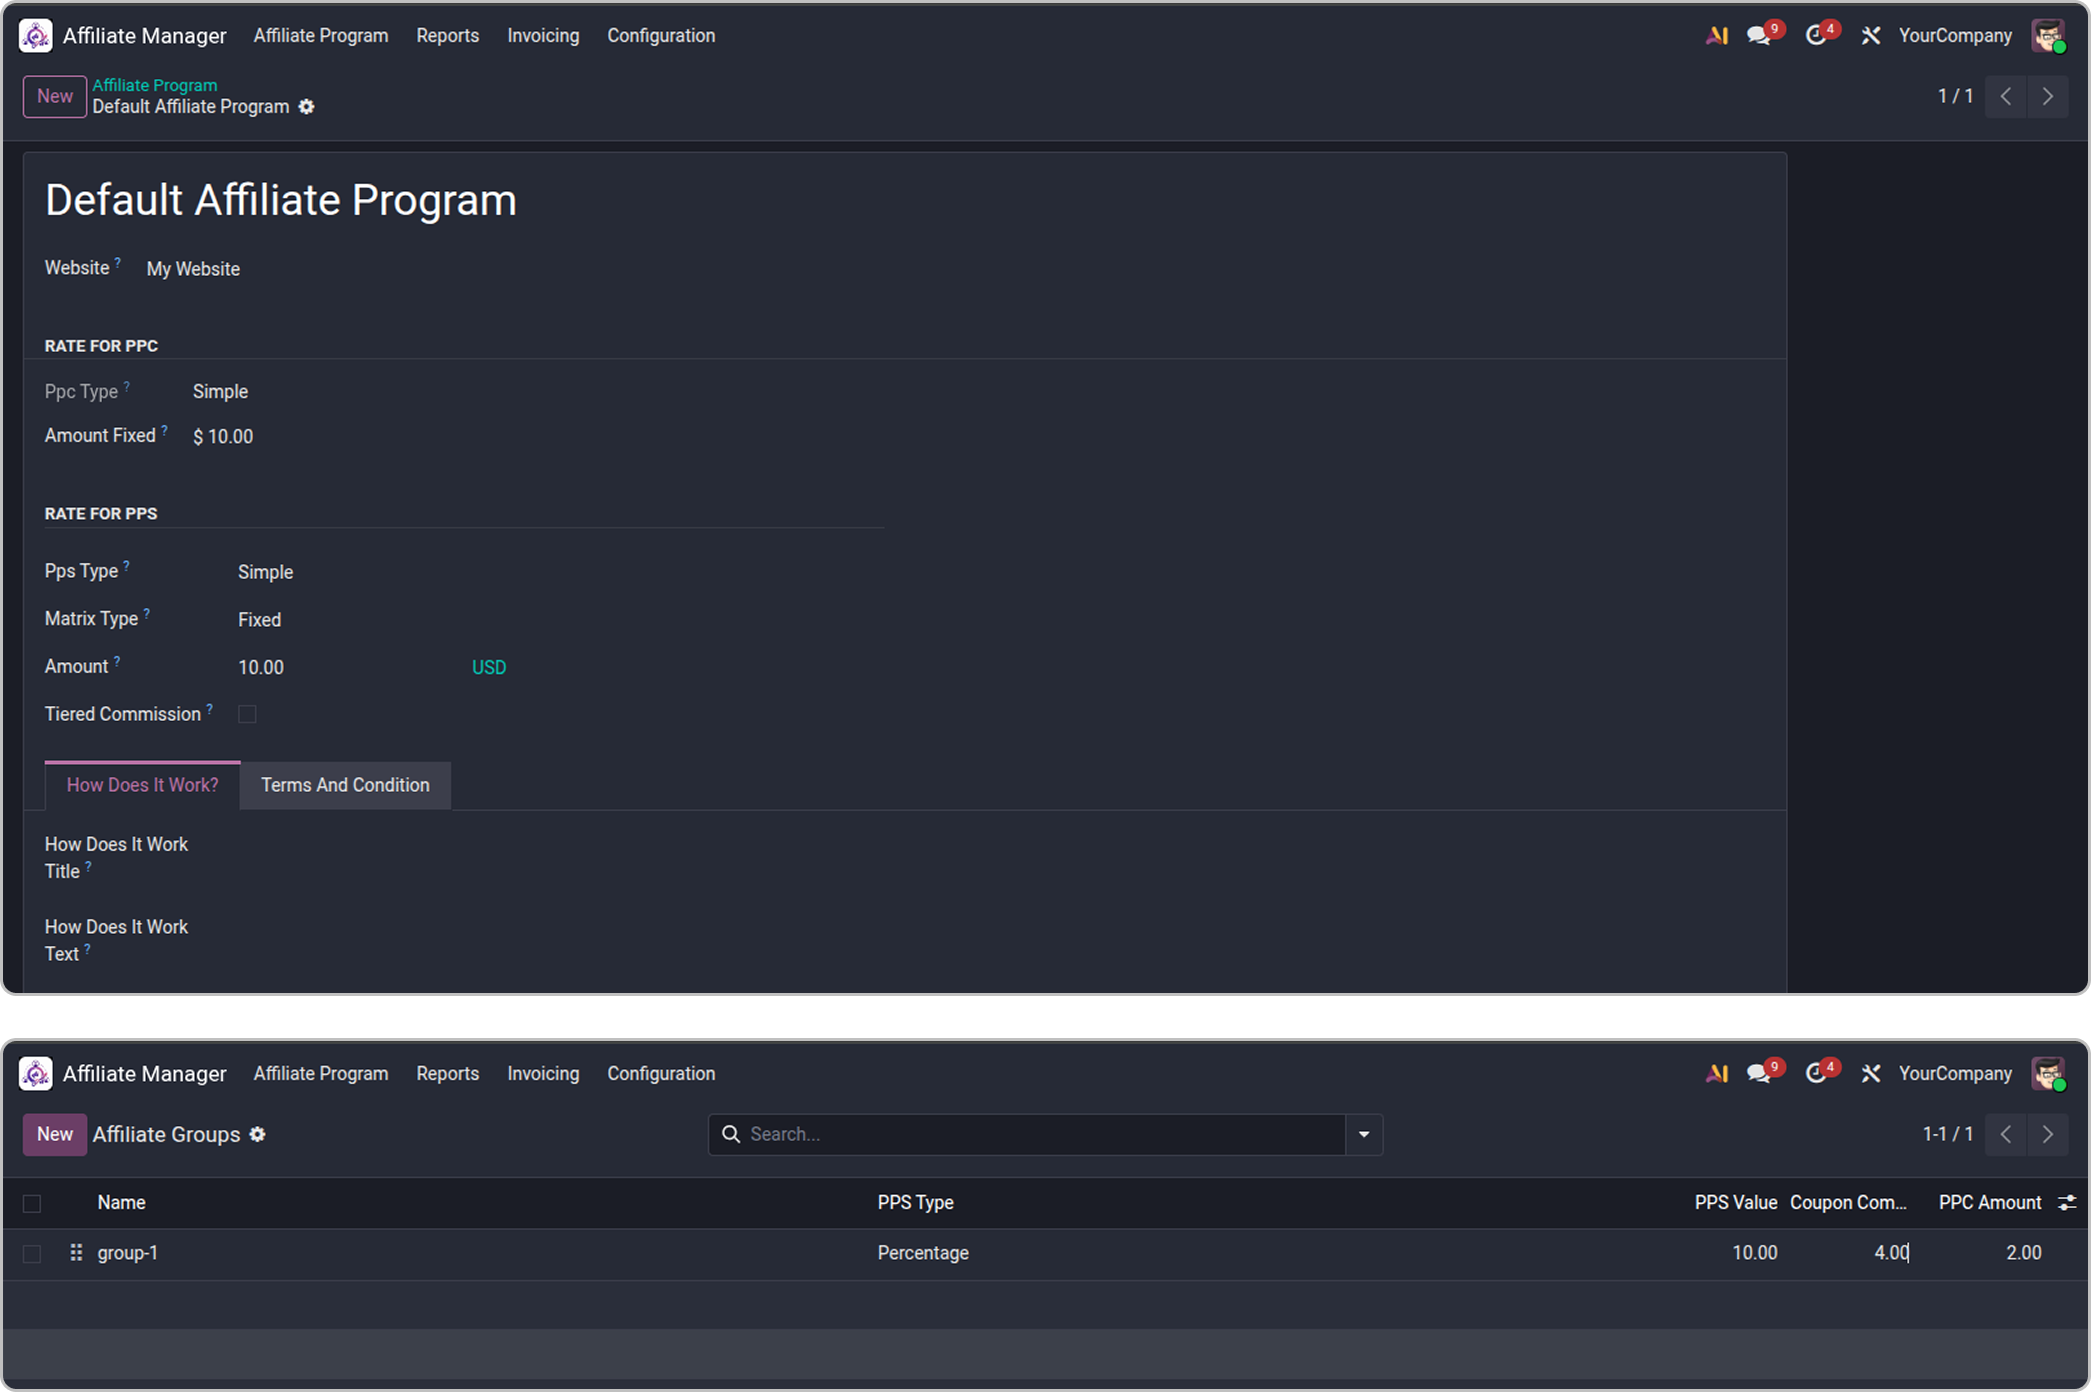
Click on image to Zoom out.
Different rates per product

If your margins vary a lot by product, switch PPS Type to Product Commission and build a rate table at Configuration > Commission > Product Commission. You can set a rate for one specific product, a whole category, or a global fallback - the first matching line wins.

Can't combine

Product commission and tiered commission can't both be on - turning one on turns the other off.
Groups (VIP, Bronze, custom cohorts)

Create named groups - like Bronze, Silver, or "Q4 influencers" - each with its own rate, then assign affiliates to a group from their contact form.
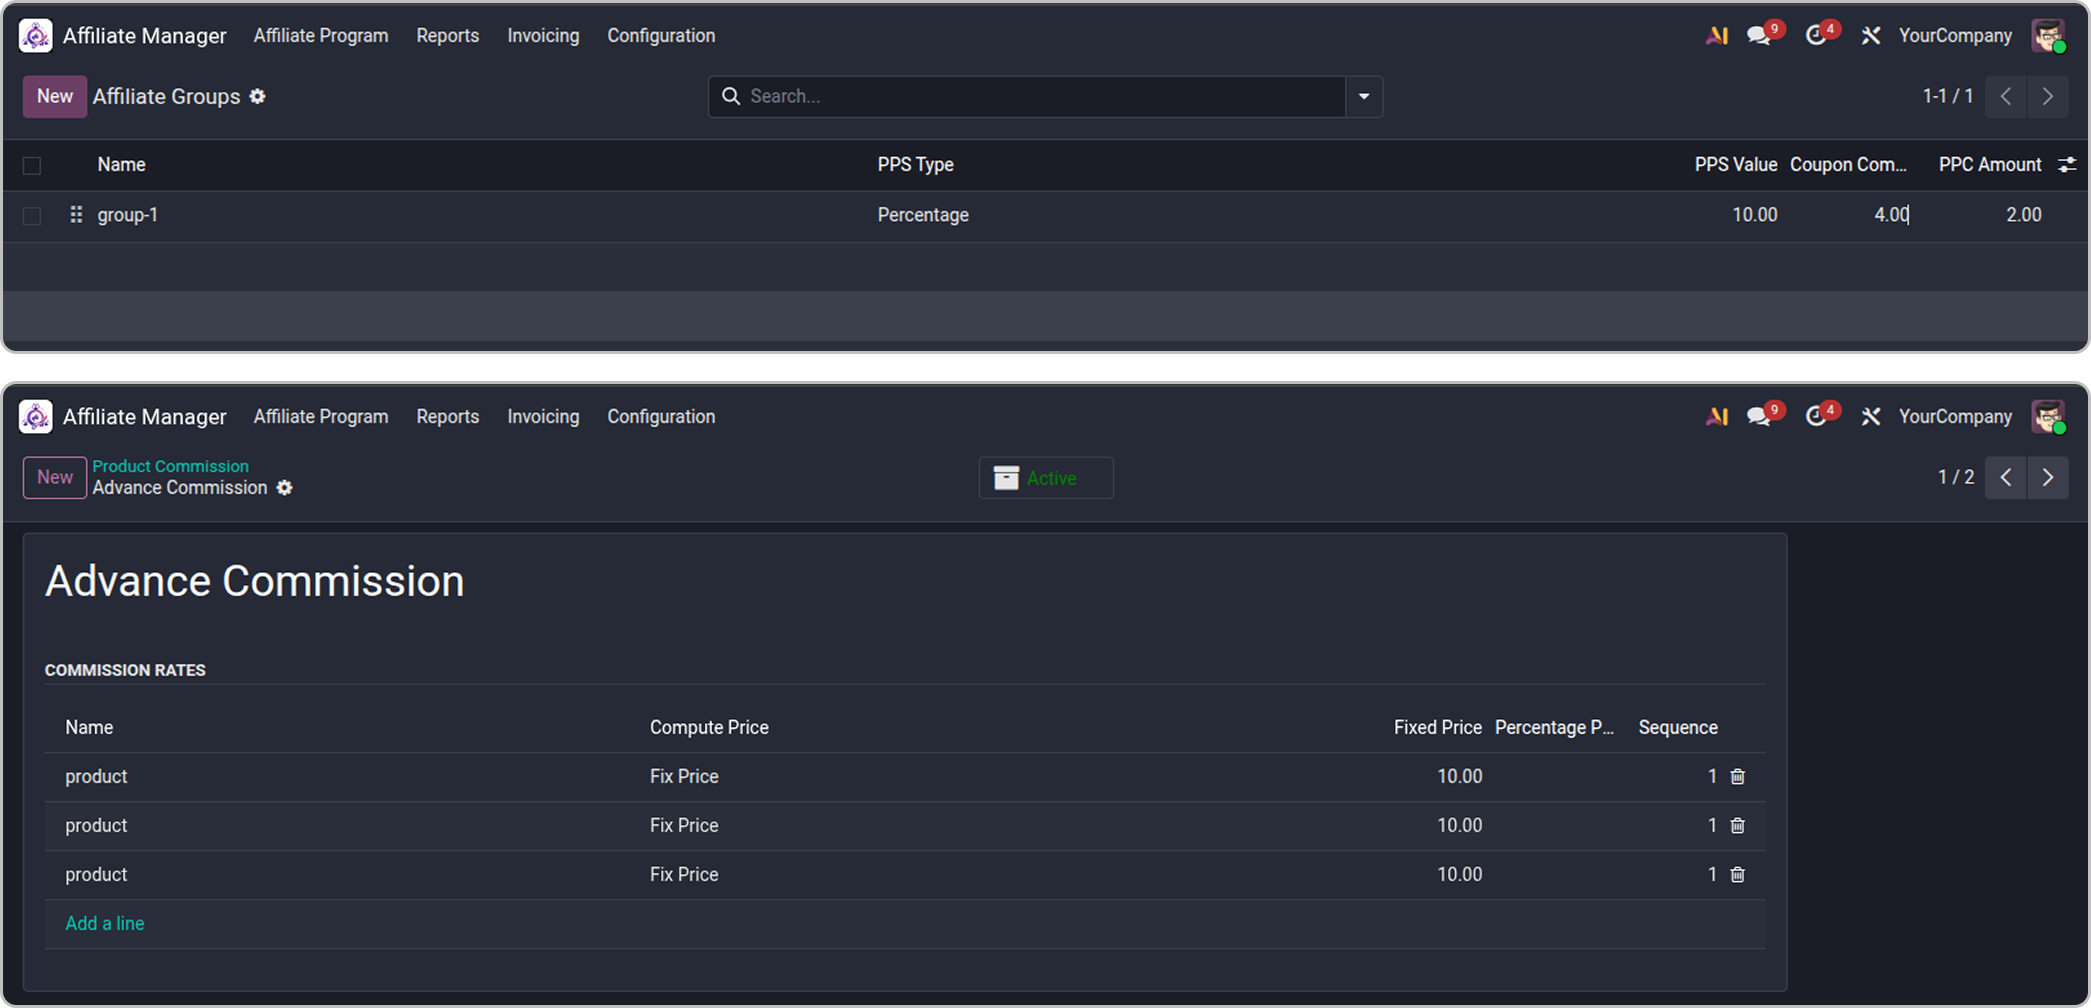
Click on image to Zoom out.
If more than one rate could apply

Only one rate is ever used per sale - the first one set, in this order :-

A custom rate set on that one affiliate.
A coupon rate (for sales made with their coupon code).
Their group's rate.
Their tier rate.
The plan's default rate.

Good to know

A rate left at 0 is treated as "not set" - the system moves to the next one on the list instead of paying nothing. You can always see which rate was used on a commission's source field.

Optional features and commission control settings

Everything here is off by default - only turn on what your program actually needs.

Pay per click

Pays affiliates for clicks, not just sales. Most programs leave this off. If you turn it on, set PPC Maturity (how long a click ages before it counts - 7 days is reasonable) and consider unique PPC for product so reloads don't pay out repeatedly.

Coupon commission

Coupon commission % is the rate for sales made using an affiliate's coupon. Since the customer already got a discount, this is usually set lower than the normal rate.

Coupon commission

Turn on enable advanced commission to unlock:

Commission on net amount : bases the rate on the amount after discounts, not the full price.
Maximum commission per sale : a hard cap on one sale's payout.
Minimum order value : orders below this earn nothing.
Excluding products

Tick no Affiliate Commission on any product or category you never want to pay commission on (gift cards, loss leaders, clearance). Delivery lines and discount lines never earn commission either way - no setup needed.

Auto-confirm sales

Auto confirm visit confirms sale commissions automatically every night instead of you approving each one. Watch one full cycle by hand first before turning this on.

Fraud detection and sub-affiliates also live in this settings block.

Your landing page and promo materials

Your recruitment page lives at /affiliate on your own website.
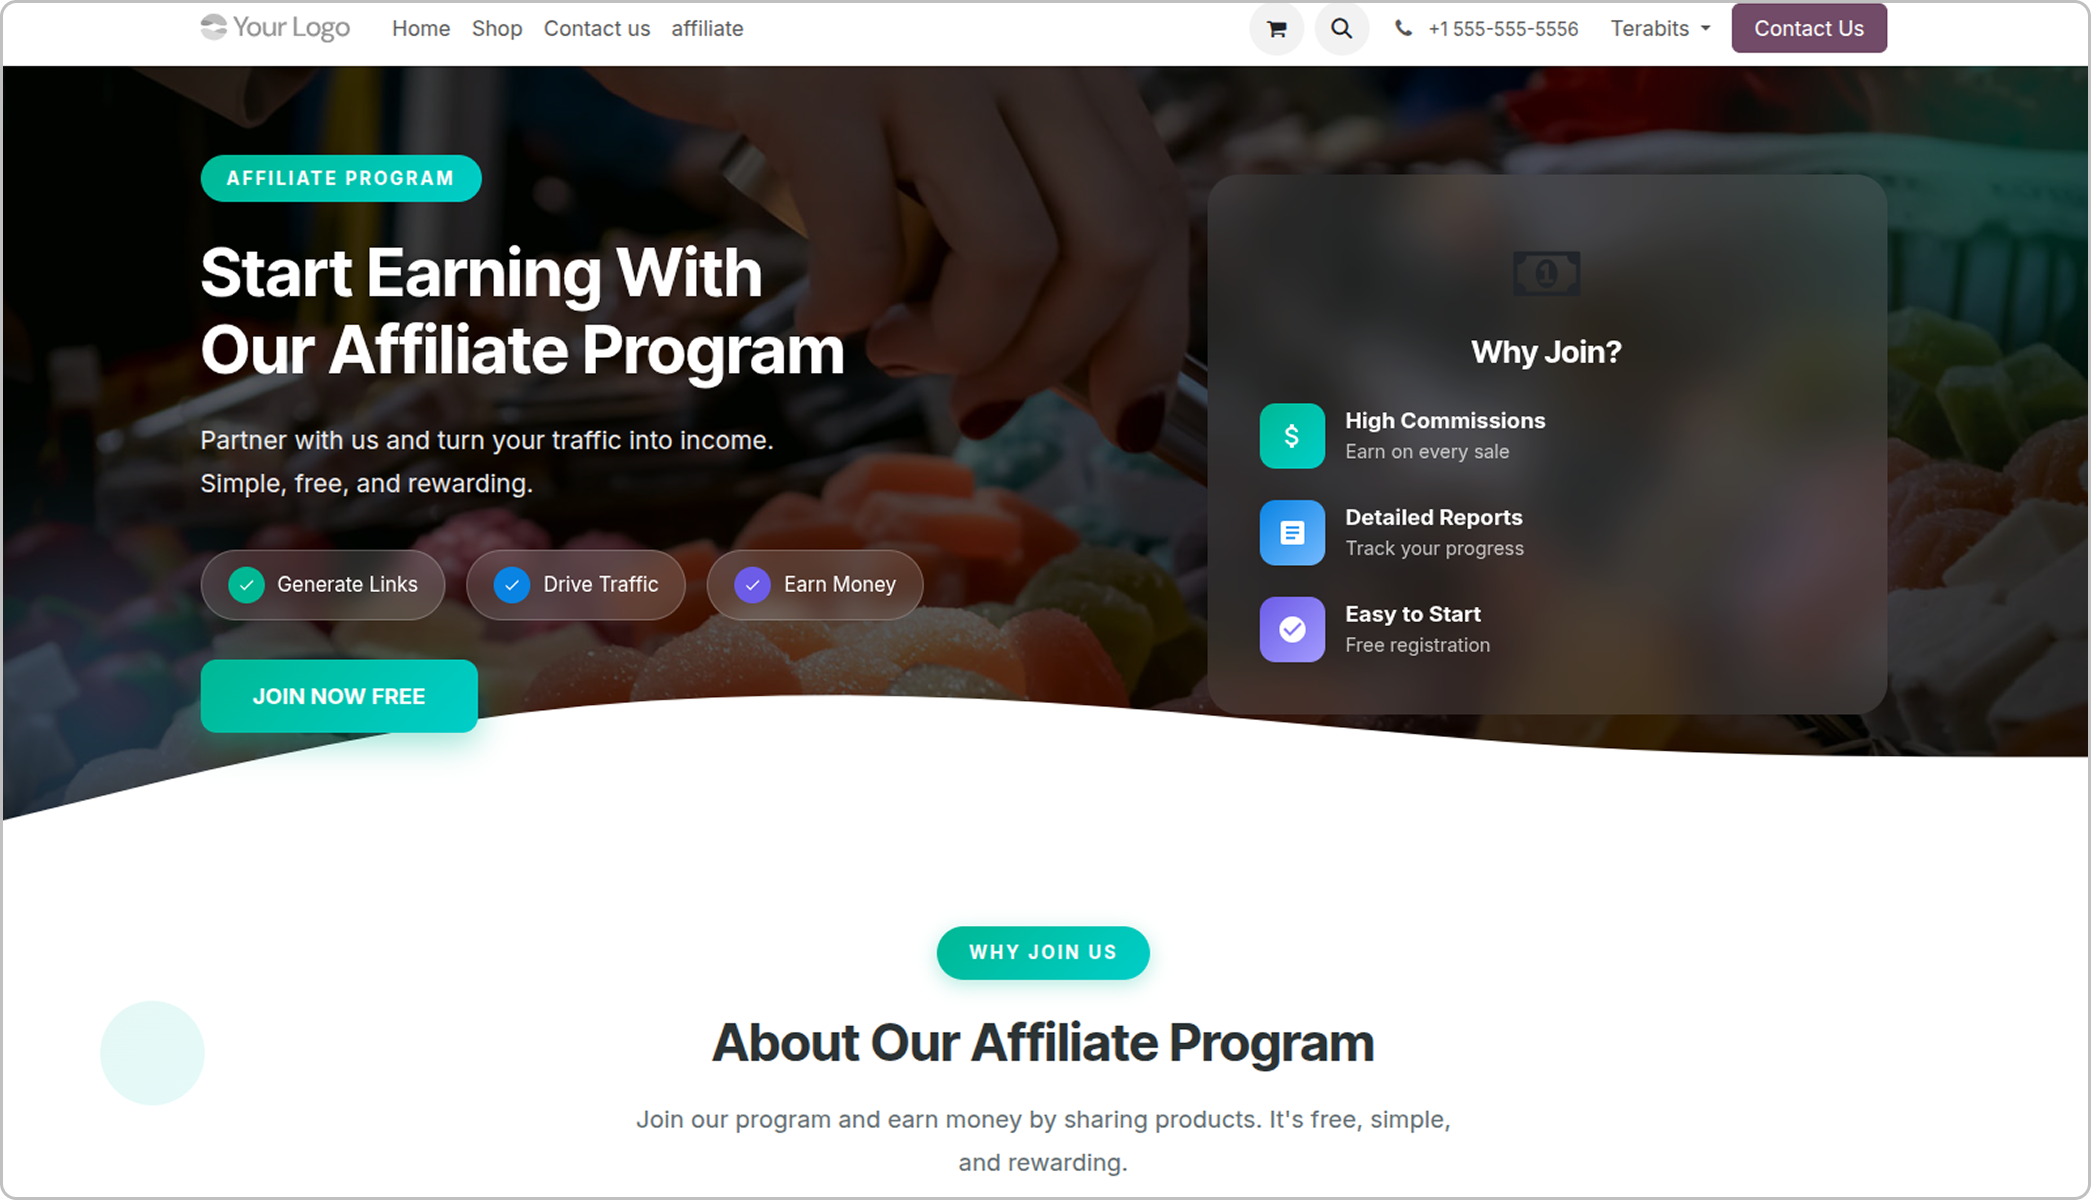
Set the banner : In affiliate website settings, add an image and title for the landing page.
Choose your buttons : Enable Signup shows "Join Now"; Enable Login shows "Sign in". Turn both off for an invite-only program.
Add banner images : Upload creatives at configuration > Affiliate Images. You can also let affiliates upload their own - each affiliate only ever sees their own uploads, never anyone else's.
Write ready-to-post text : At configuration > Promo Content, write posts for Email, Social Media, WhatsApp, etc. Use {link}, {product}, and {product_link} and they'll be filled in automatically for each affiliate.
Click on image to Zoom out.

Before you launch: a 15-minute test

Walk one sale through whole chain yourself before inviting real affiliates. It catches almost everything.

Check your configuration
Payout product is set, and Payment Day / Minimum Payout Balance match your real finance process.
The refund hold window matches your published return policy.
The commission plan has a rate, and its website is correct.
Your "how it works" and terms text are actually written, not left blank.
At least a few banner images and promo templates exist.
Run a real test order
Create a test affiliate and approve them - check the welcome email arrives.
Open their referral link in a private browser window and place a test order.
Confirm the order, then check a commission appeared in Reports > Order Report.
Confirm the commission and check it reaches confirm status.
Run the payout manually and check a draft bill is created.
Pay the bill and check the commission reaches paid.
Refund the order and check the commission is clawed back correctly.

Only then

Turn on auto confirm visit and auto approve request. Automate what you've already watched work by hand.

Approving affiliates

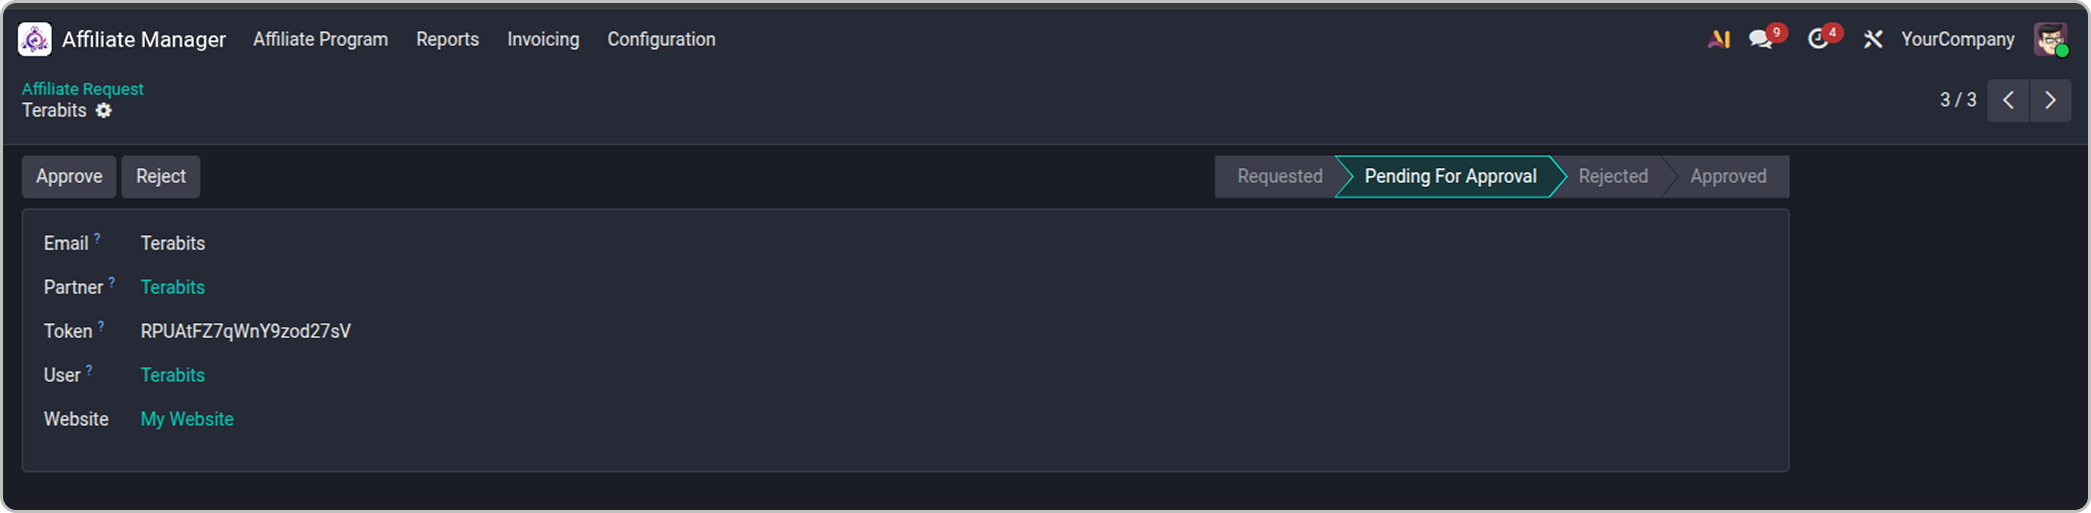
Applications land at affiliate program > pending requests.

Check your configuration
Requested : They started signing up; got a token email.
Pending For Approval : Signup finished, waiting on you.
Approved : They're now an active affiliate with a referral link.
Rejected : Access is revoked; they get a rejection email.

Three buttons: Approve (grants access, generates their key, sends the welcome email), Reject, and cancel Affiliate (revokes someone already approved).
Click on image to Zoom out.
Their affiliate record

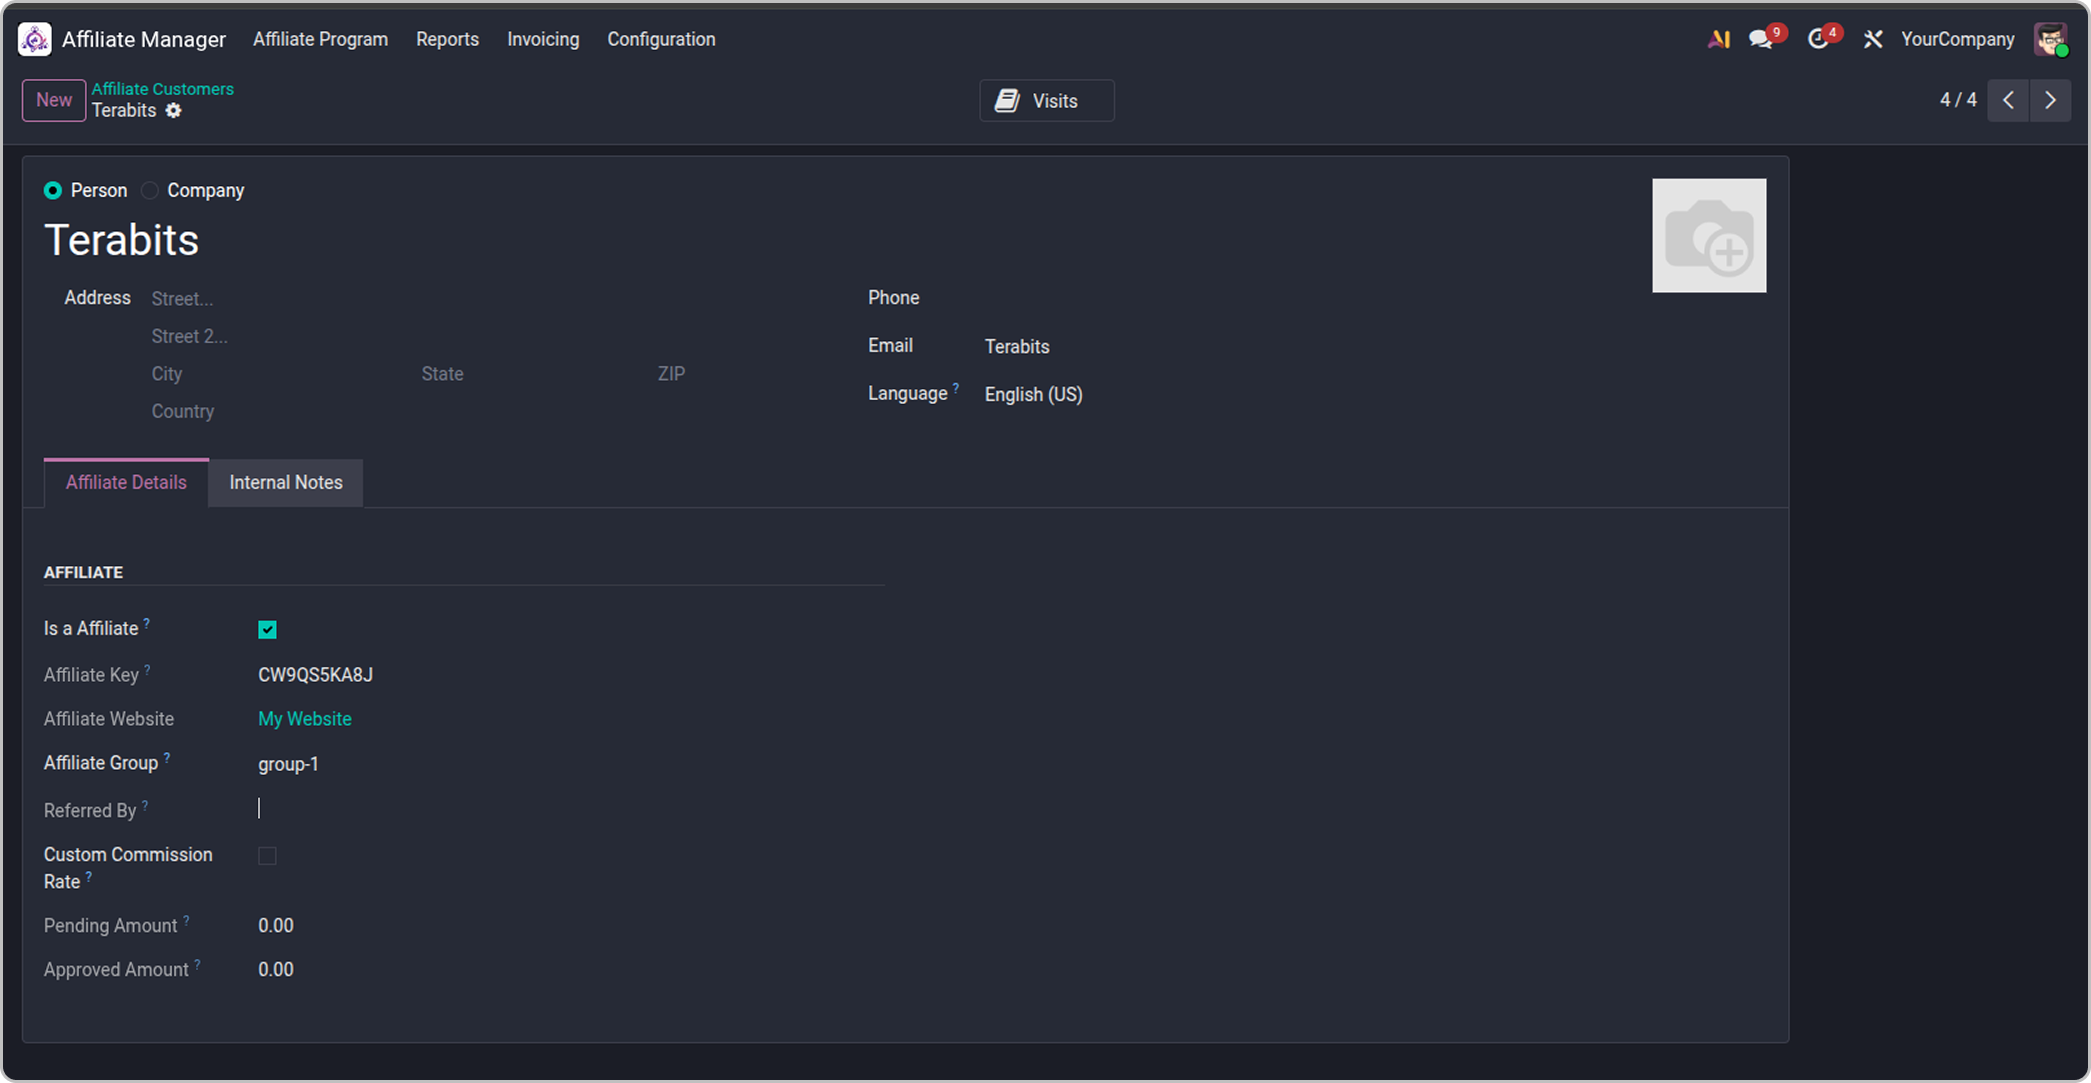
Every approved affiliate is a normal contact with an extra Affiliate Details tab, at Affiliate Program > All Affiliates. Key fields: their Affiliate Key (referral code), their group, who recruited them, and whether they have a custom rate.
Click on image to Zoom out.

Who gets credit for a sale

Two ways a sale gets traced back to an affiliate - and only one affiliate is ever credited.

Referral links
A link like yoursite.com?ref=XXXXXXXXXX. The most recent click wins. It's remembered for your Attribution Cookie window, then forgotten once a sale uses it.
Coupon codes
Any discount code can be linked to an affiliate - good for podcasts, print, or anywhere a link doesn't work.
If both are present

The coupon wins. Customers who use a coupon at checkout are crediting that affiliate on purpose.

Affiliates can never earn from buying their own products - this is checked automatically, even with a second account using the same email.

The four stages a commission moves through

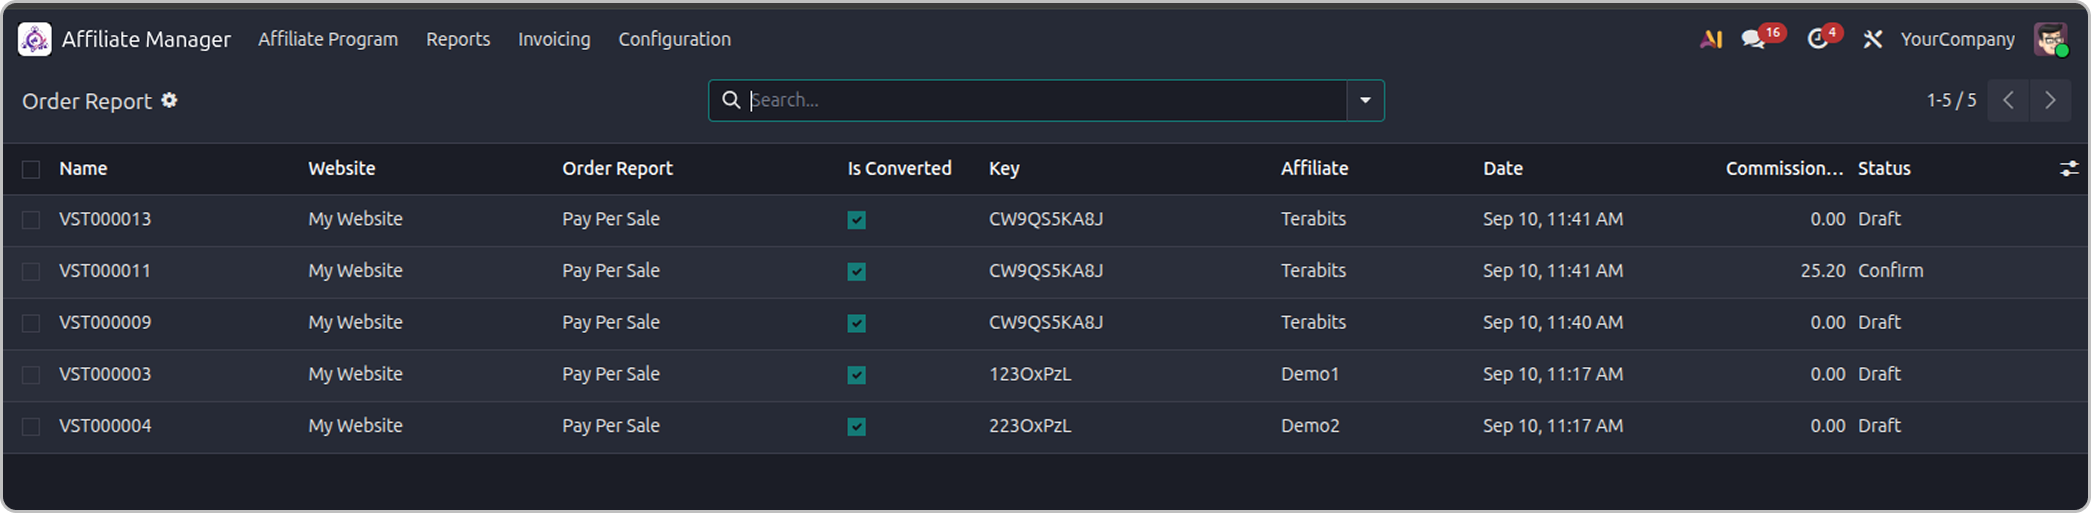
Draft : Just created by a click or order. Not yet earned.
Confirm : Earned and priced, waiting for the next payout.
Invoiced : A bill exists but hasn't been paid yet.
Paid : The bill is fully paid. Done.

Sale commissions confirm manually (or automatically overnight, if you turned that on). Click commissions confirm once they pass their maturity window.

Use the preview commission button any time to see what a commission would pay, without actually creating anything.
Click on image to Zoom out.

The four stages a commission moves through

The payout run happens daily but only does anything on your payment day.

On that day, for each affiliate, it gathers every commission that is : confirmed, past the refund hold window, and not flagged as suspicious. If the total meets your minimum payout balance, it drafts one vendor bill. Otherwise the balance just rolls into next month.

Pay these bills through your normal accounting process at Affiliate Manager > Invoicing > Invoice. A commission only shows as paid once its bill is fully reconciled - a payment that's registered but not yet reconciled shows as processing to the affiliate.

Paying someone early

Select any confirmed commissions in order report and run Create Visits Invoice to bill them right away.

Click on image to Zoom out.

Refunds and clawing back commission

When a customer gets a refund, the affiliate's commission on that sale is reversed automatically - how, depends on how far it's already travelled.

Draft or Confirm : Just cancelled - nothing had been paid.
Invoiced : Cancelled, plus a reminder to void the unpaid bill.
Paid : A negative "reversal" is created and taken out of their next payout.

Why your refund hold window matters here :

Physical products
Returns happen after delivery - sometimes weeks later. A real hold window (e.g. 30 days) means most refunds happen while the commission is still just confirmed, so nothing is ever paid out & then clawed back.
Digital products
With no returns expected, holding the money back only delays affiliates for no reason. A 0-day hold pays them faster - and clawback still works fine on the rare refund.

Affiliates always see any active clawback amount stated plainly on their Payments page - never as an unexplained drop in balance.

Fraud control & sub-affiliates

Two ways a sale gets traced back to an affiliate - and only one affiliate is ever credited.

Fraud checks
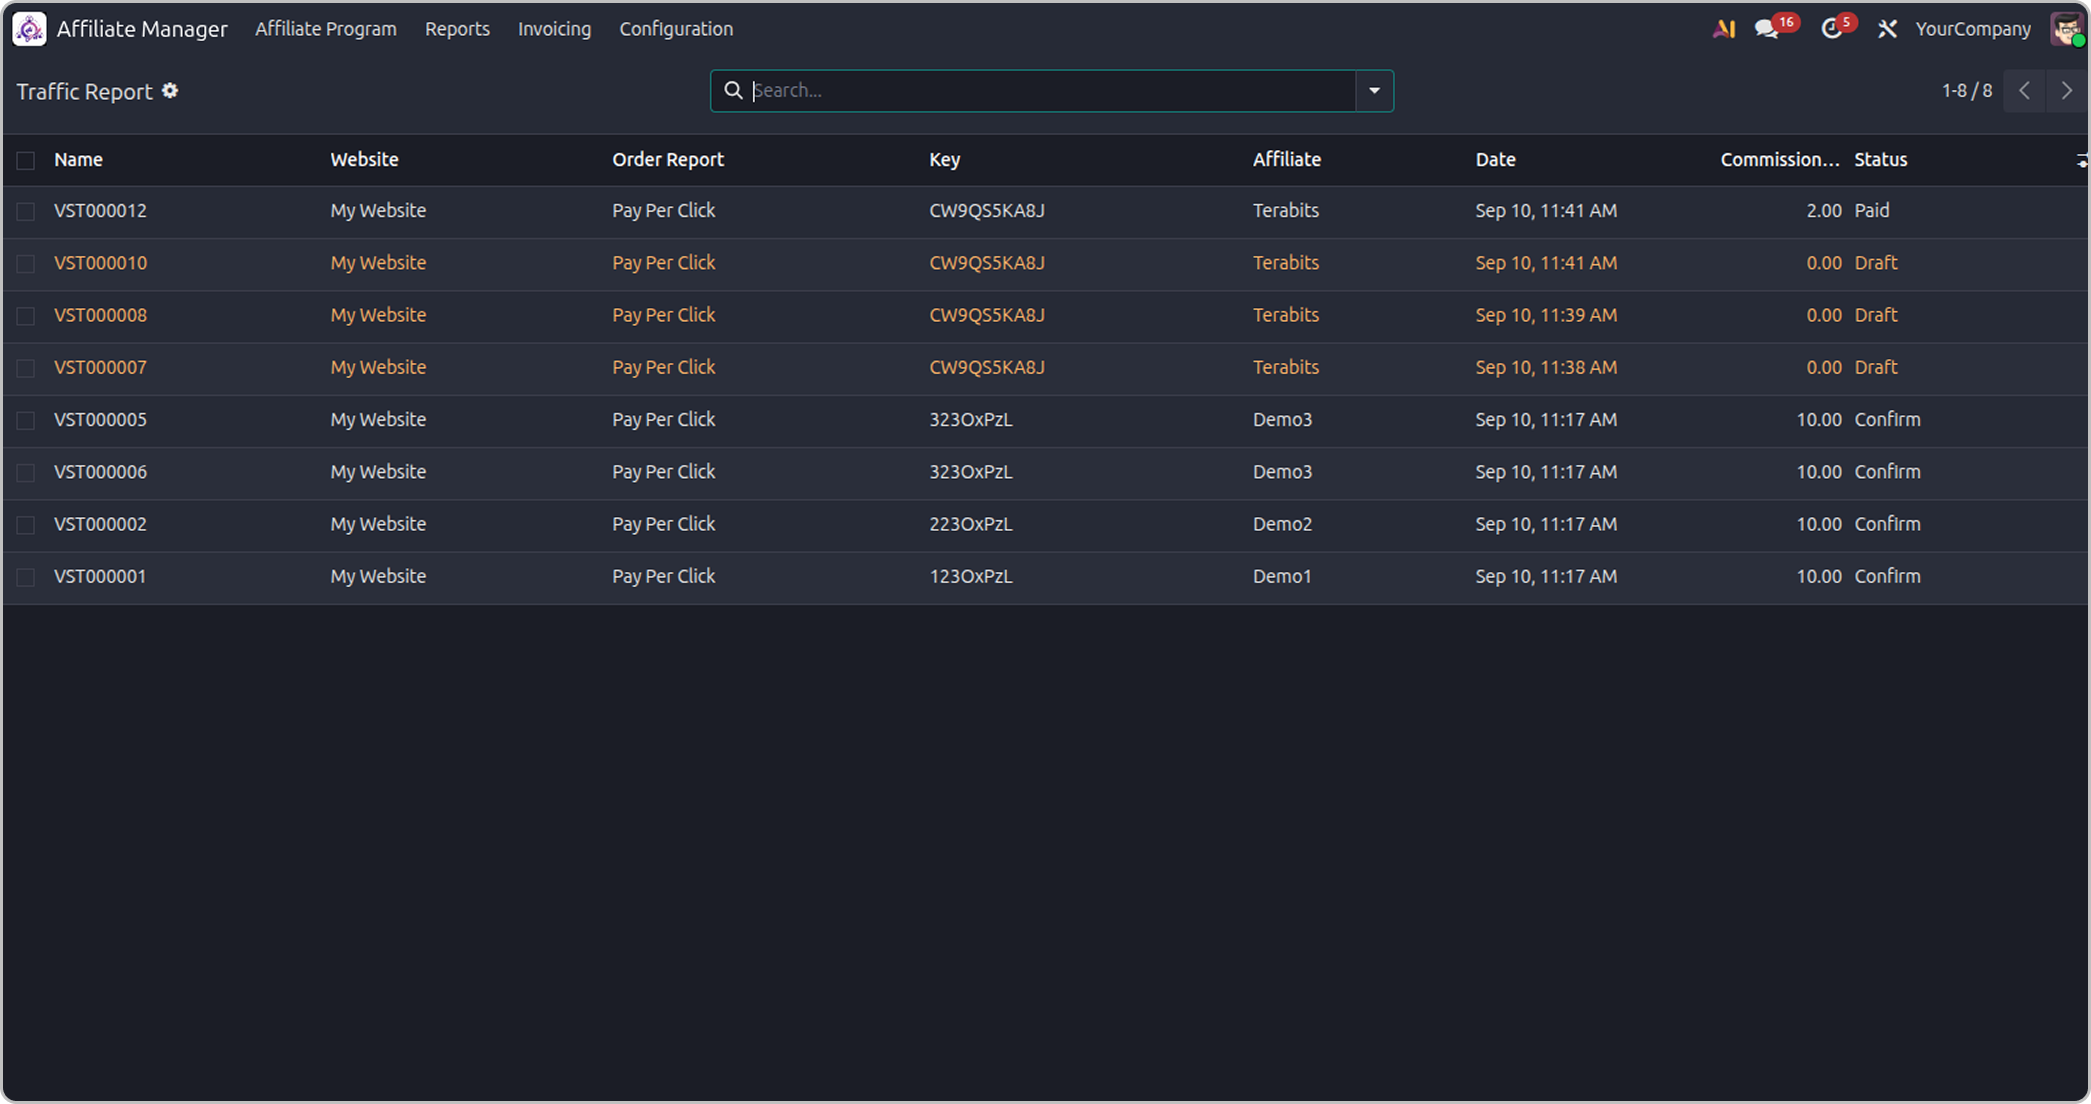
An optional nightly scan. It only ever flags & holds a commission - it never cancels anything on its own.
Four signals it watches for: too many clicks from one IP, too many sales from one IP, an unusually high sales-to-clicks ratio, and an unusually high refund rate. Any of these can be turned off by setting its threshold to 0.
A flagged commission is held out of payouts until you either confirm it (clears the flag), use clear fraud flag (marks it reviewed without confirming), or cancel it if it really was fraud.
Click on image to Zoom out.
Sub-affiliates (referral bonuses)
Off by default. When on, an affiliate earns a small extra slice when someone they recruited makes a sale - one level deep only.
Choose whether the bonus is a percentage of the recruit's sale value (more generous) or of the recruit's commission (safer for your margins). Recruiters see a "My Team" panel showing who they've recruited and how much it's earned them.

What an affiliate sees on their dashboard

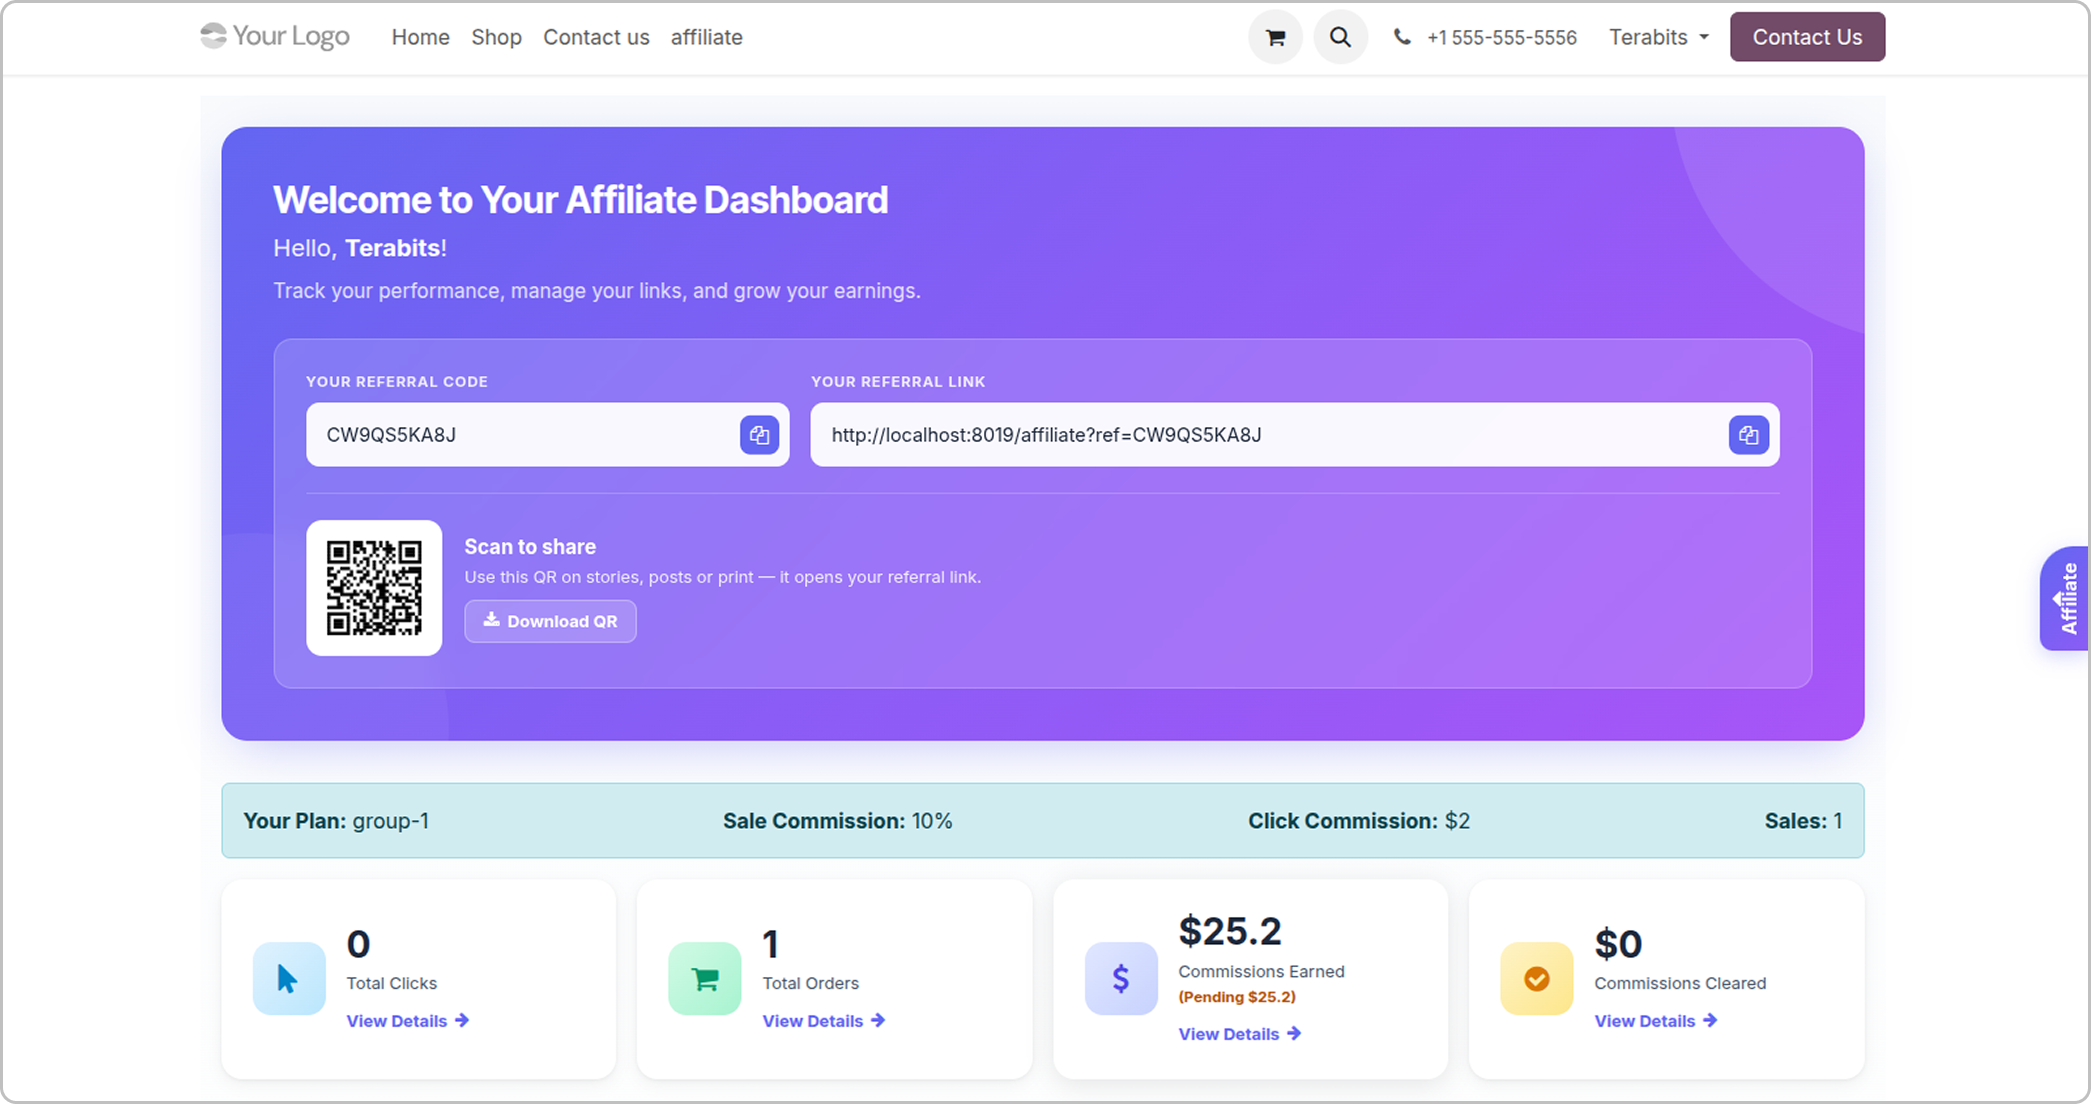
Dashboard : Clicks, orders, earnings, referral link + QR code, tier progress.
Statistics : Traffic and orders charted over time.
Commissions : Every earning, with dates.
Payments : Cleared/pending totals and payment history.
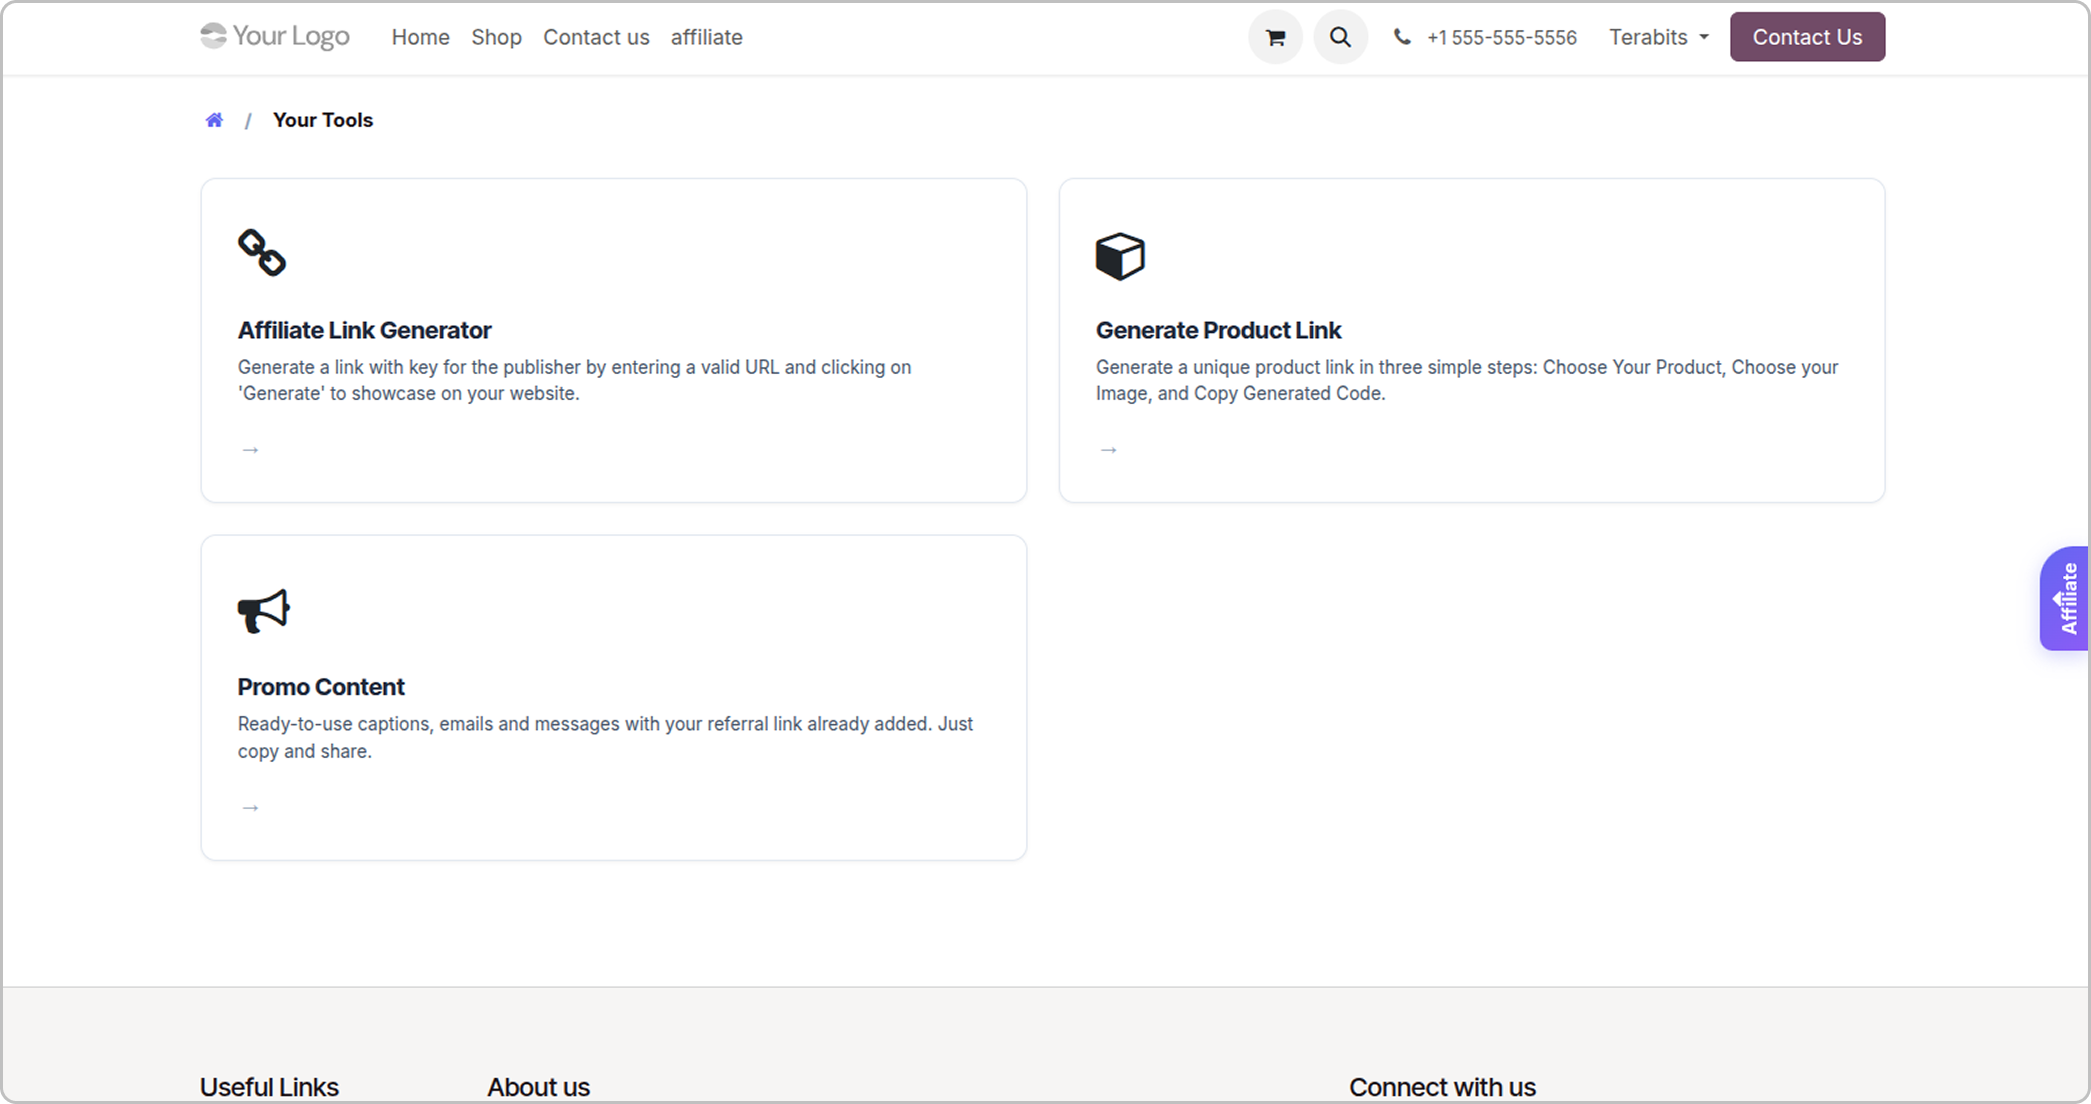
Tools : The four promotion tools.

An affiliate only ever sees their own data - this is enforced by the system, not just hidden in the screen.
Click on image to Zoom out.

Their promotion tools

Link generator : turns any page on your site into their tracked link.
Product links : search your catalogue, copy a tracked link with a QR code.
Banners : pick a creative and a standard ad size, copy the embed code.
Promo content : your ready-to-post text, pre-filled with their link and chosen product.
Click on image to Zoom out.

All settings, automatic emails and scheduled tasks & troubleshooting.

All settings, quick reference
Setting - Auto approve request
Default - Off
What it does - Skip manual approval for new affiliates.
Setting - Affiliate payout product
Default - No
What it does - Line item used on payout bills.
Setting - Payment day
Default - 7
What it does - Day of month payouts run (1-28).
Setting - Minimum payout balance
Default - 0
What it does - Minimum earned before billing.
Setting - PPS commission hold days
Default - 30
What it does - Refund-window hold before paying - keep 30, set 0.
Setting - Enable PPC
Default - On
What it does - Pay for clicks, not just sales.
Setting - Coupon commission %
Default - 0
What it does - Rate for coupon-attributed sales.
Setting - Enable advanced commission
Default - Off
What it does - Turns on net-amount basis, max cap, min order value.
Setting - Enable Sub-affiliate (MLM)
Default - Off
What it does - One-level referral bonuses.
Setting - Auto confirm visit
Default - Off
What it does - Nightly auto-confirm of sale commissions.
Setting - Enable fraud detection
Default - Off
What it does - Nightly fraud scan.
Setting - Attribution cookie
Default - 1 day
What it does - How long a click stays credited.
Automatic emails and scheduled tasks
Six emails go out automatically: invitation, approved/welcome, rejected, account cancelled, tier achieved, and group assigned. All are editable odoo templates.
Four scheduled tasks run daily in the background: confirming matured clicks, running the payout, auto-confirming sale commissions (if enabled), and the fraud scan (if enabled). Find them at Settings > Technical > Scheduled Actions.
Troubleshooting
Problem - No commission was created
  • Likely cause - Check in order: order confirmed > referral cookie or coupon present > buyer isn't the affiliate > product isn't excluded > order meets the minimum value.
Problem - Confirming a commission gives an error
  • Likely cause - Read the message - it names the cause (usually a missing rate, a zero value, or PPC being off).
Problem - No payout bill was created
  • Likely cause - The run only fires on your payment day, and only once the total meets your minimum payout balance.
Problem - A commission is stuck at invoiced
Likely cause - It moves to paid only once the bill is fully reconciled.
Problem - QR codes don't show
Likely cause - rlPyCairo isn't installed - install it and restart Odoo.
Problem - An affiliate can't reach the portal
Likely cause - They need to be approved with a live referral key. Rejecting or cancelling them clears it.
Problem - The tier email never arrived
Likely cause - It only fires on an upgrade - never on the starting rung, never twice for the same rung.

AI Affiliate Management

This add-on gives your affiliates an AI writer. With one click they get social posts,
WhatsApp messages and emails, with their referral link already inside. You choose
who can use it and how much. You also get AI reports about your whole program.

Here is a detailed explanation about all the features of this module.

Module installation and setup

What you need before you start

This adds AI to your existing affiliate module. It does not create a new app. The new options appear inside the Affiliate Manager menus you already use.
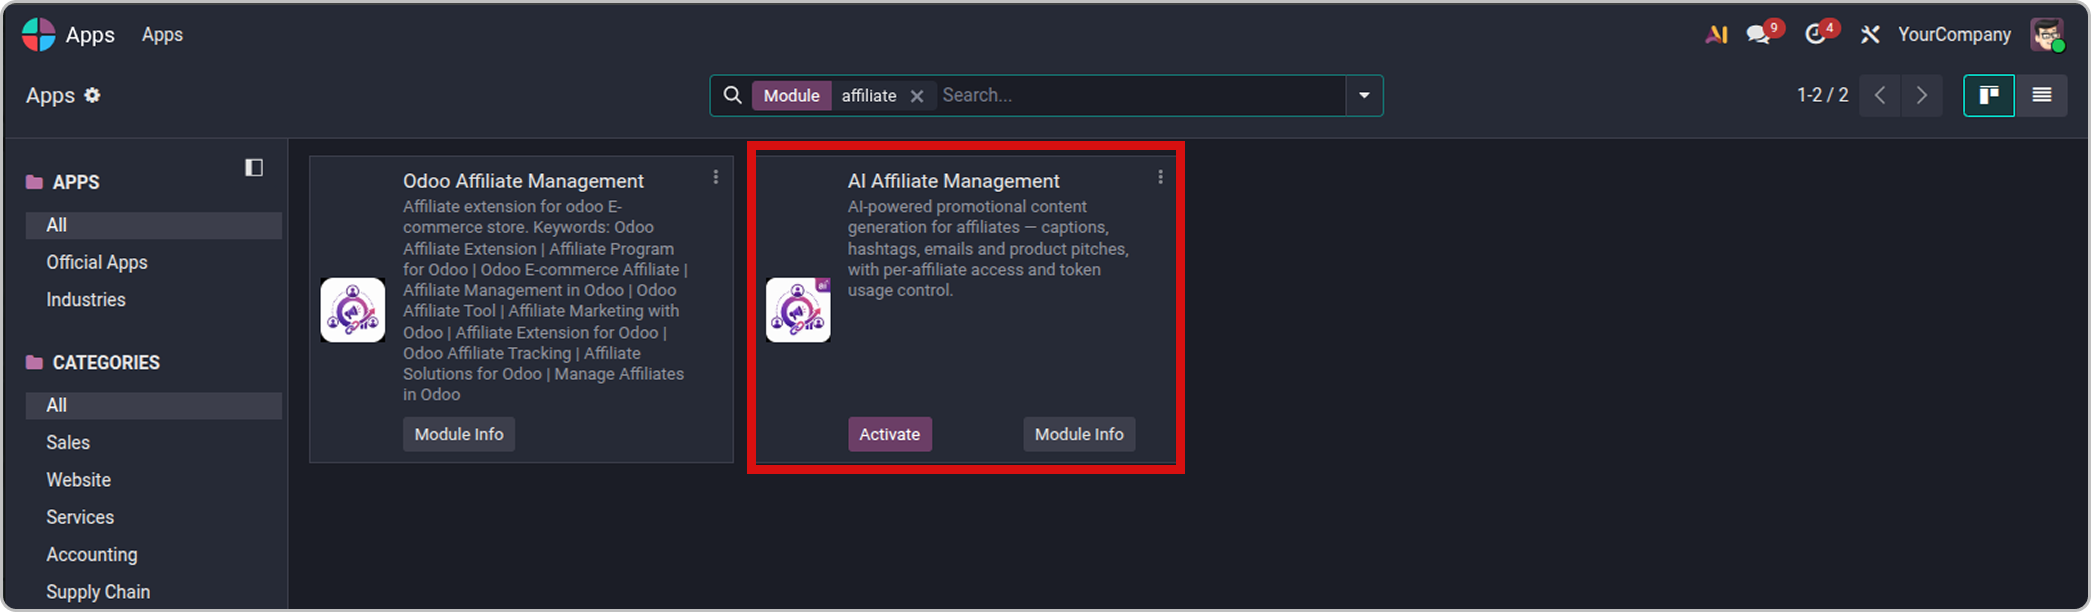
Copy the ai_affiliate_management_bits folder into your Odoo addons folder.
Restart Odoo.
Open Apps. Click Update Apps List. (If you don't see it, turn on developer mode first).
In the search bar, remove the Apps filter. Search for AI Affiliate Management.
Click Activate. Wait until the page reloads.
Click on image to Zoom out.

Good to know

After install, the AI is still off. Affiliates will not see any AI tools until you finish.

Set-up AI access, tokens, providers, and affiliate summaries

Turn on AI and connect your AI provider

Here you tell Odoo which AI company to use and give it your API key.
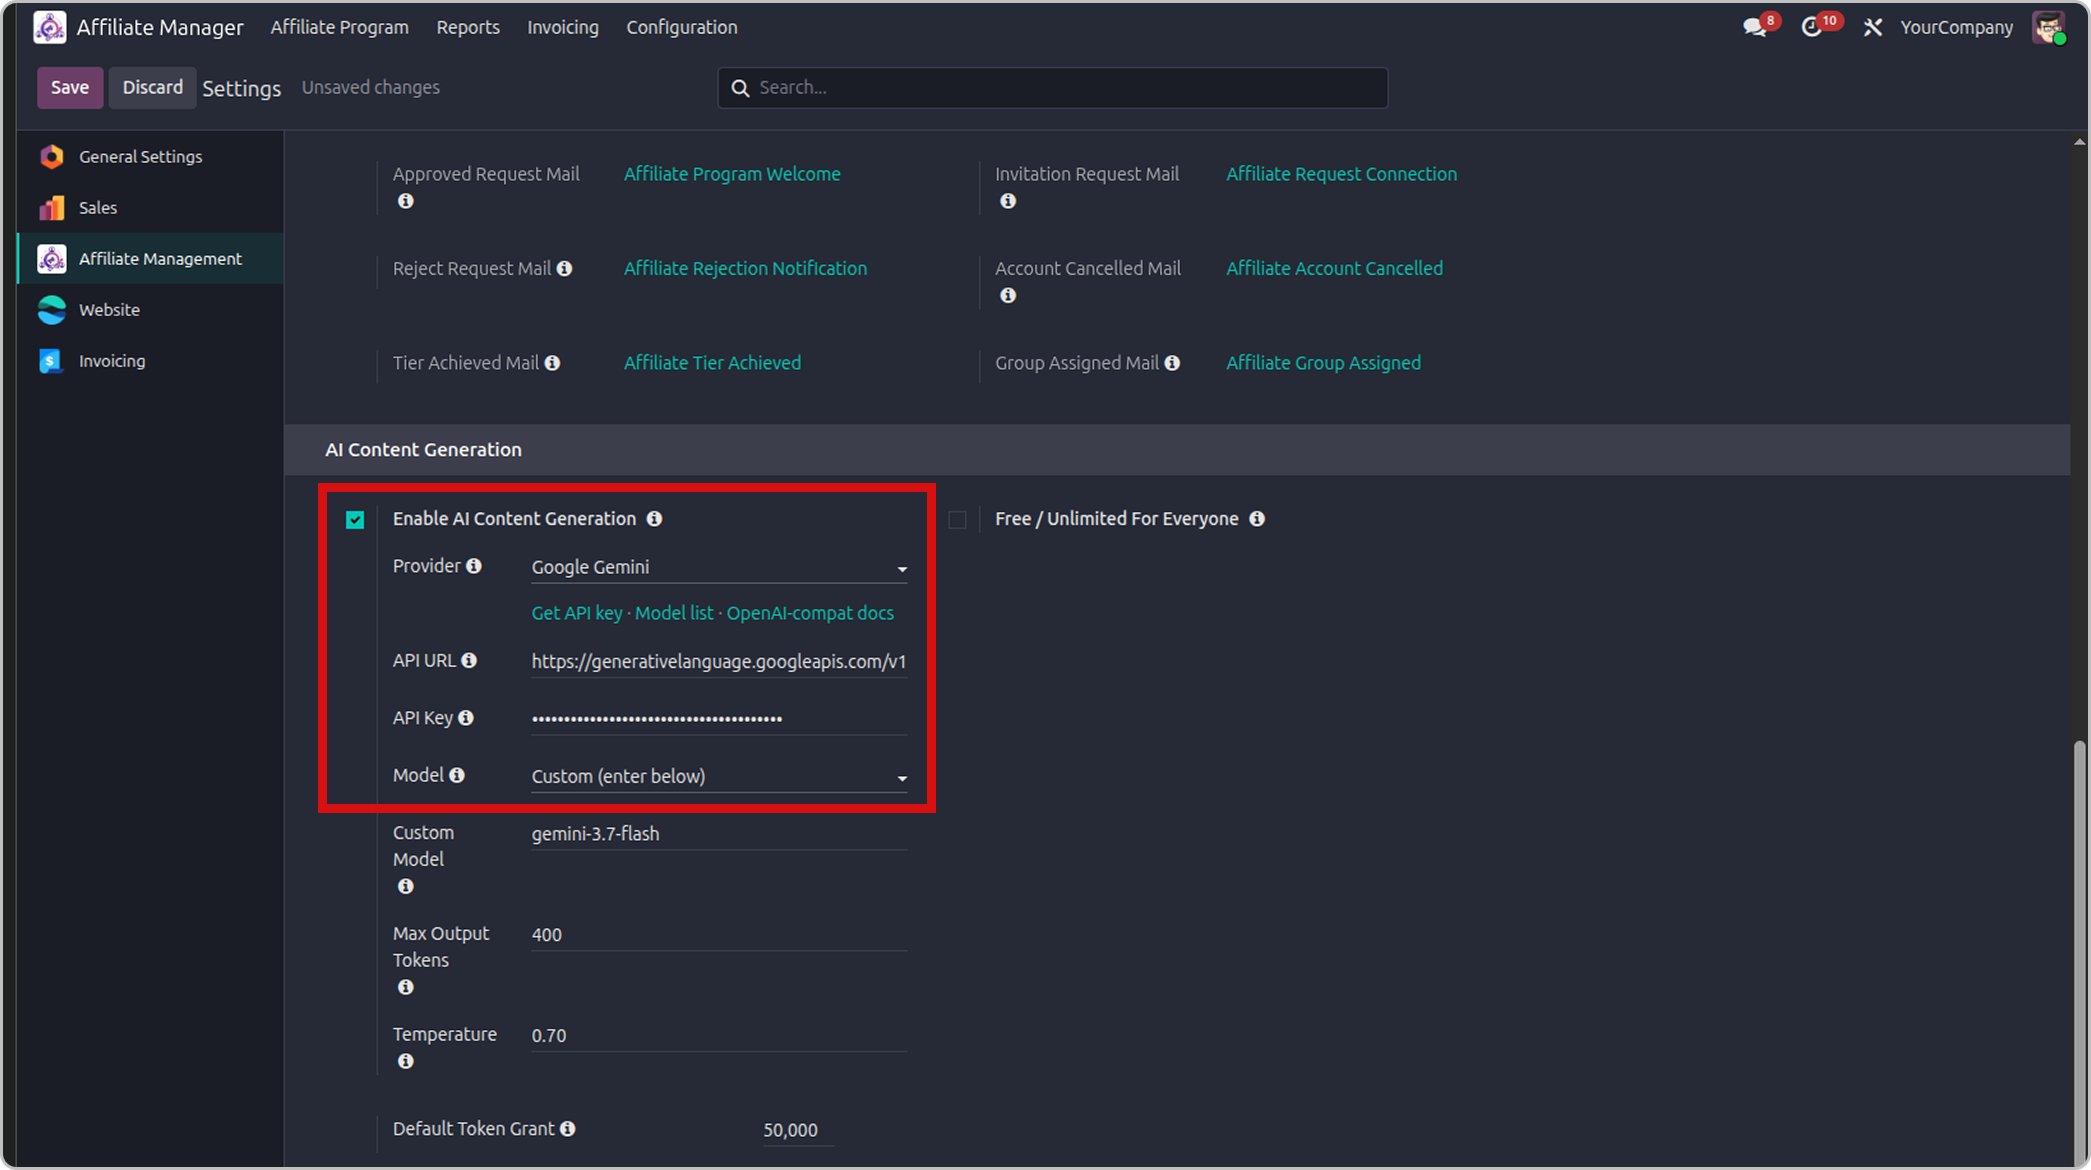
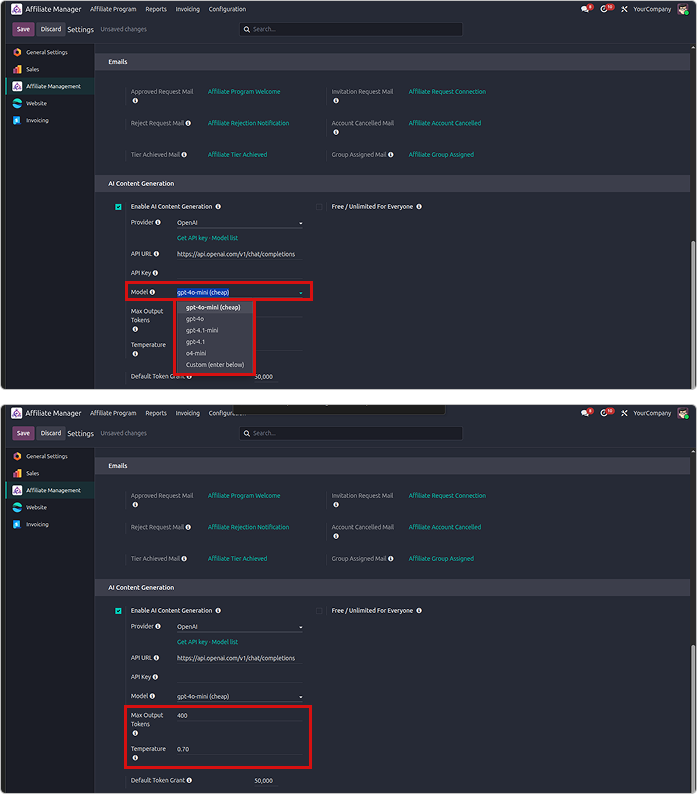
Go to affiliate manager > configuration > settings then find the AI content generation block.
Tick Enable AI Content Generation. More options open below it. This is the main on/off switch.
Choose your Provider. The API URL fills in by itself.
Click the Get API key link under the provider. The provider's website opens. Create a key there and copy it.
Paste the key into API key. It shows as dots, so nobody can read it over your shoulder.
Choose a Model. The one marked (cheap) is a good start.
Want a model that is not in the list? pick custom (enter below) and type its exact name in custom model.
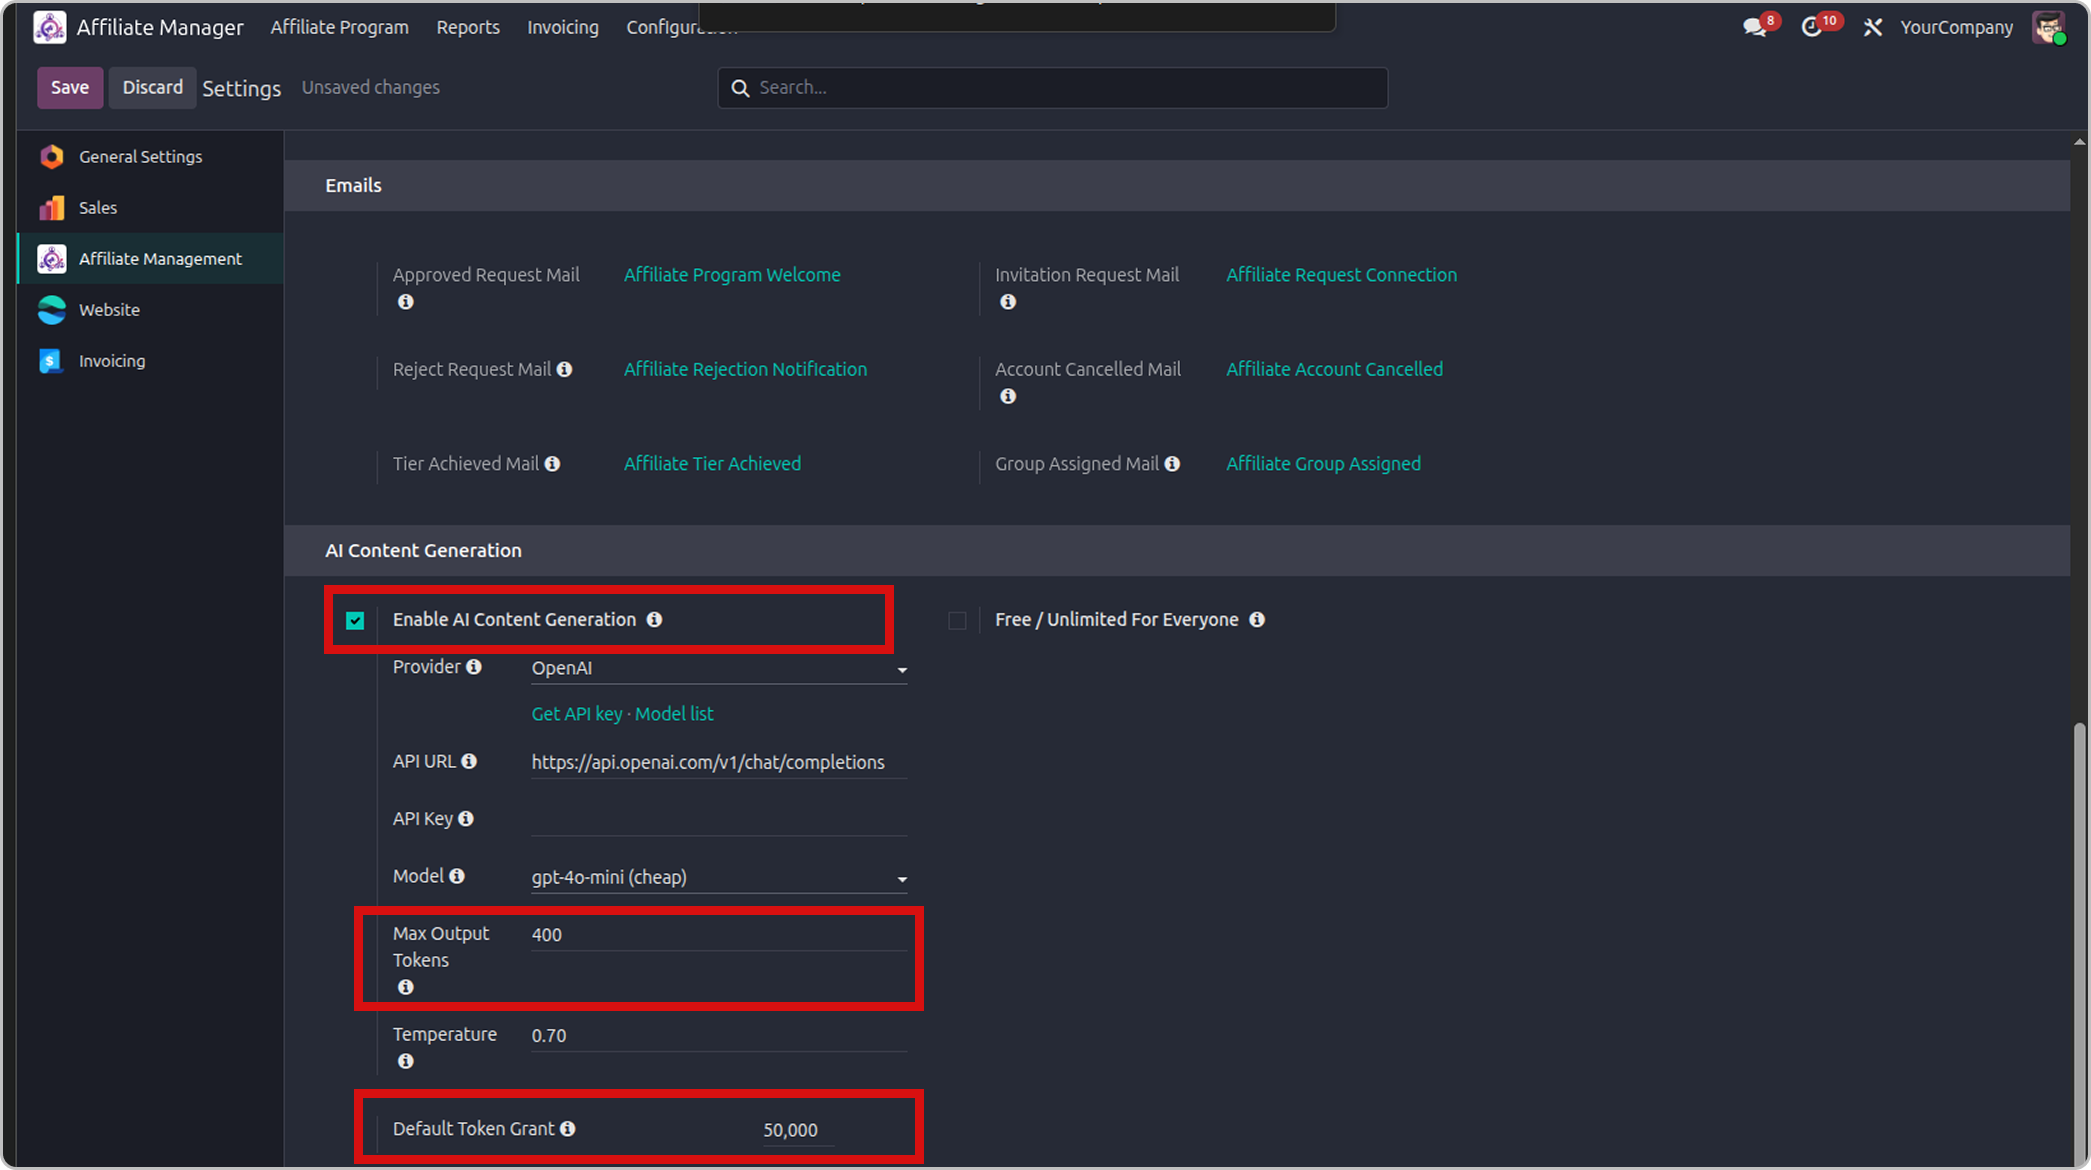
Leave Max Output Tokens and Temperature as they are for now. The table below explains them.
Click Save.
Click on image to Zoom out.
The two number settings, in simple words :
Max Output Tokens : The longest answer the AI may write. A bigger number means longer text and a higher cost. (starts with 400).
Temperature : How creative the AI is. 0.2 gives safe, similar text each time. 0.9 gives more variety. (starts with 0.7).
Providers you can pick :
Provider : OpenAI
Default model : gpt-4o-mini
Note : Marked as cheap.
Provider : Google Gemini
Default model : gemini-2.0-flash
Note : Marked as cheap.
Provider : Anthropic Claude
Default model : claude-haiku-4-5
Note : Marked as cheap.
Provider : OpenRouter
Default model : openai/gpt-4o-mini
Note : One key for many AI companies.
Provider : Custom
Default model : You type it
Note : For your own AI server. Type the API URL and the custom model name yourself.
Click on image to Zoom out.

Good to know

  • Each provider remembers its own key. You can switch to another provider and back without typing the key again.
  • If you untick Enable AI Content Generation later, all AI tools disappear for affiliates straight away.
Choose how tokens are counted

The AI provider charges you for tokens. Token balances let you decide how much each affiliate can use.
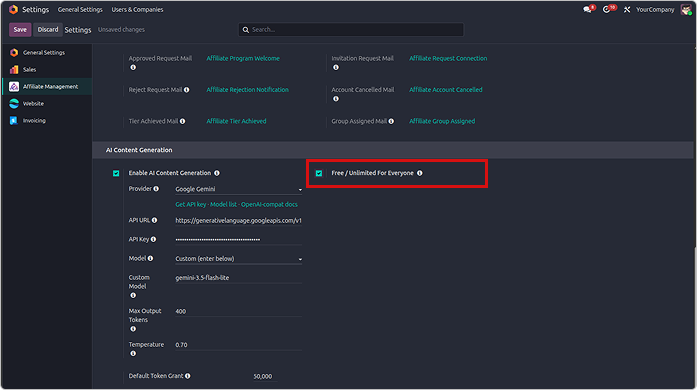
Go to the same Settings page, just below the provider options.
Want no limits at all? Tick Free / Unlimited For Everyone. Nobody's tokens are counted.
Want limits? Leave that box unticked. Type a number in Default Token Grant. Every affiliate gets this many tokens the first time you give them access. The default is 50000.
Click Save.
Click on image to Zoom out.

Good to know

  • Your own admin tools never use anyone's tokens.
  • If an AI request fails, no tokens are taken.
  • One click on generate writes 3 versions and usually uses a few hundred tokens.
Give an affiliate AI access

Nobody gets AI by default. You turn it on for each affiliate, one by one.
Go to Affiliate Manager > Affiliate Program > All Affiliates then open the affiliate.
Open the affiliate you want.
Find the AI Assistant section. It is right after the earnings fields.
Tick AI Content Access. Three more fields appear.
Click Save. If their balance was 0, Odoo adds the Default Token Grant to AI Token Balance.
Optional: tick unlimited AI usage if this person should never run out. The balance box then locks.
Click on image to Zoom out.
Add more tokens
Open the affiliate.
Type the new number in AI Token Balance. The number you type replaces the old one. It is not added on top.
Click Save.
Take access away
Untick AI Content Access.
Click Save. The AI boxes disappear from that affiliate's portal.

Good to know

  • AI Tokens Used is the total this affiliate has spent so far. You can read it, but not change it.
Get a quick AI summary of one affiliate

The AI reads this affiliate's numbers and tells you, in 2 or 3 sentences, how they are doing and what you could do next.
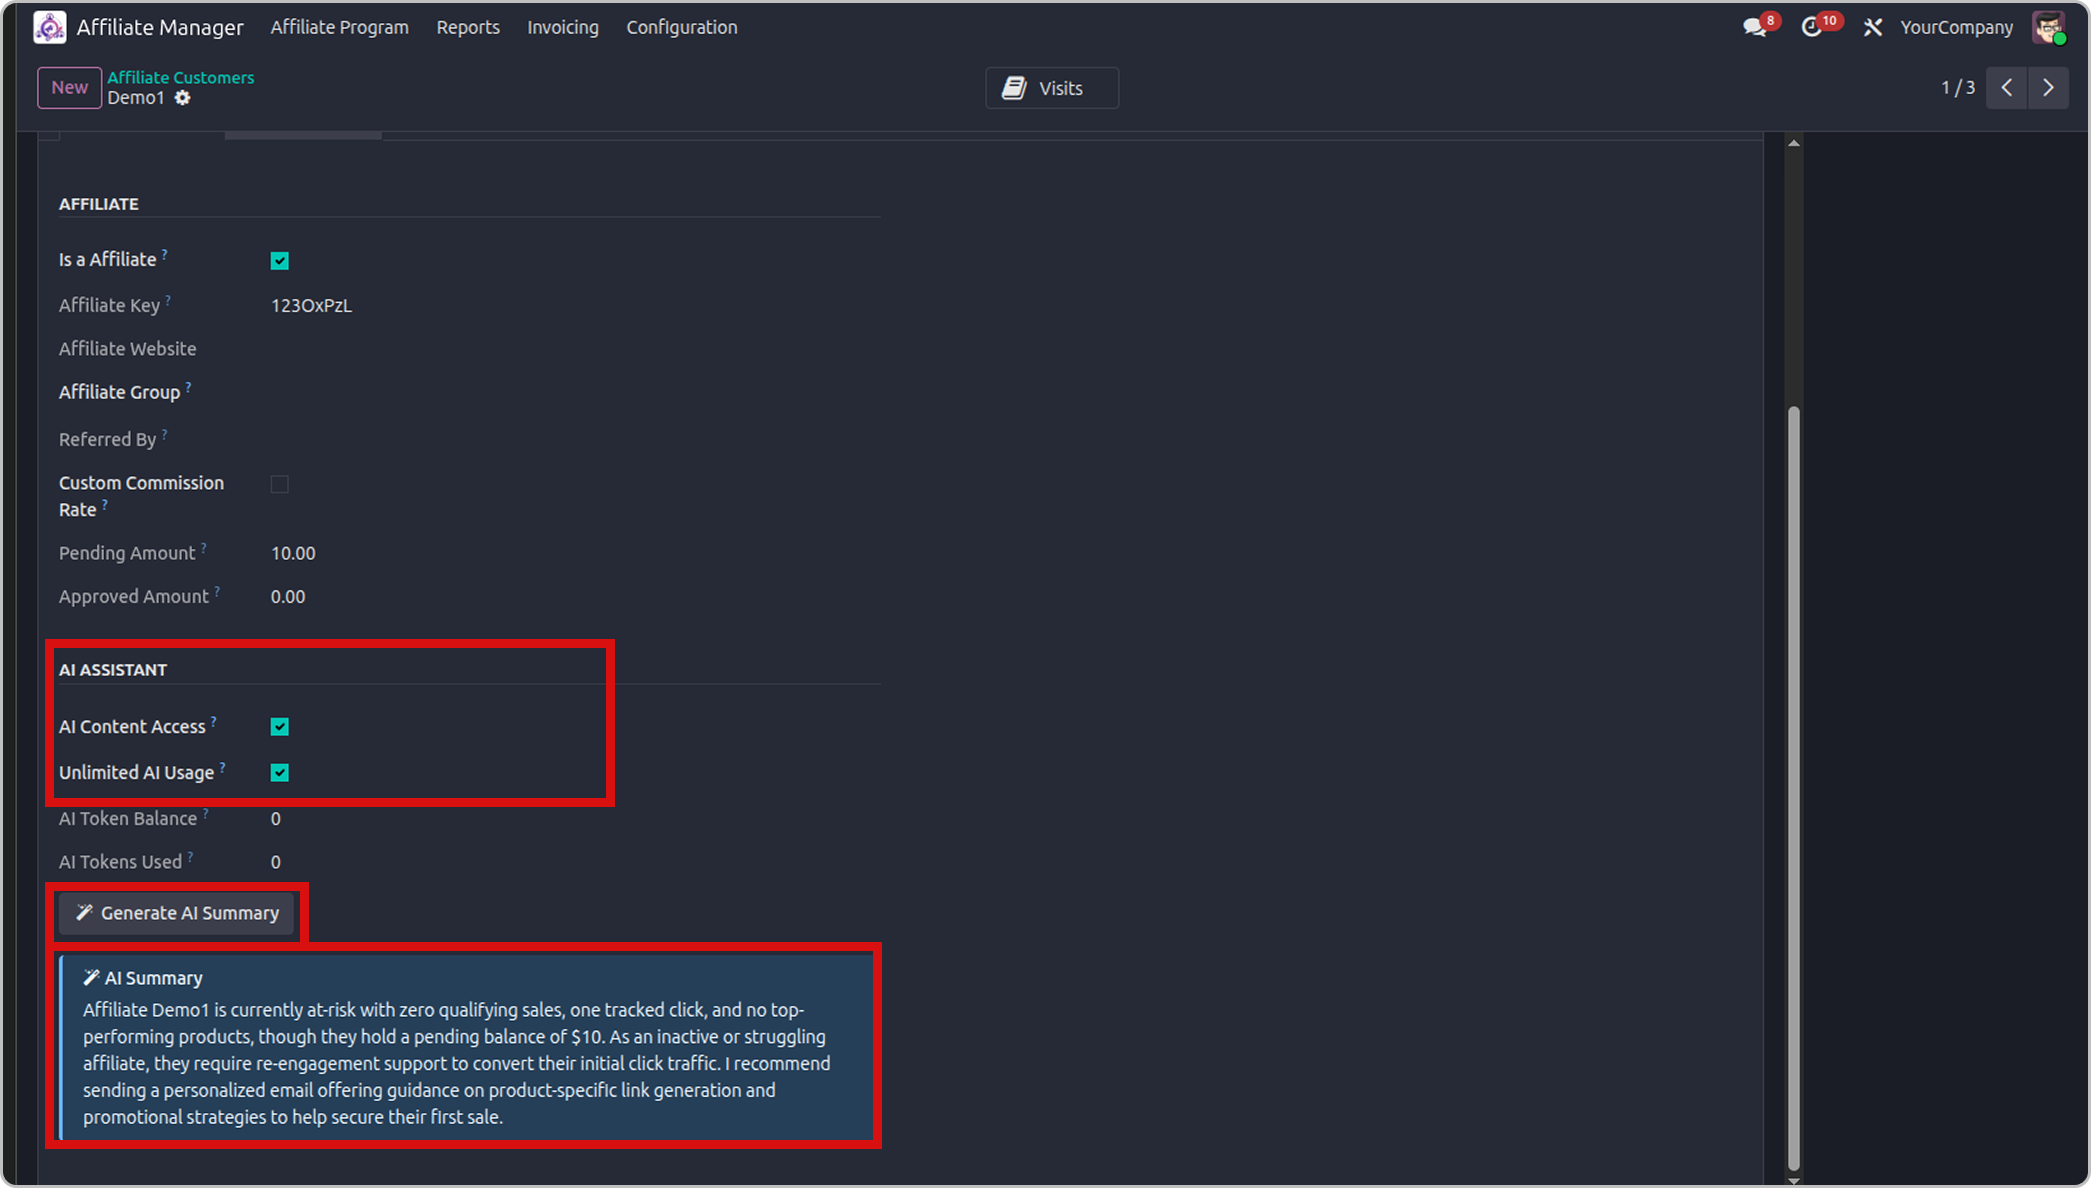
Go to Affiliate Manager > Affiliate Customer then open the affiliate.
Open the affiliate.
In the AI Assistant section, click Generate AI Summary.
Wait a few seconds. A blue AI Summary box appears.
Read it. It says if the affiliate is a top performer, steady, or at risk, and gives one idea, such as a bonus or a higher tier.
Click the button again any time to get a fresh summary.
Click on image to Zoom out.

Good to know

  • This is free for you. It does not use the affiliate's tokens. The summary stays saved on the affiliate until you make a new one.

Make ready-made promo texts in bulk

The AI writes several promo texts at once and saves them in your Promo Content library. All affiliates can then copy them.

Go to Affiliate Manager > Configuration > Generate Swipes (AI).
Open the menu. A popup called Generate Promo Swipes opens.
Channel: where the text will be used. Social media, WhatsApp / SMS, Email, or Blog / review.
Tone: how it should sound. Casual, Professional, Funny, or Urgent (FOMO).
Language: type any language, for example English, Spanish or Hindi.
How many: how many texts you want.
Template type: pick one.
  • Product templates: one text works for any product the affiliate picks.
  • Generic: uses the affiliate's home referral link, no product.
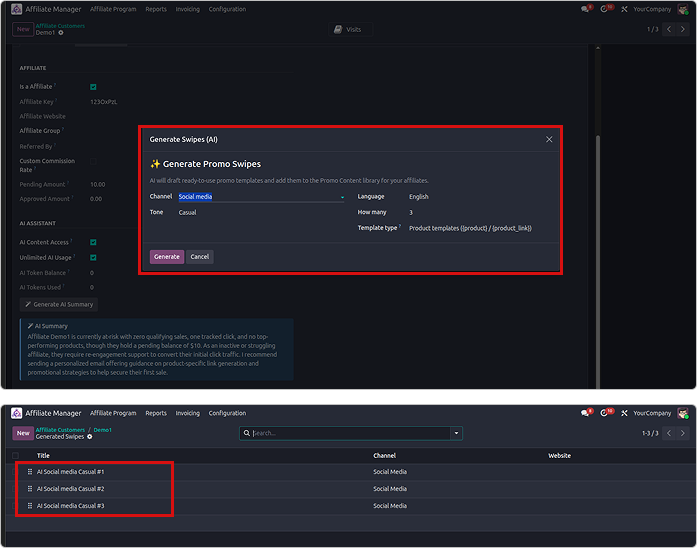
Click Generate. Wait a few seconds.
A list of the new texts opens. They are named like AI Social media Casual #1.
Open each text and read it. Change what you want, or archive the ones you don't like.
Click on image to Zoom out.

Good to know

  • New texts are live straight away. Affiliates can see them on their Promo Content page.
  • You can find all texts later at Affiliate Manager > Configuration > Promo Content.
  • This does not use any affiliate's tokens.

Ask the AI about your whole program

Ask questions in plain English, such as “Who are my top 5 affiliates?”. Or get a full health check of your program with numbers and advice.
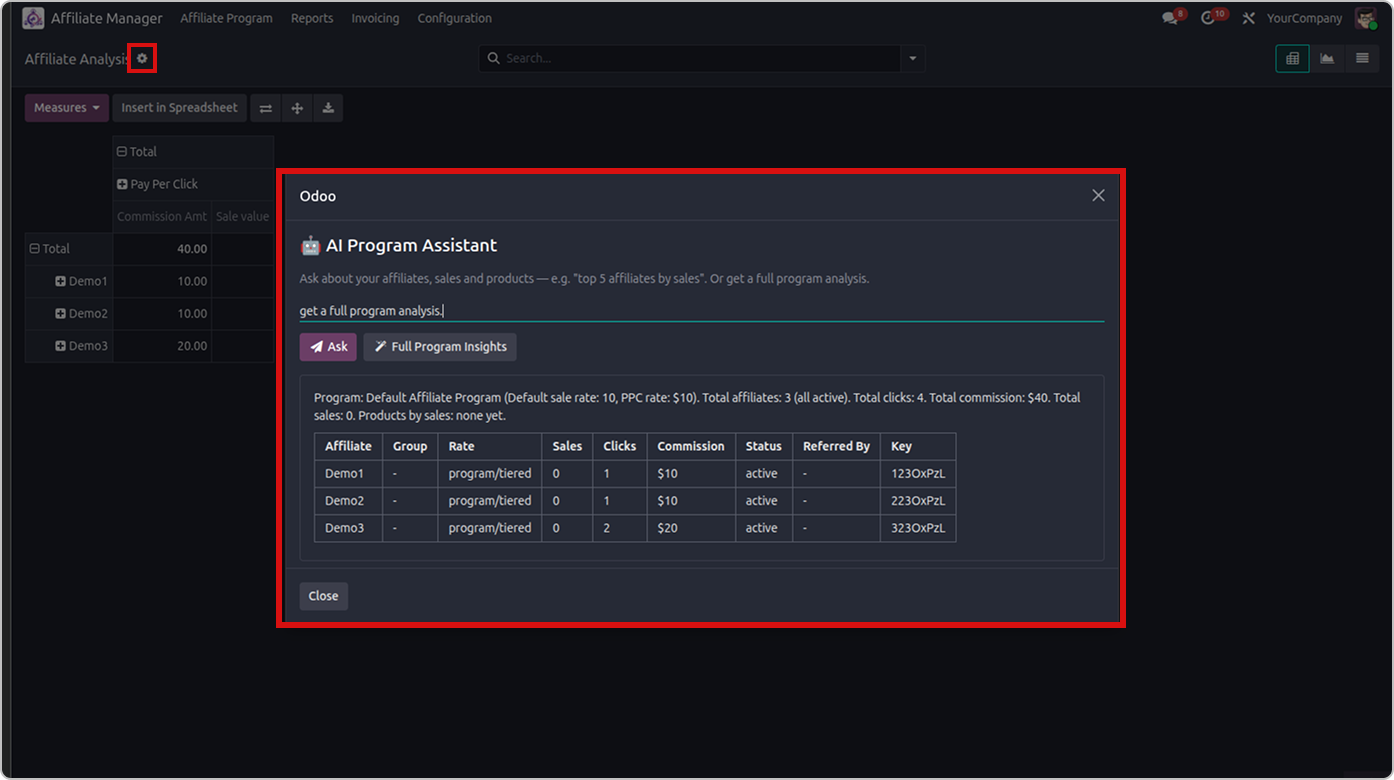
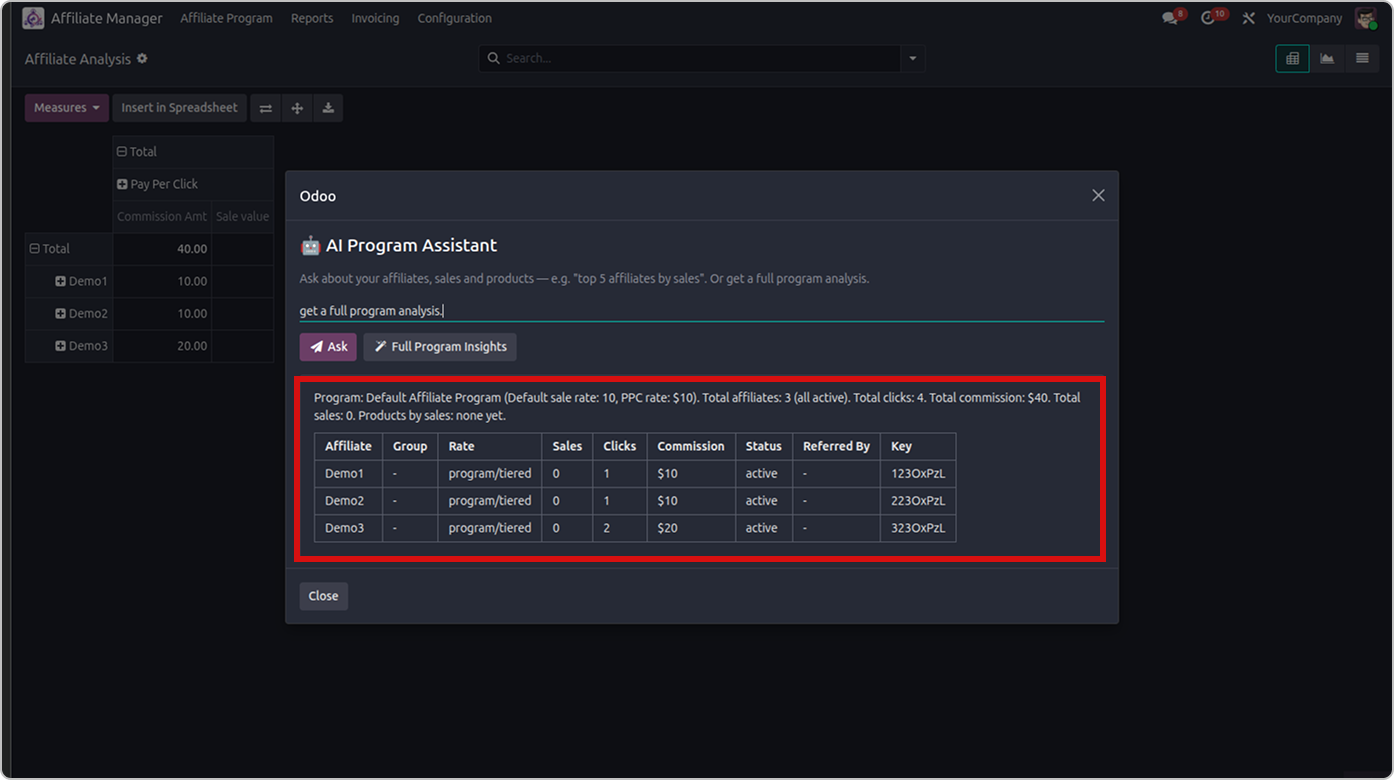
Go to Affiliate Manager > Reports > Analysis > gear icon > AI Program Insights.
Open Analysis.
Click the gear icon next to the page title.
Click AI Program Insights. A popup called AI Program Assistant opens.
Type your question in the box.
Click Ask. The answer appears below. Lists and rankings come as a table.
Or click Full Program Insights for a complete report.
Click Close when you are done.
Click on image to Zoom out.
Questions you can try
Show me the top 5 affiliates by sales.
List all inactive affiliates.
Which products sell the most?
Who has a custom commission rate?
Who referred the most sub-affiliates?
Click on image to Zoom out.
What Full Program Insights shows
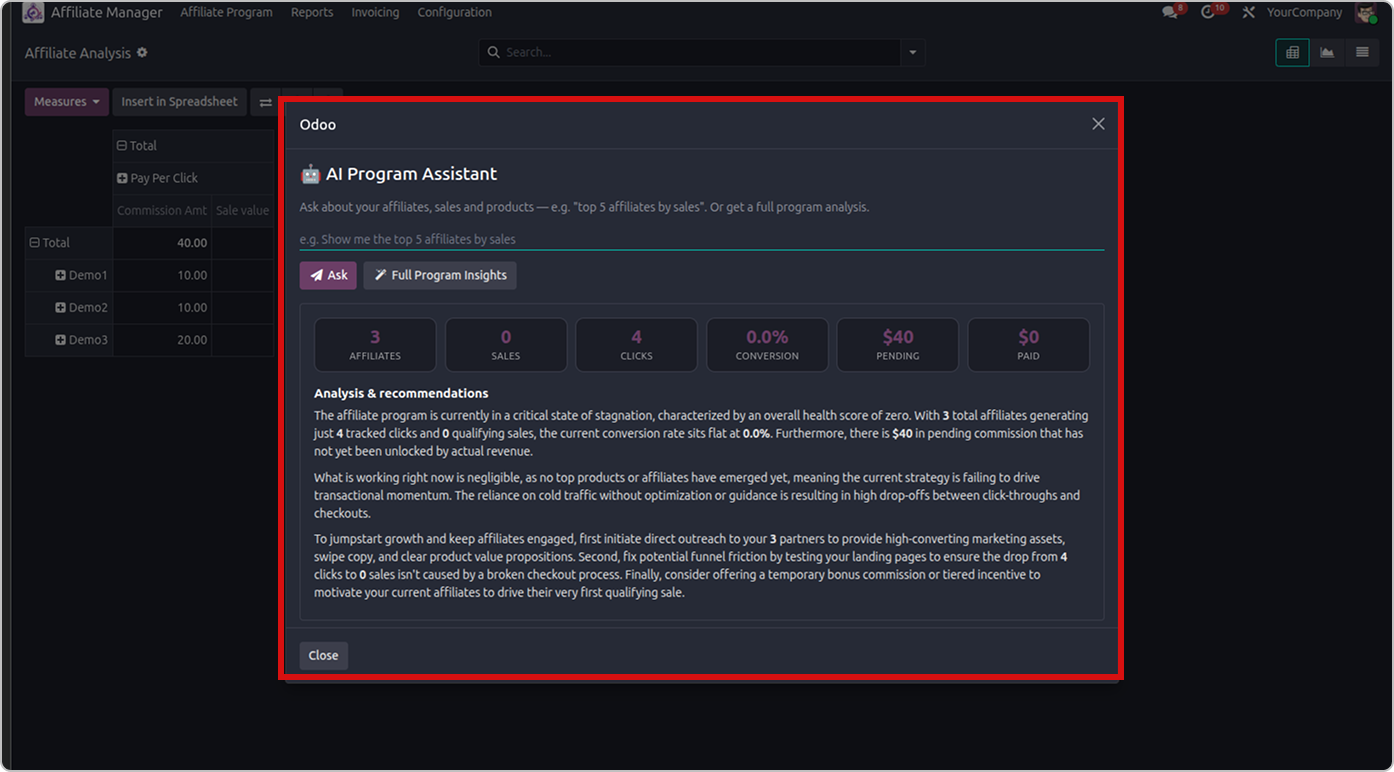
Six number cards: affiliates, sales, clicks, conversion, pending and paid.
Top affiliates table and top products table.
Analysis & recommendations: a short text from the AI with 2 or 3 ideas to grow.
Click on image to Zoom out.

Good to know

  • The number cards and tables come straight from Odoo. Only the text under “Analysis & recommendations” is written by the AI.
  • The gear menu item also works on Order Report and Traffic Report.
  • For questions, the AI reads up to 60 affiliates at a time.
  • This does not use any affiliate's tokens.

See every AI request and what it cost

Every AI request is saved here, from affiliates and from you, whether it worked or failed.
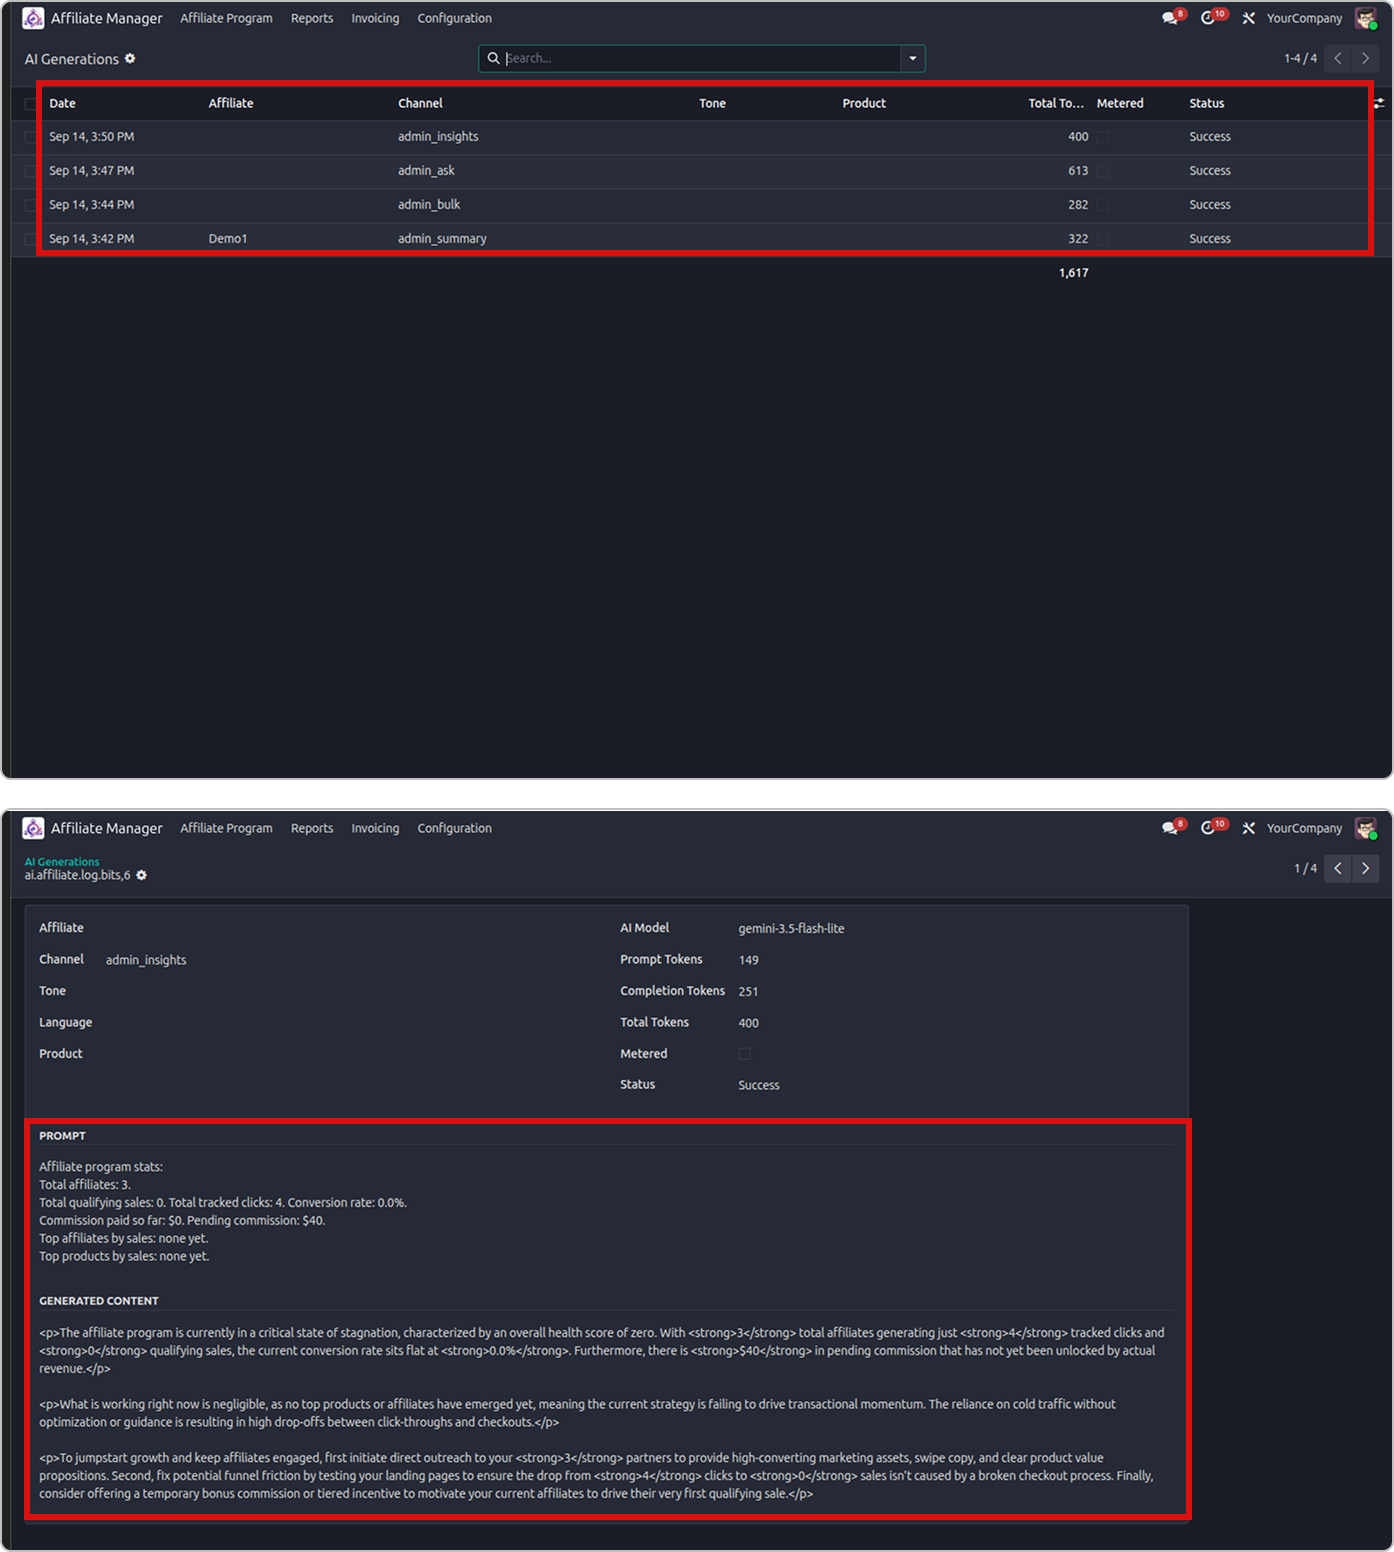
Go to Affiliate Manager > Reports > AI Generations.
Open the menu. The newest requests are at the top.
Look at the columns: Date, Affiliate, Channel, Tone, Product, Total Tokens, Metered and Status.
Click any line to see the full question sent to the AI and the text it wrote back.
If Status says error, open the line. The Error field tells you why.
Click on image to Zoom out.

Tips

  • Metered ticked means tokens were taken from the affiliate's balance.
  • Group the list by Affiliate to see who uses the most tokens.

Ask the AI coach on your dashboard

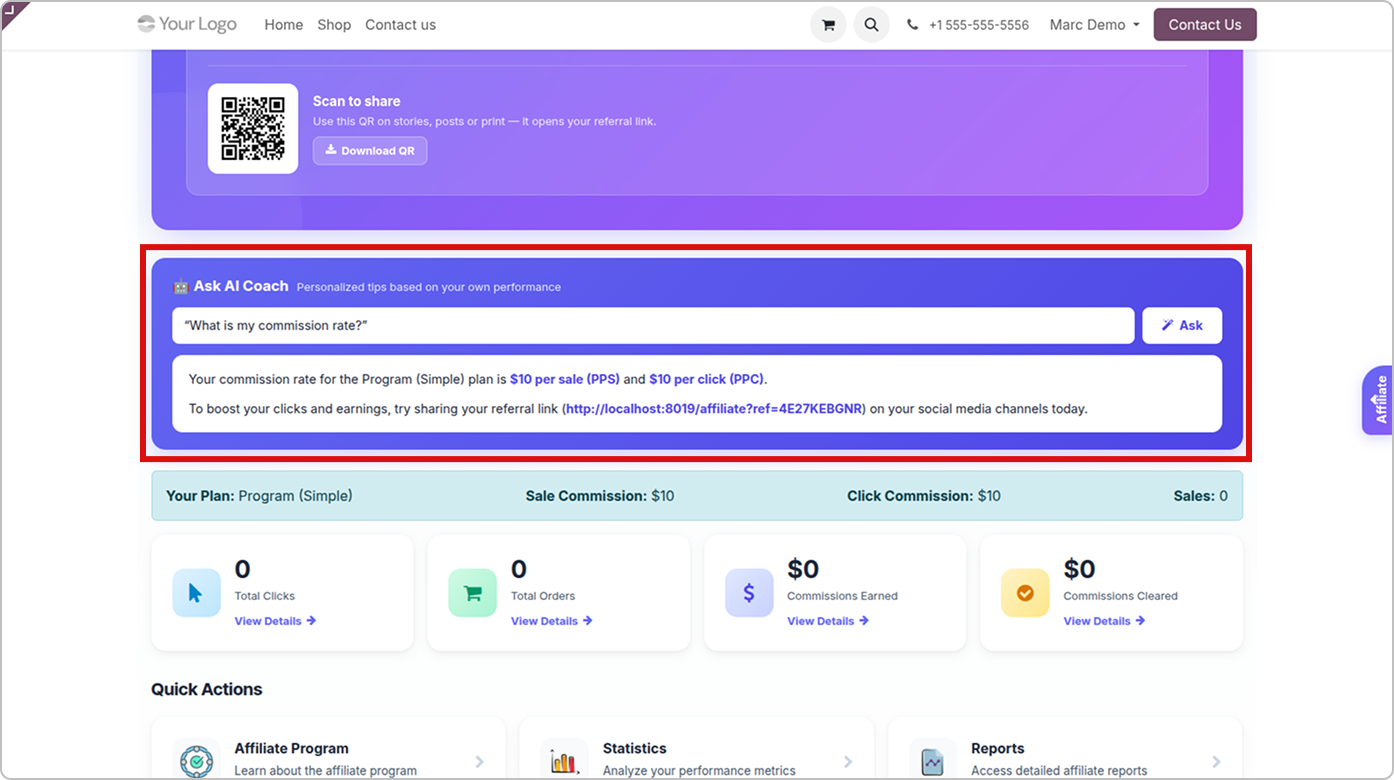
Ask anything about your affiliate account. The coach answers using your own numbers: your plan, tier, earnings, last sale and payout rules.

Go to My Affiliate dashboard at /affiliate/dashboard
Log in and open your affiliate dashboard.
Find the Ask AI Coach box, just under the welcome message.
Type your question.
Click Ask. It shows “Thinking…”.
Read the answer. The important numbers are in bold. Your tokens left are shown under it.
Questions you can try
What is my commission rate ?
How many more sales do I need for the next tier ?
What was my last sale ?
When do I get paid ?
Which product should I promote ?
Click on image to Zoom out.

Good to know

  • If the coach doesn't have the information, it says so. It does not make up numbers.

Open the AI Studio

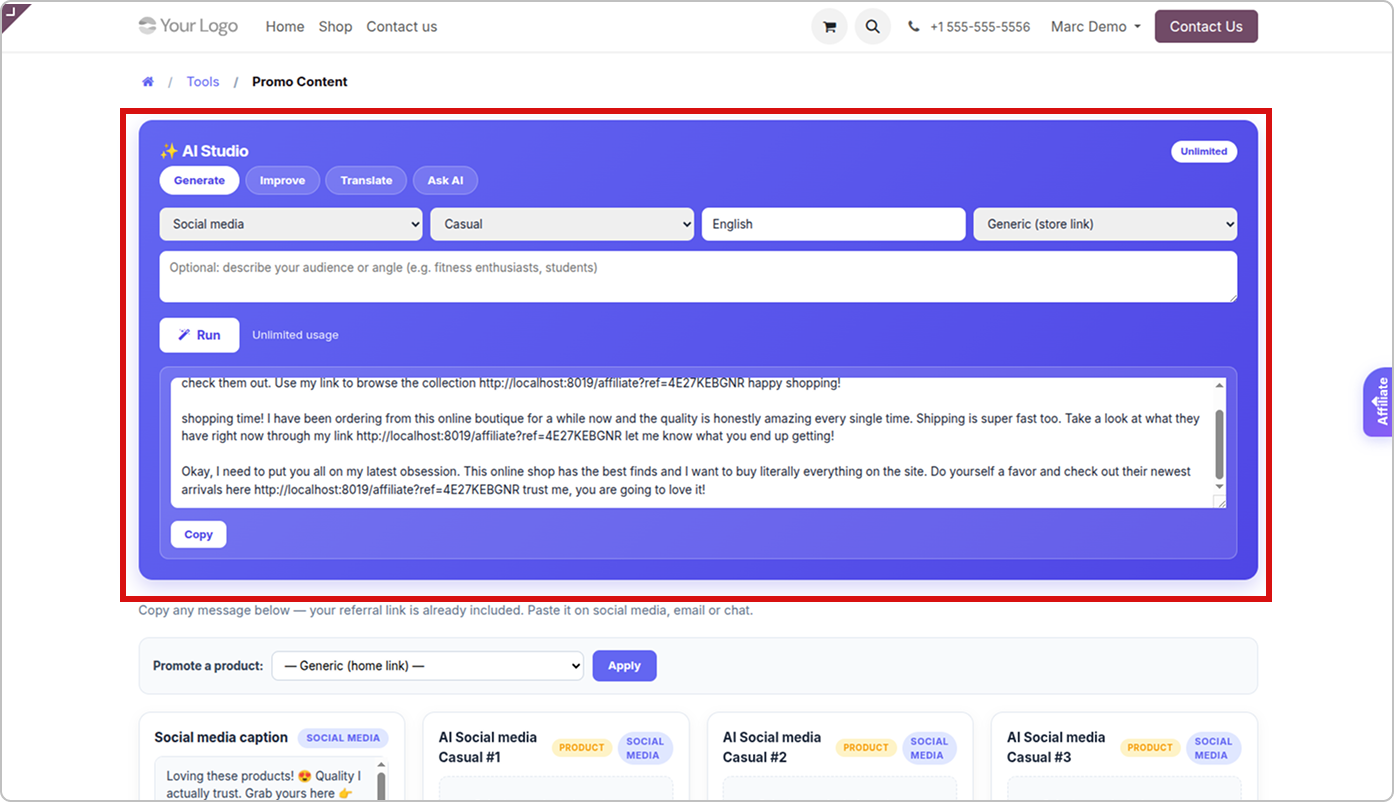
AI Studio is your writing helper. It sits at the top of your promo content page.

Go to Dashboard > Tools > Promo Content at /affiliate/tools/swipes
On your dashboard, click Tools.
Click Promo Content.
The AI Studio box is at the top of the page.
At the top right you see Left (tokens you still have) and Used. If you have no limit, it just says Unlimited.
There are four tabs: Generate, Improve, Translate and Ask AI. The next steps explain each one.
Questions you can try
What is my commission rate ?
How many more sales do I need for the next tier ?
What was my last sale ?
When do I get paid ?
Which product should I promote ?
Click on image to Zoom out.

Write new posts with generate

Pick a few options and the AI writes 3 different posts for you. Your referral link is already inside each one.
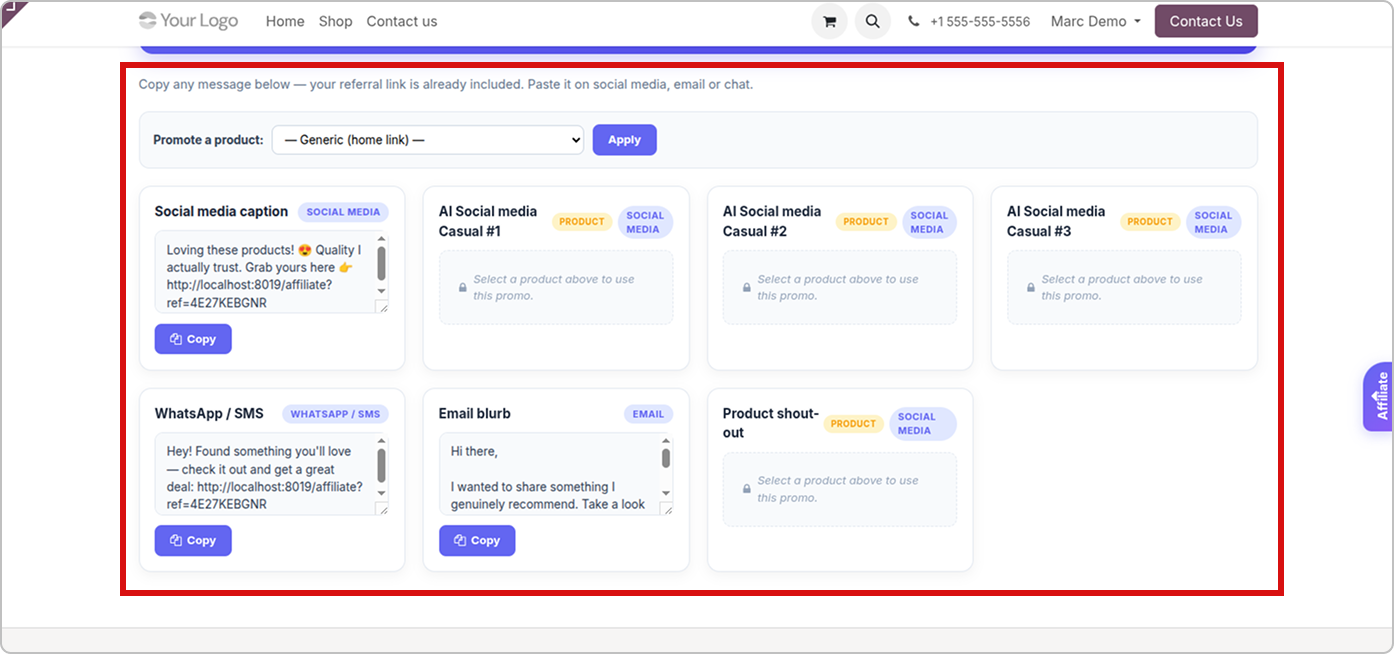
In AI Studio, click the Generate tab.
Pick where you will post: Social media, WhatsApp / SMS, Email or Blog / review.
Pick a tone: Casual, Professional, Funny or Urgent (FOMO).
Type a language. English is already filled in.
Pick a product. Or choose Generic (store link) to promote the whole store.
Optional: in the big box, say who you are writing for. For example “students” or “people who love the gym”.
Click Run. It shows “Working…”.
Paste it into Instagram, Facebook, WhatsApp or your email.
Click on image to Zoom out.

Good to know

  • With a product picked, the link opens that product's page. With Generic, it opens your home referral link.
  • The text is plain, with no stars or odd symbols, so it pastes cleanly.
  • Always read the post before you share it.

Make your own text better with improve

Already wrote something? Paste it here. The AI makes it clearer, shorter and more convincing, with the same meaning.
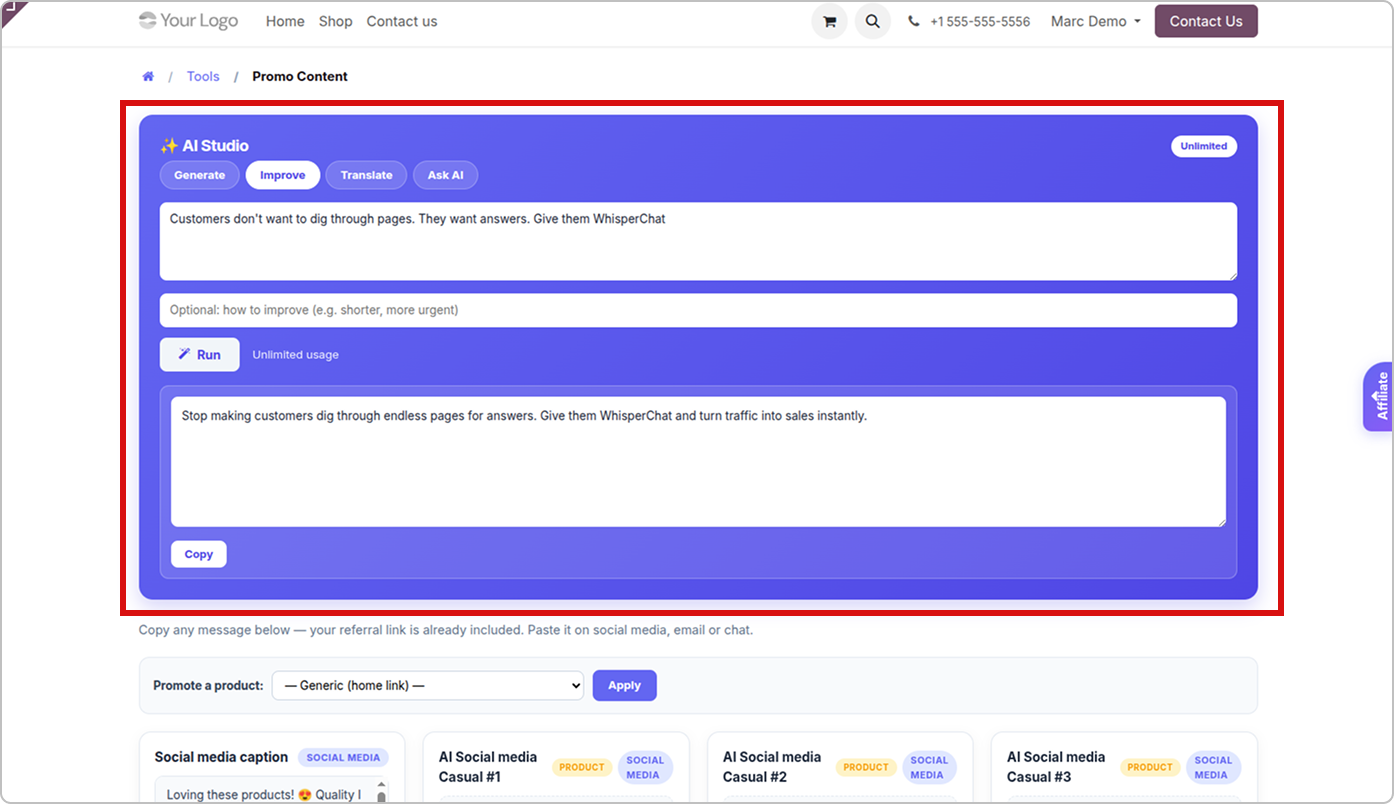
In AI Studio, click the Improve tab.
Paste your text into the big box.
Optional: say how to improve it. For example “shorter”, “more urgent” or “add emojis”.
Click Run.
Click Copy under the new version.
Click on image to Zoom out.

Good to know

  • Your links and hashtags are kept. The AI reads about the first 2,000 characters, so very long text gets cut.

Translate text in any language

Translate your promotional messages into different languages while preserving their natural marketing tone and original formatting.
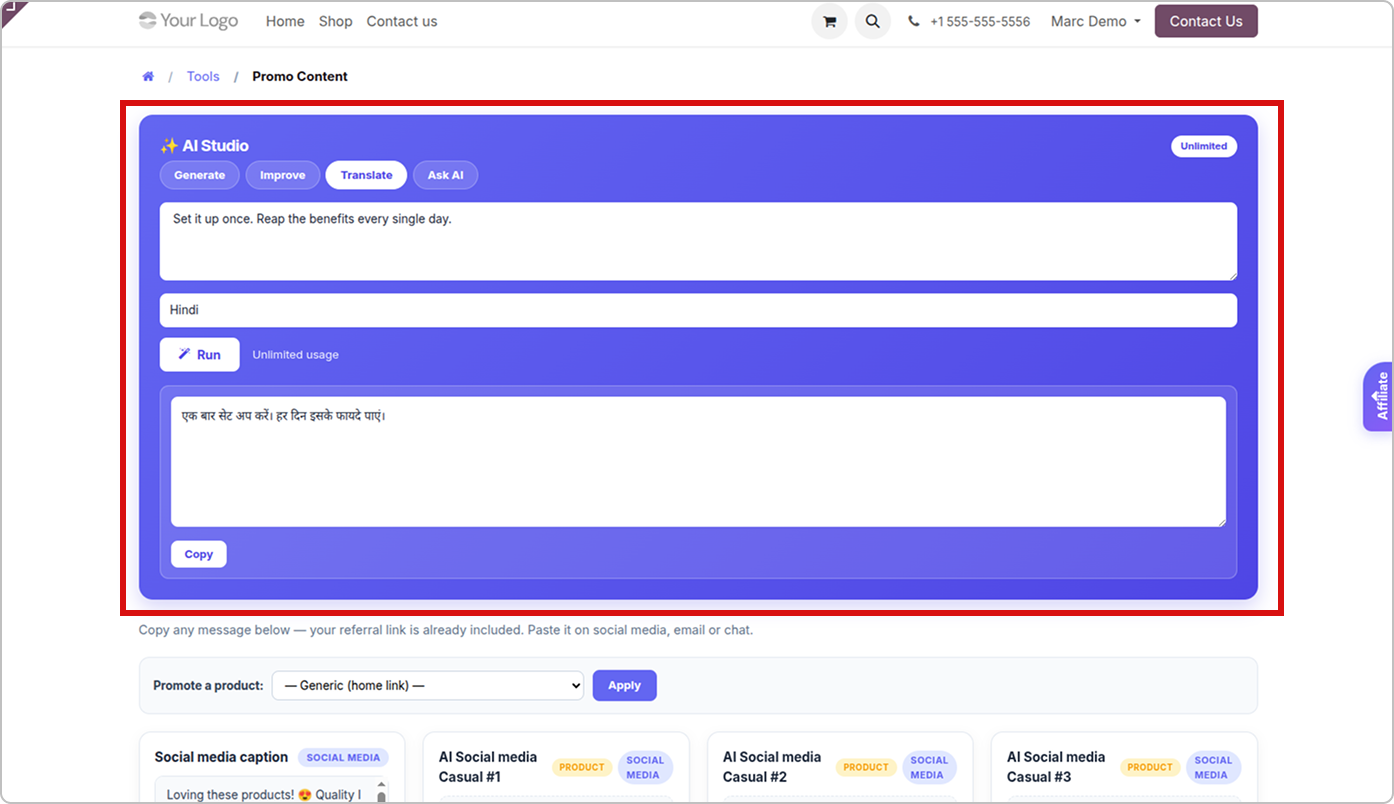
Enter Promotional Text: Paste your existing promotional message into the AI Studio text area. The AI will use it as the source for translation.
Select Translate: Choose the Translate option to translate your promotional content while maintaining its original marketing purpose and tone.
Specify the Language: Enter your desired target language (e.g., Hindi, French, or Spanish) and click Run to generate the translated message.
Copy the Translated Content: Review the generated result and click Copy to use it. The AI keeps the marketing tone natural while preserving links, hashtags, and emojis.
Click on image to Zoom out.

Good to know

  • AI translates your message naturally, keeping its marketing tone, links, hashtags, and emojis intact.

Ask a question inside the studio

This is the same helper as the AI Coach, with a bigger box for longer questions.
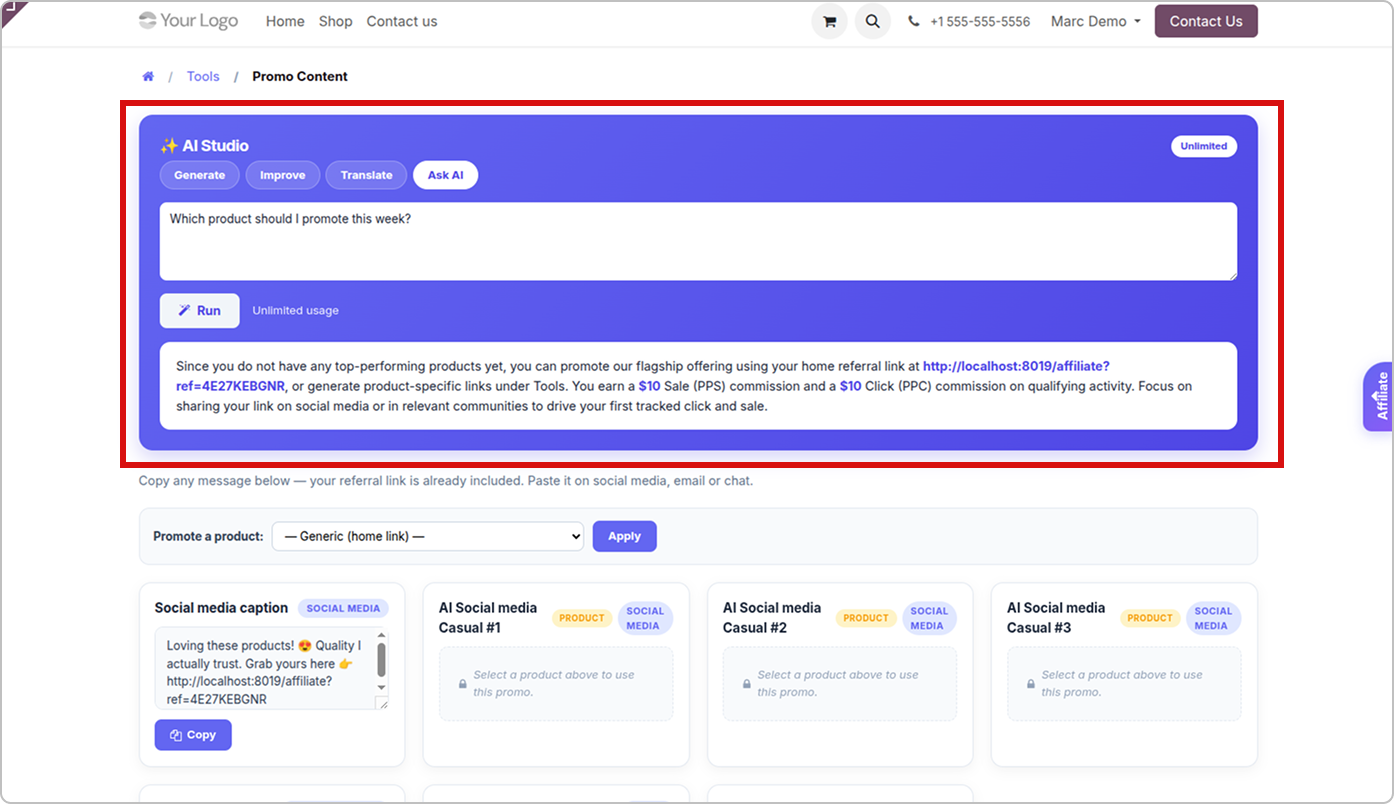
In AI Studio, click the Ask AI tab.
Type your question. And click on Run
Read the answer. The important numbers are in bold.
Click on image to Zoom out.

Good to know

  • Links, hashtags and emojis stay exactly the same.

Get a caption for a product in one click

The fastest way to post about a product. One click writes a social media caption with your product link inside.
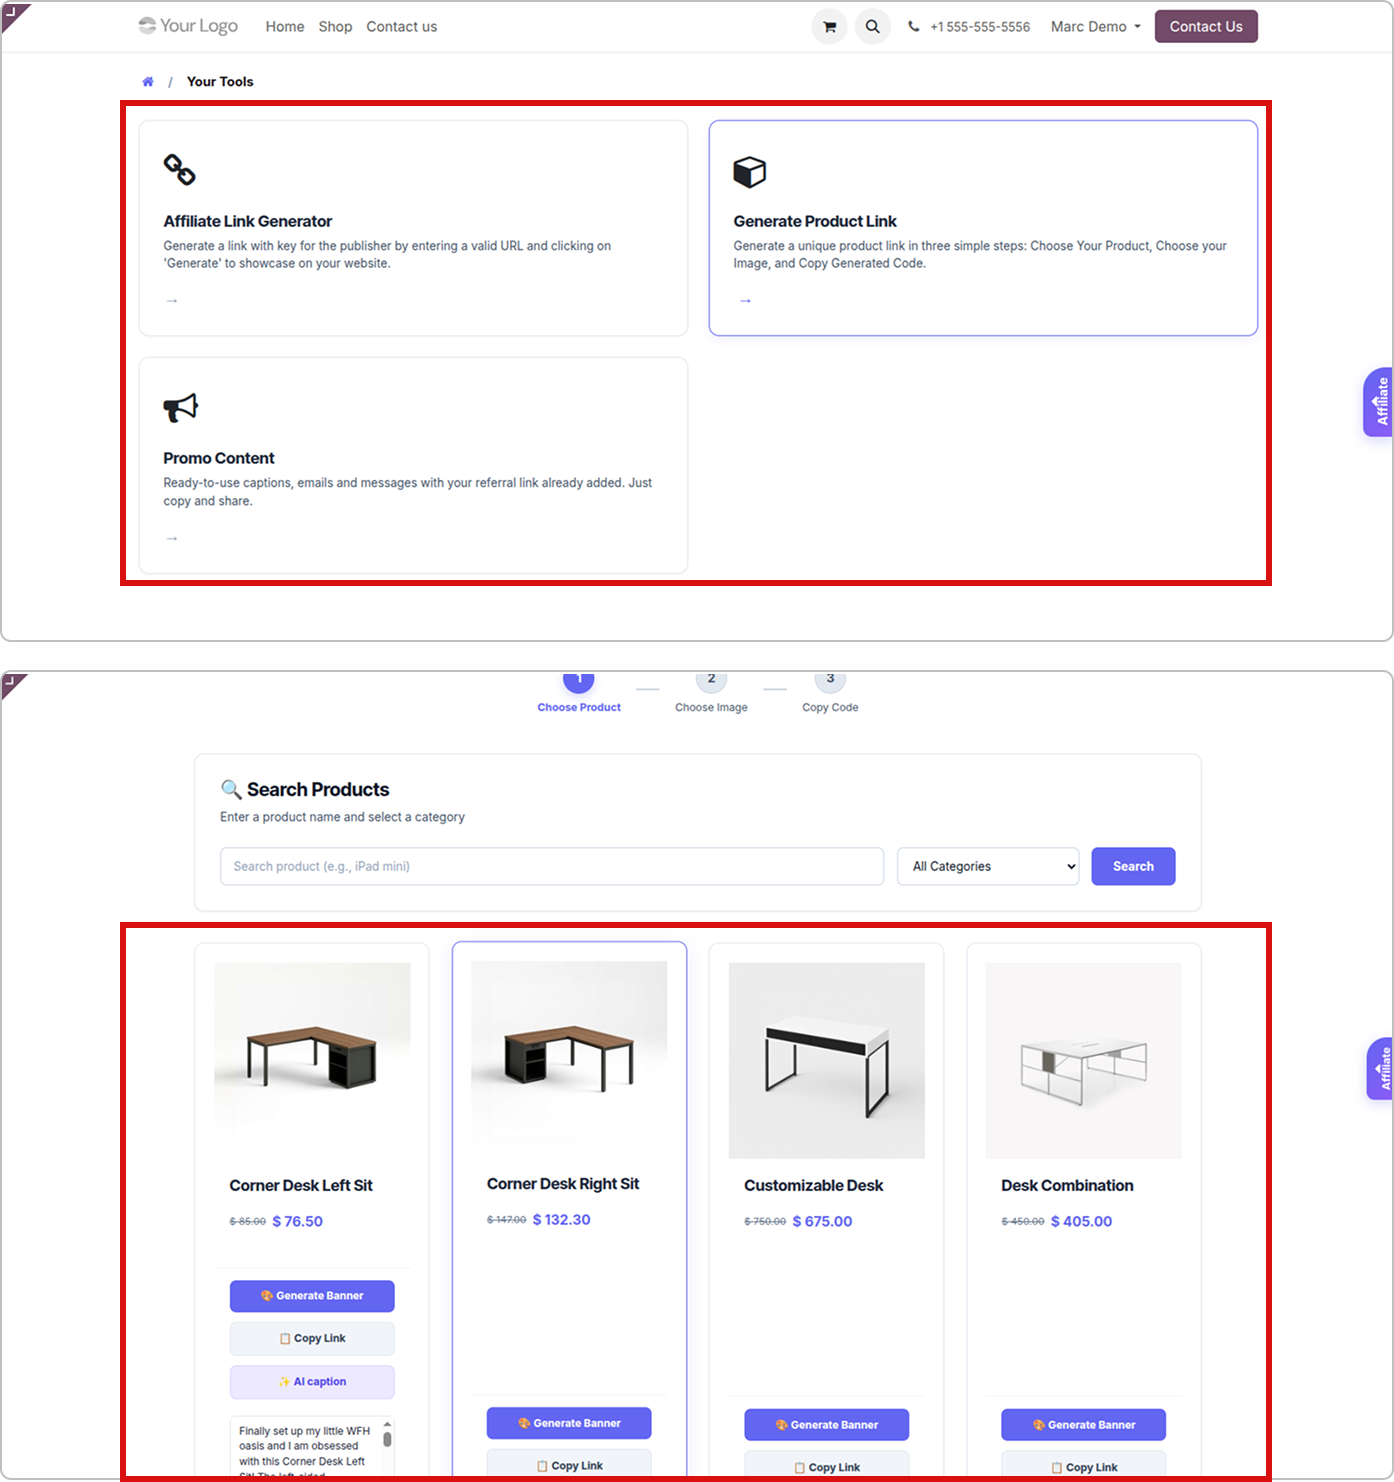
Go to Dashboard > Tools > Generate Product Link at /affiliate/tools/products
On your dashboard, click Tools, then Generate Product Link.
Find the product you want.
Click AI caption next to it. It shows “Generating…”.
The caption appears under the product, with your link inside.
Click Copy and paste it where you want.
Click on image to Zoom out.

Good to know

  • This button always writes for social media, in a casual tone, in English. For other choices, use Generate in AI Studio

AI section on the affiliate landing page

A new section on your public affiliate page tells people about the AI tools. It helps you get new affiliates.
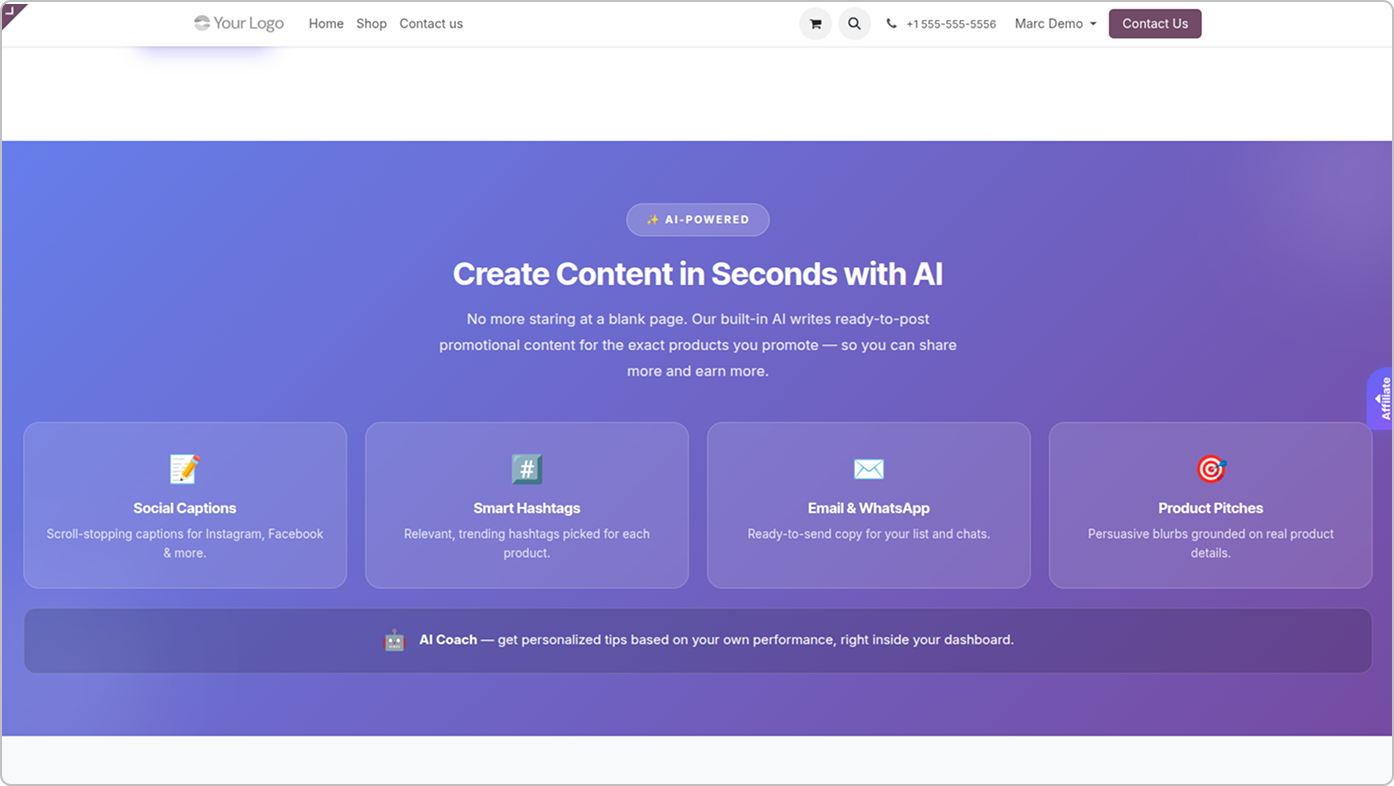
Go to Your website > /affiliate.
Open your website's affiliate page.
Scroll down past the tools section.
You see Create Content in Seconds with AI, with four cards: Social Captions, Smart Hashtags, Email & WhatsApp and Product Pitches, plus a line about the AI Coach.
Click on image to Zoom out.

Good to know

  • Everyone sees this section, even people who are not logged in.
  • It shows even when AI is turned off in Settings. To hide it: turn on developer mode, go to Settings > Technical > User Interface > Views, search Affiliate Landing : AI Content, and archive that view.
Problems and fixes
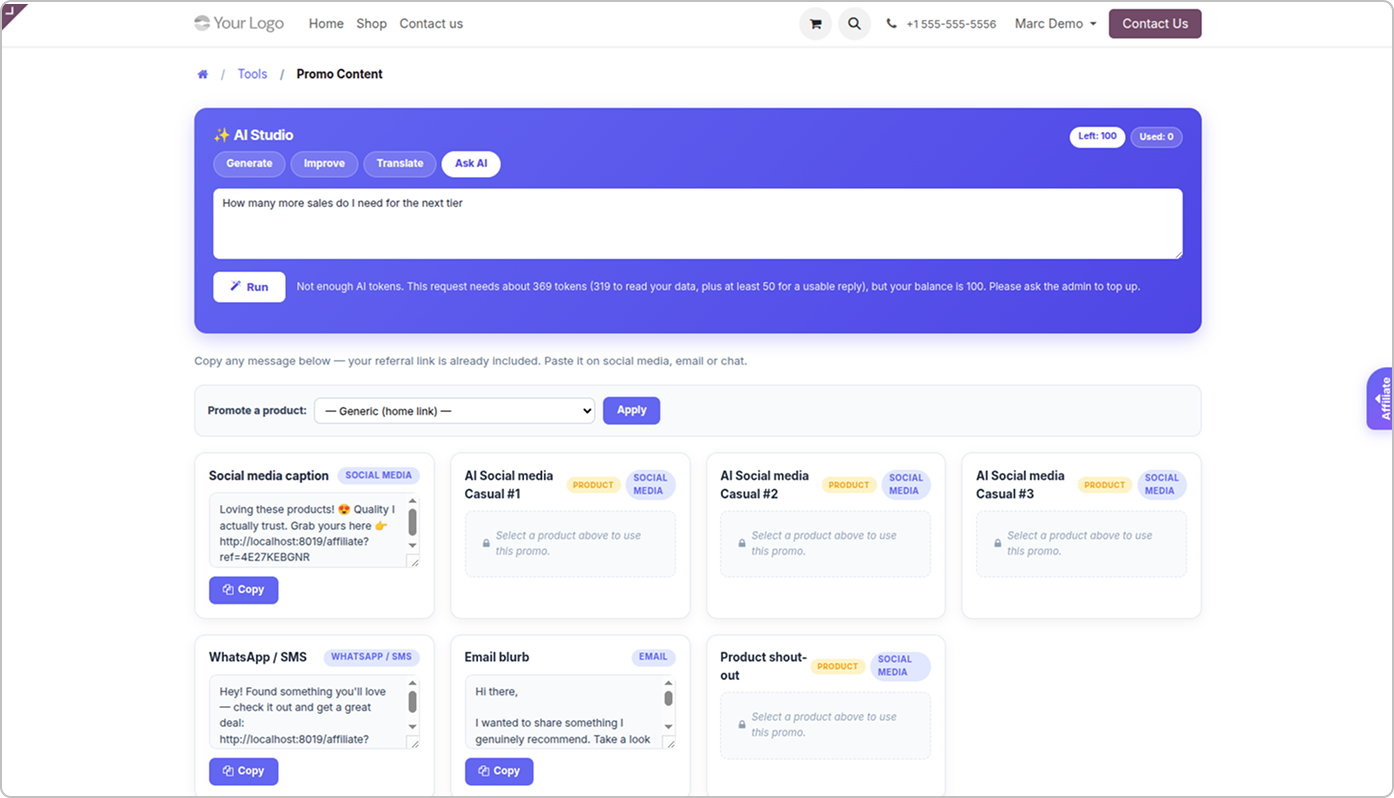
Problem : No AI Studio, no AI Coach and no AI caption button.
Why it happens : AI is off in Settings, or this affiliate has no AI access.
How to fix it : Admin: tick Enable AI Content Generation and AI Content Access on the affiliate.
Problem : AI content generation is currently disabled.
Why it happens : The main switch is off.
How to fix it : Admin: tick Enable AI Content Generation and save.
Problem : You don't have AI content access. Please ask the admin to enable it.
Why it happens : AI Content Access is not ticked for this affiliate.
How to fix it : Admin - open the affiliate, tick AI Content Access, save.
Problem : You're out of AI tokens. Please ask the admin to top up your balance.
Why it happens : The affiliate's token balance is 0.
How to fix it : Admin - type a new number in AI Token Balance, or tick Unlimited AI Usage.
Problem : The AI request failed. Please try again in a moment.
Why it happens : Incorrect API key or model, insufficient AI credits, or a busy AI provider.
How to fix it : Admin - Go to Reports > AI Generations, open the red Error line, and check the Error field (A8). Correct the key or model, or add AI credits.
Problem : Only affiliate program managers can use this AI feature.
Why it happens : Your Odoo user is not an affiliate manager.
How to fix it : Ask an administrator to set your user's Affiliate access to Manager.
Click on image to Zoom out.