Simplify Access Management
"All In One Access Management app for setting the correct access rights (Hide/Unhide/Read-only)
on fields, models, menus, domains, buttons/tabs, views, actions, reports, chatter for any module,
any user, any company from one place!"
Hide Menu/Sub-menu
Now you can manage access rights for Menus/Submenus of any app. You can hide any menus/submenu and hide the main apps menus from any users.
Model Access
Now you can manage the access rights of any models like REPORTS, ACTIONS, VIEWS, CREATE, DELETE, UPDATE, ARCHIVE/UNARCHIVE, DUPLICATE, and EXPORT for the specified model.
Fields Access
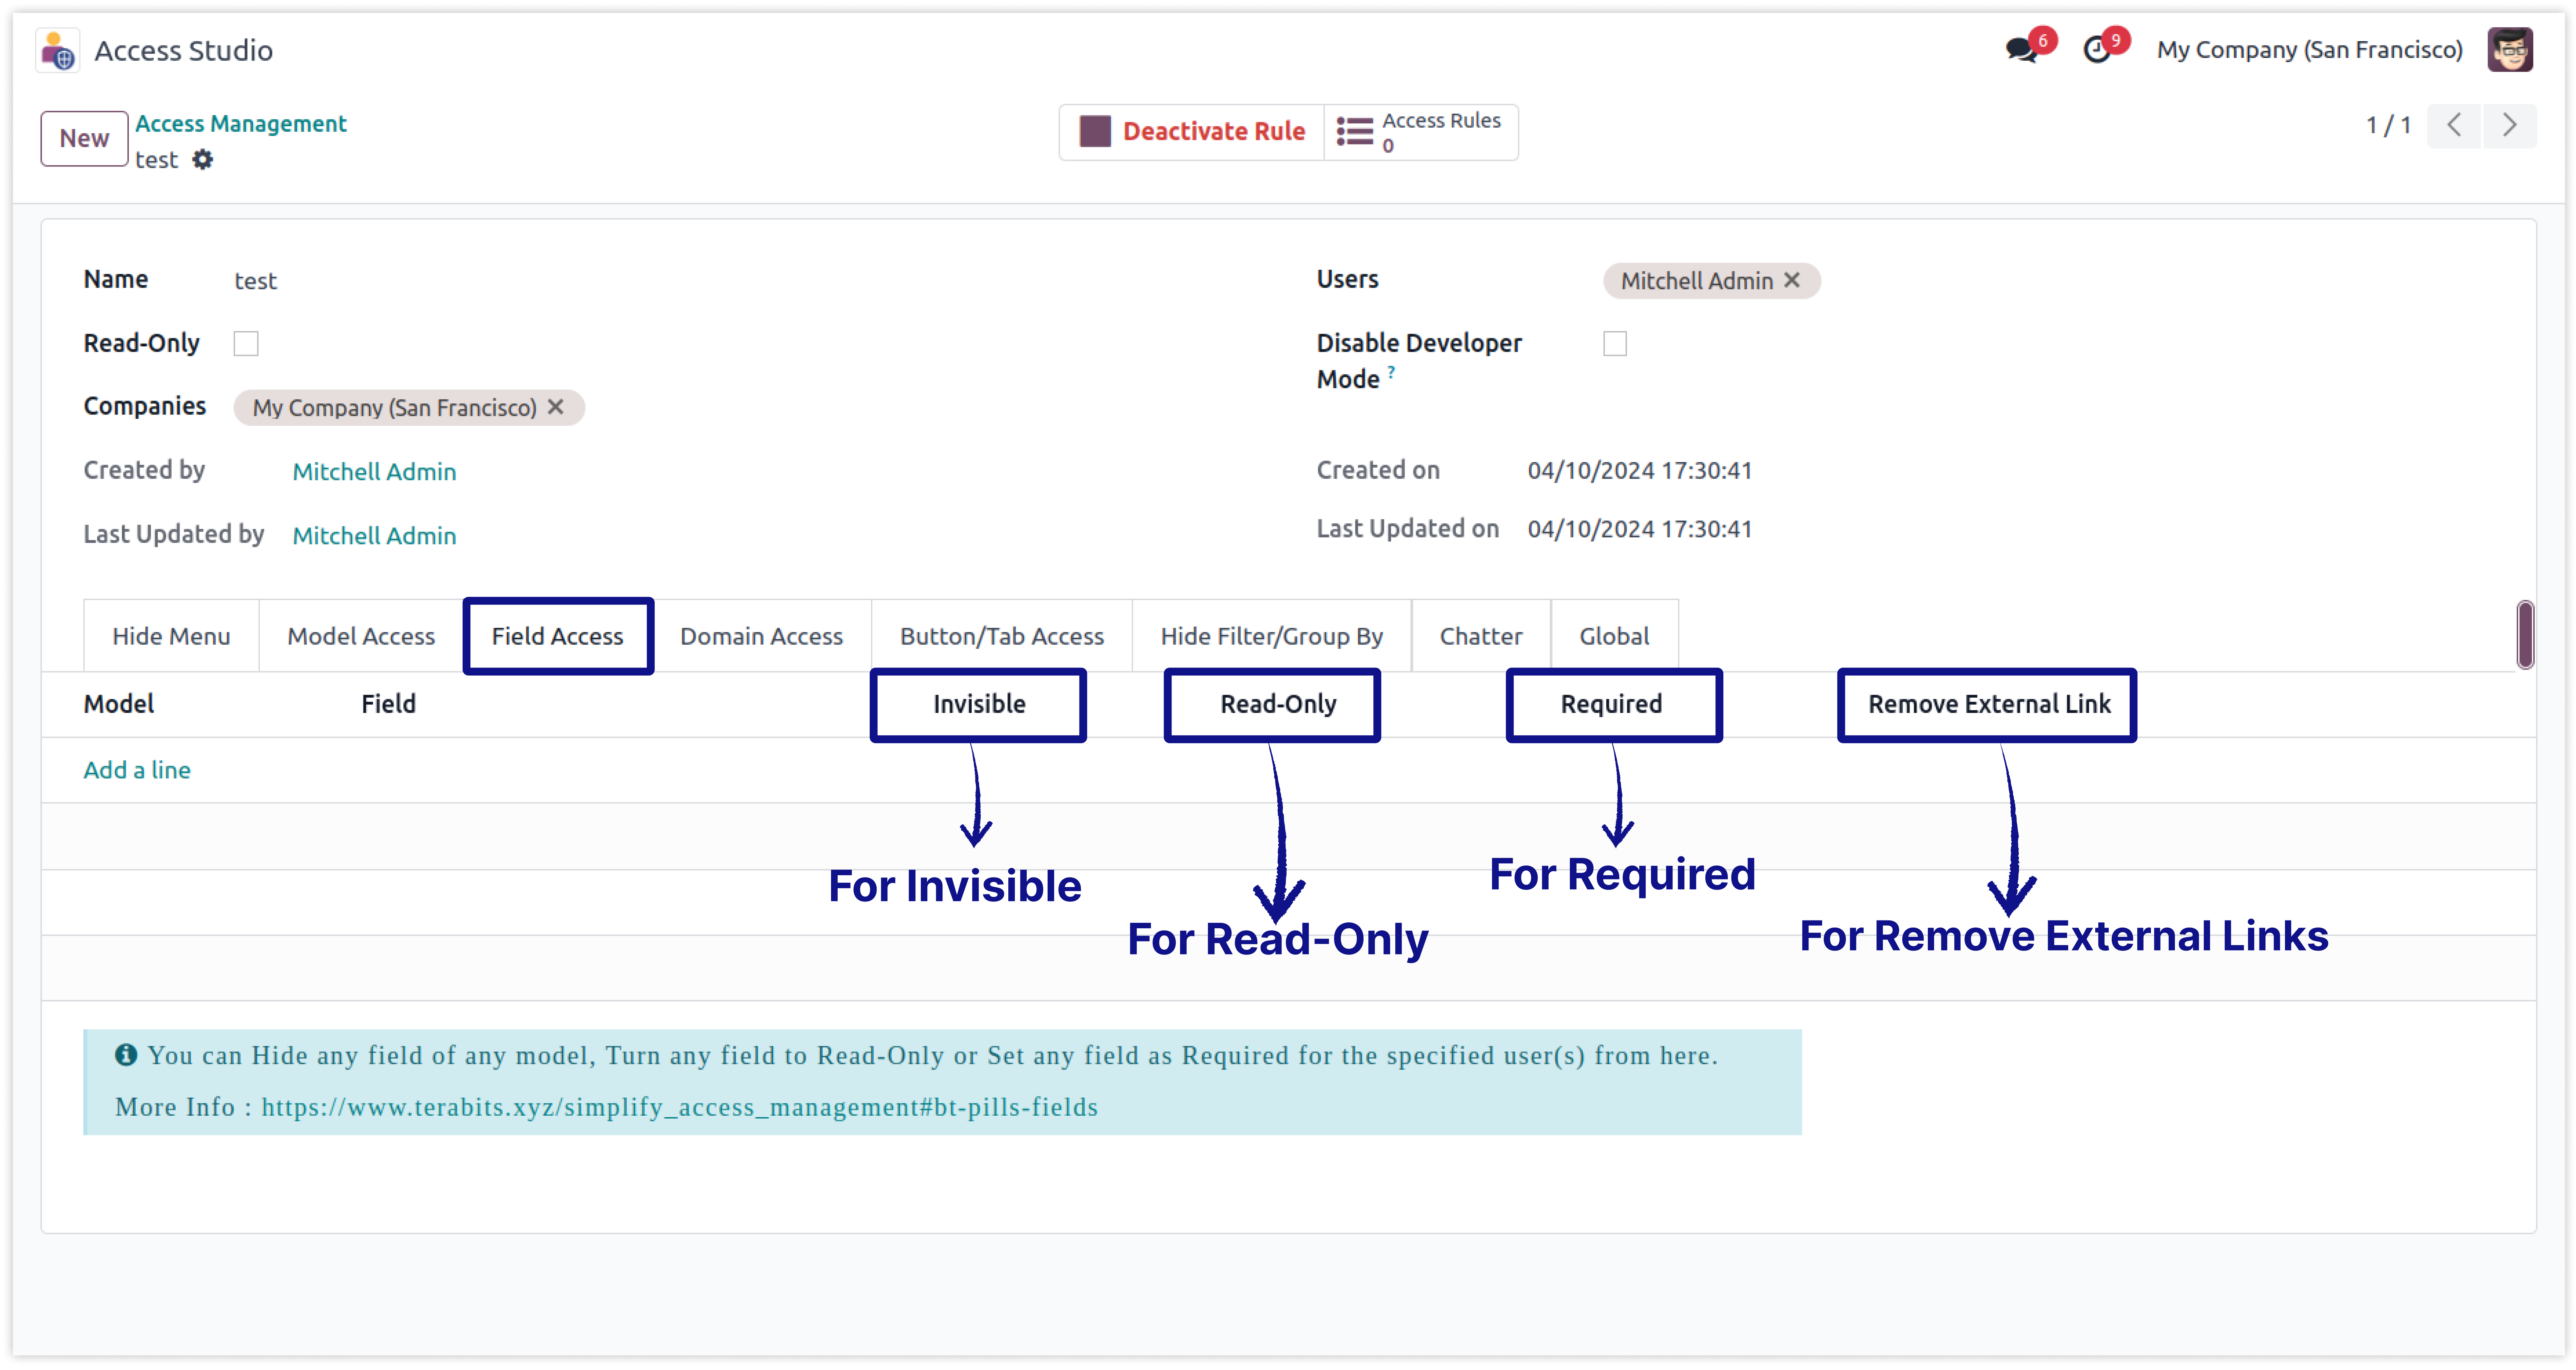
Now you can manage access rights of any model's field. You can make any fields INVISIBLE, REQUIRED, READONLY, and hide External Links from any relational fields.
Domain Access
You can set CREATE, UPDATE, DELETE, and READ access rights of any model for the selected users only. And also you can customize domain to access models record based on any field.
Buttons/Tab Access Rights
You can make invisible any ACTIONS, SMART BUTTONS, and TABS from any model's view.
Readonly User
You can make any user READ-ONLY with just one click, By this action specified user can't modify anything in the system.
Chatter Access Rights
You can hide chatter properties( Send a message, Log Notes, Schedule Activity) of every model for any users by just one click.
Disable Developer Mode
You can disable developer mode for any user by just one click.
Hide Filters And Groups
You can hide Any filters and groups from any model's view.
Also the app allows you to create user-wise access management so that you can add/remove users
to and from any group(s) in batch and with much ease without any coding in very less time. And this
works with all the base and third party apps.
- All access rules allowed for Multi Company and Multi Users.
Introduction
Configuring correct access rights in Odoo is quite technical and lengthy process for someone who has little experience with the system and can get messy if you are not sure what you are doing. This module helps you to avoid all these complexities and saves your precious time by providing you a user-friendly interface from where you can define all the access settings to specific users in one place.
- No technical knowledge needs.
- Work in both Odoo Community and Enterprise addons.
Configuring correct access rights in Odoo is quite technical and lengthy process for someone who has little experience with the system and can get messy if you are not sure what you are doing. This module helps you to avoid all these complexities and saves your precious time by providing you a user-friendly interface from where you can define all the access settings to specific users in one place.
- Also the app allows you to create user-wise access management so that you can add/remove users to and from any group(s) in batch and with much ease without any coding in very less time. And this works with all the base and third party apps.
Here is the detailed explanation about all features of this module.
 Hide Filters And Groups
Module setup and fields explanation.
After installing this module, You need to enable a user group named 'Access management' for users, who you want to allow running this app.
Click on image to Zoom out.
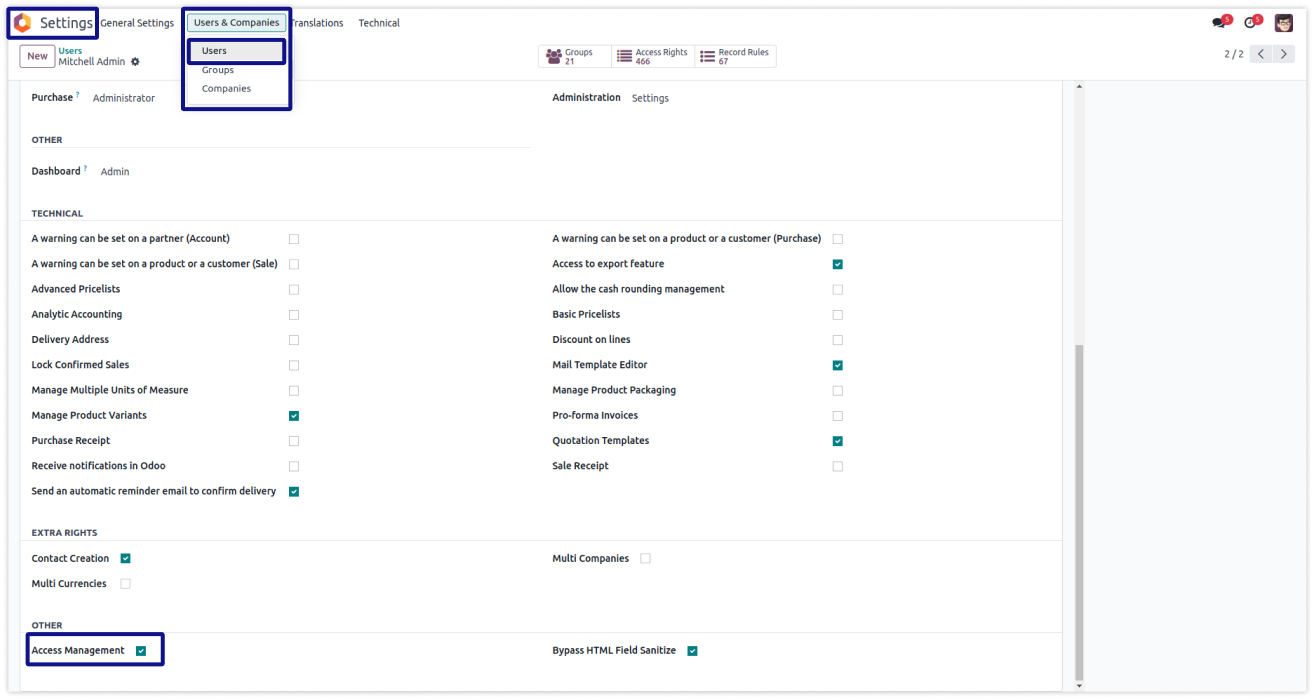
Now you have the access of access studio. you can see the app access studio in your odoo apps window.
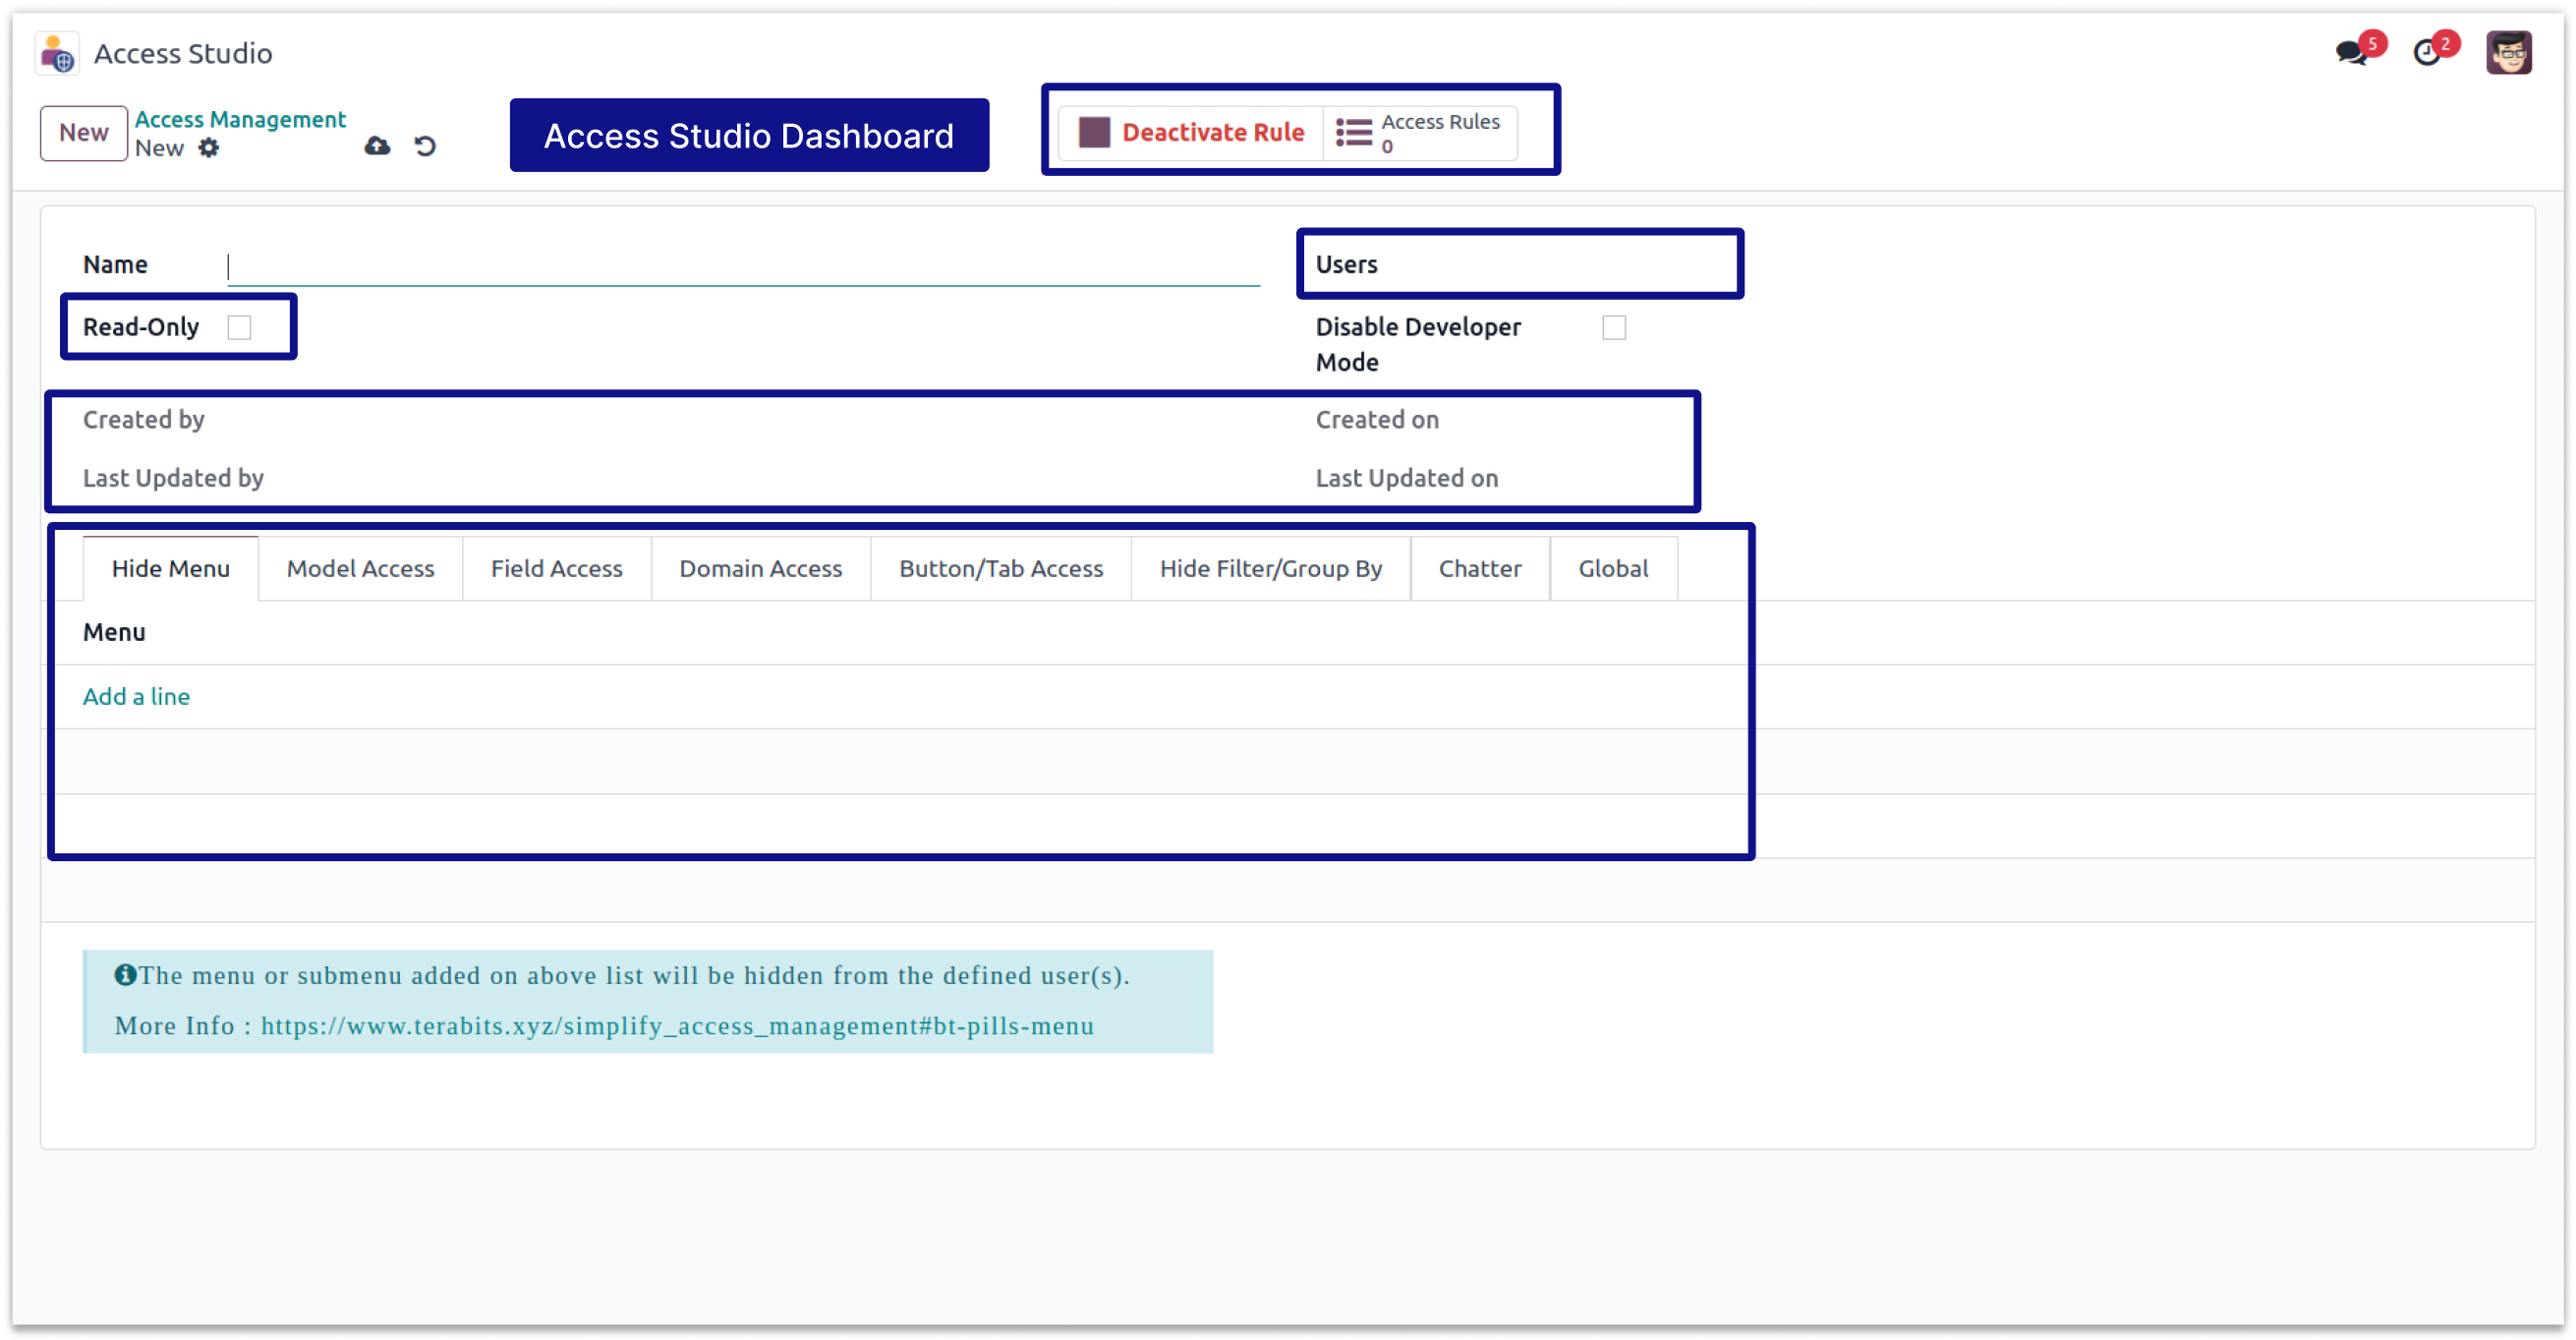
Select the users to which you want to apply the access rules.
This checkbox is for set ready-only access to any users. To make users ready-only in the environment, you have to change access from settings. But here only one click will make any user read-only in the environment.
This checkbox is for hiding chatter for any users. after checking this field, selected users will not be able to watch the chatter window in every model's views.
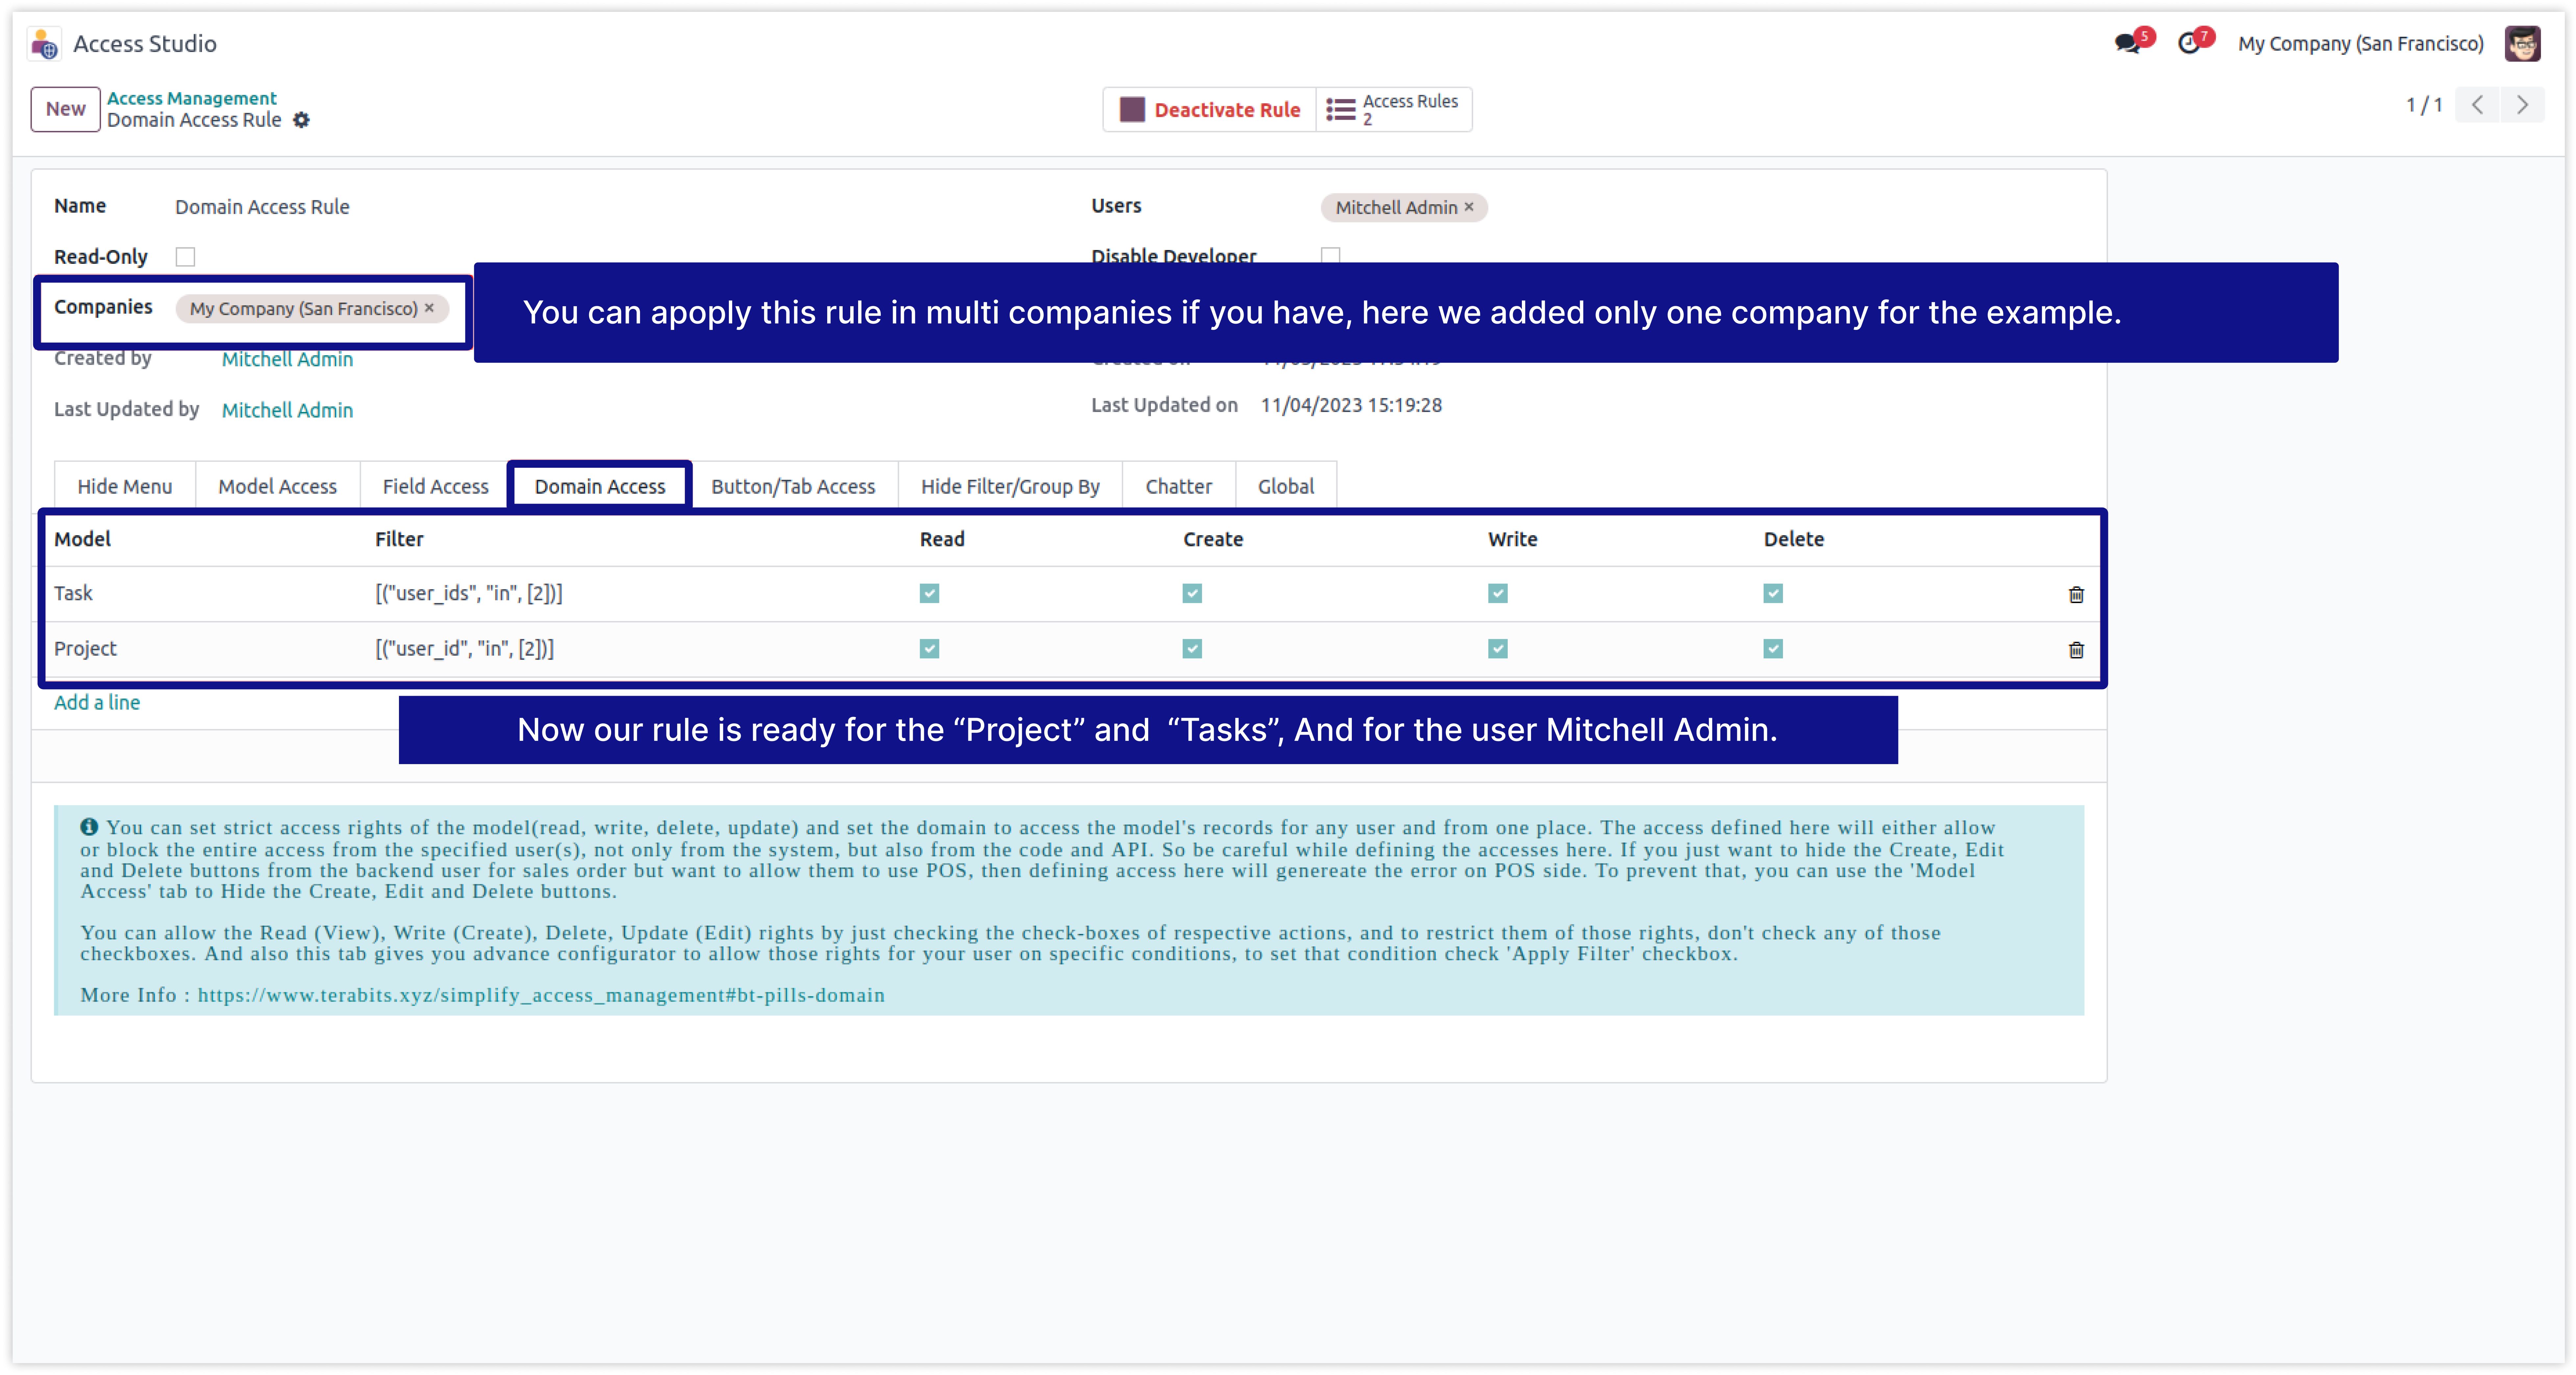
This rule is also applicable in multi companies, So here you can set companies in which you have to apply this rule.
This fields show the detail of create date of this rule, Created on which date?, Last updated by and Last updated datetime.
This is the all are the access right setup tabs which is explained deeply in next pages.
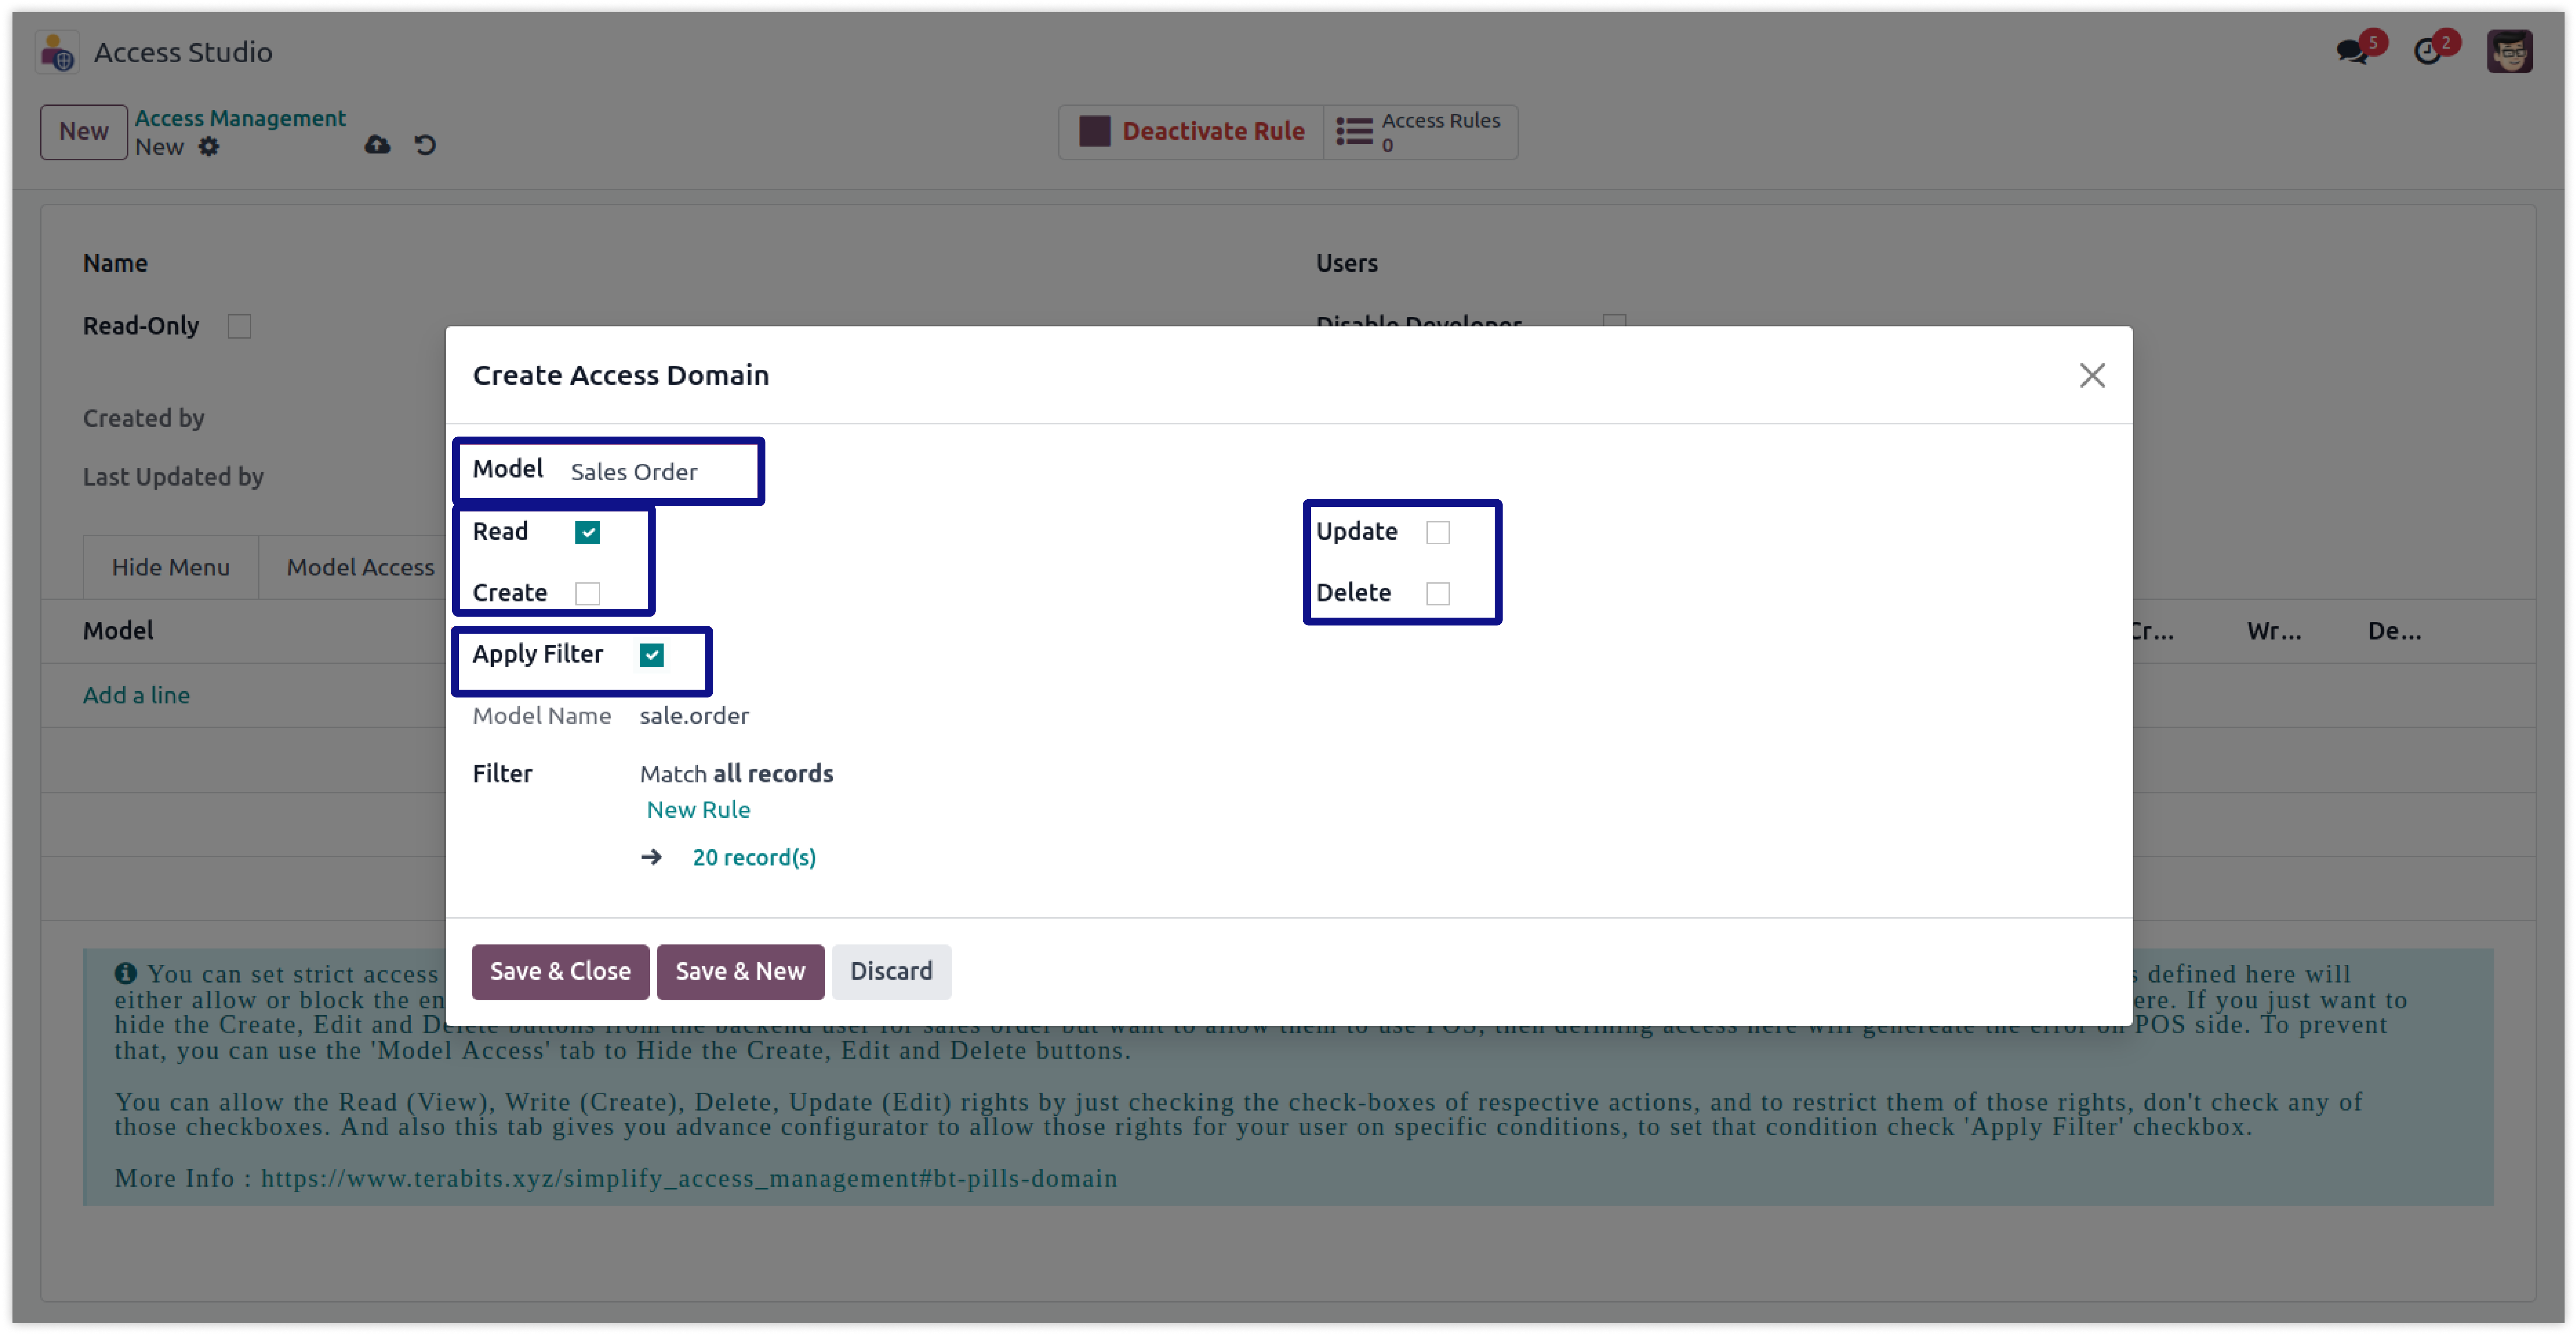
This Form is for set access of any model by domain, and ristrict access of read, write, delete, update. Detailed explanation available in domain access page.
Now modifying the access right of fields (Invisible, Read-only, Required) for any model, and for any user it is quite simple.
Define user wise fields access right in odoo is not posssible. You can set fields access using a web studio. But here is some limitations -
You must have technical knowledge.
You have to need Odoo enterprise addons.
You will not be able to set access user-wise, if you set it from the studio, it will apply to all the users.
Here is the solution
Simplified Access Management provides the feature which allows you to create user wise fields access rights from one place and solutions of all above problems.
No need to have technical knowledge, Only you have to understand our module features, and you will be rock.
Work in both Enterprise and Community versions(12,13,14,15).
Set access right user-wise with multi companies. Need to select users and activate your customized rules.
You can customize rules for base modules as well as third-party modules.
How to setup Field's access rights.
Here we have explained some examples step by step.
This example shows that how to make sale order fields invisible, readonly and required.
-
First create the new record in access studio.
-
In this form select the users and companies to which you want to apply this rule.
-
Then click on the Fields Access tab.
-
Below is a view of the creating record.
-
Click on image to Zoom out.
-
Now create the line and select model sale order.
-
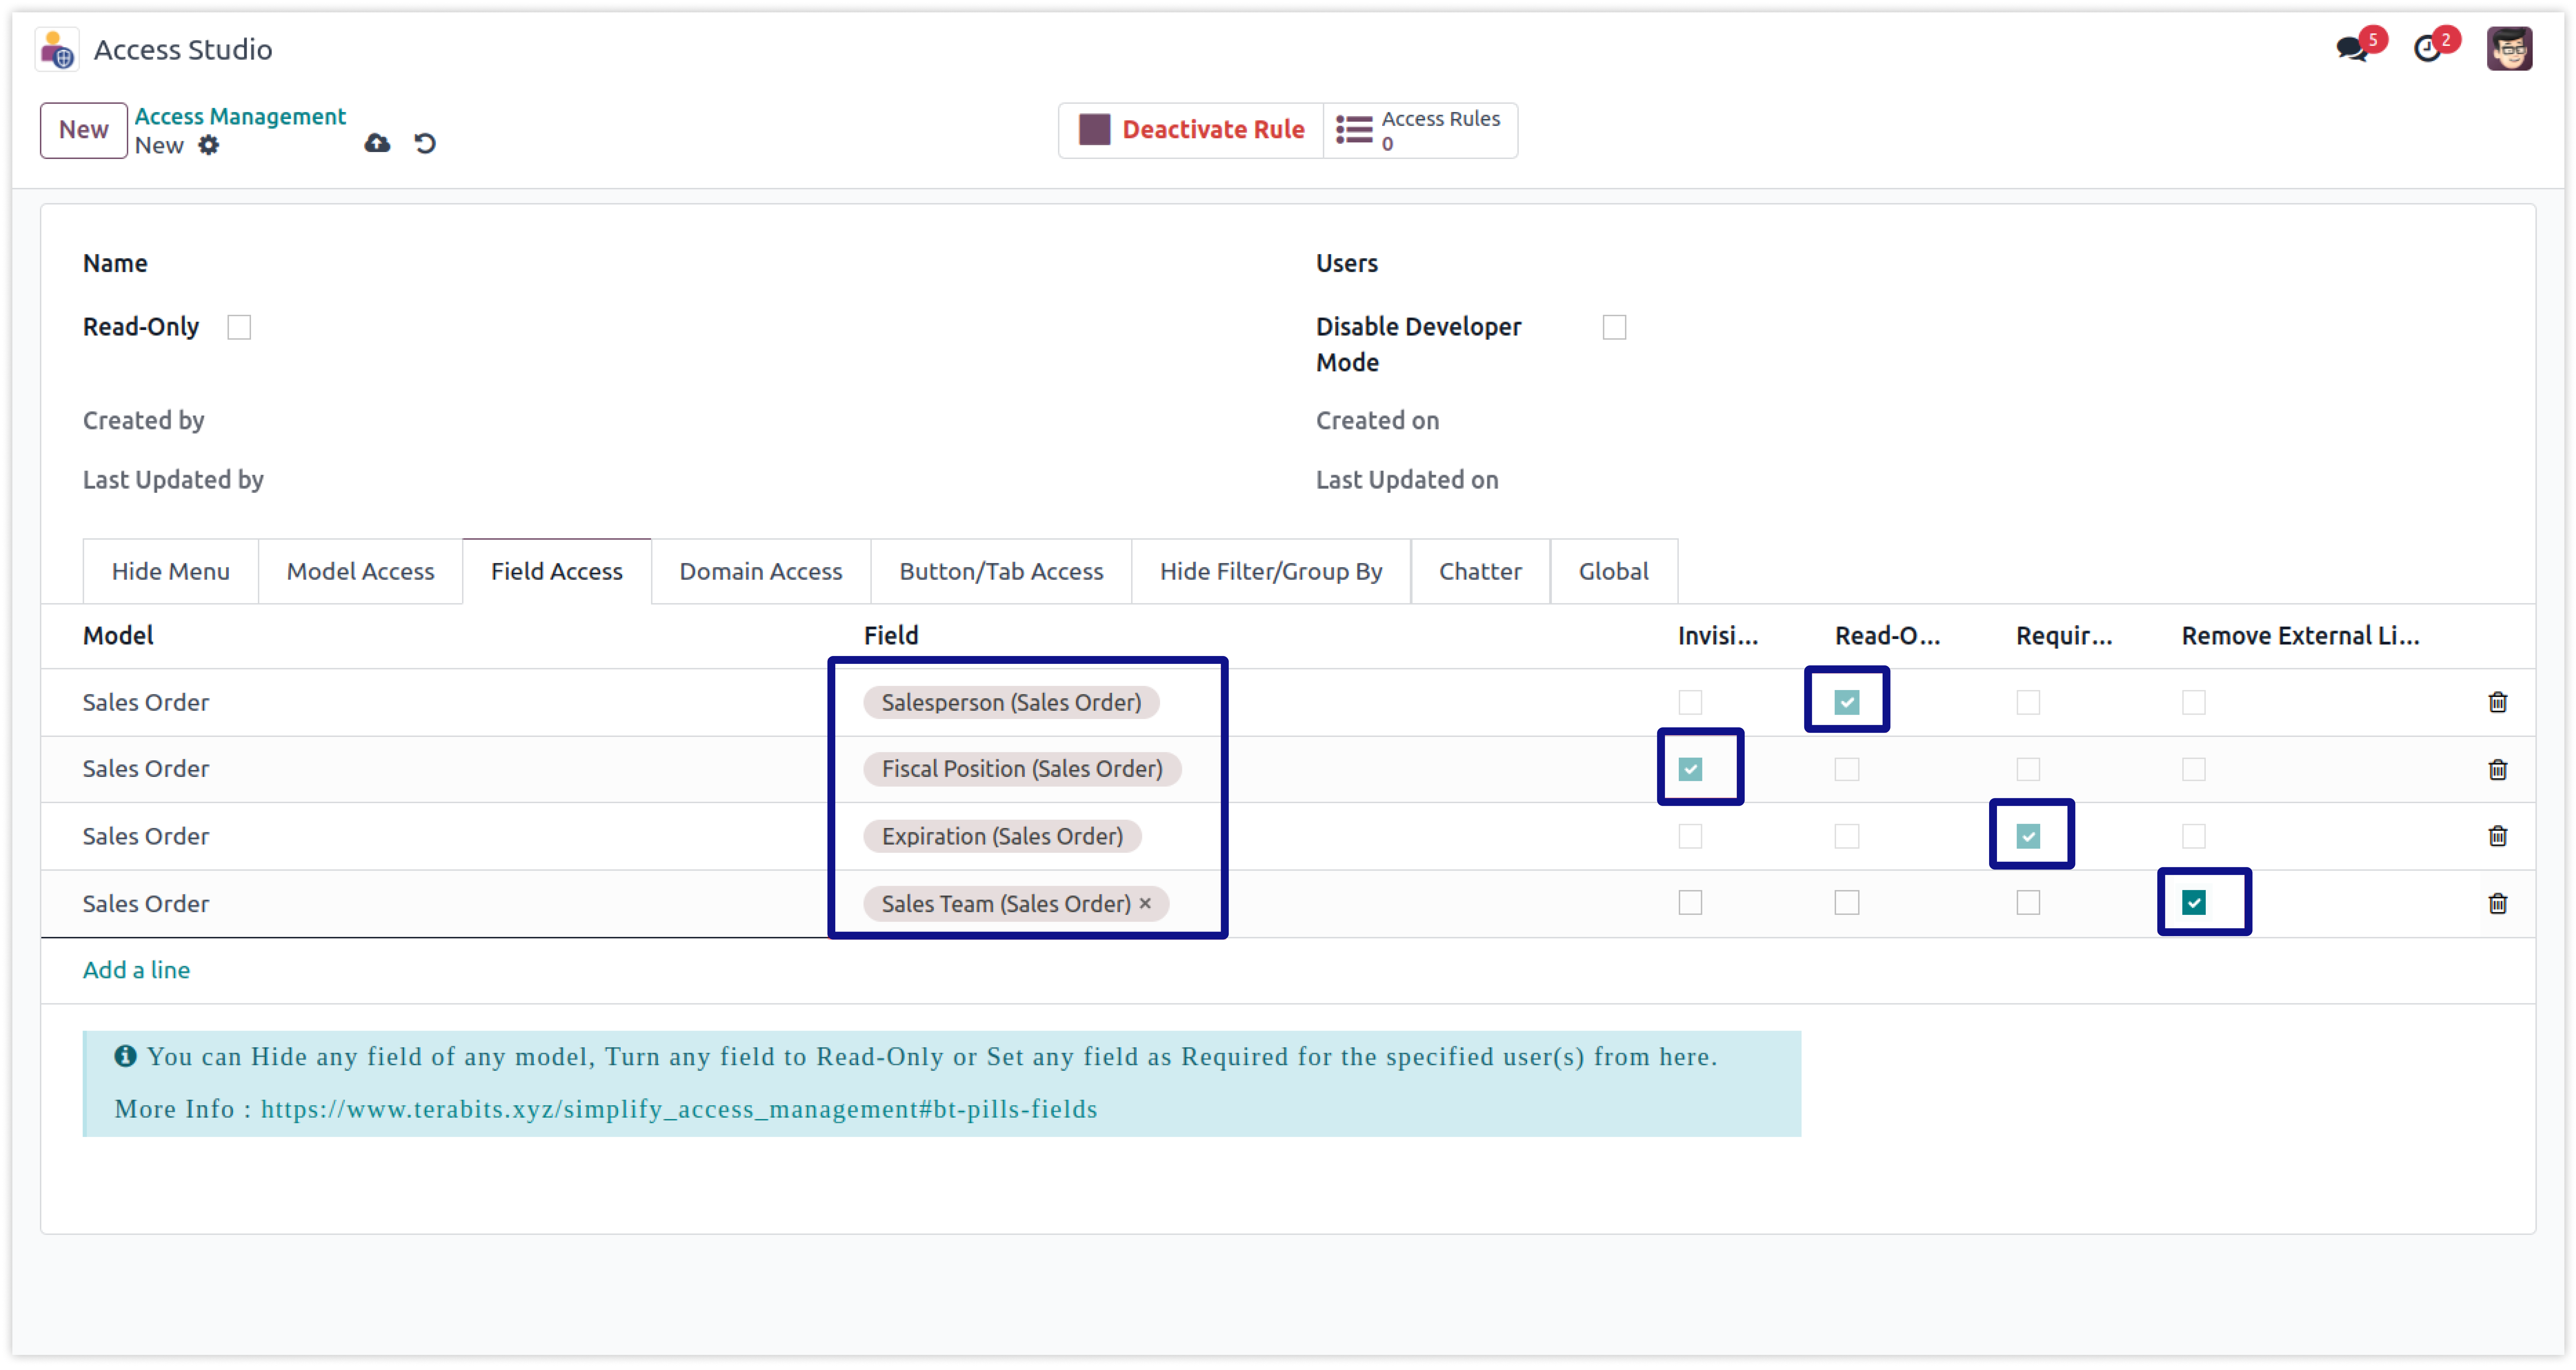
Here we have added separate lines to apply different access on different fields.
-
Here is the view after create the lines for access right for different fields.
-
Click on image to Zoom out.
-
Here is the view before applying access rights for the sale order.
-
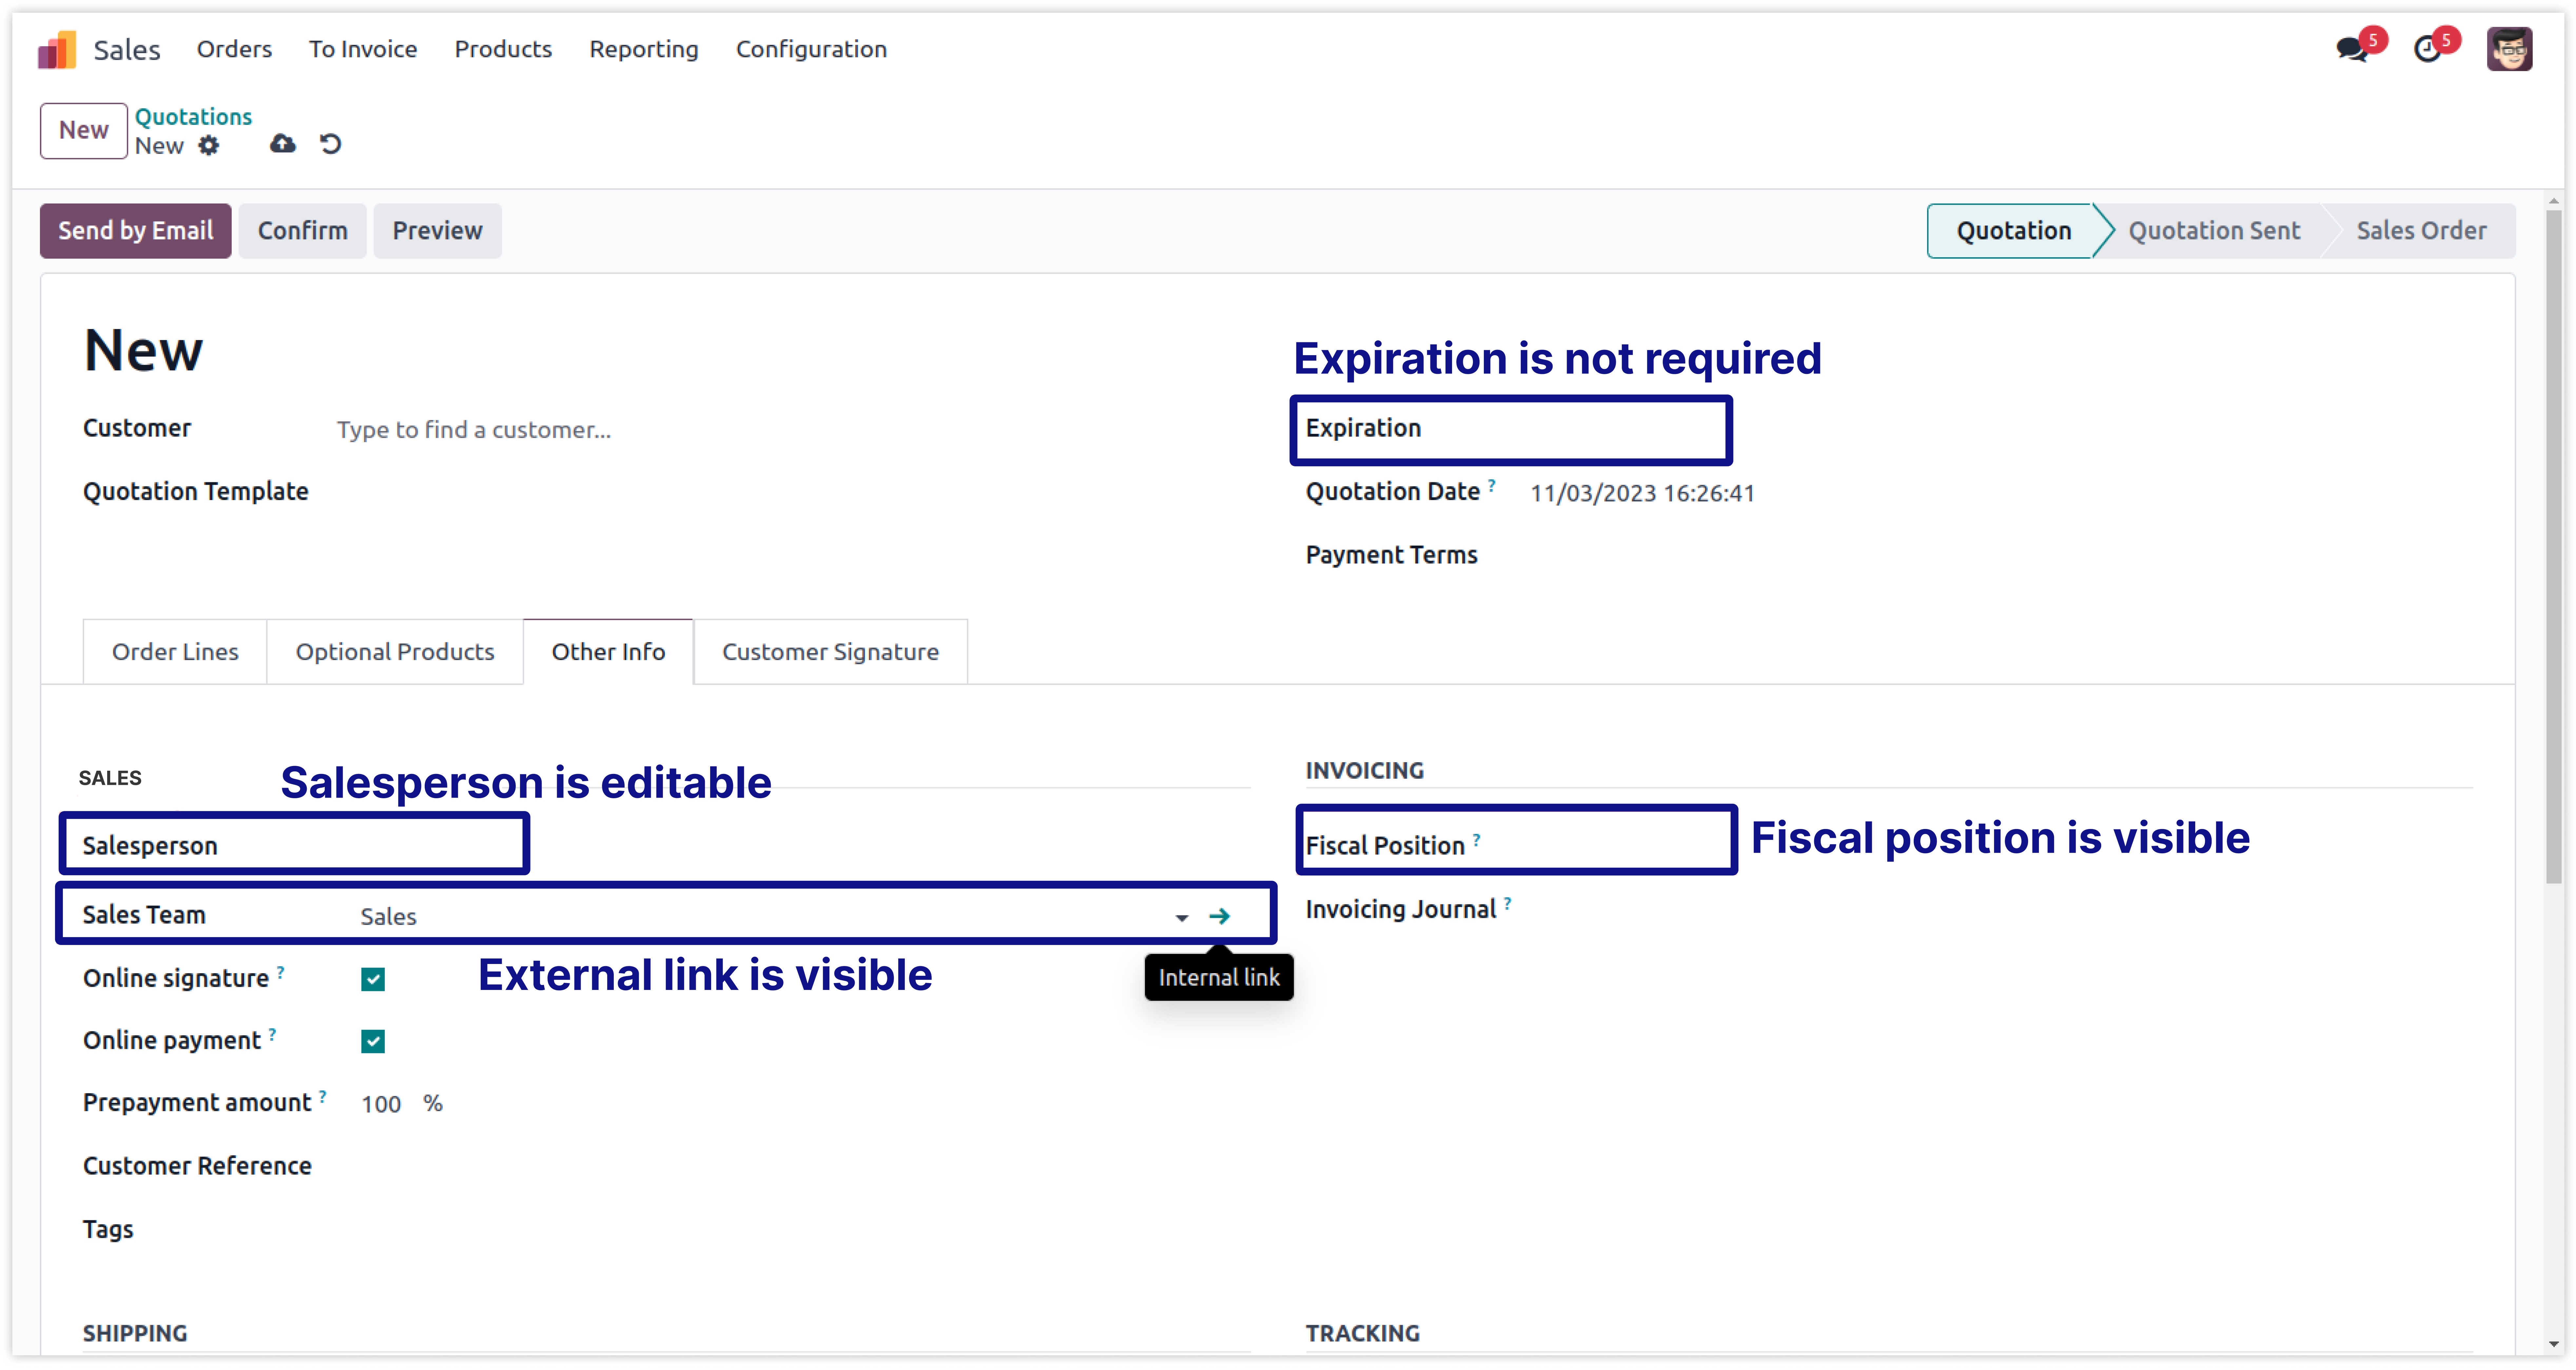
Before applying rule, the salesperson is editable, fiscal position is visible, and expiration date is not required.
-
Click on image to Zoom out.
-
Here is the view After applying access rights for the sale order.
-
Now, the salesperson is read only, fiscal position is invisible, and expiration date is required.
-
Click on image to Zoom out.

Now set user-wise model's access right( Report, Actions, Views, Export) for any user from one place and.
To set the user-wise model's access right (for reports, actions, views, create, delete, edit, archive/unarchive, duplicate, restrict export, etc.) in your ERP is very difficult and time-consuming in Odoo. Here is some limitations -
You must have technical knowledge/technical person.
Not possible to set user wise access for models report, actions, views etc.
You have to create separate rules for all things Reports, actions, views, restrict export.
Here is the solution
Simplified Access Management provides the feature which allows you to create user-wise model's(report, actions, views, export) access rights from one place and solutions of all above problems.
No need to have technical knowledge/technical person, Only you have to understand our module features.
You can access right user-wise with multi companies. Need to select users and activate your customized rules.
You can set access right for Report, View, Actions, Export in single rule.
You can customize rules for base modules as well as third-party modules.
How to setup Model's access rights.
Here we have explained some examples' step by step. At the last one example explained by video.
-
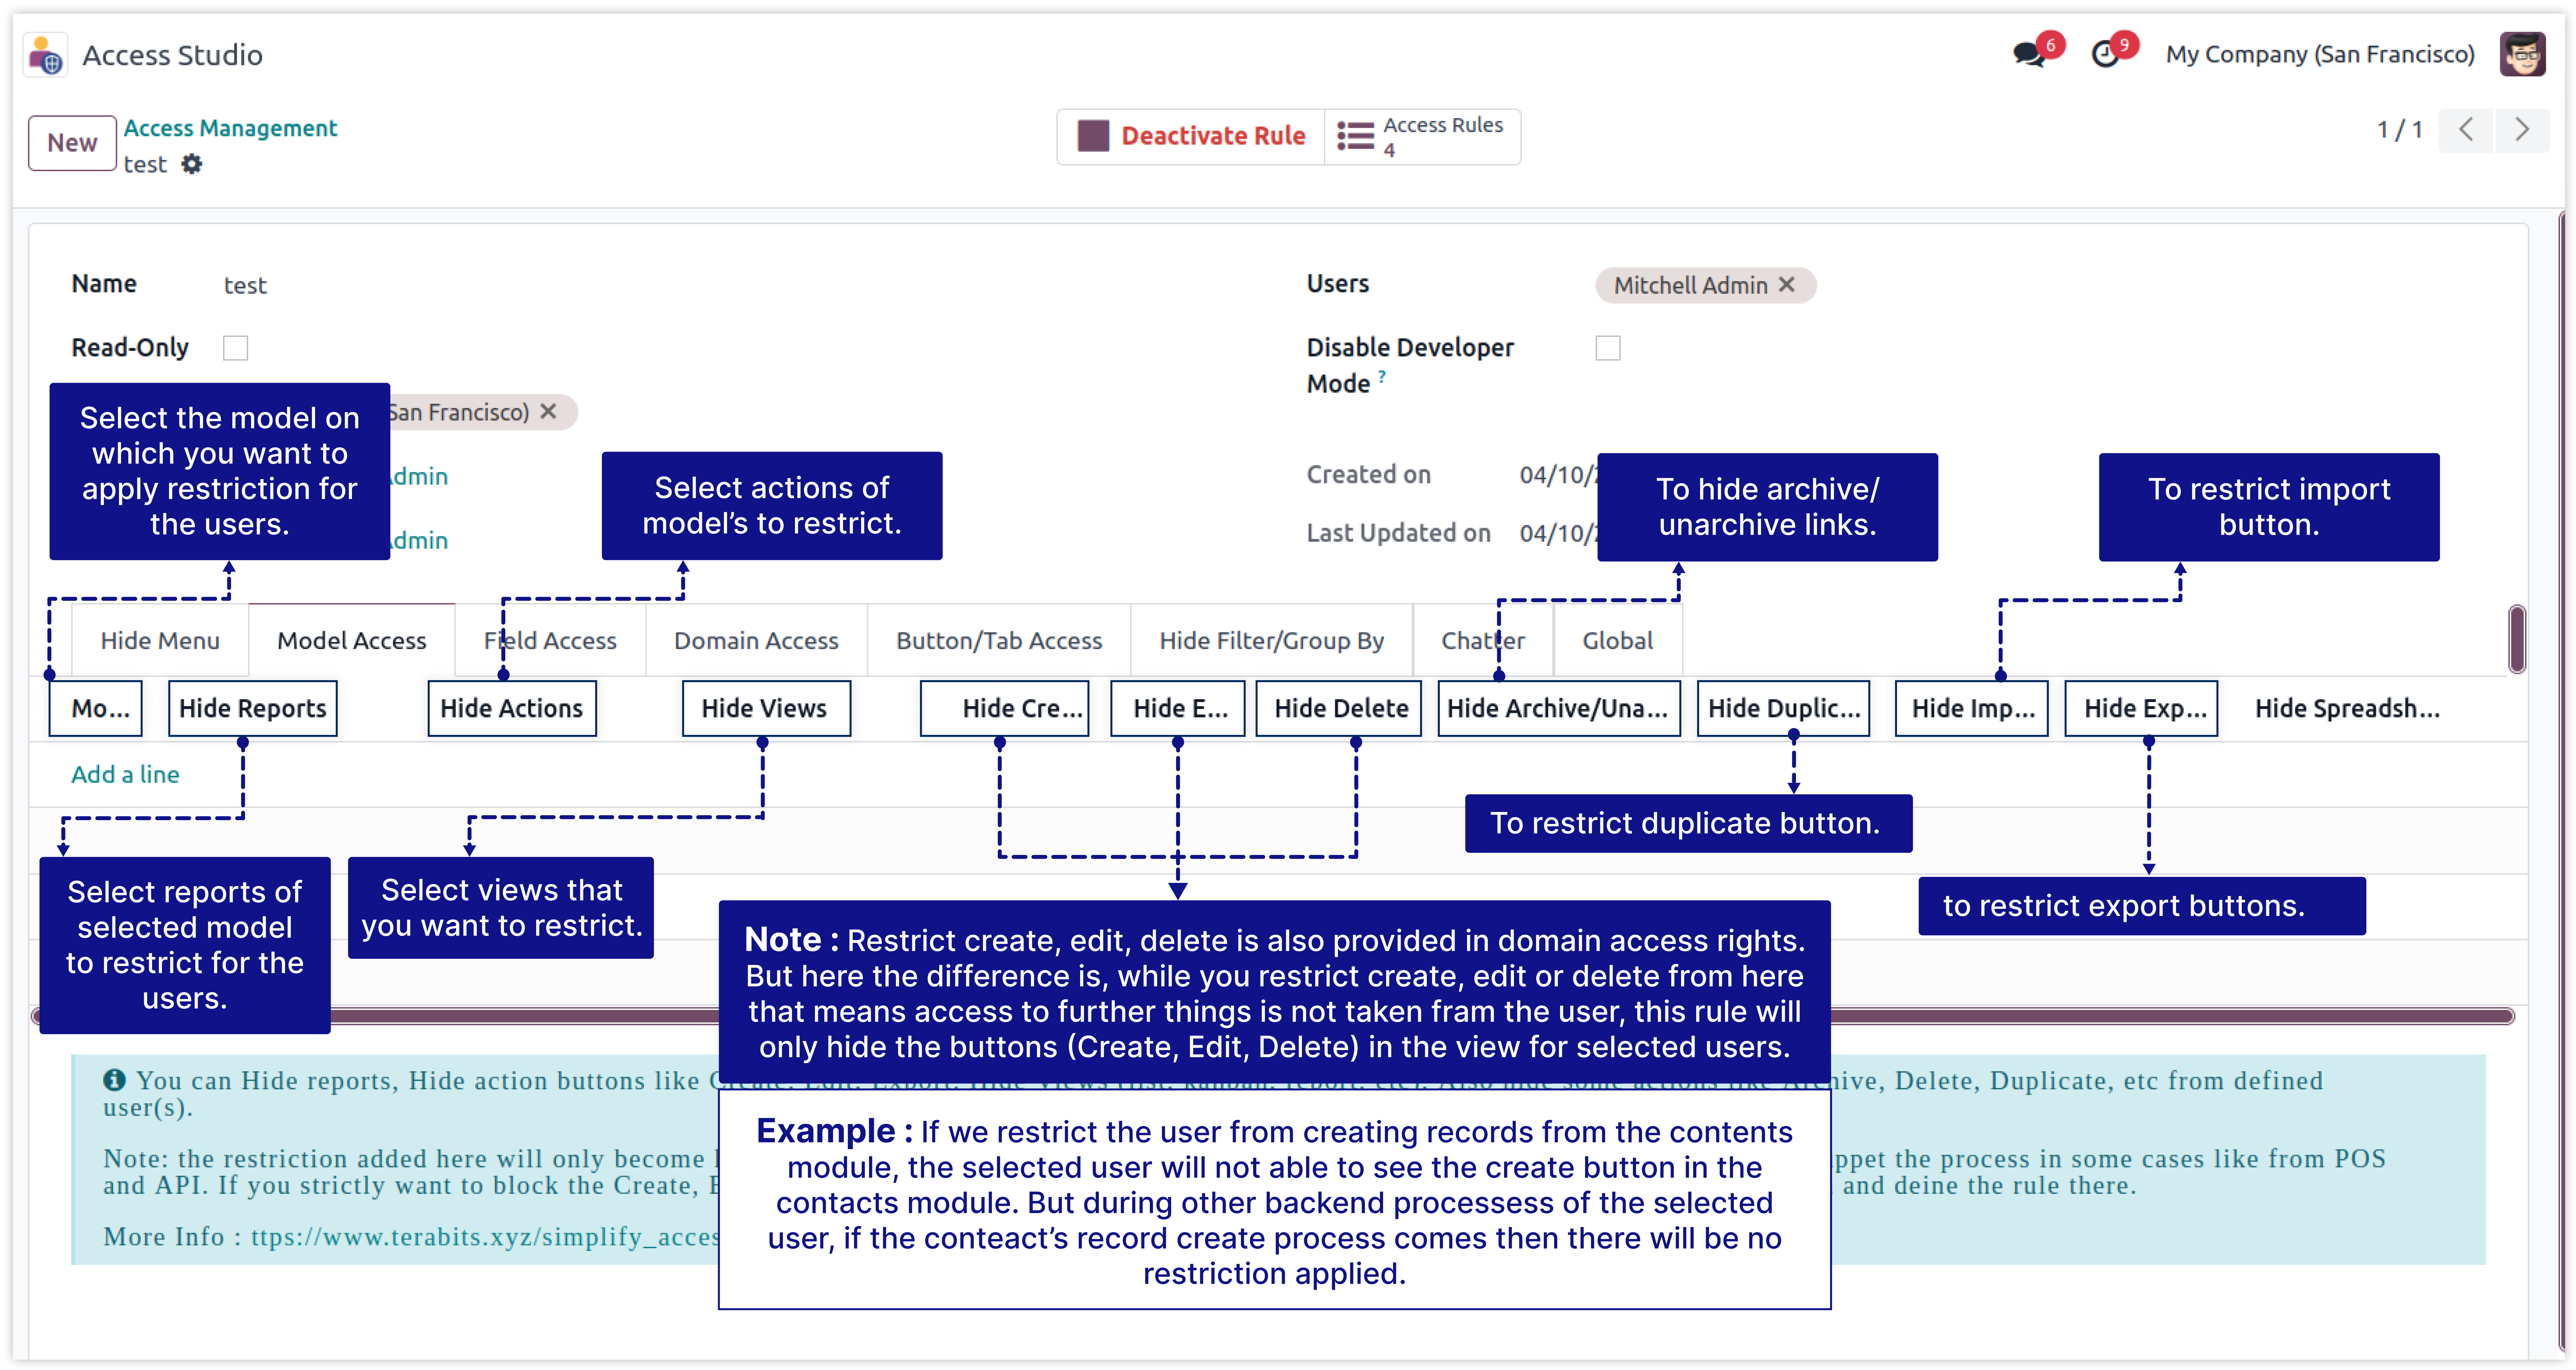
First of all you will need to know all about Models Access Right to make right rules for the users.
-
So, here we have explained all model access right features in below image. .
-
Click on image to Zoom out.
In this example we will restrict sale order create, delete, edit, actions, reports and views for the user mitchell admin.
-
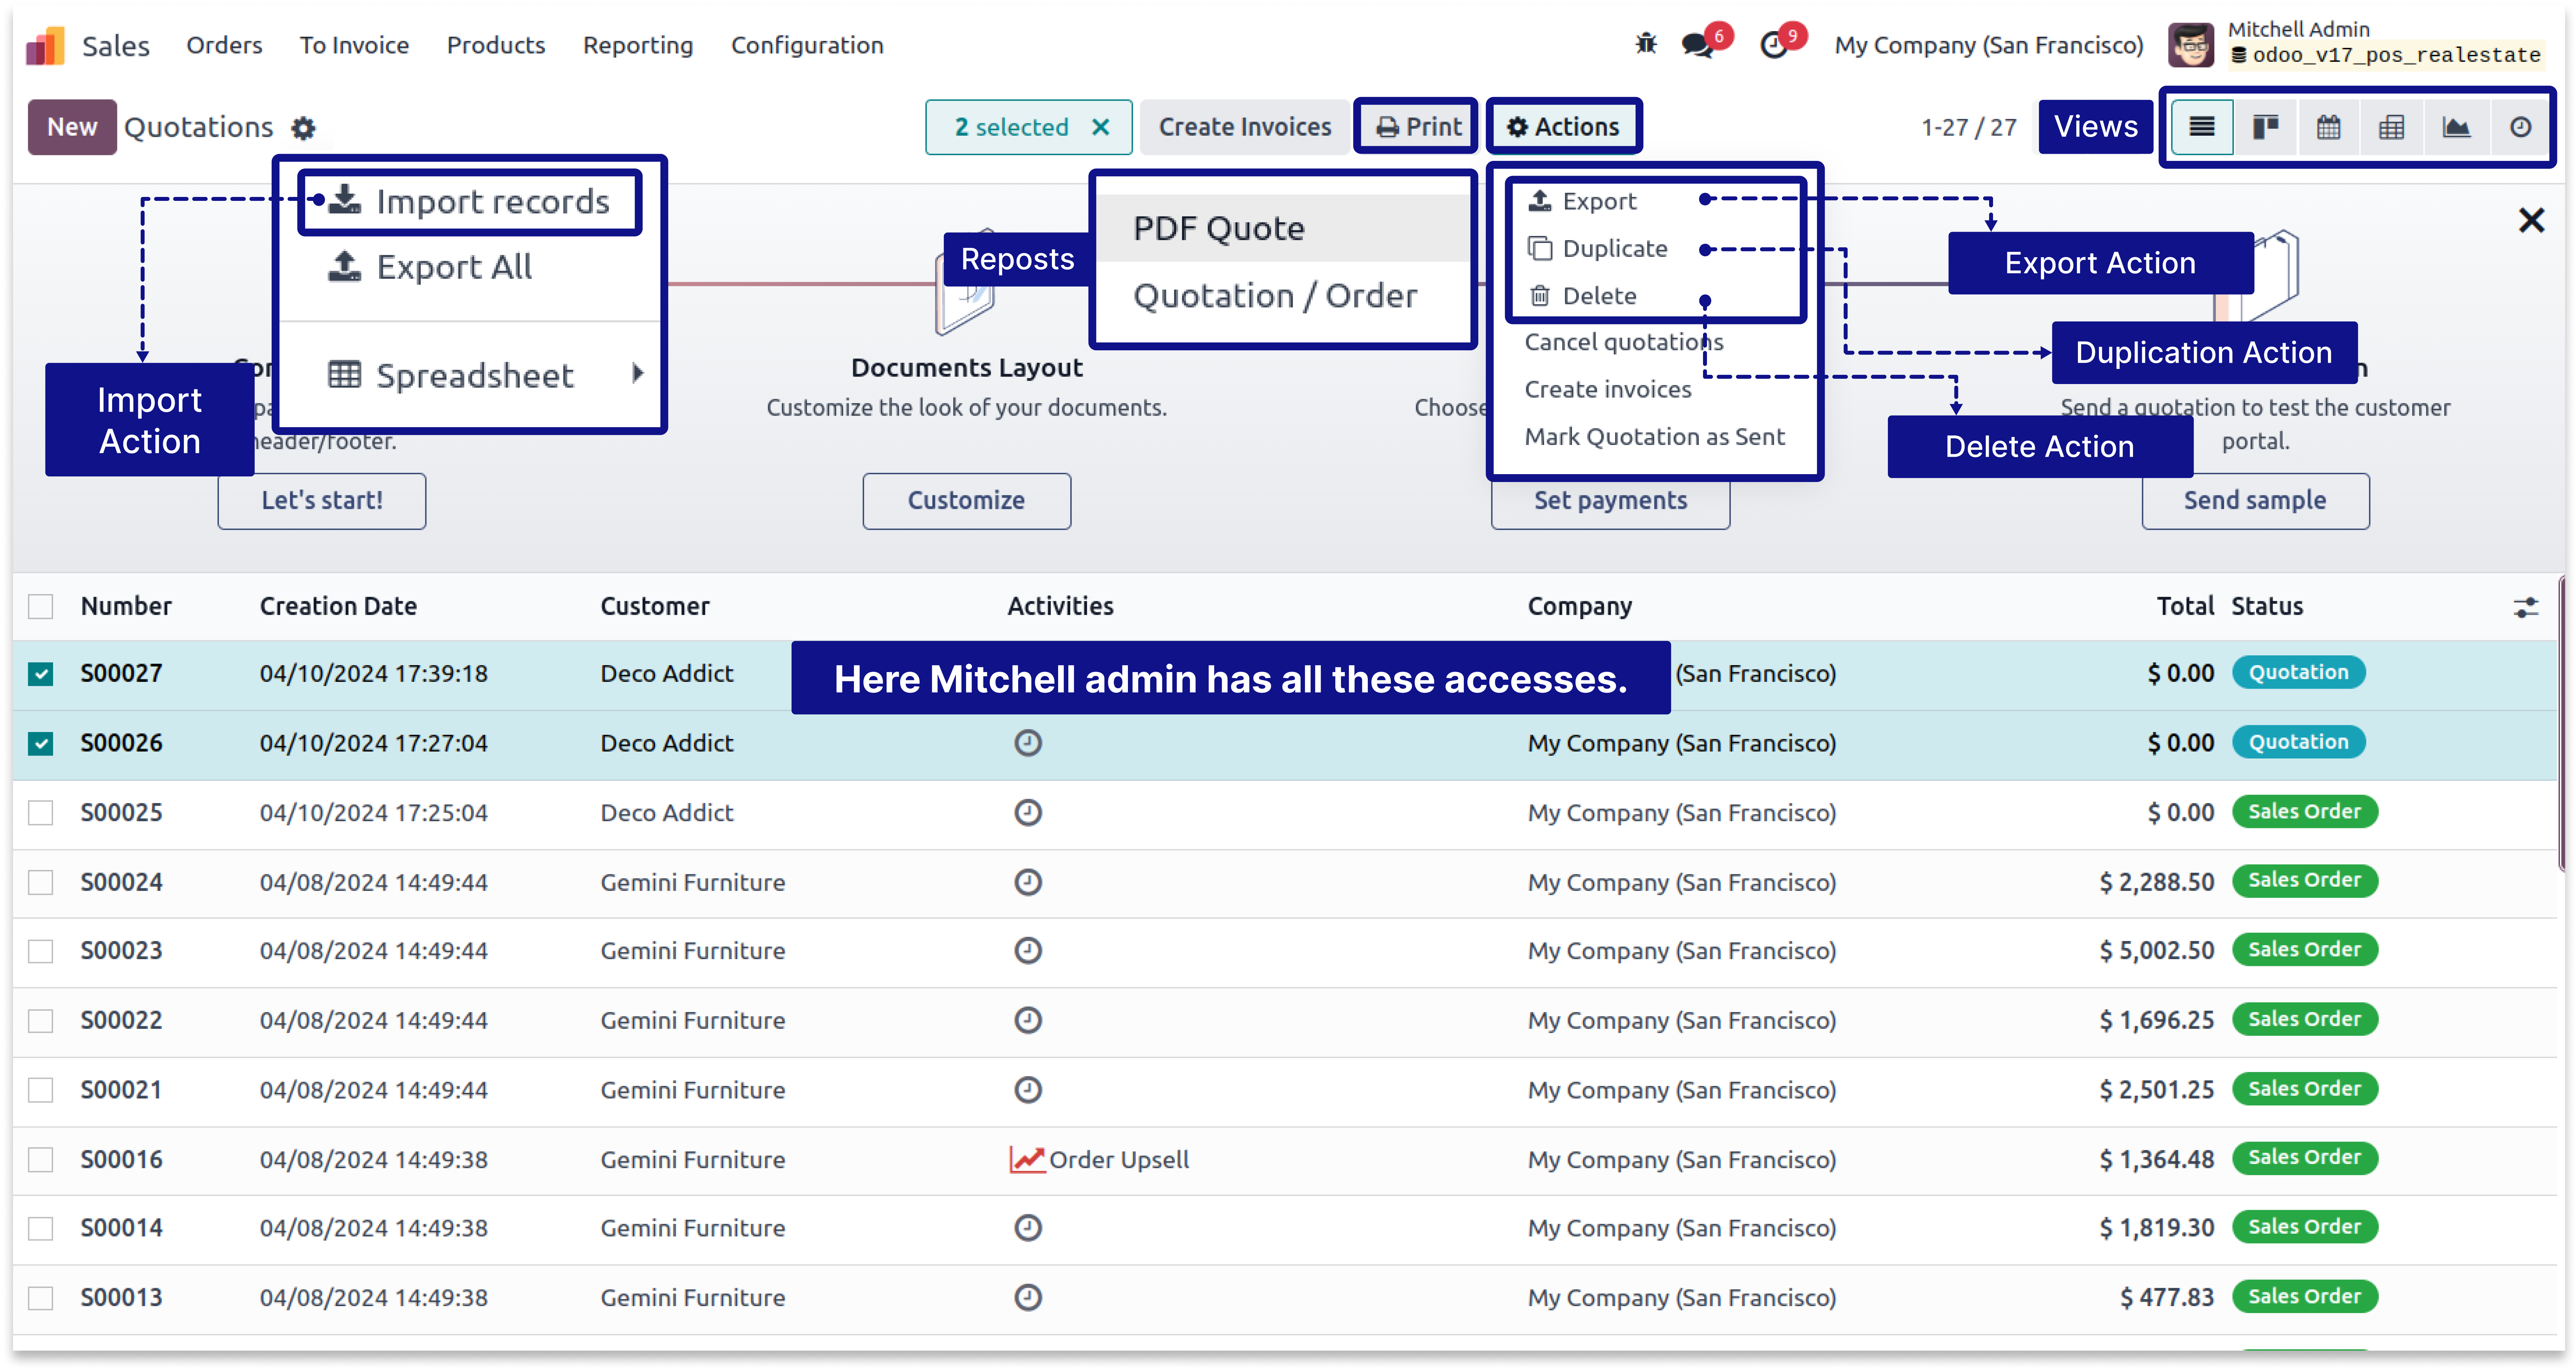
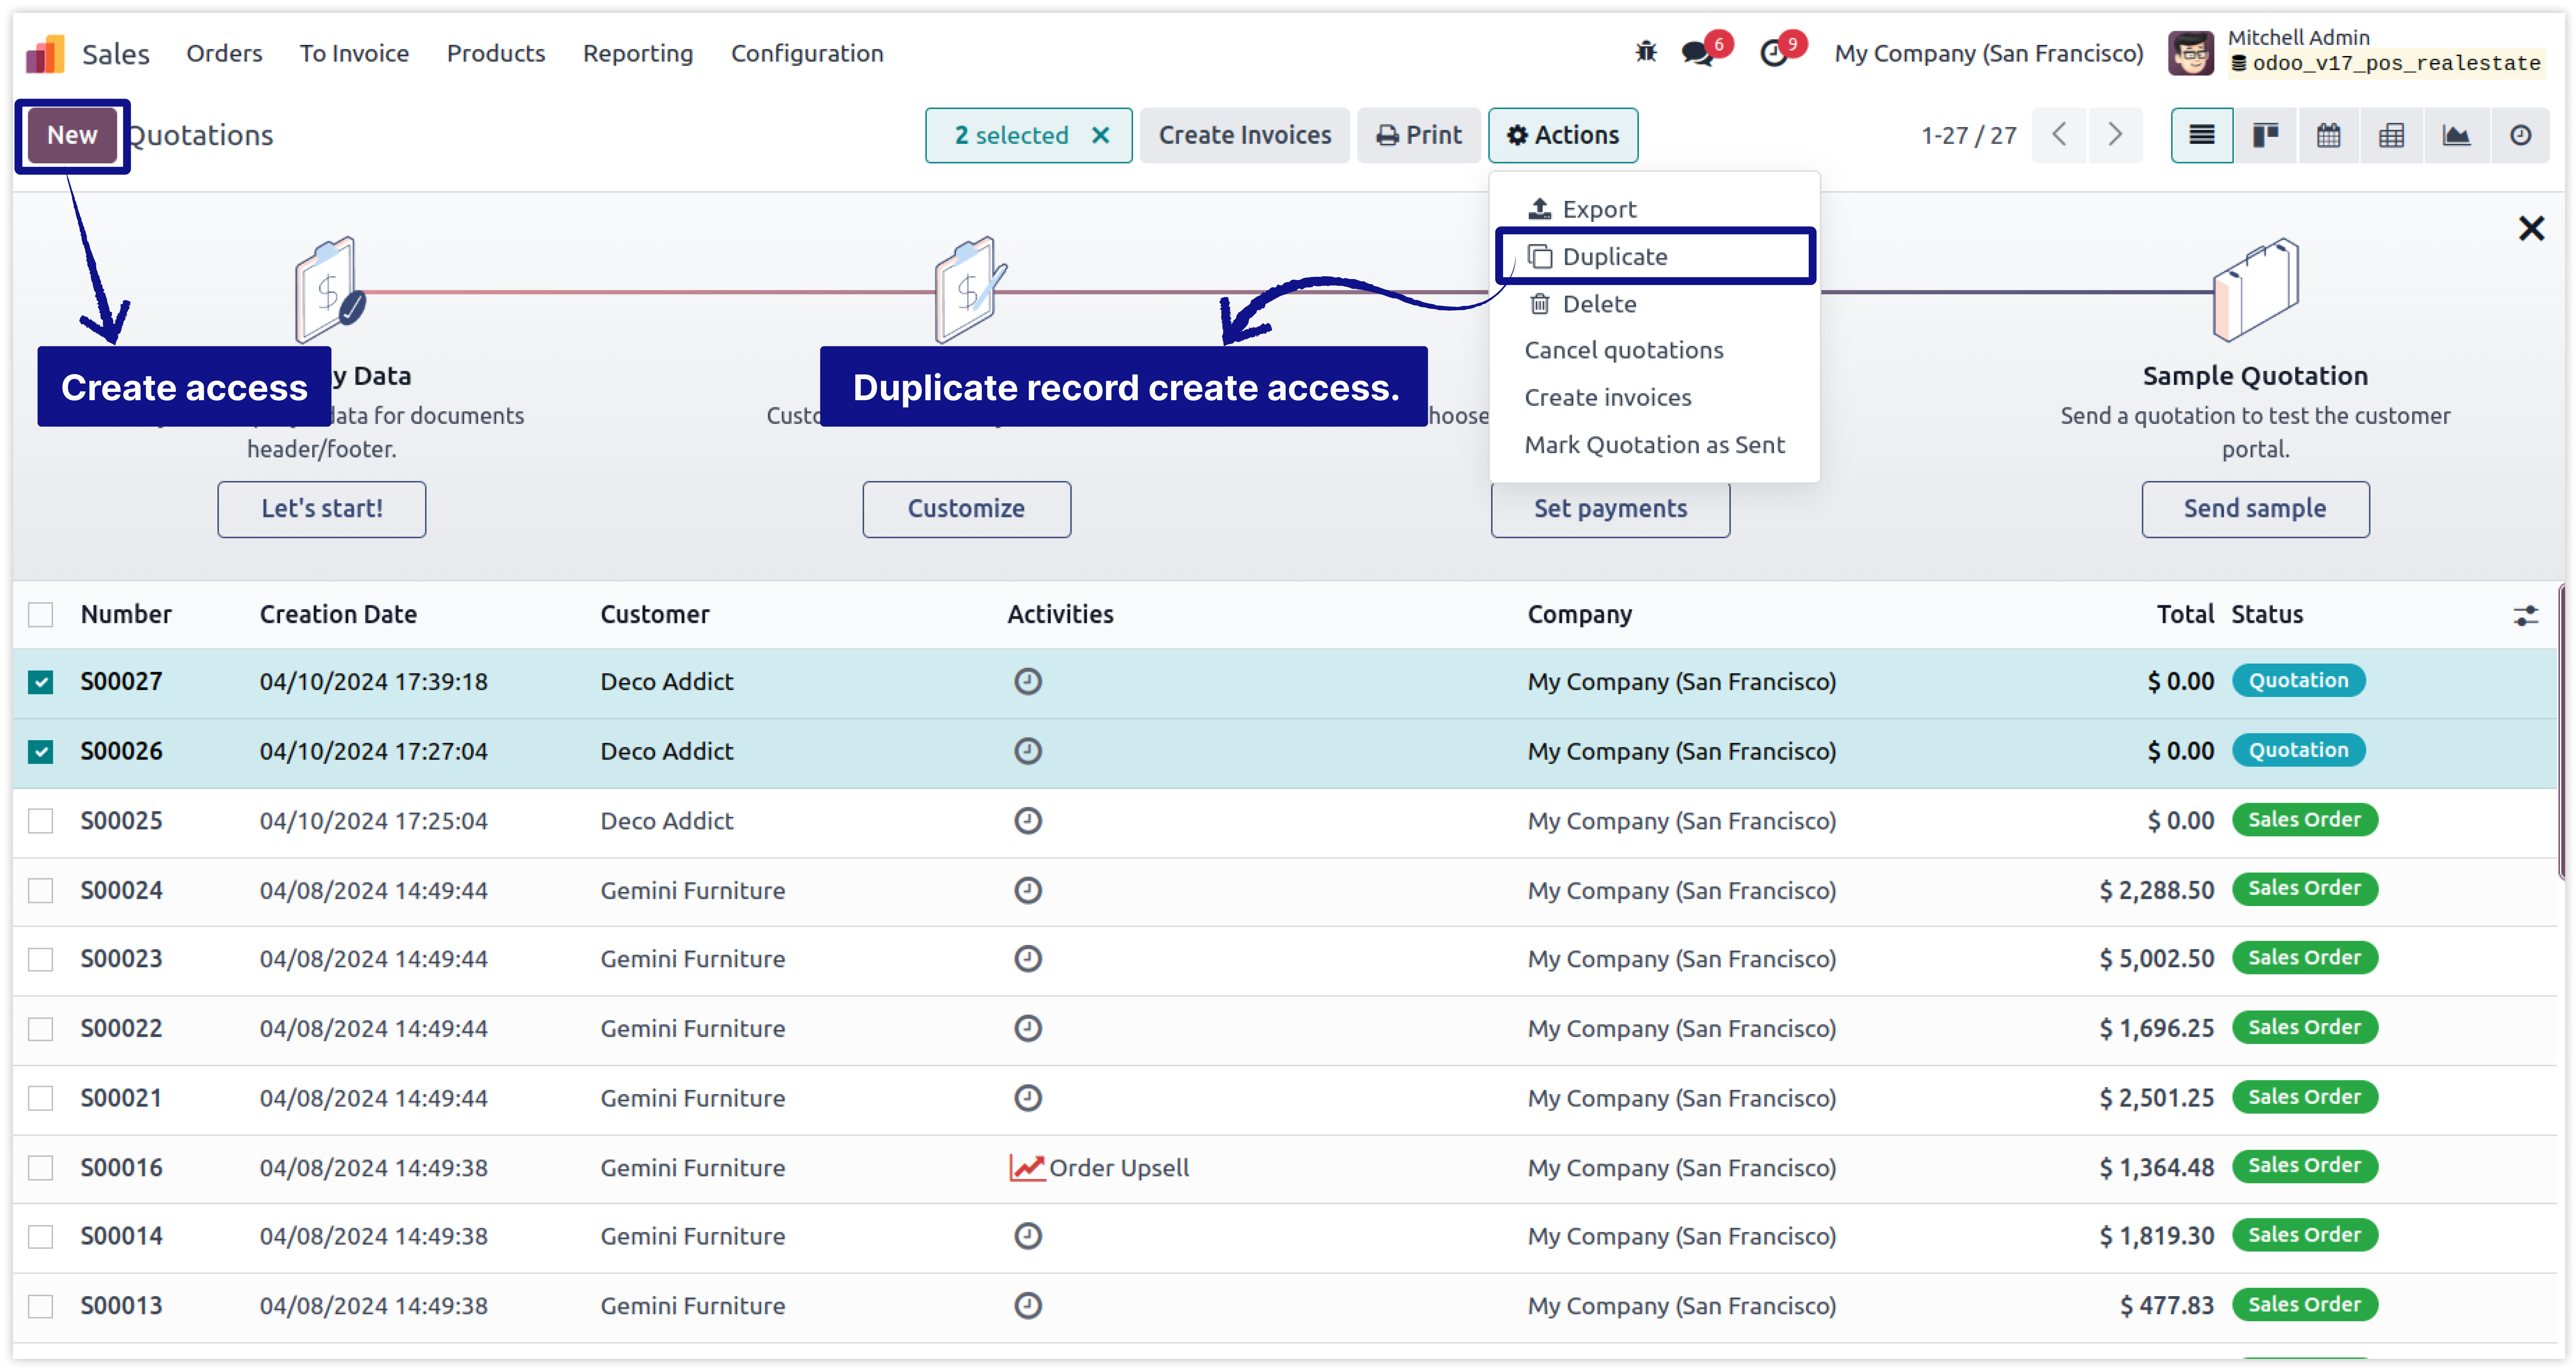
Below Images show that mitchell admin has all the access right of a sale order model.
-
We highlighted his access that is created, delete, edit, report print, actions, and to see all views (tree,form,chart etc.)
-
Click on image to Zoom out.
-
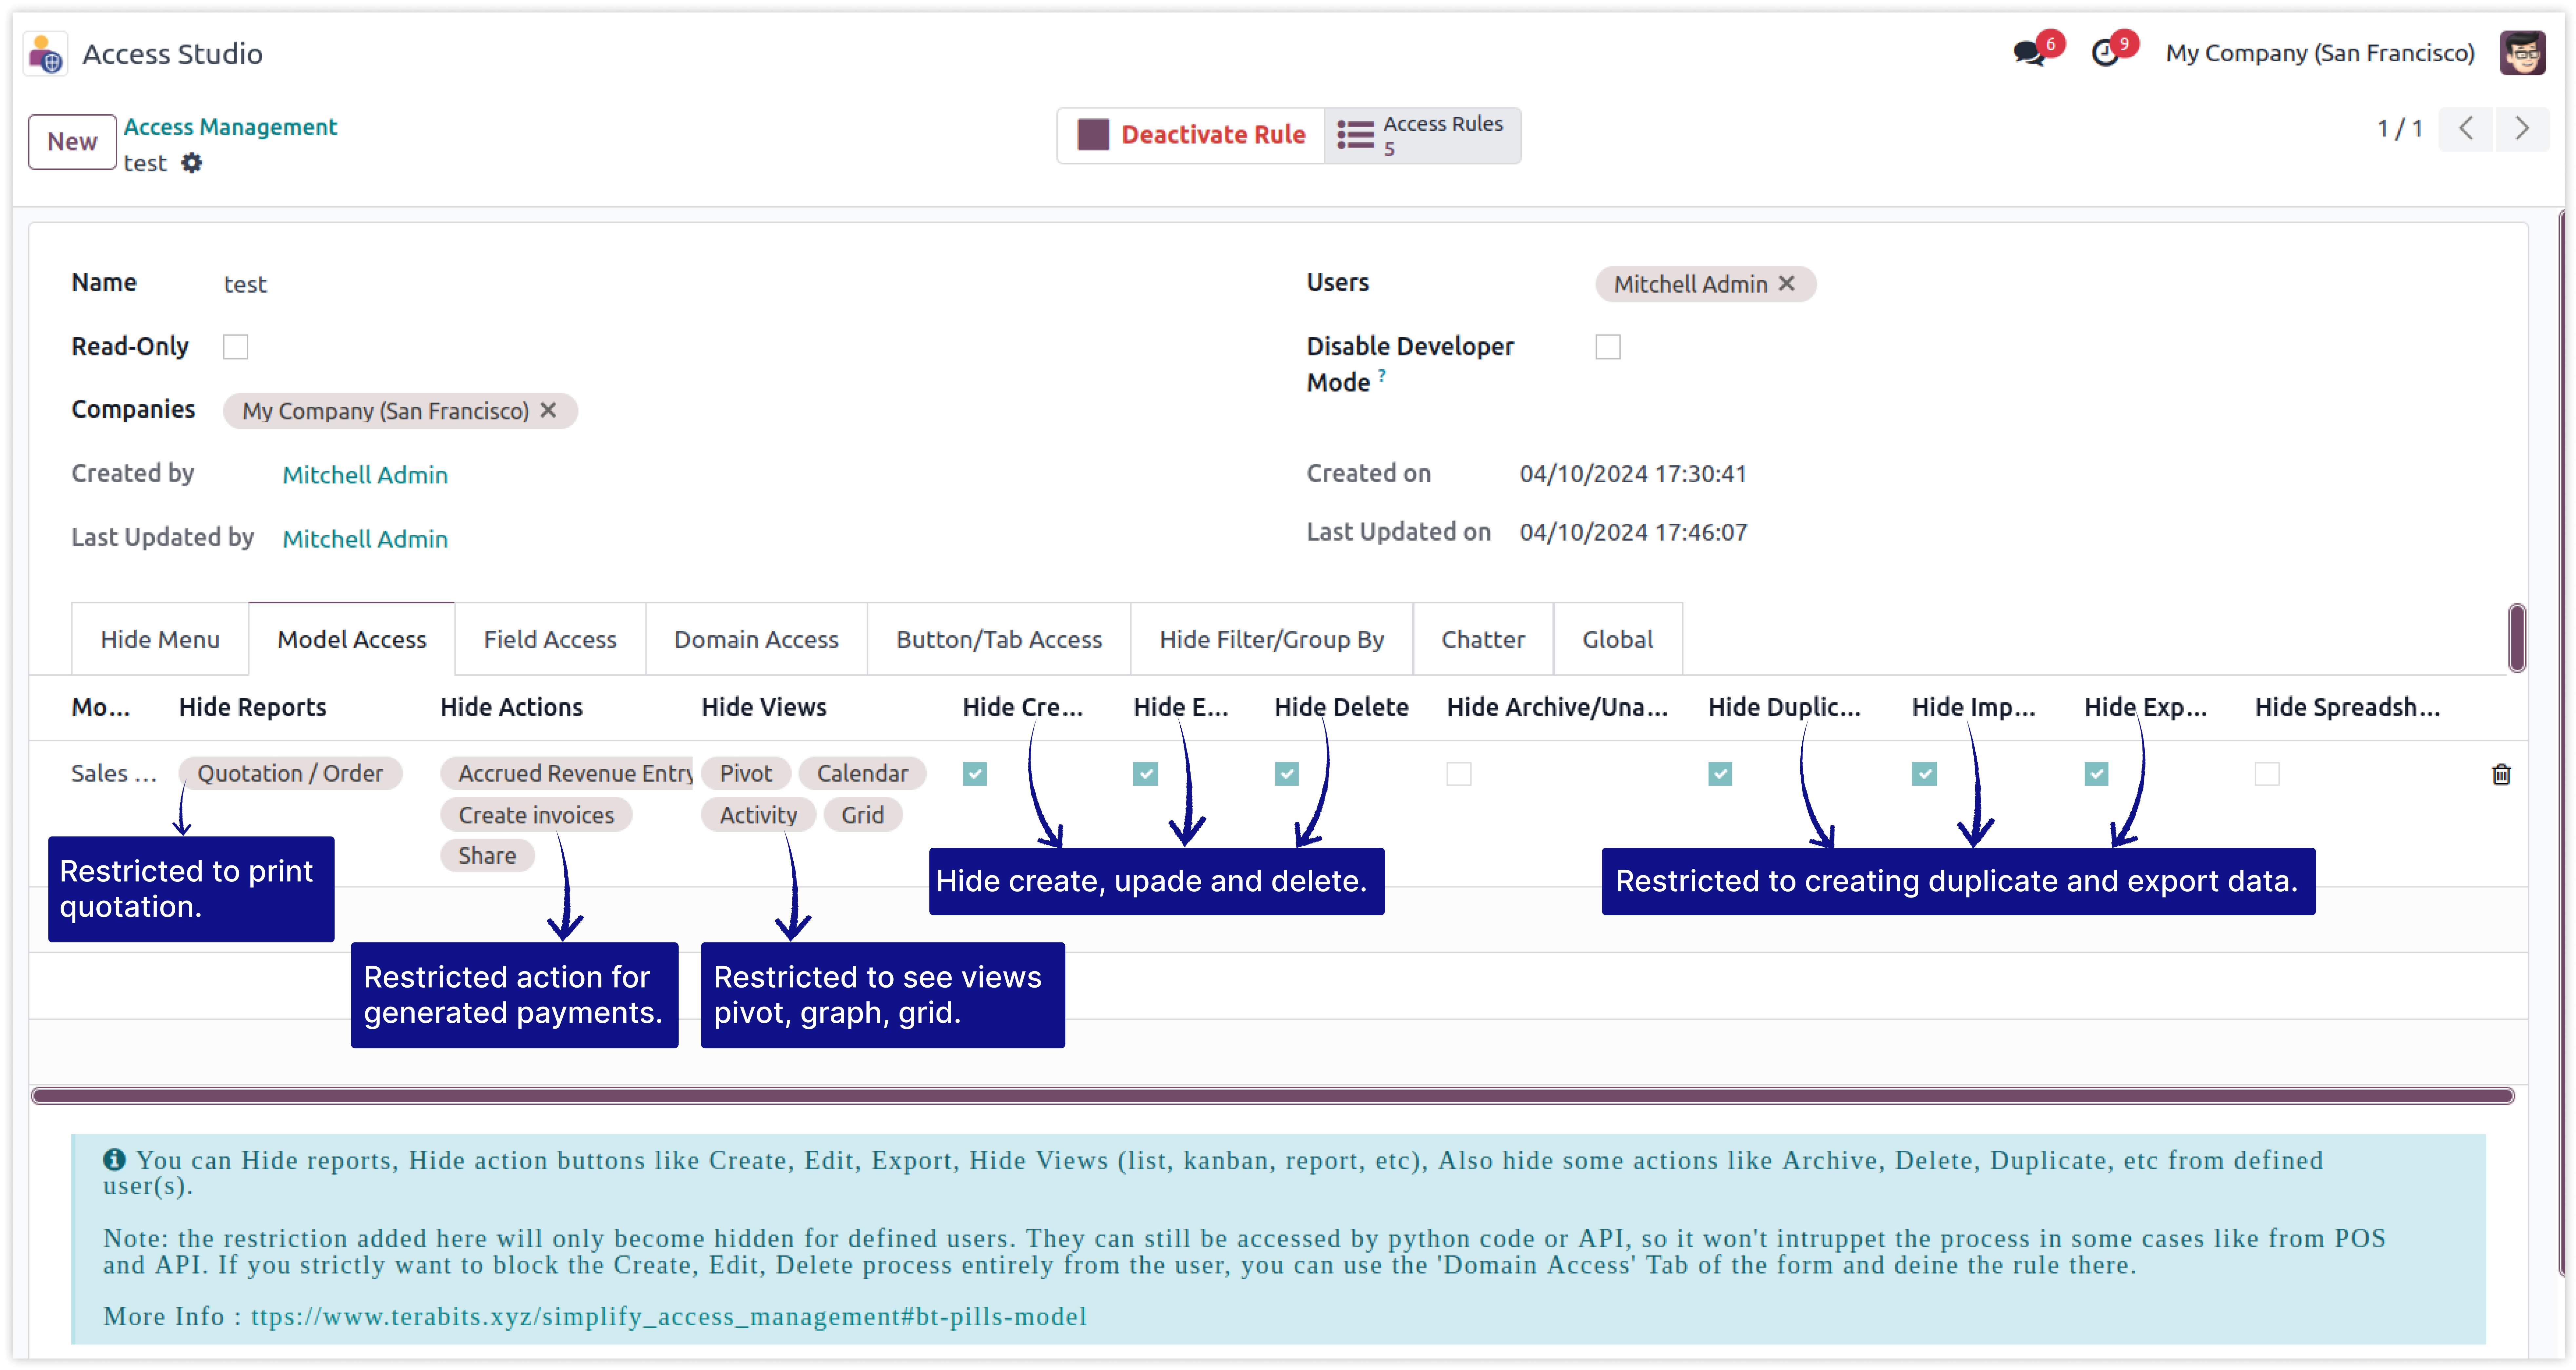
Here we have created rule of sale order model for the user mitchell admin.
-
In this rule, we have restricted (1) To print quotation report, (2) Action of generate payment, (3) To see the pivot, graph, grid views (4) Hide the buttons of create, edit, delete (5) To create duplicate record and export data of sale order.
- Let see what happens after apply this rule. -
Click on image to Zoom out.
-
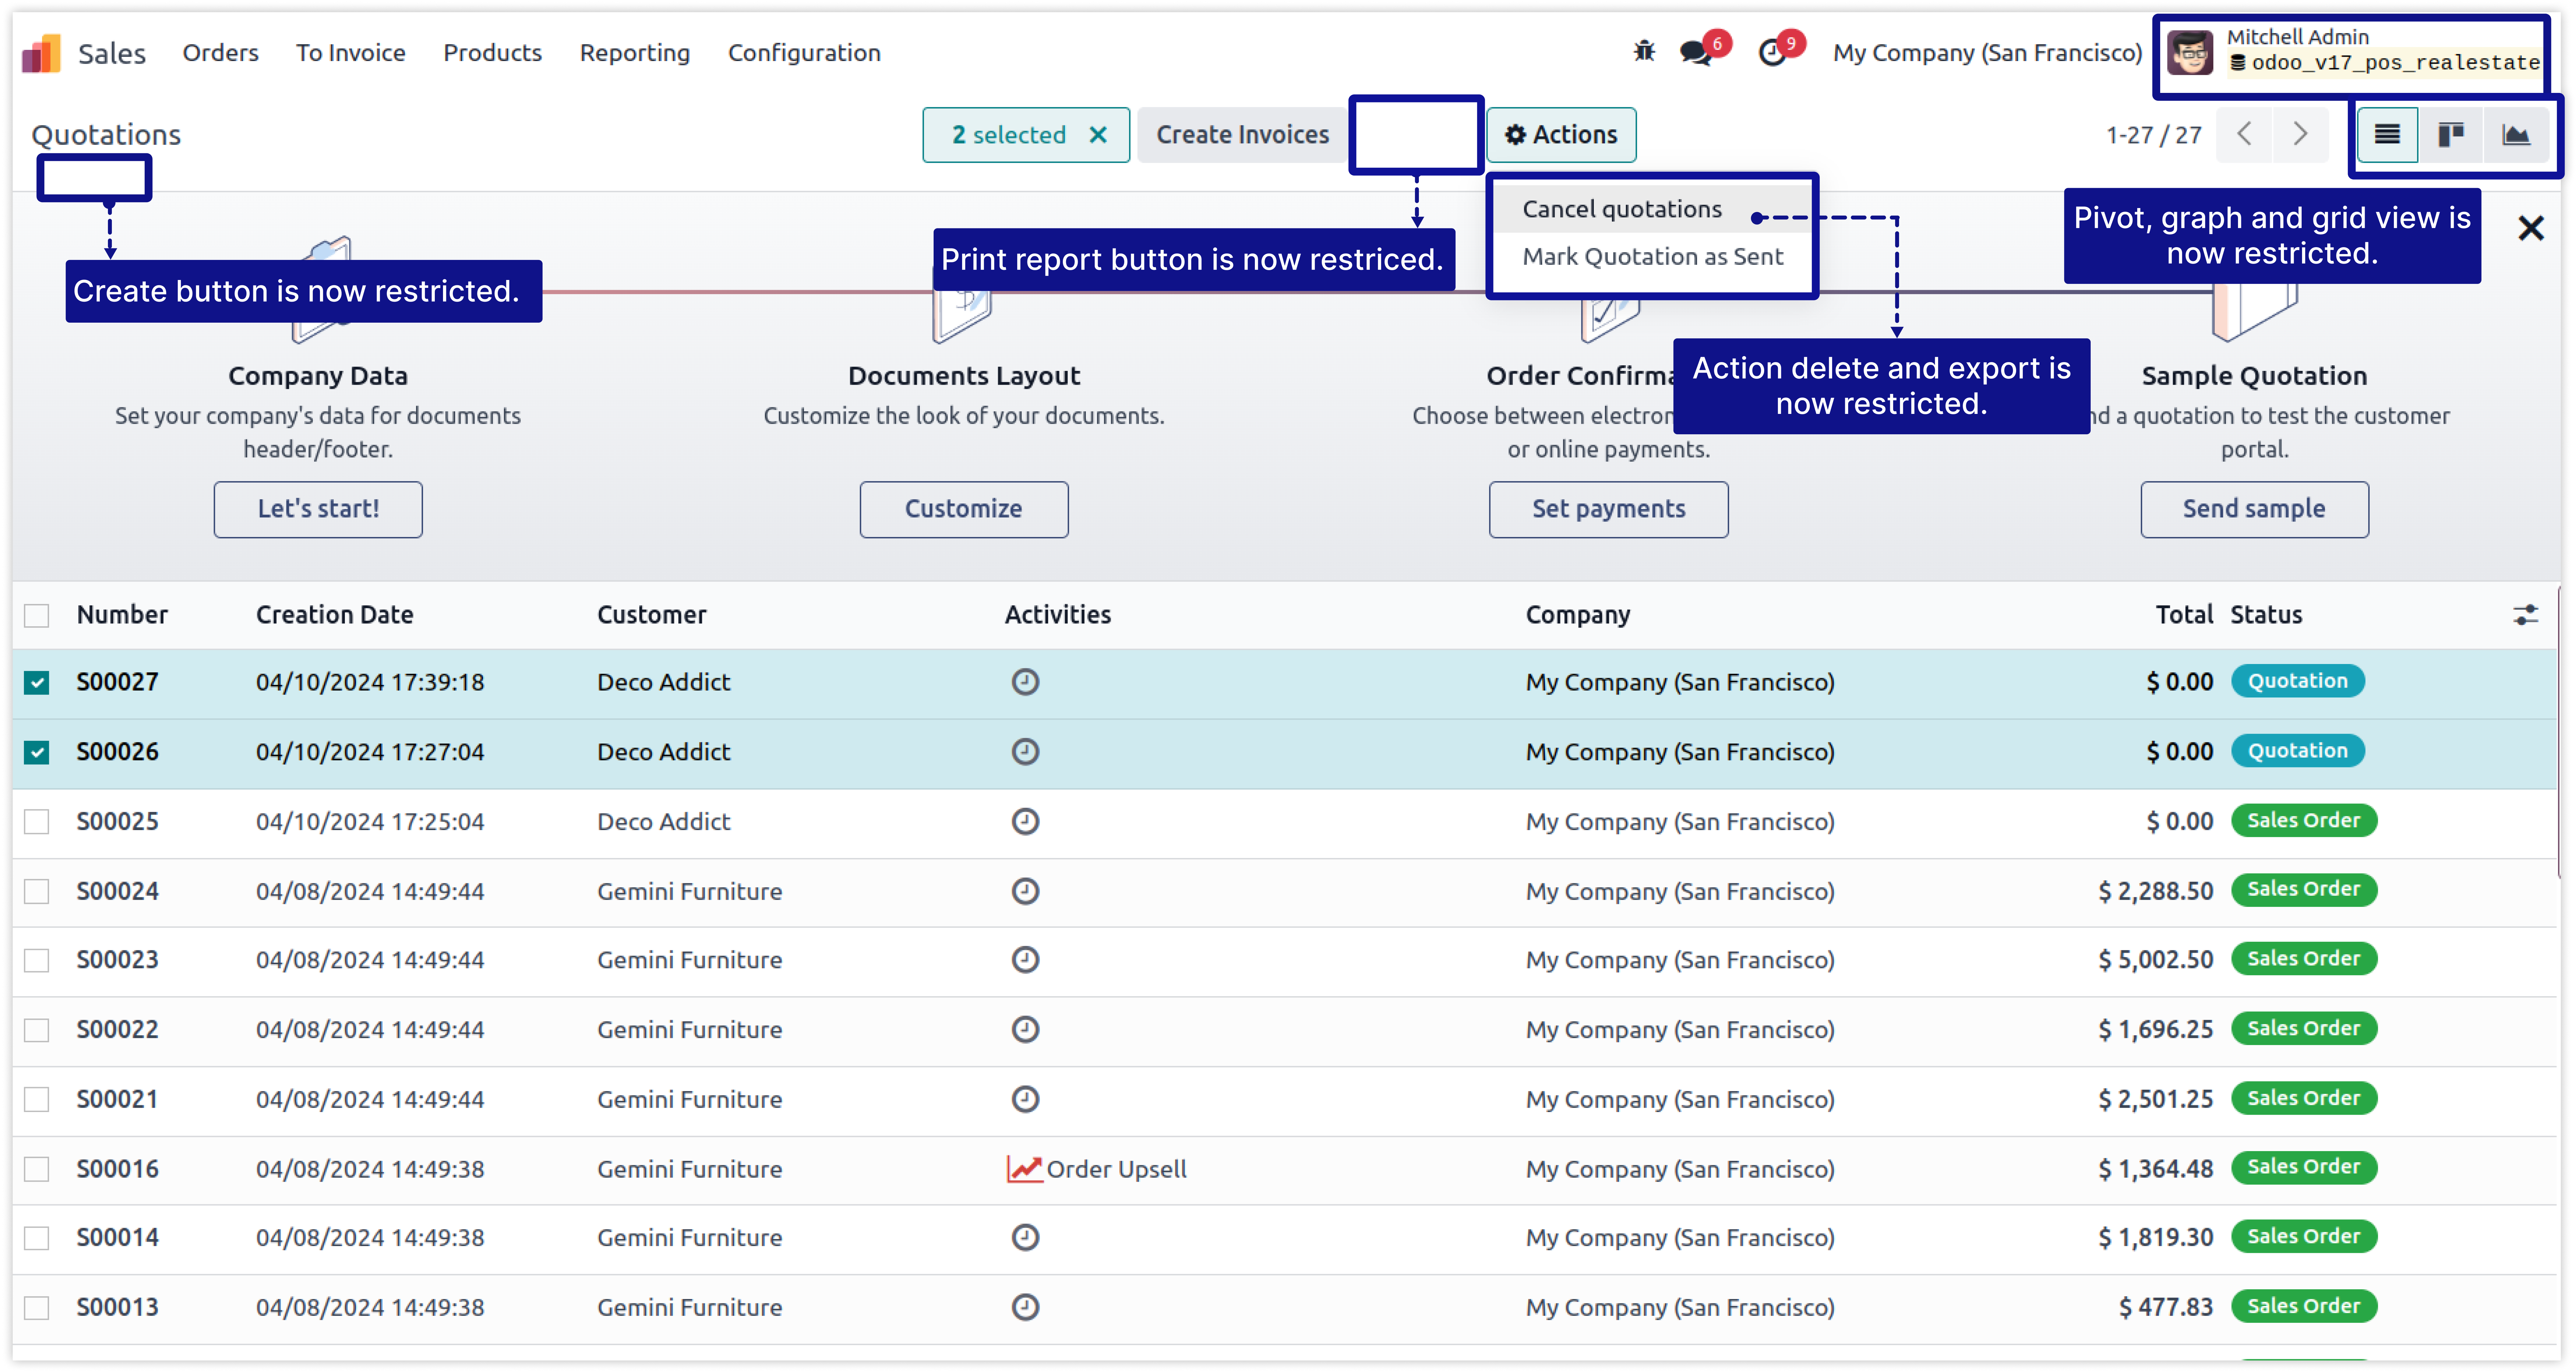
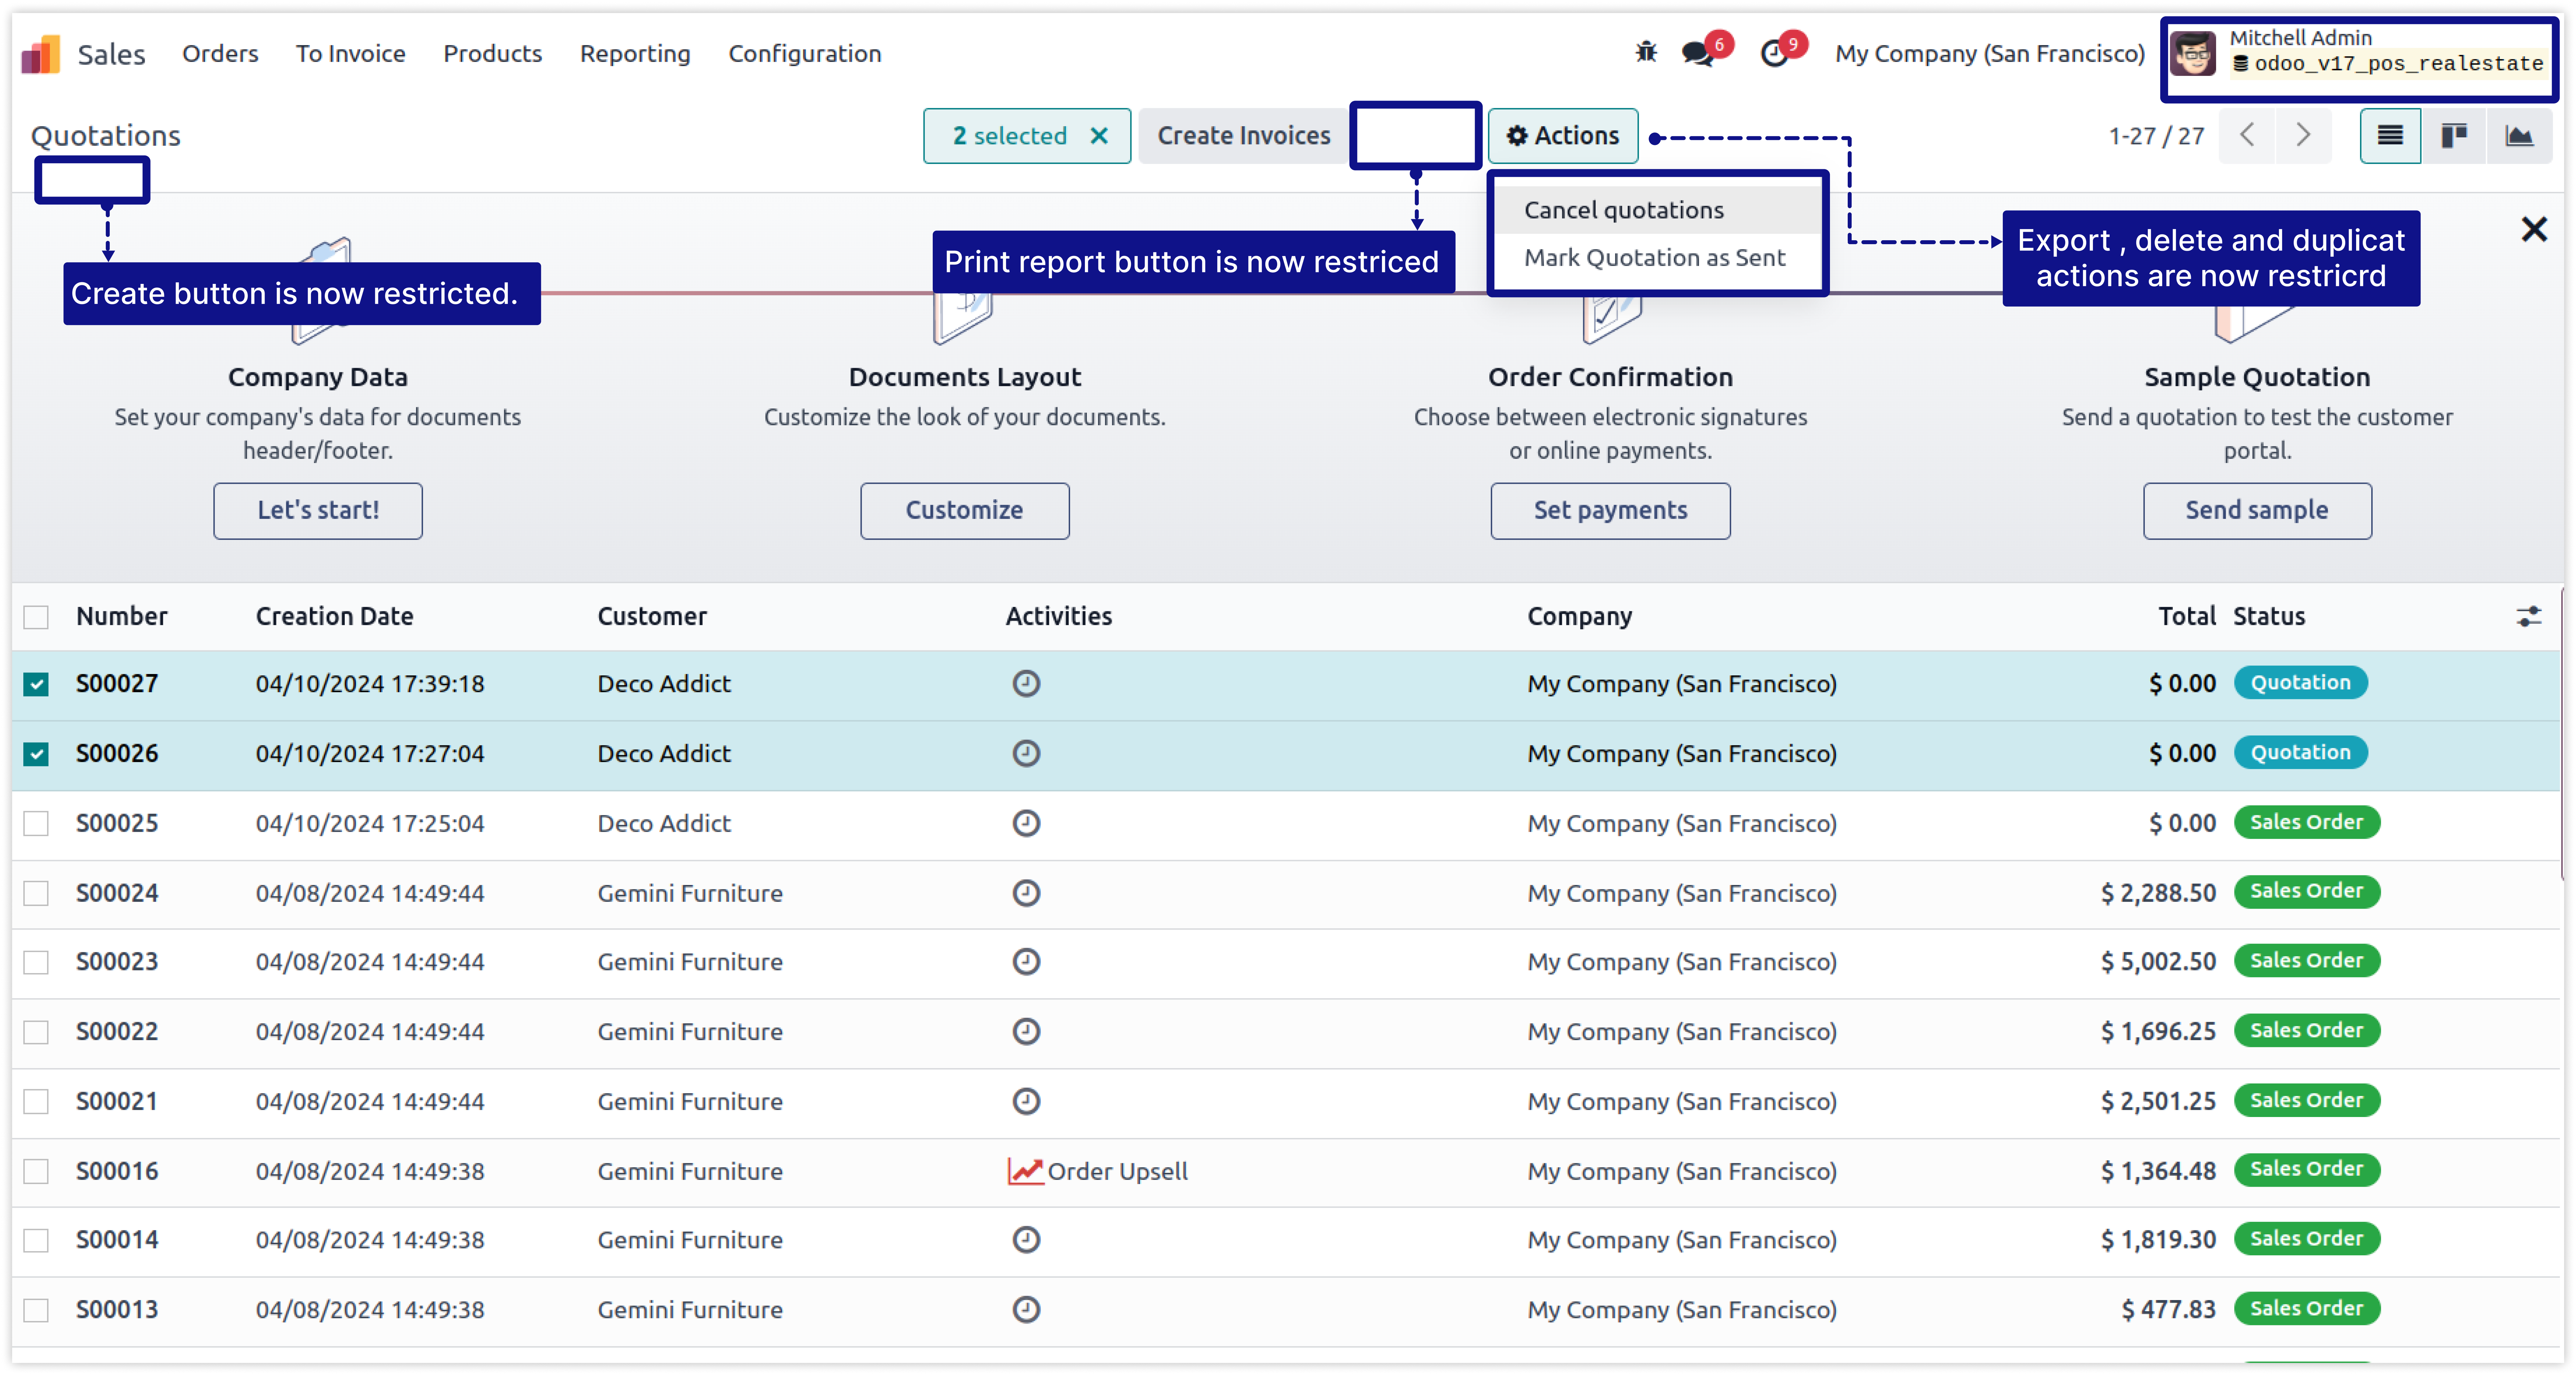
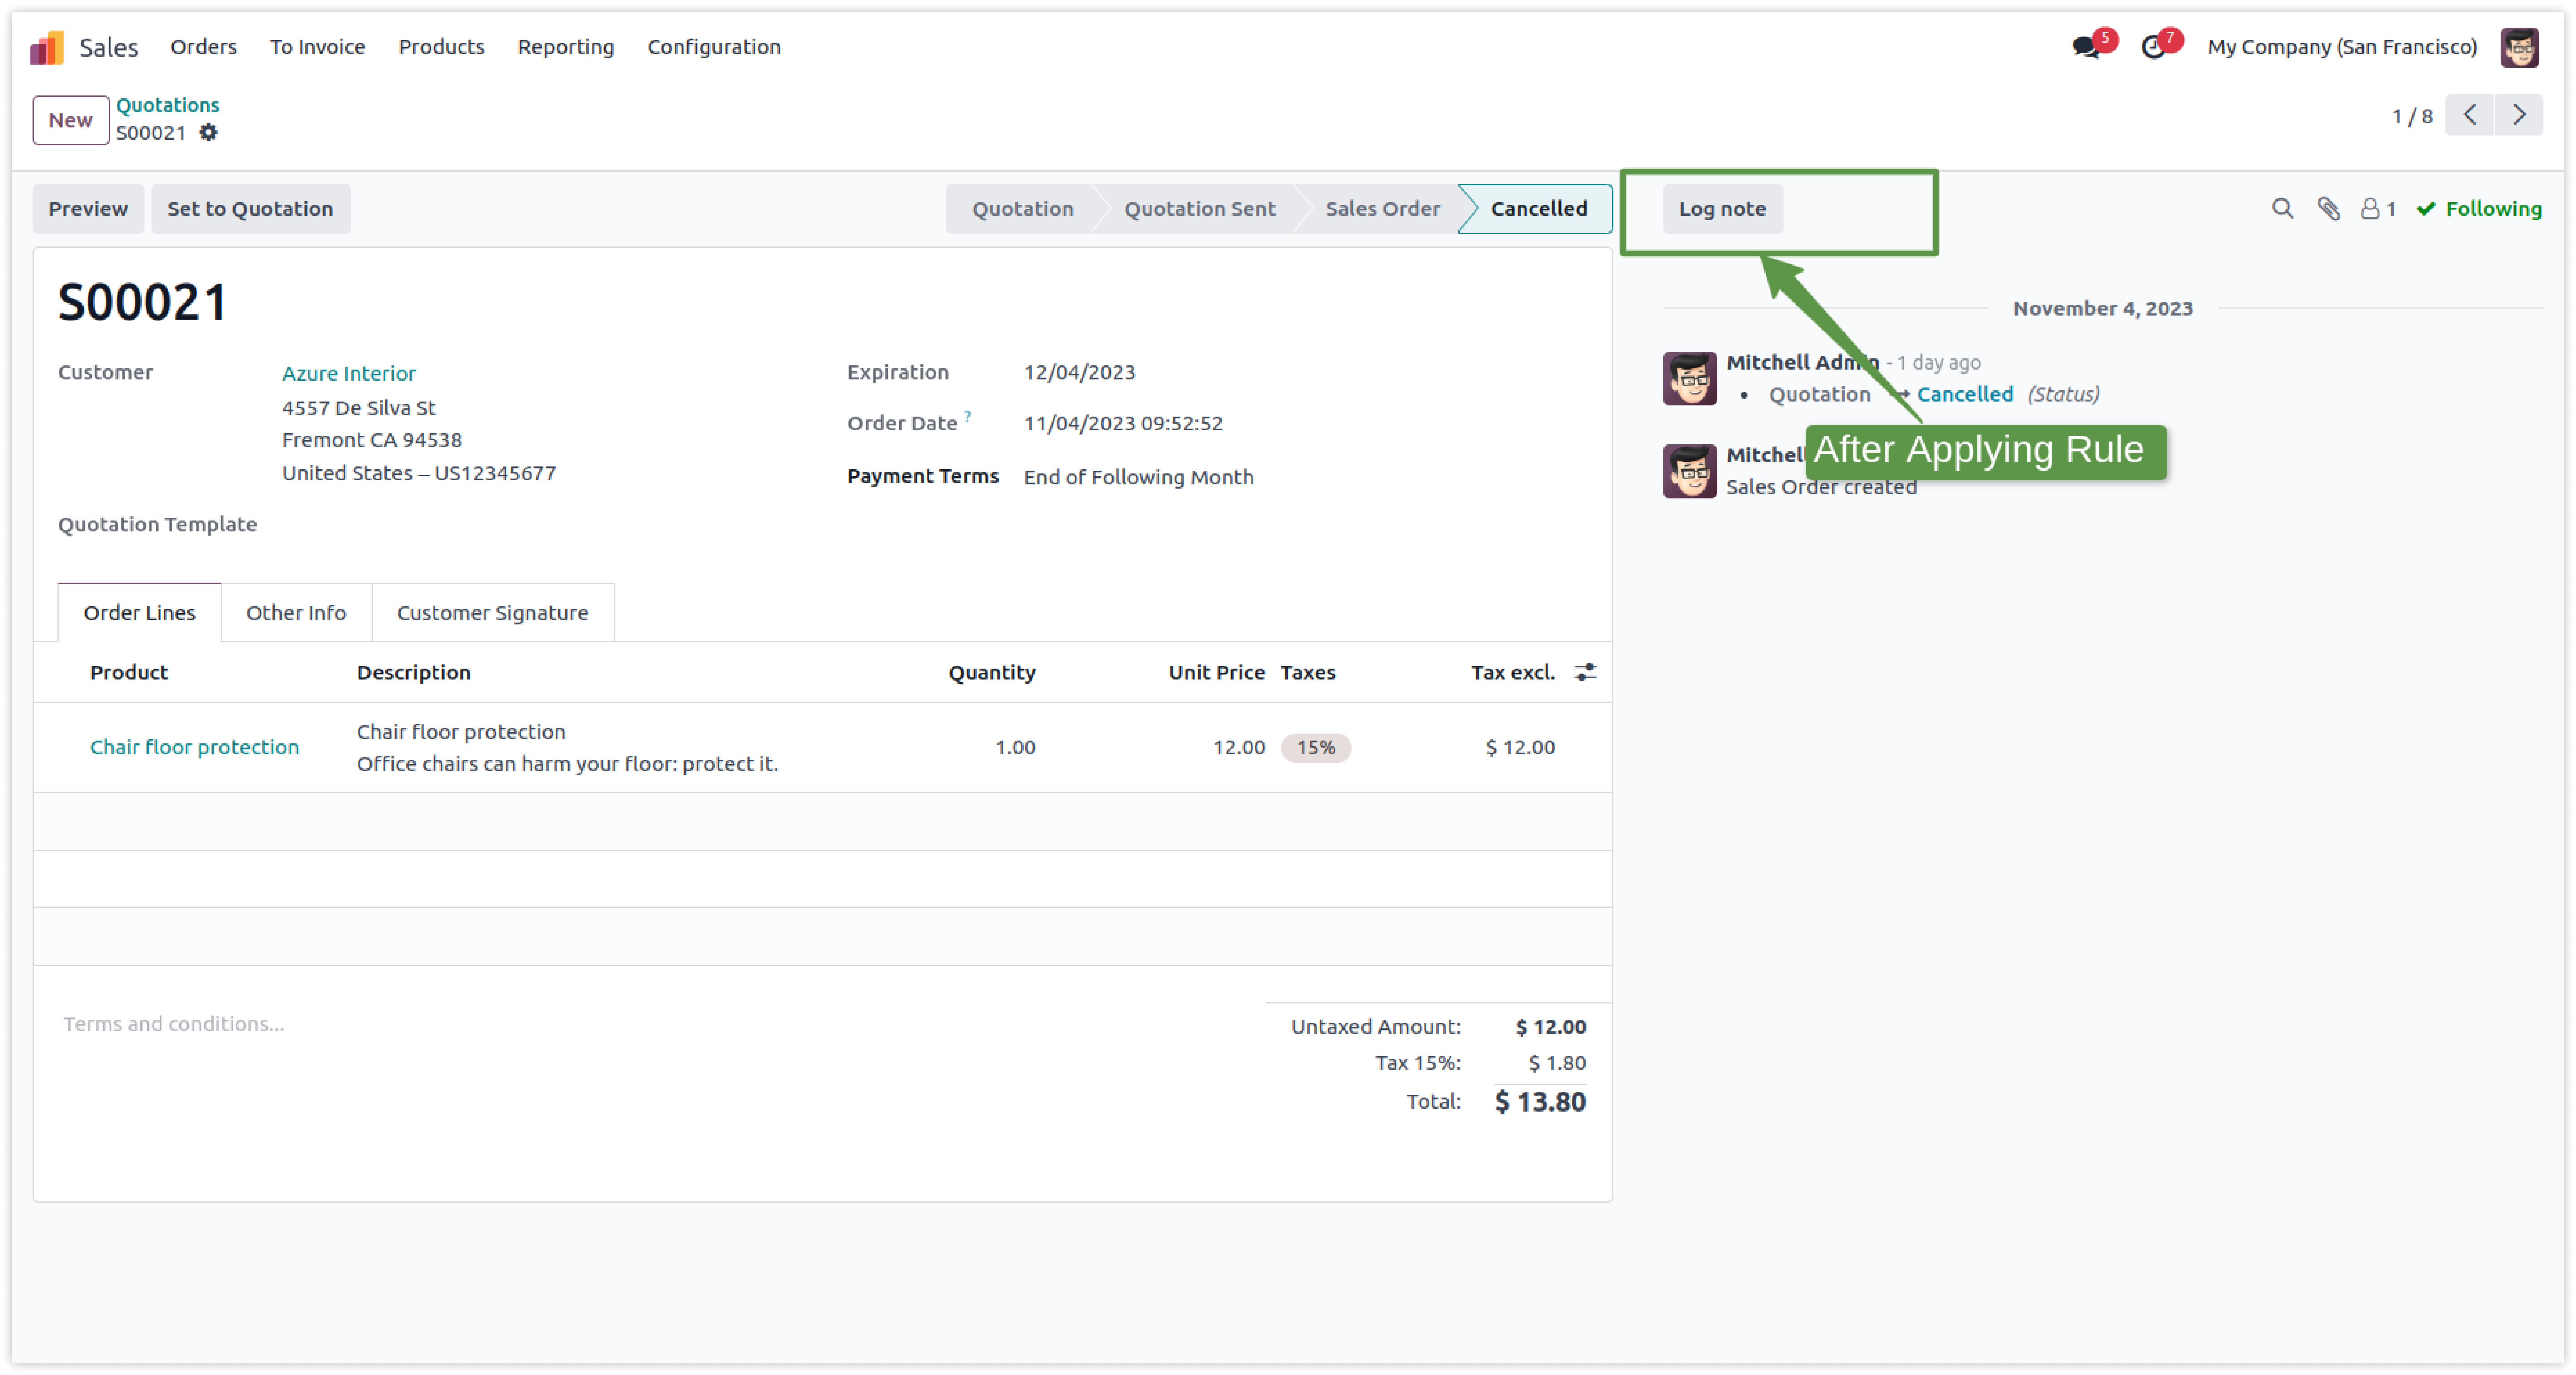
After applying the above rule, See the affected result shown in the below image.
-
Now you can see that Sale order create, edit and delete access is restricted.
-
Mitchell Admin can't see the Pivot view, Graph view and Grid view.
-
Mitchell Admin can't be able to generate a payment for the quotation.
-
Mitchell Admin can't be able to export record and make duplicate record by action.
-
Click on image to Zoom out.
Now you can restrict access of action buttons, object buttons, tabs and links (in kanban box) of the model for any user from one place.
Creating access rules for Action buttons, Object buttons, and Tabs is easily not possible in odoo. Here are some limitations.
You must have technical knowledge/technical person.
Not possible to create user-wise access rules.
Here is the solution
Simplified Access Management provides the feature which allows you to create user wise Buttons/Tabs access rights from one place and solutions of all above problems.
No need to have technical knowledge/technical person, Only you have to understand our module features.
You can set user-wise access of buttons/tabs with multi companies.
You can set access right user-wise. Need to select users and activate your customized rules.
You can customize rules for base modules as well as third-party modules.
How to setup Buttons/tab access rights.
Here we have explained some examples step by step.
-
First of all you will need to know all about Button/Tab Access Right to make right rules for the users.
-
So, here we have explained all Button/Tab access right features in below image .
-
Click on image to Zoom out.

In this example we will restrict Buttons, Tabs, Kanban link of the model Picking types(stock.picking.types) and Transfers(stock.picking) for the user Mitchell Admin.
-
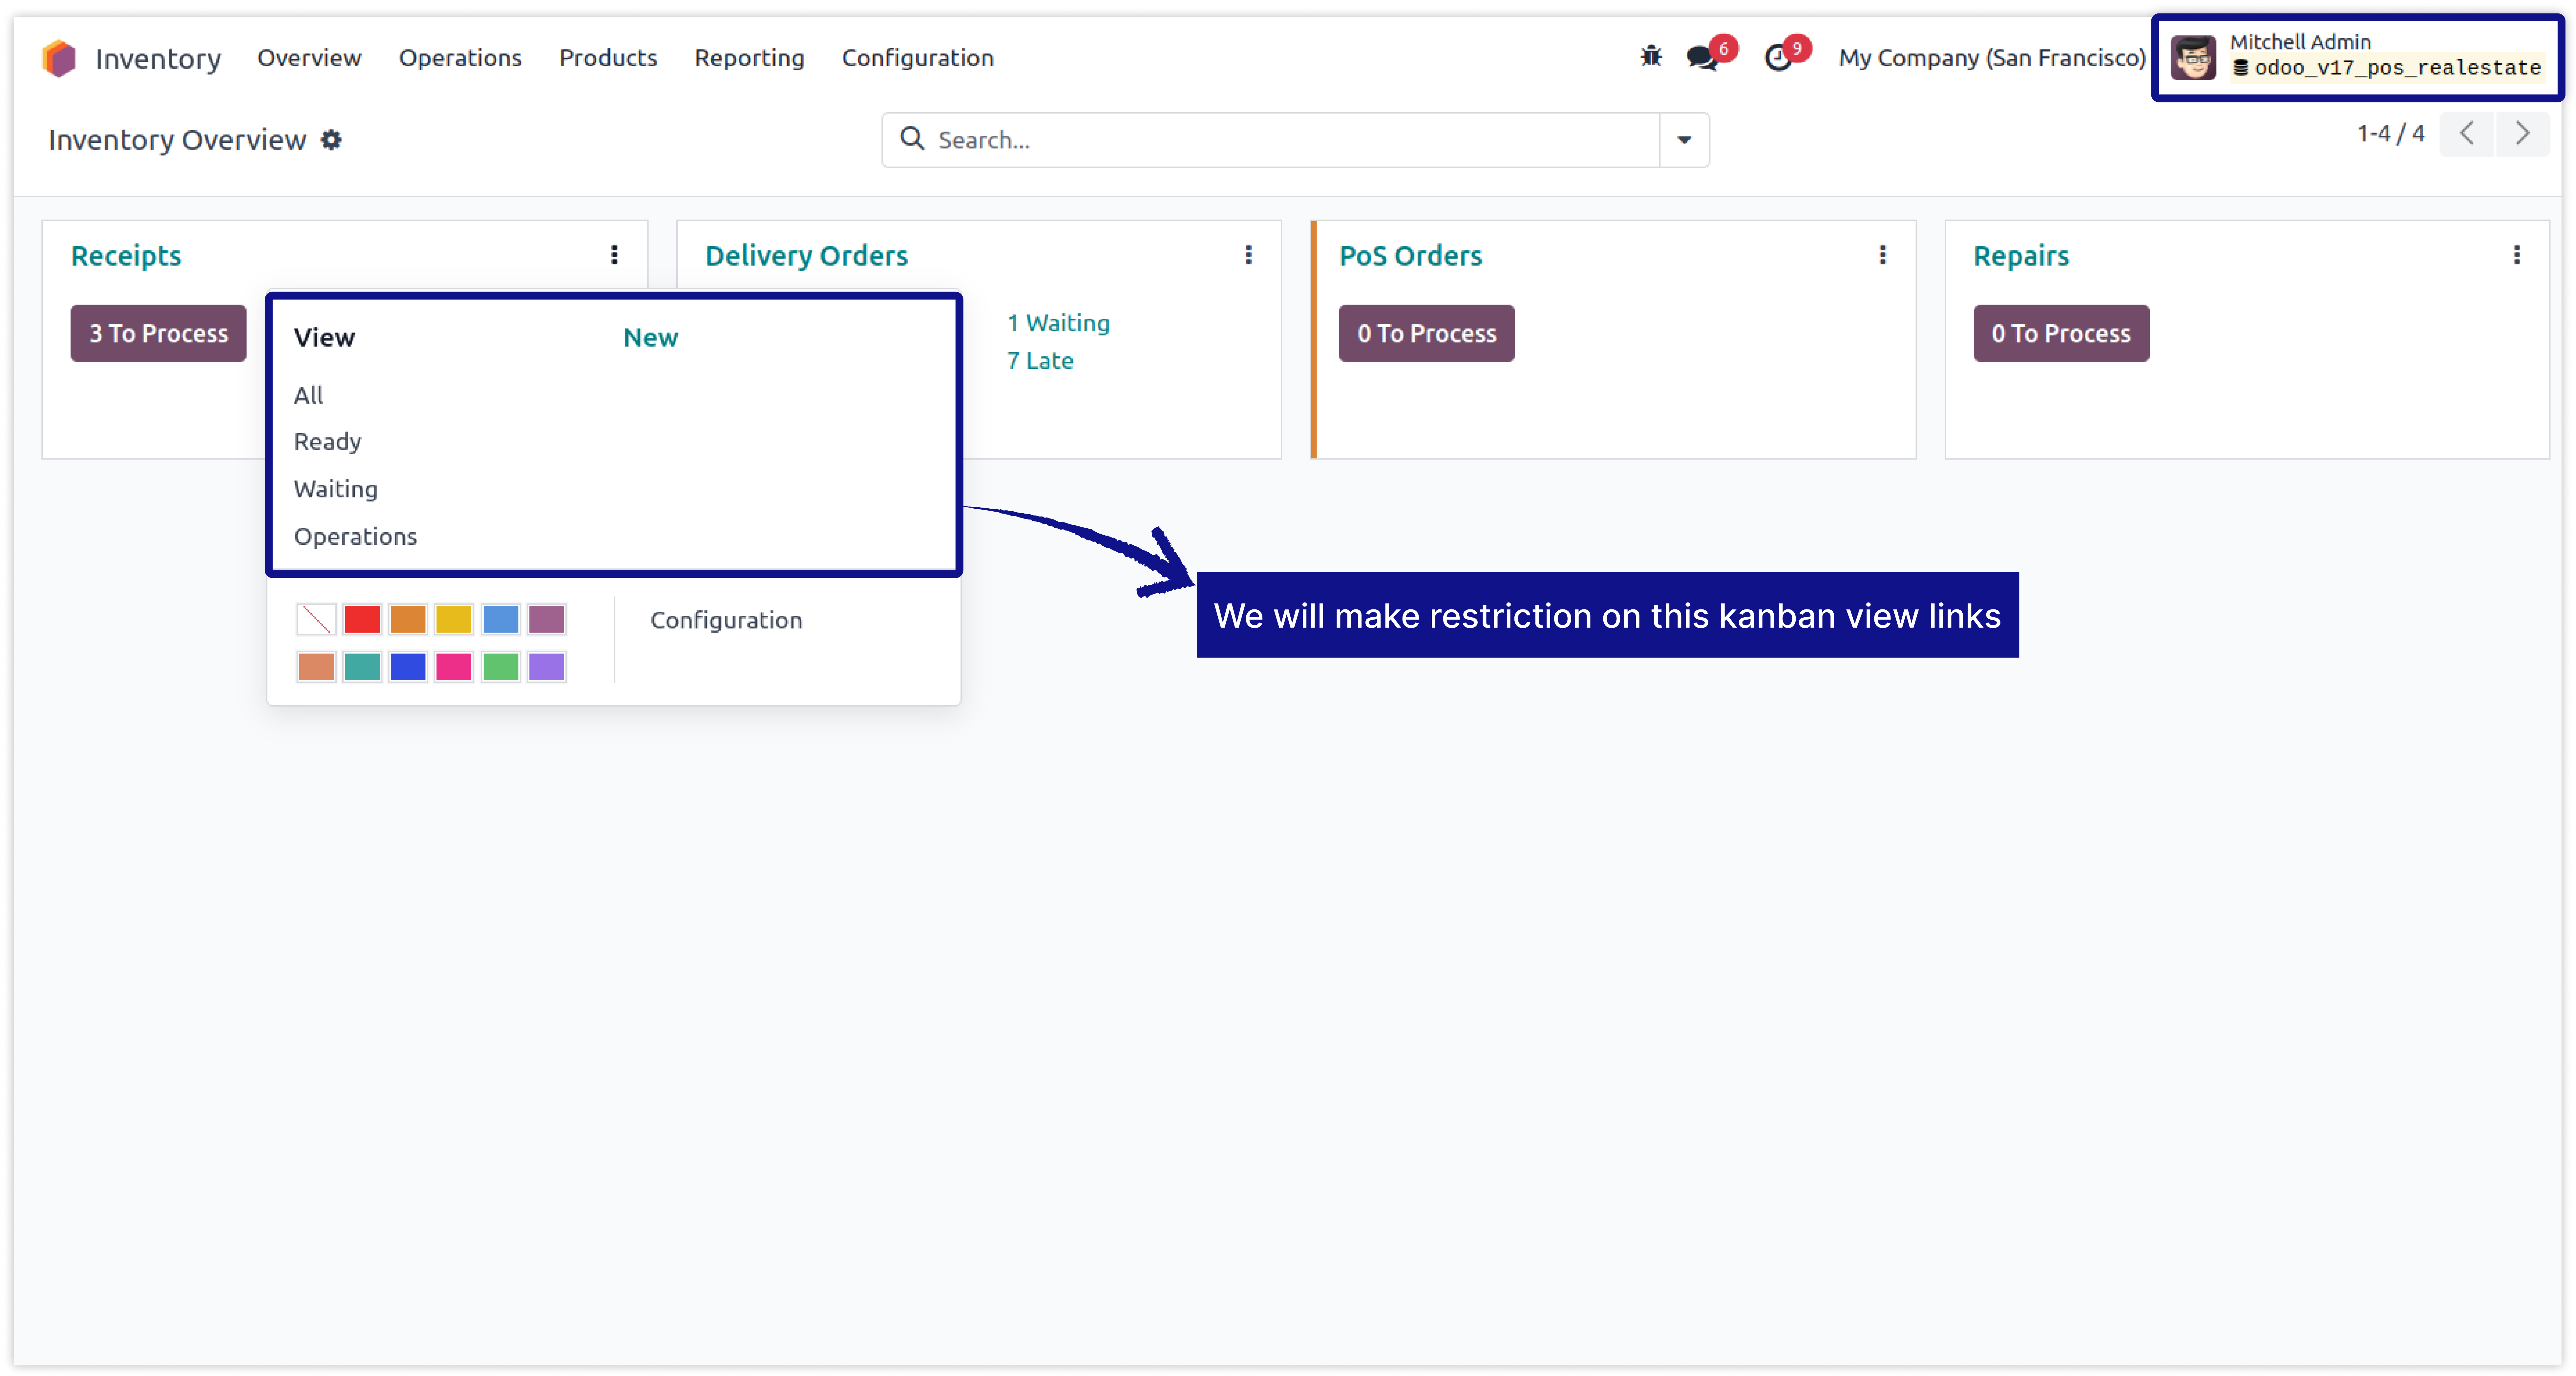
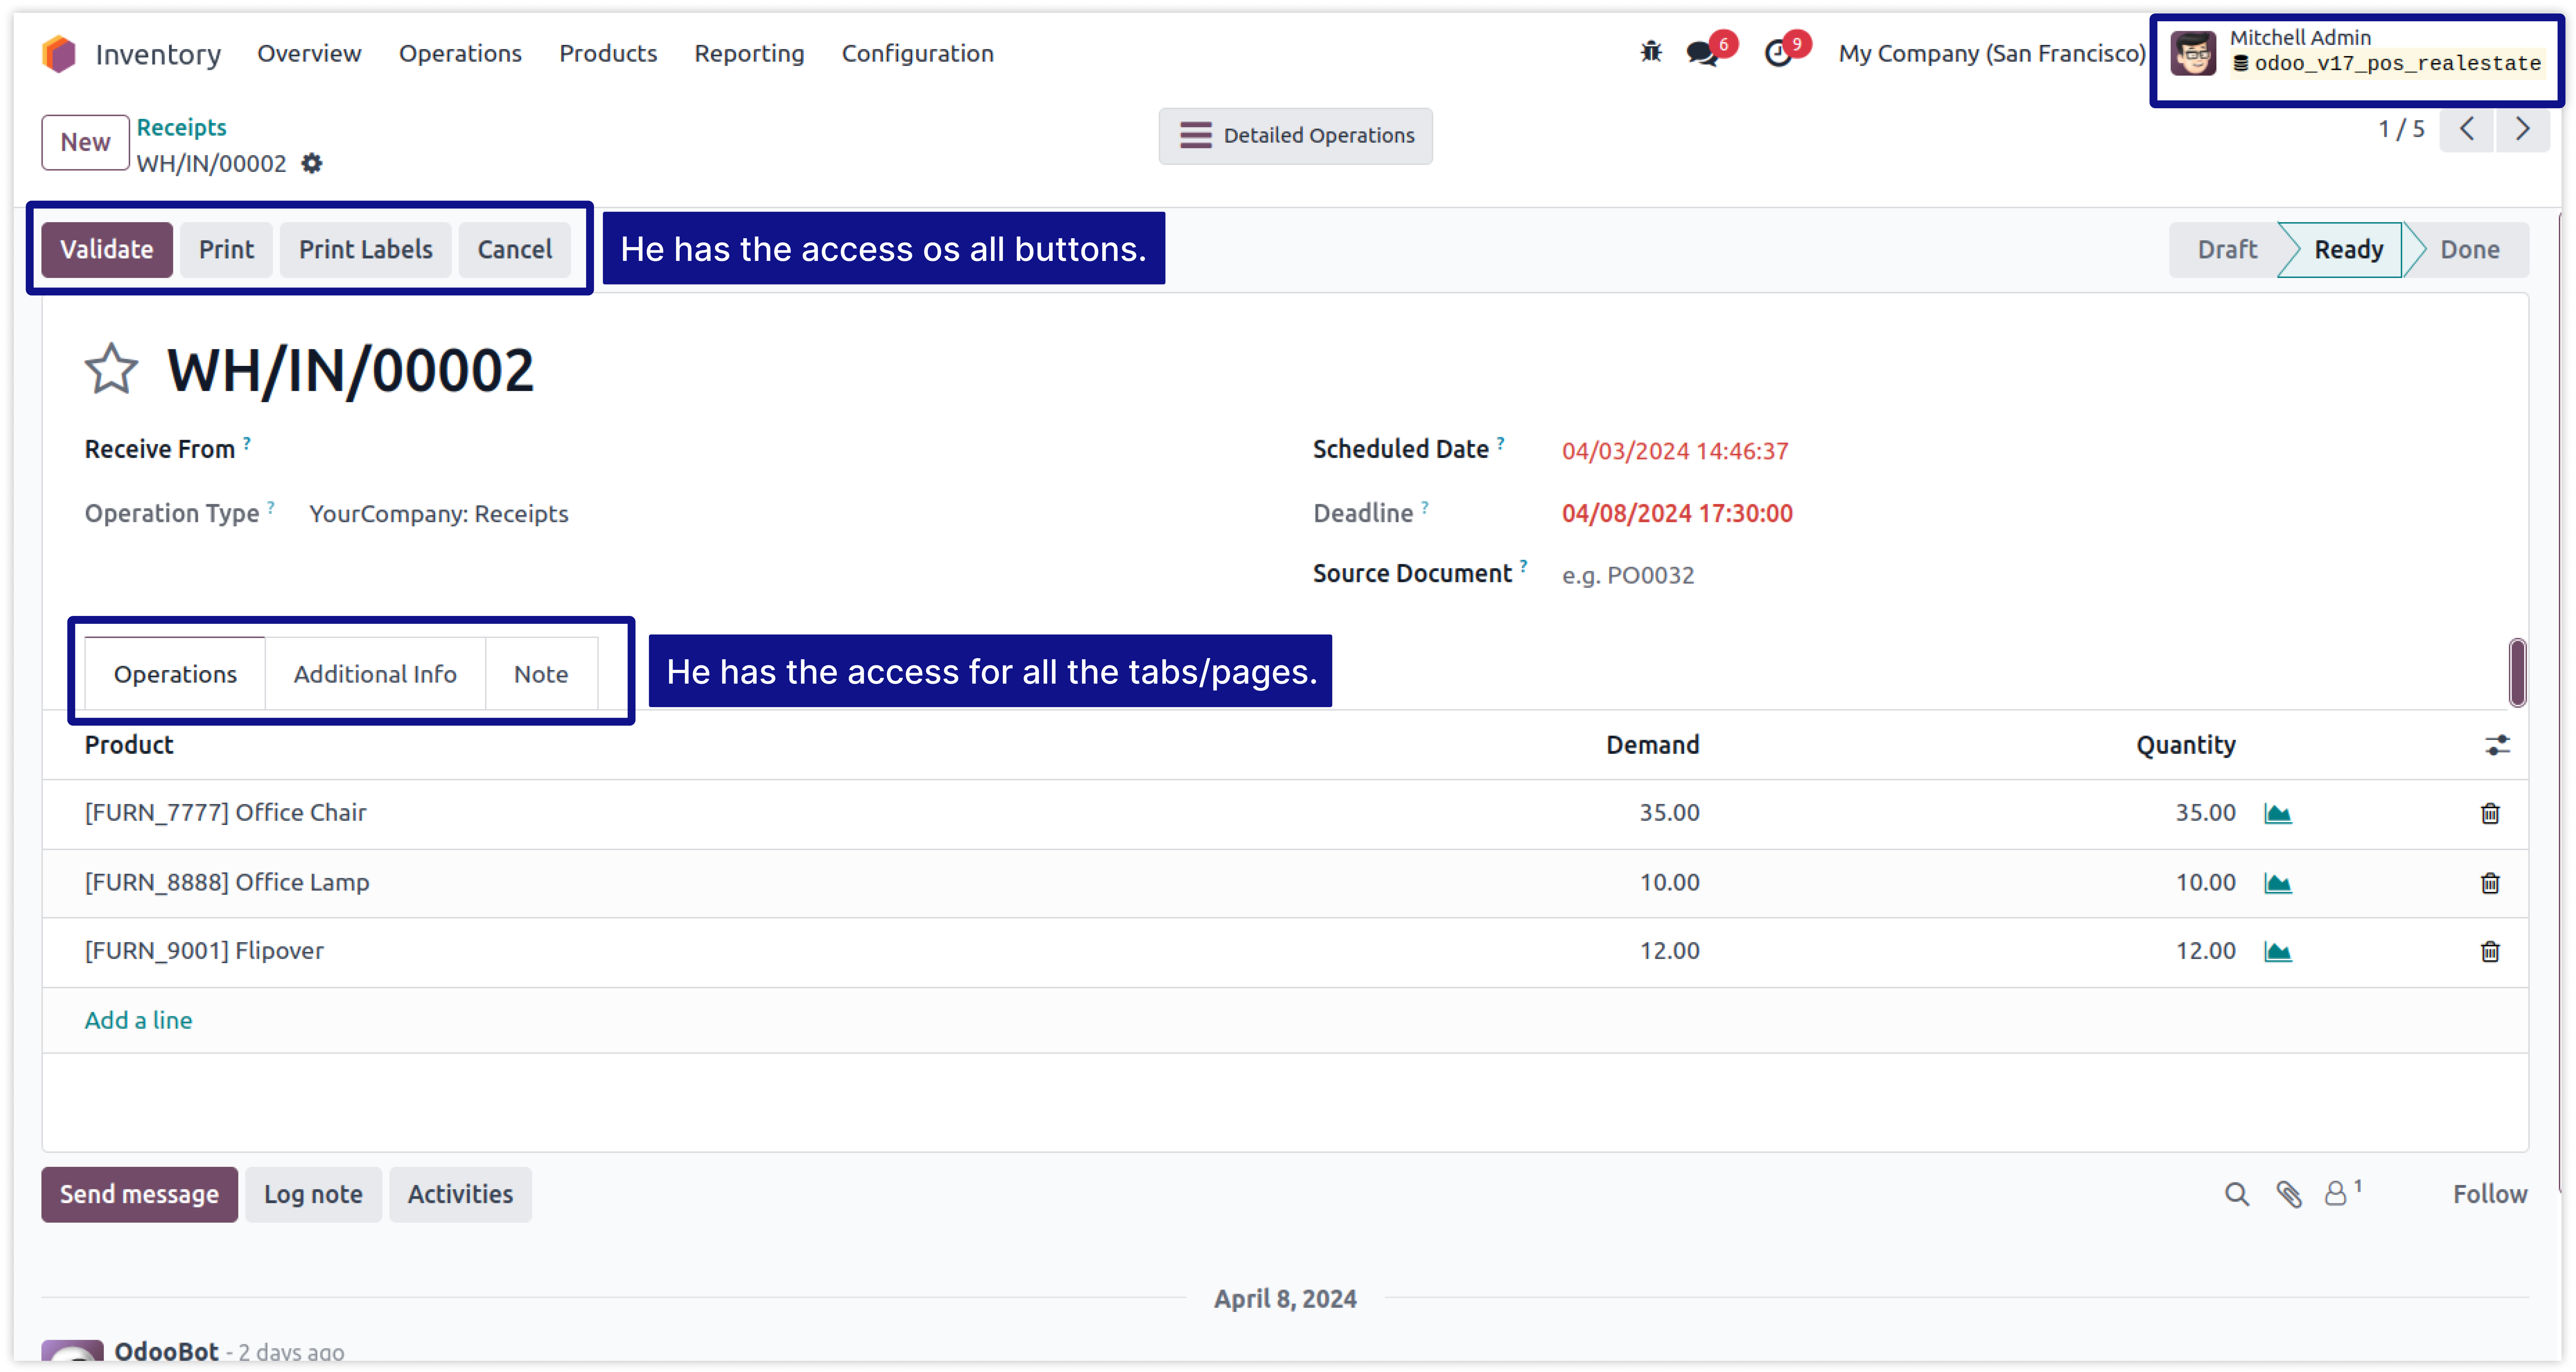
Below Images show that mitchell admin has all the access rights of model Picking types(stock.picking.types) and Transfers(stock.picking).
-
We highlighted his access that is Buttons, Tabs and all Kanban Links.
-
Click on image to Zoom out.
-
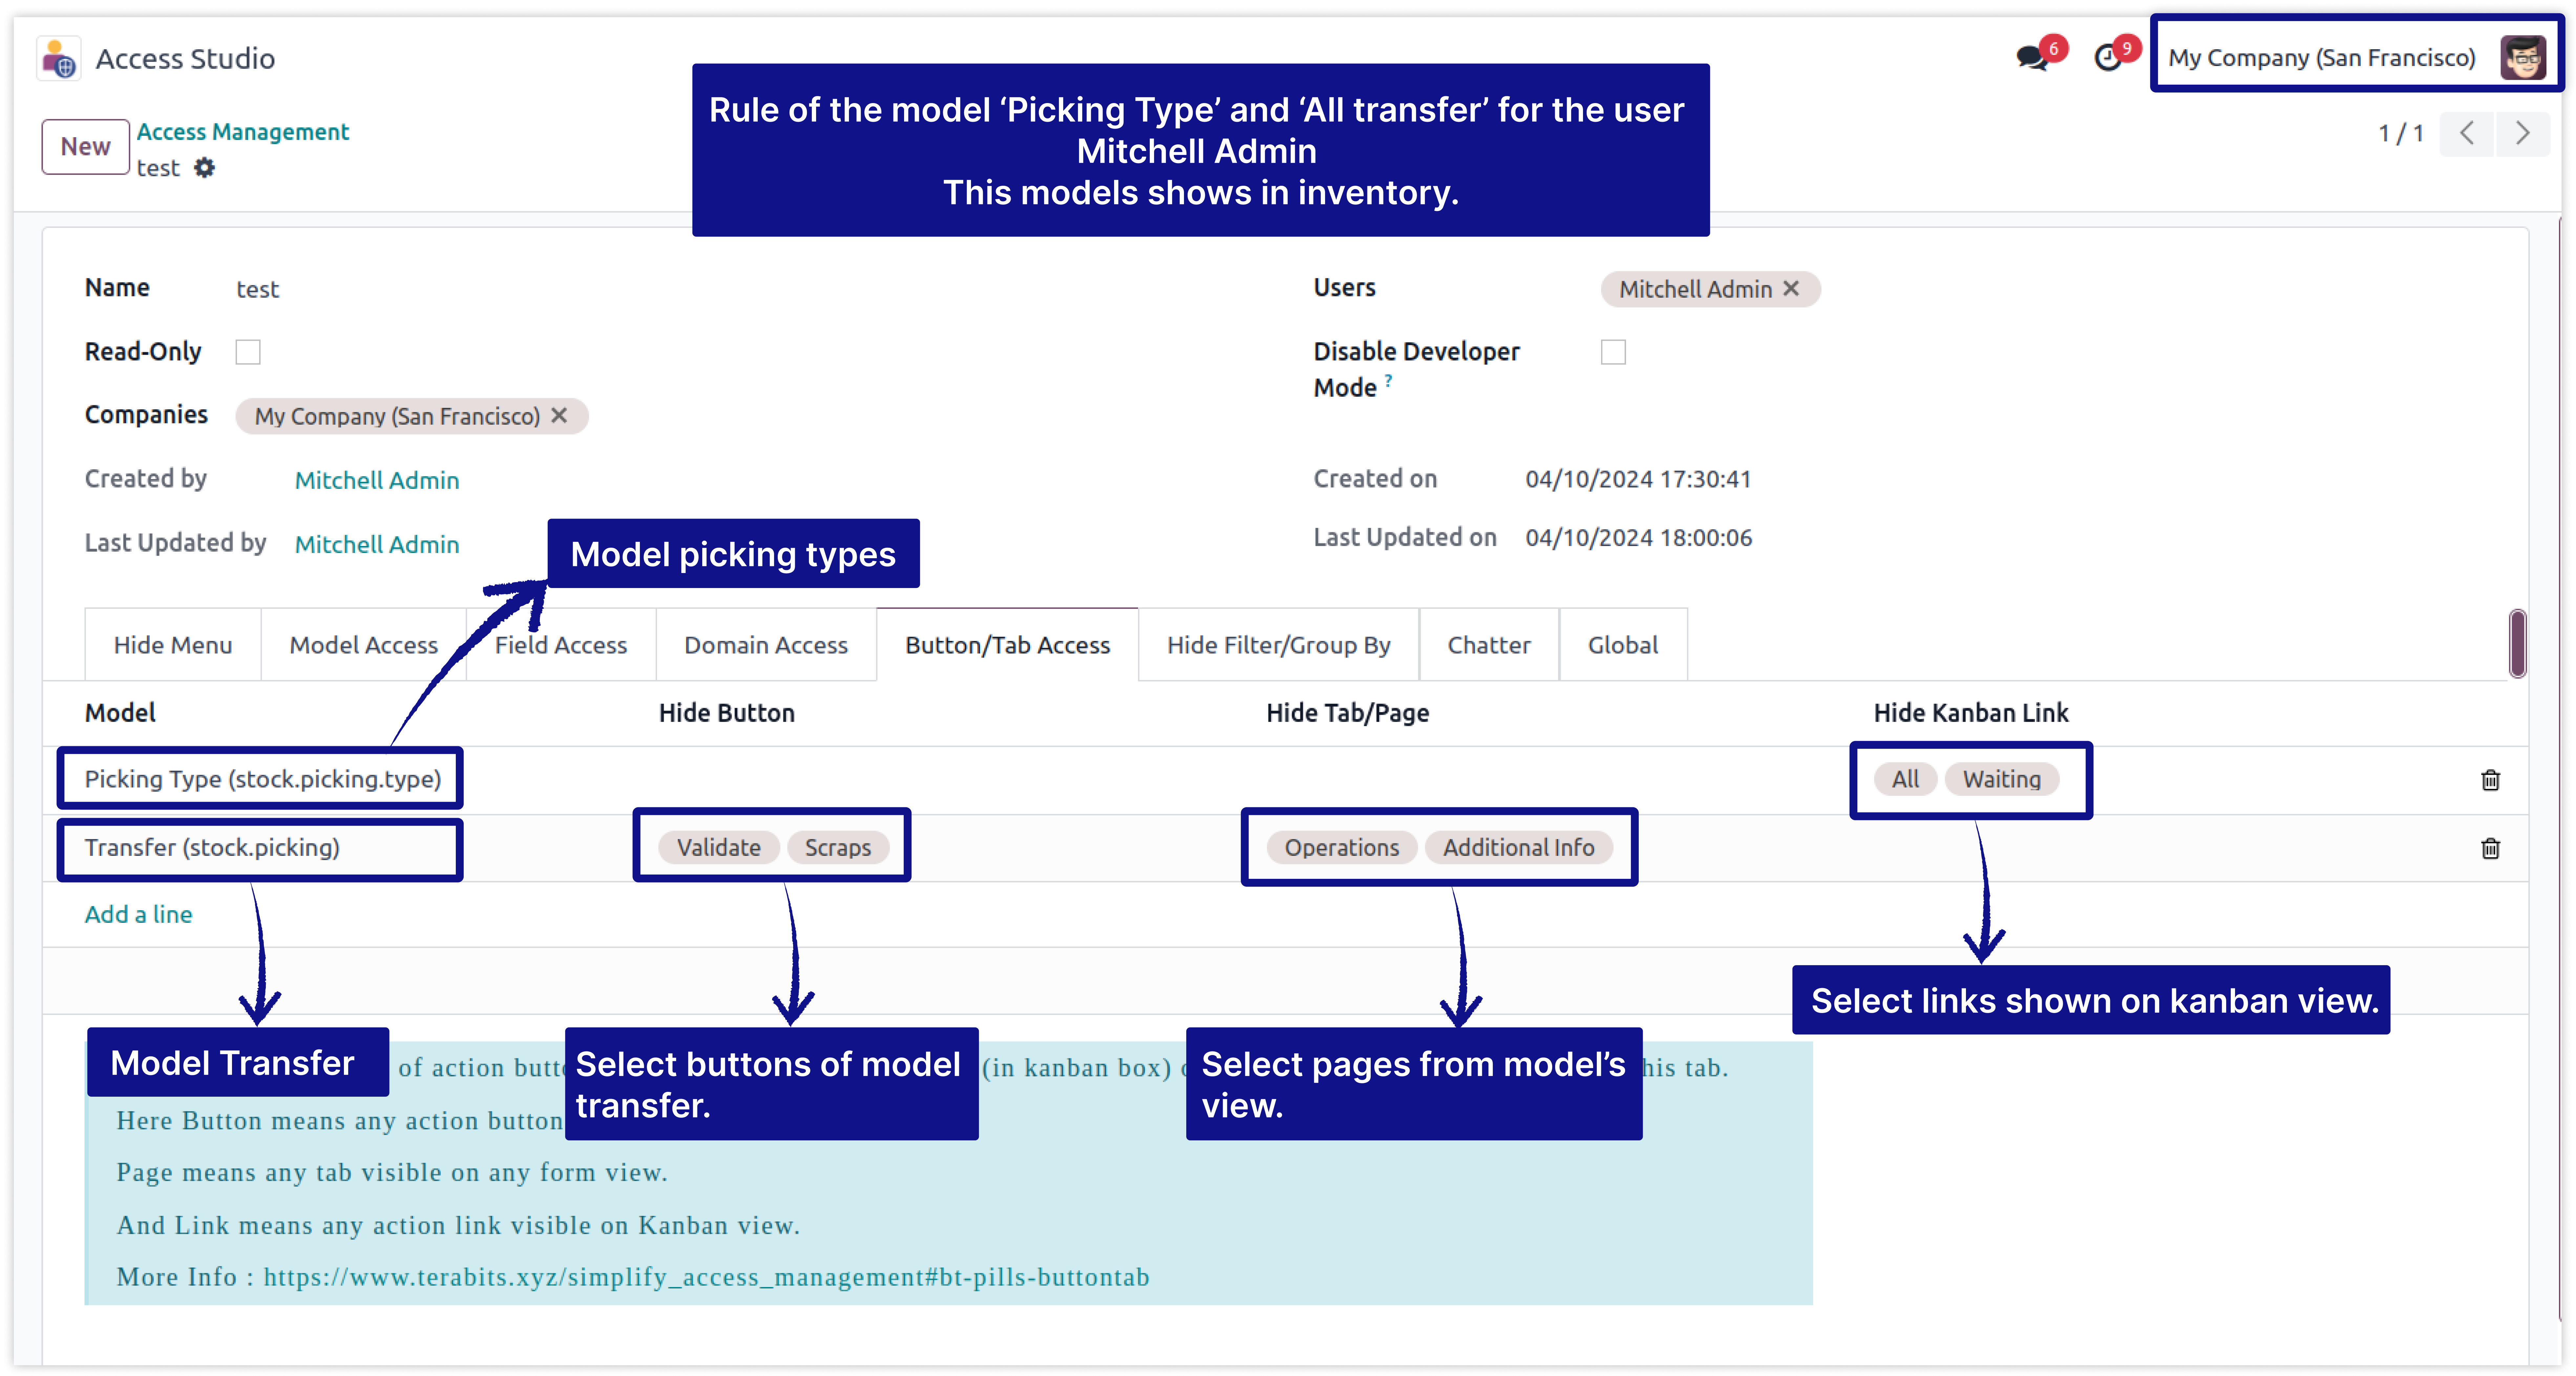
Here we have created rule of model Picking types(stock.picking.types) and Transfers(stock.picking) for the user Mitchell Admin.
-
In this rule, We have restricted the links ('All' and 'Waiting') from the kanban view of the model 'Picking types'.
-
Click on image to Zoom out.
-
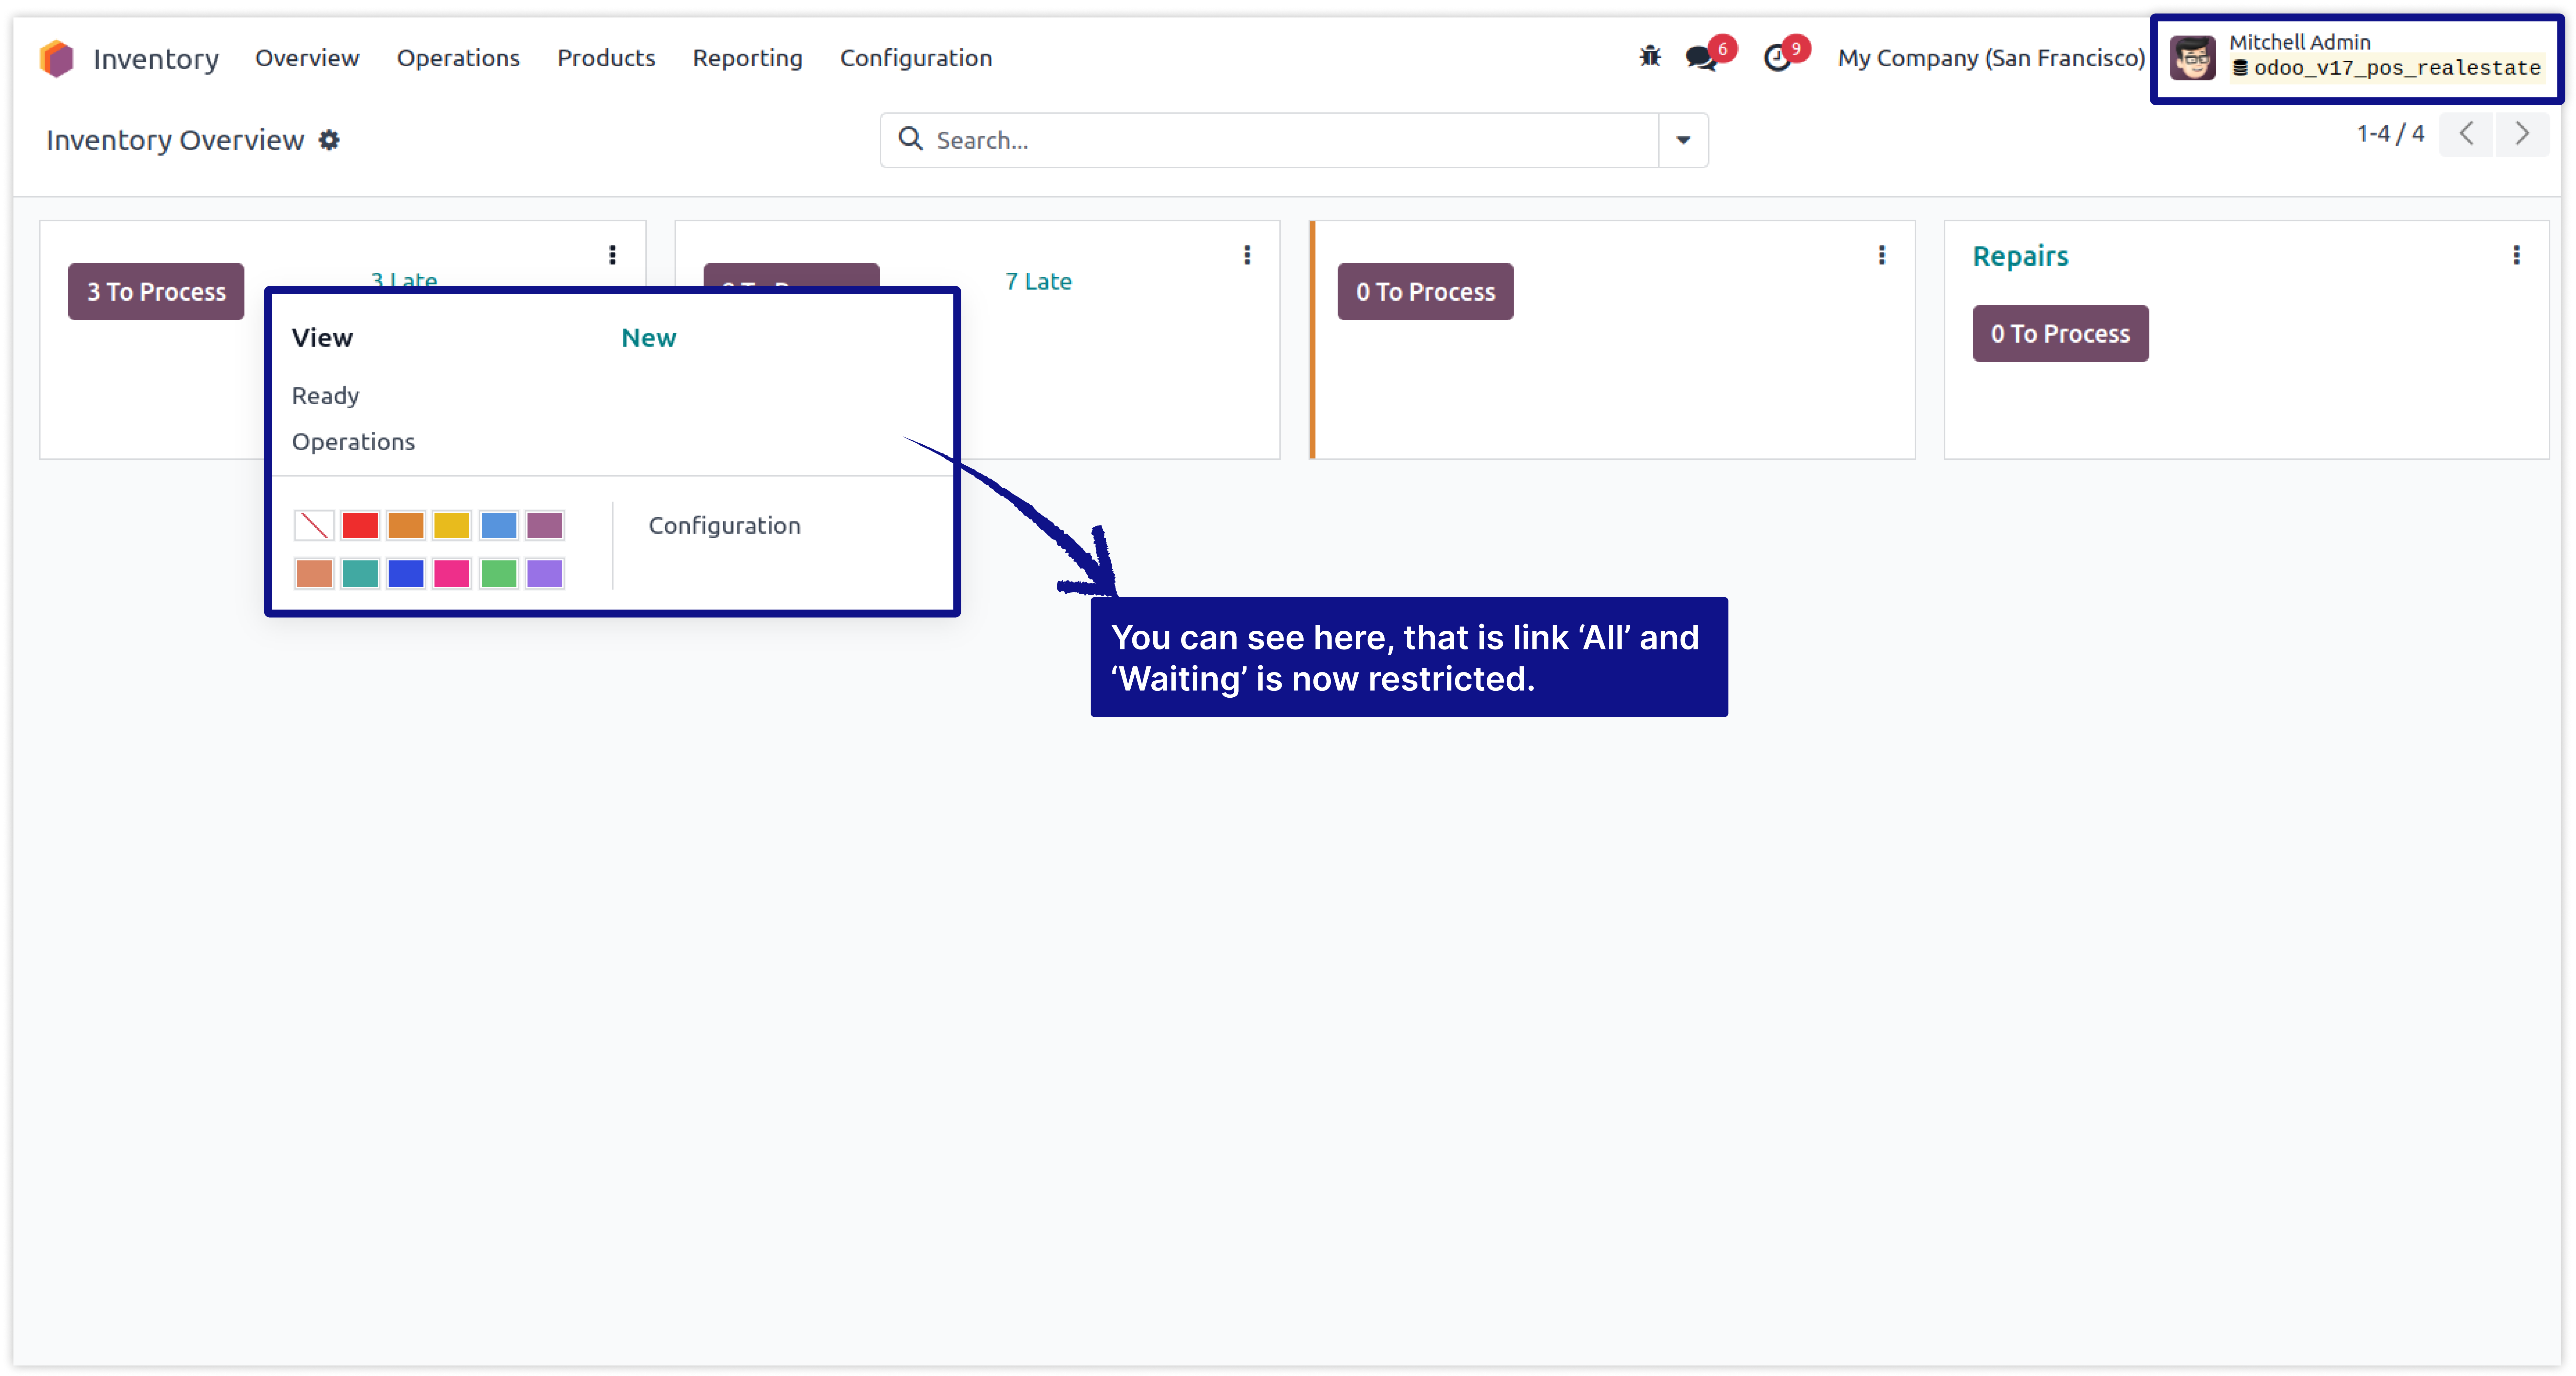
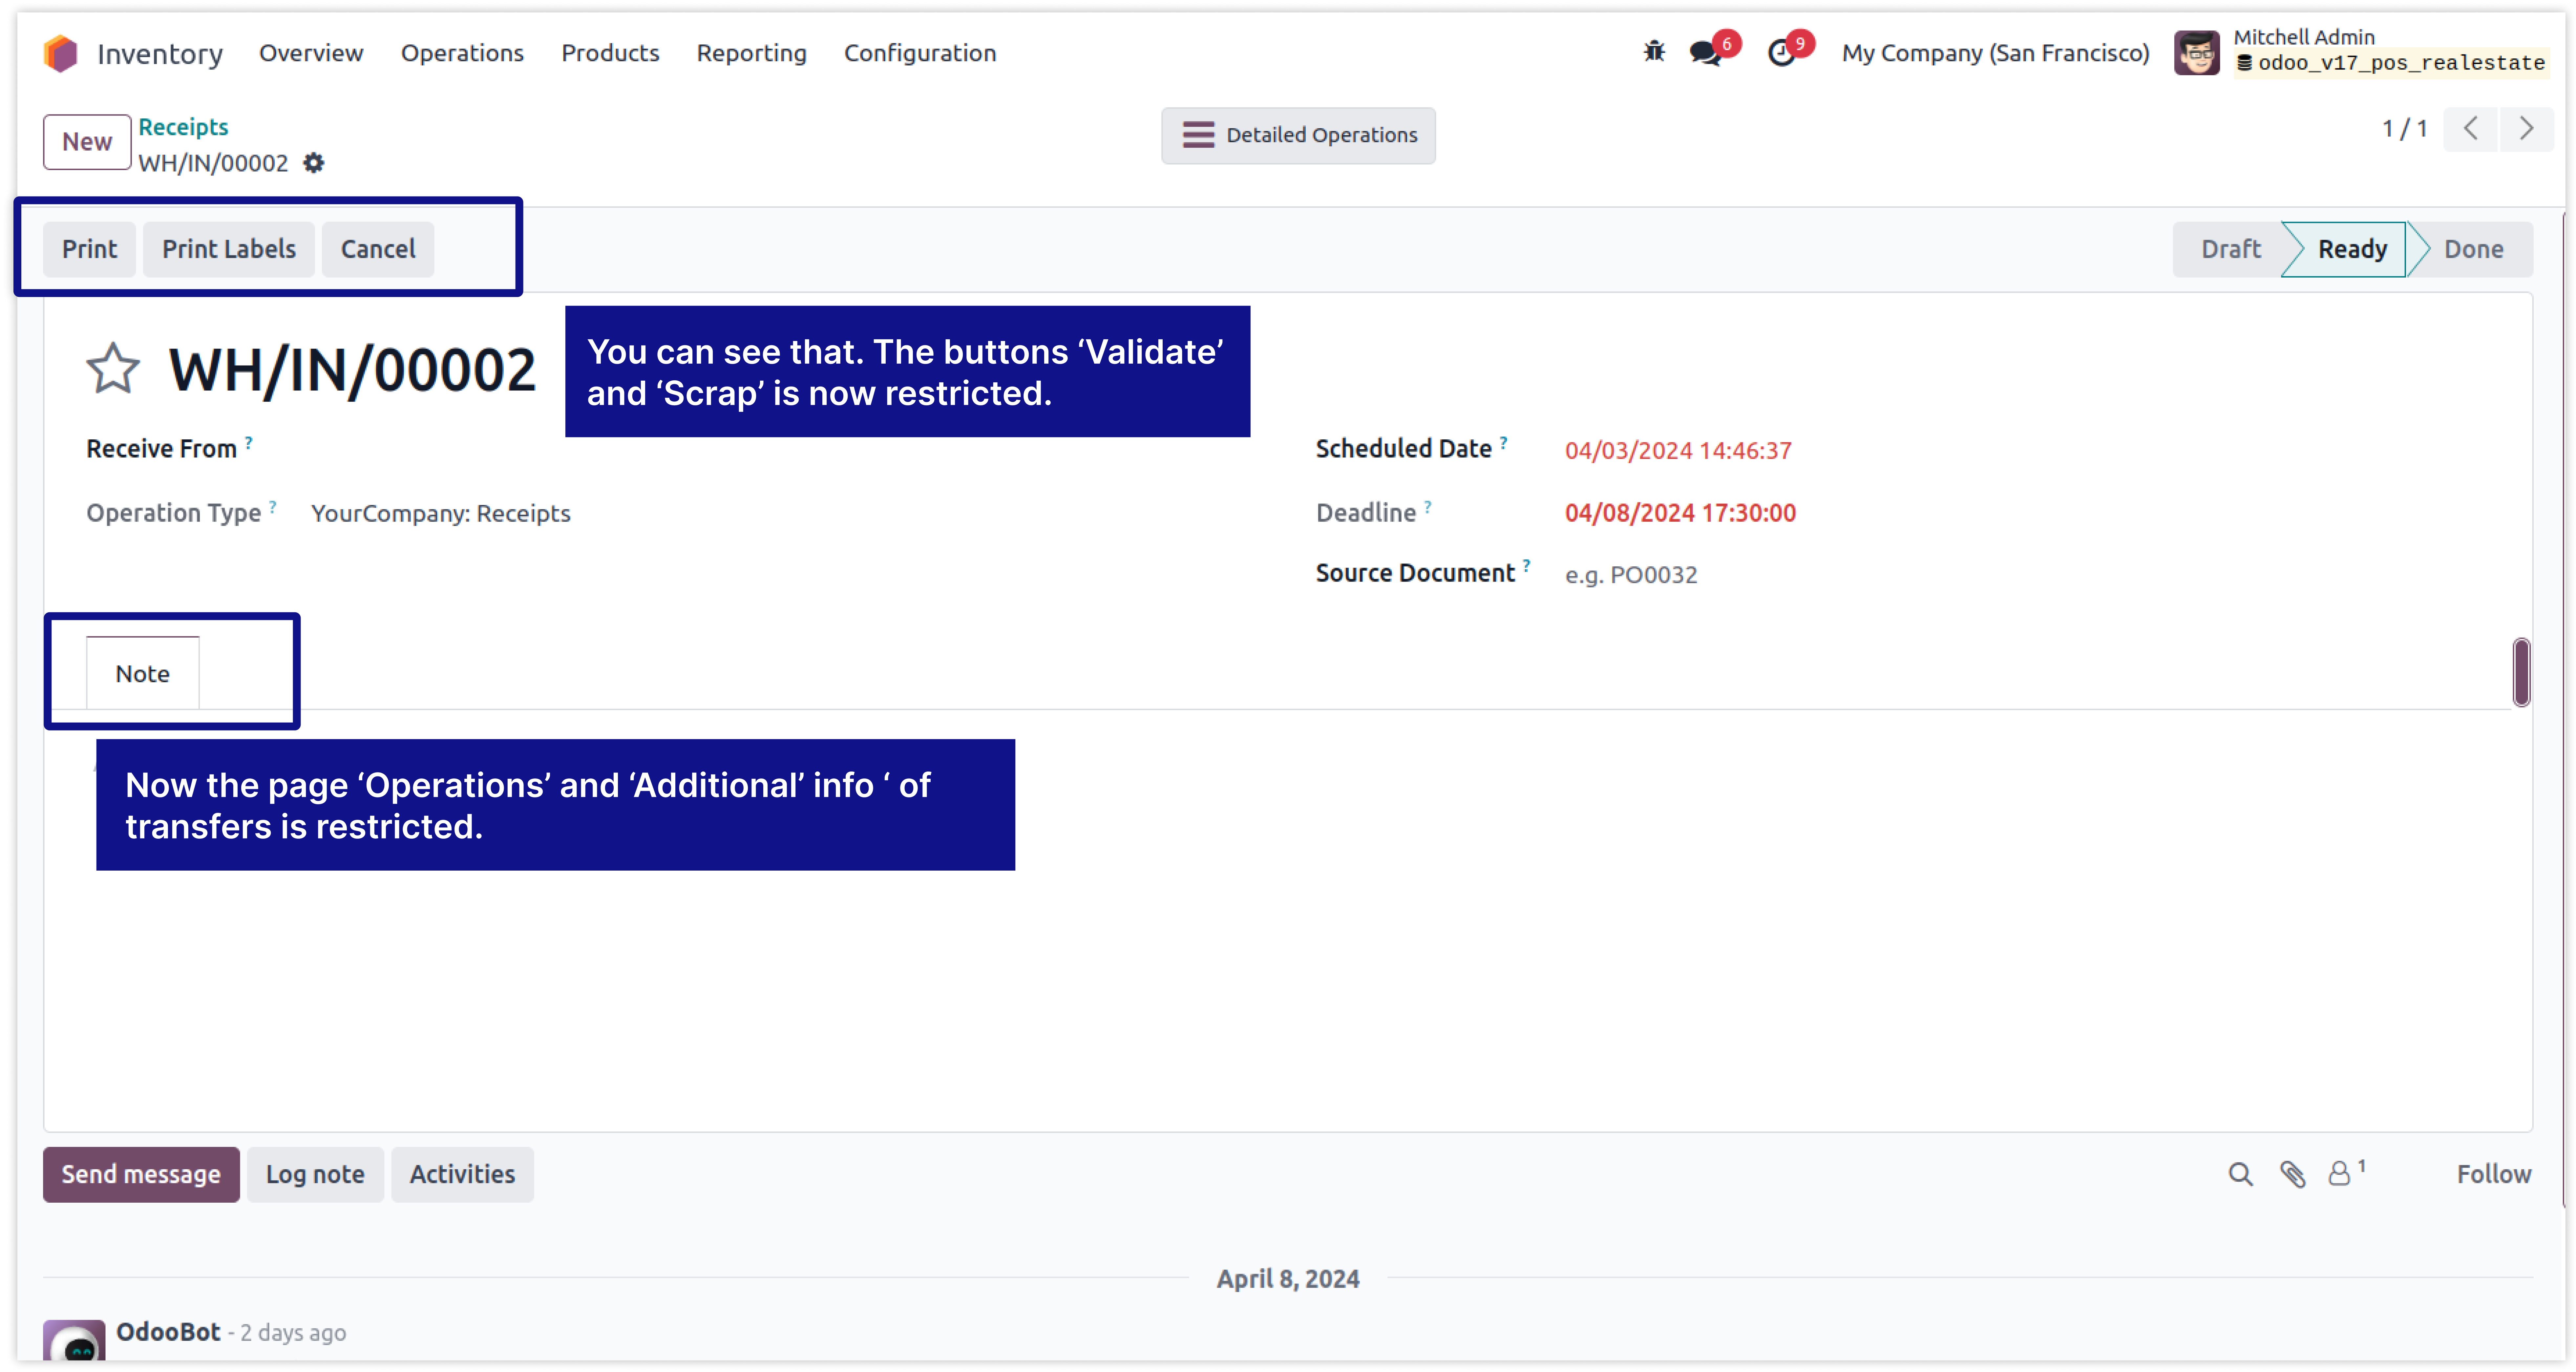
After applying the above rule, The result has shown in the below image.
-
Now you can see that Links ('All' and 'Waiting') is restricted from kanban view.
-
Mitchell Admin can't access the Buttons 'Validate' and 'Scrap'.
-
Mitchell Admin can't access the tab/page 'Operations' and 'Additional Info' in the form of model Transfers
-
Click on image to Zoom out.
Now you can set access rights of menus/submenus for any user from one place.
To set user-wise access rights of menus are not possible in odoo. Here are some limitations to set menu access in odoo.
You must have technical knowledge/technical person.
Not possible to create user-wise access right rules.
Here is the solution
Simplified Access Management provides the feature which allows you to create user wise Menu/Submenus access rights from one place and solutions of all above problems.
No need to have technical knowledge/technical person, Only you have to understand our module features.
You can set user-wise access right of menu/submenus with multi companies.
You can customize rules for base modules as well as third-party modules.
How to hide menu/submenu access rights.
Here we have explained some examples step by step. At the last one example explained by video.
-
First of all you will need to know all about Menu/Submenu Access Right to make right rules for the users.
-
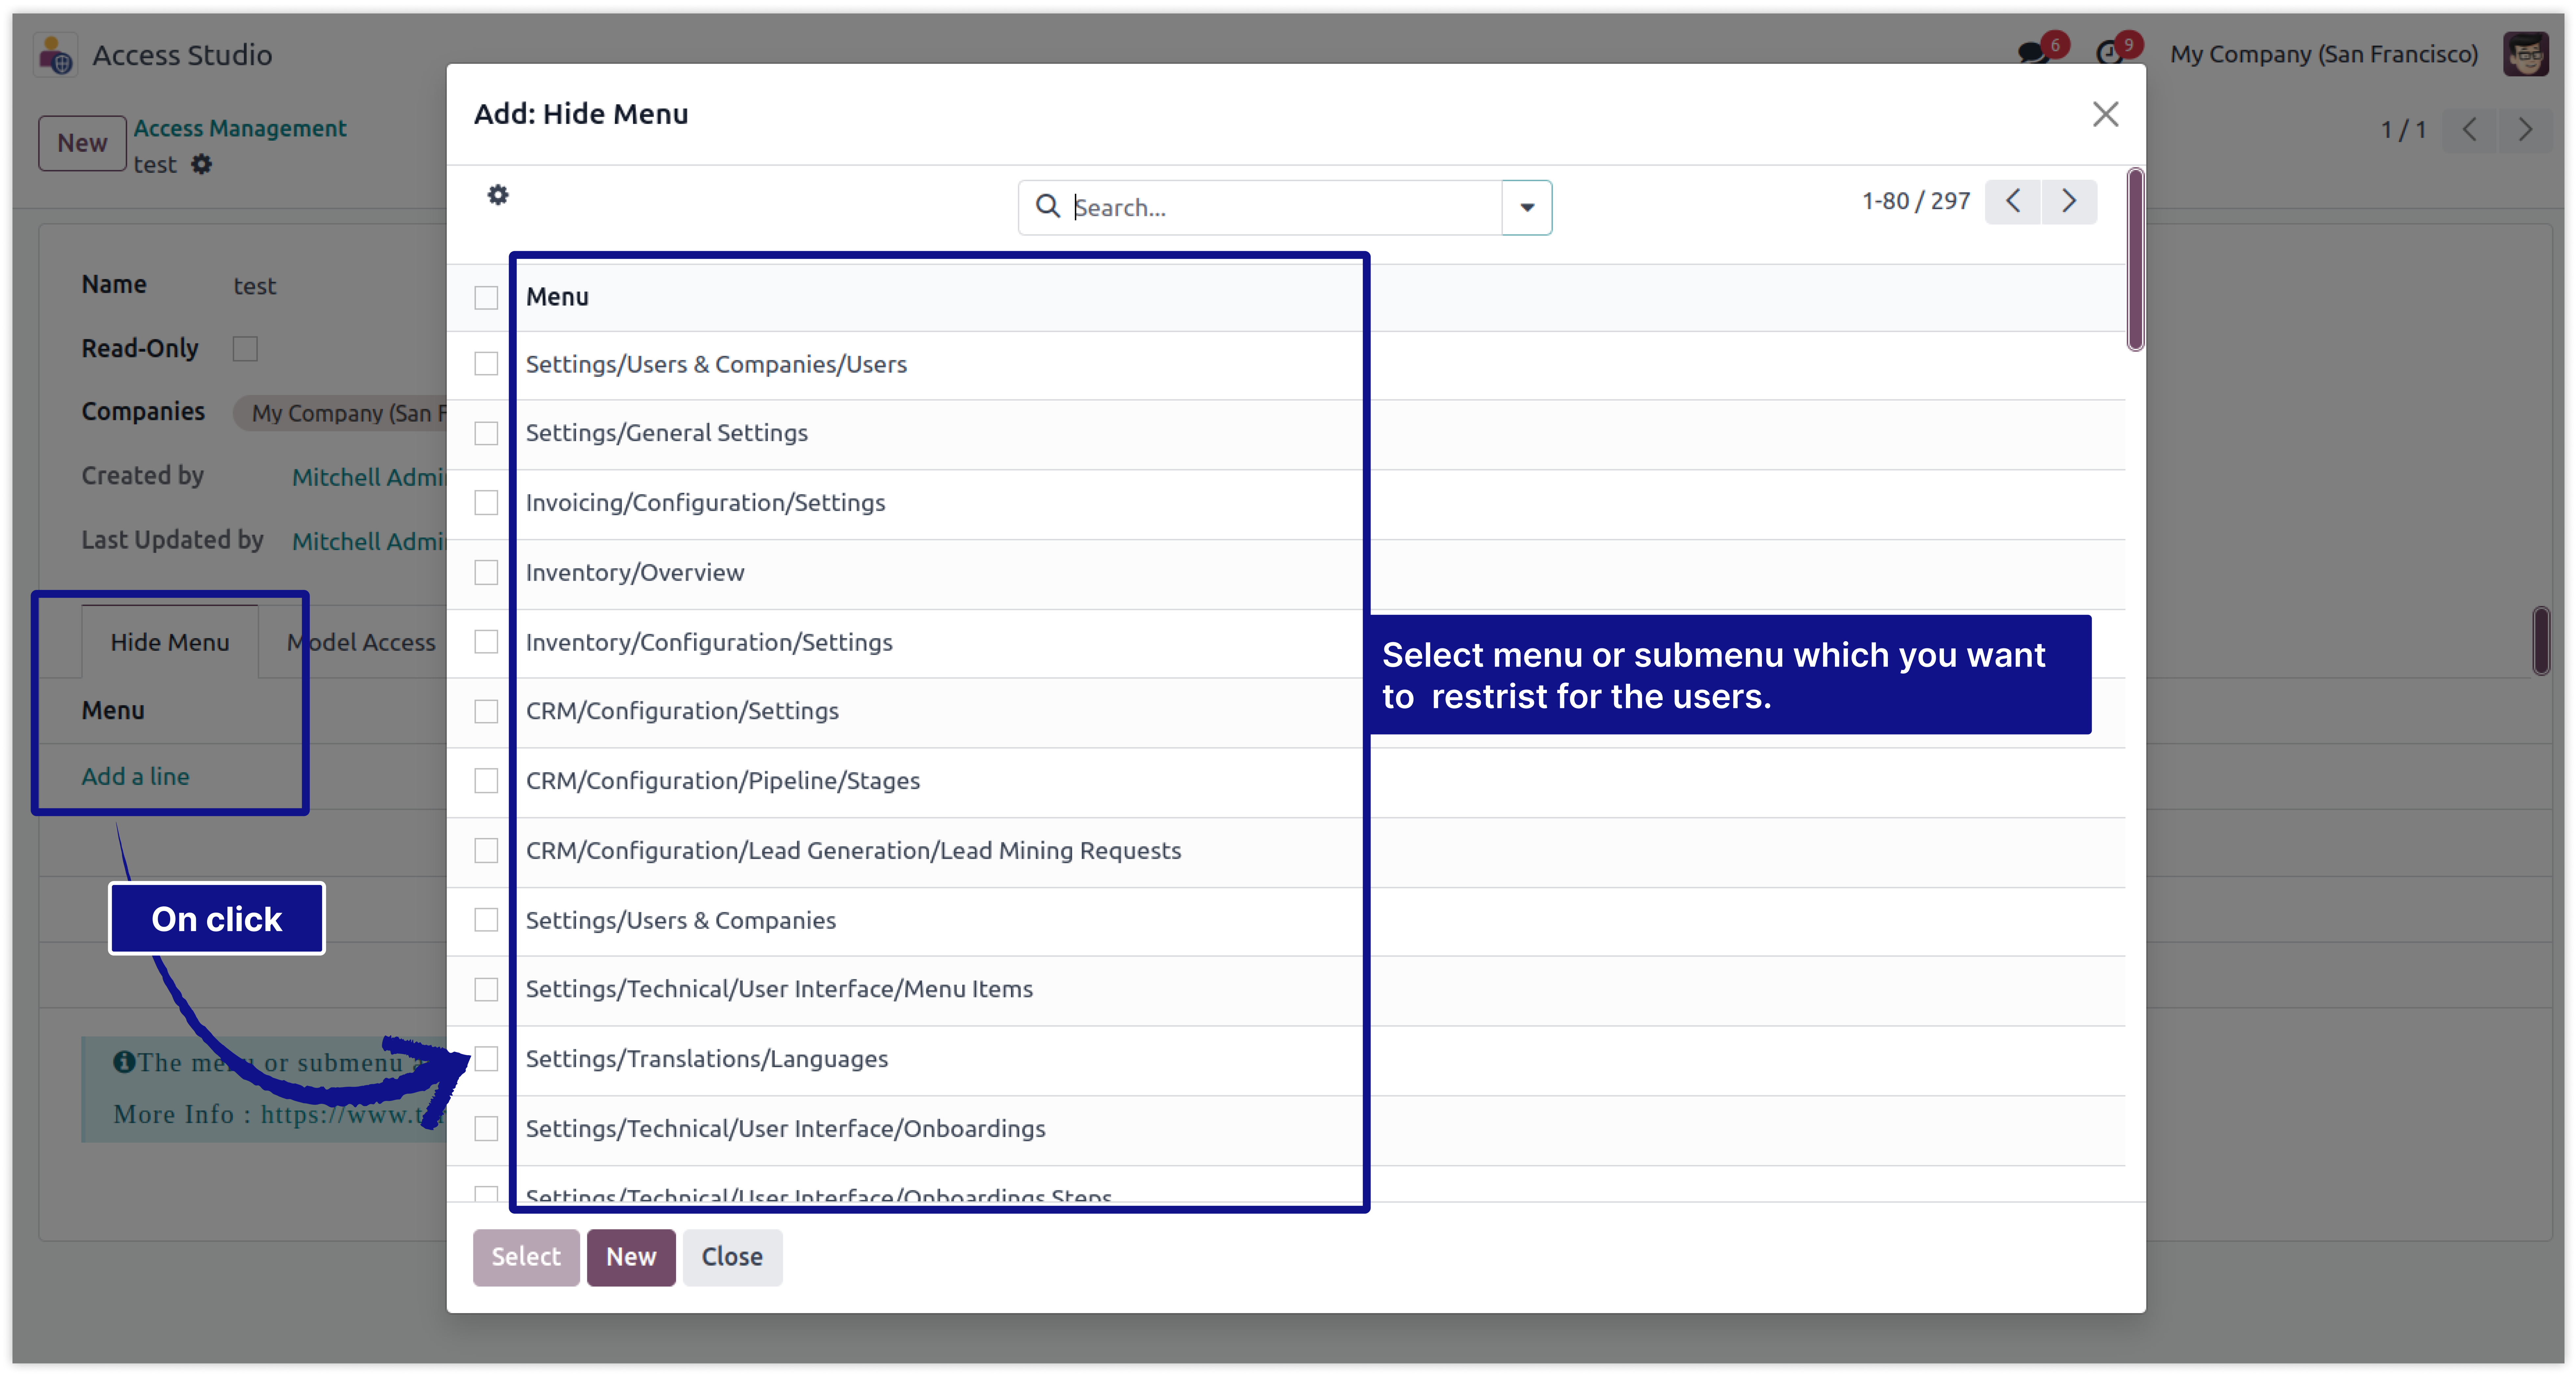
So, here we have explained all Menu access right features in below view .
-
Click on image to Zoom out.
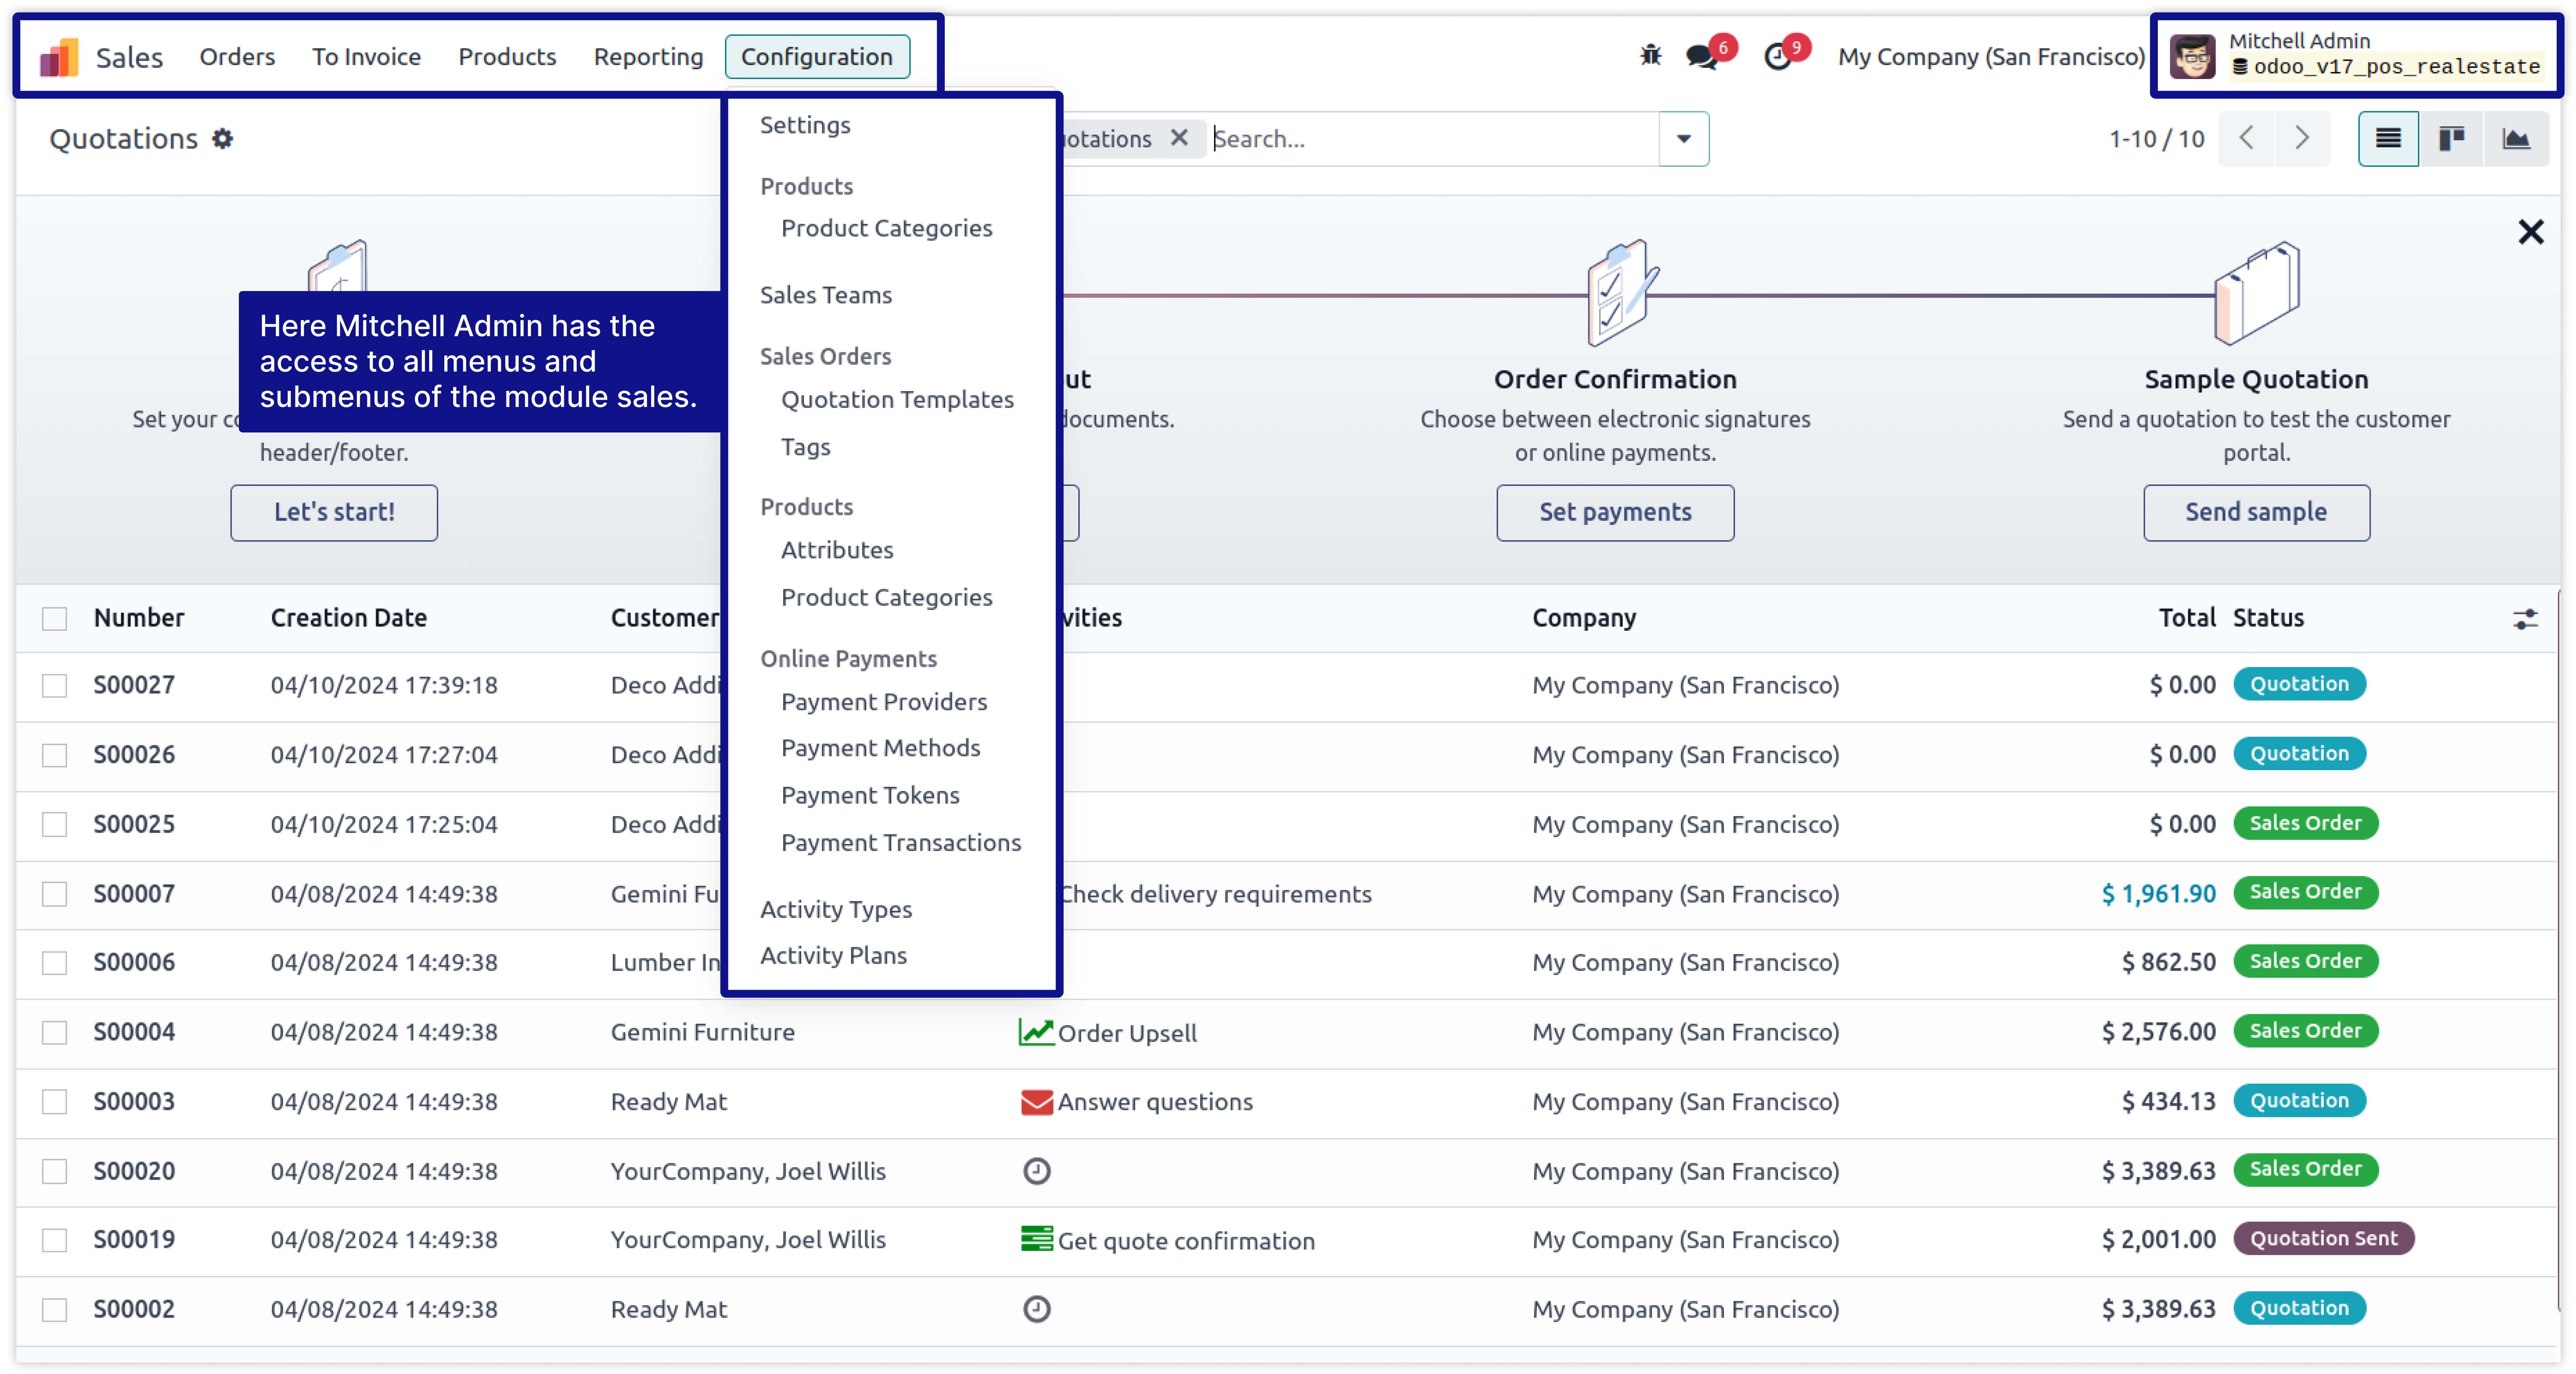
In this example we will set menu access rights for the user Mitchell Admin from the Sales module.
-
The below Image show that Mitchell Admin has access to all the menus.
-
We highlighted his access that is all the sales menus and submenus.
-
Click on image to Zoom out.
-
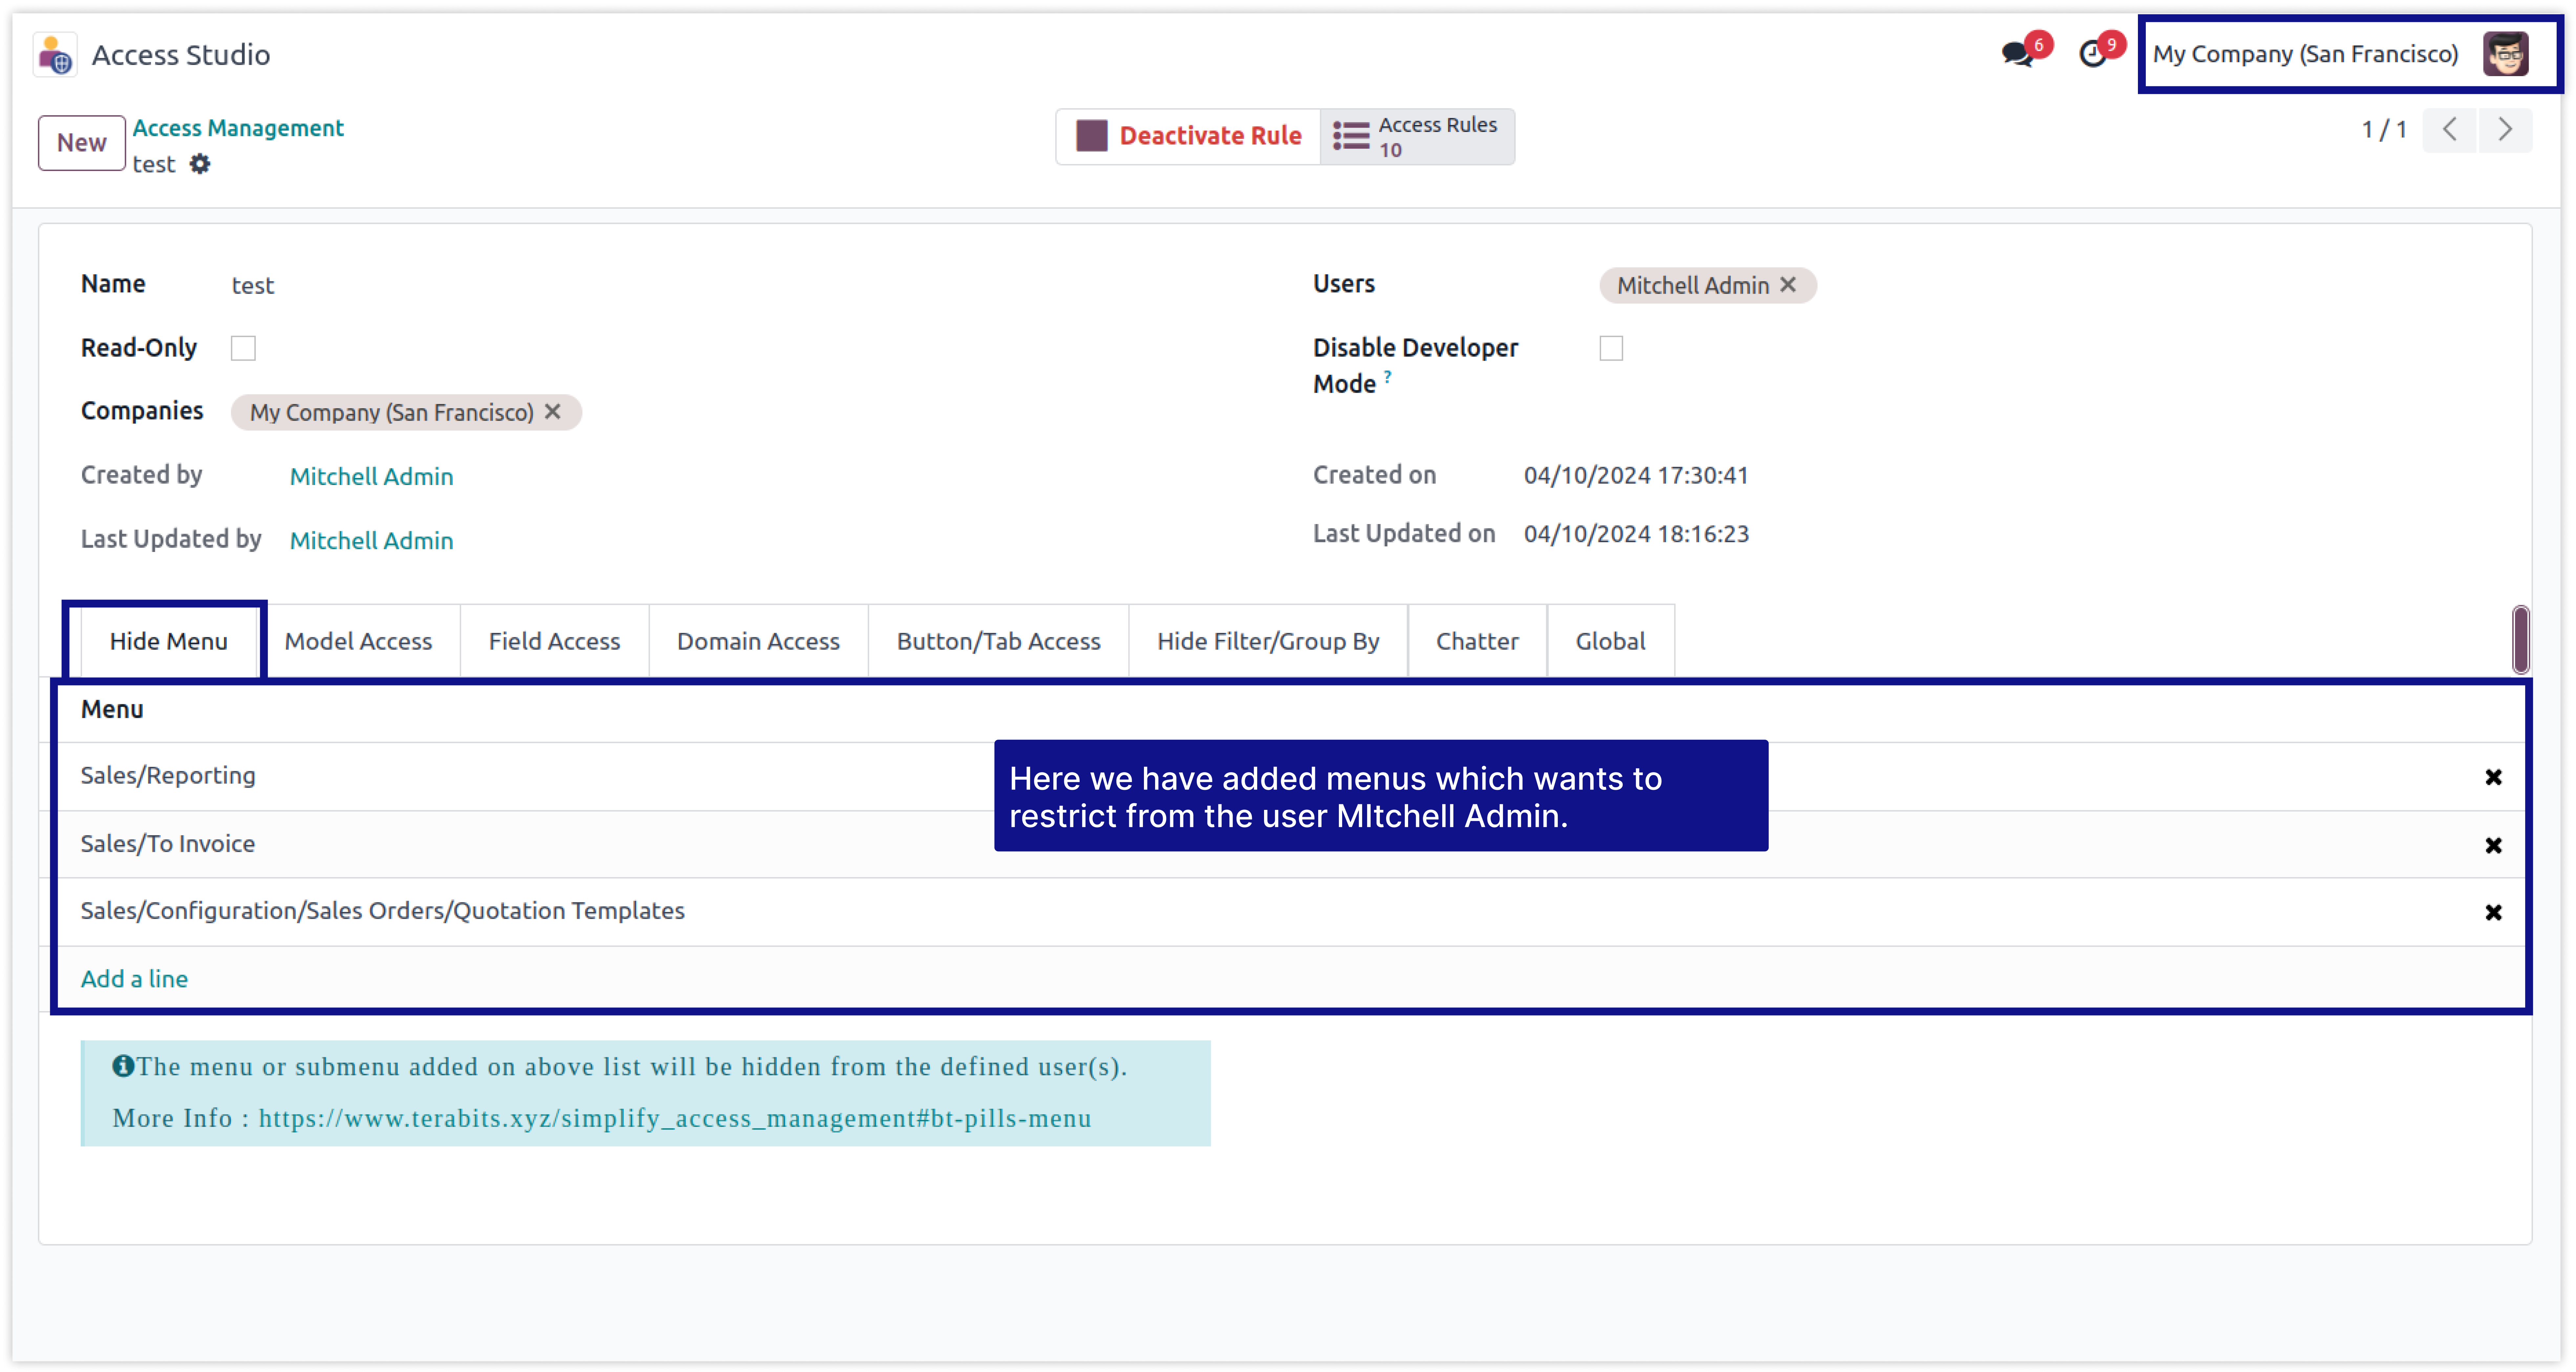
Here we created the rule of menu access of sales module for the user Mitchell Admin.
-
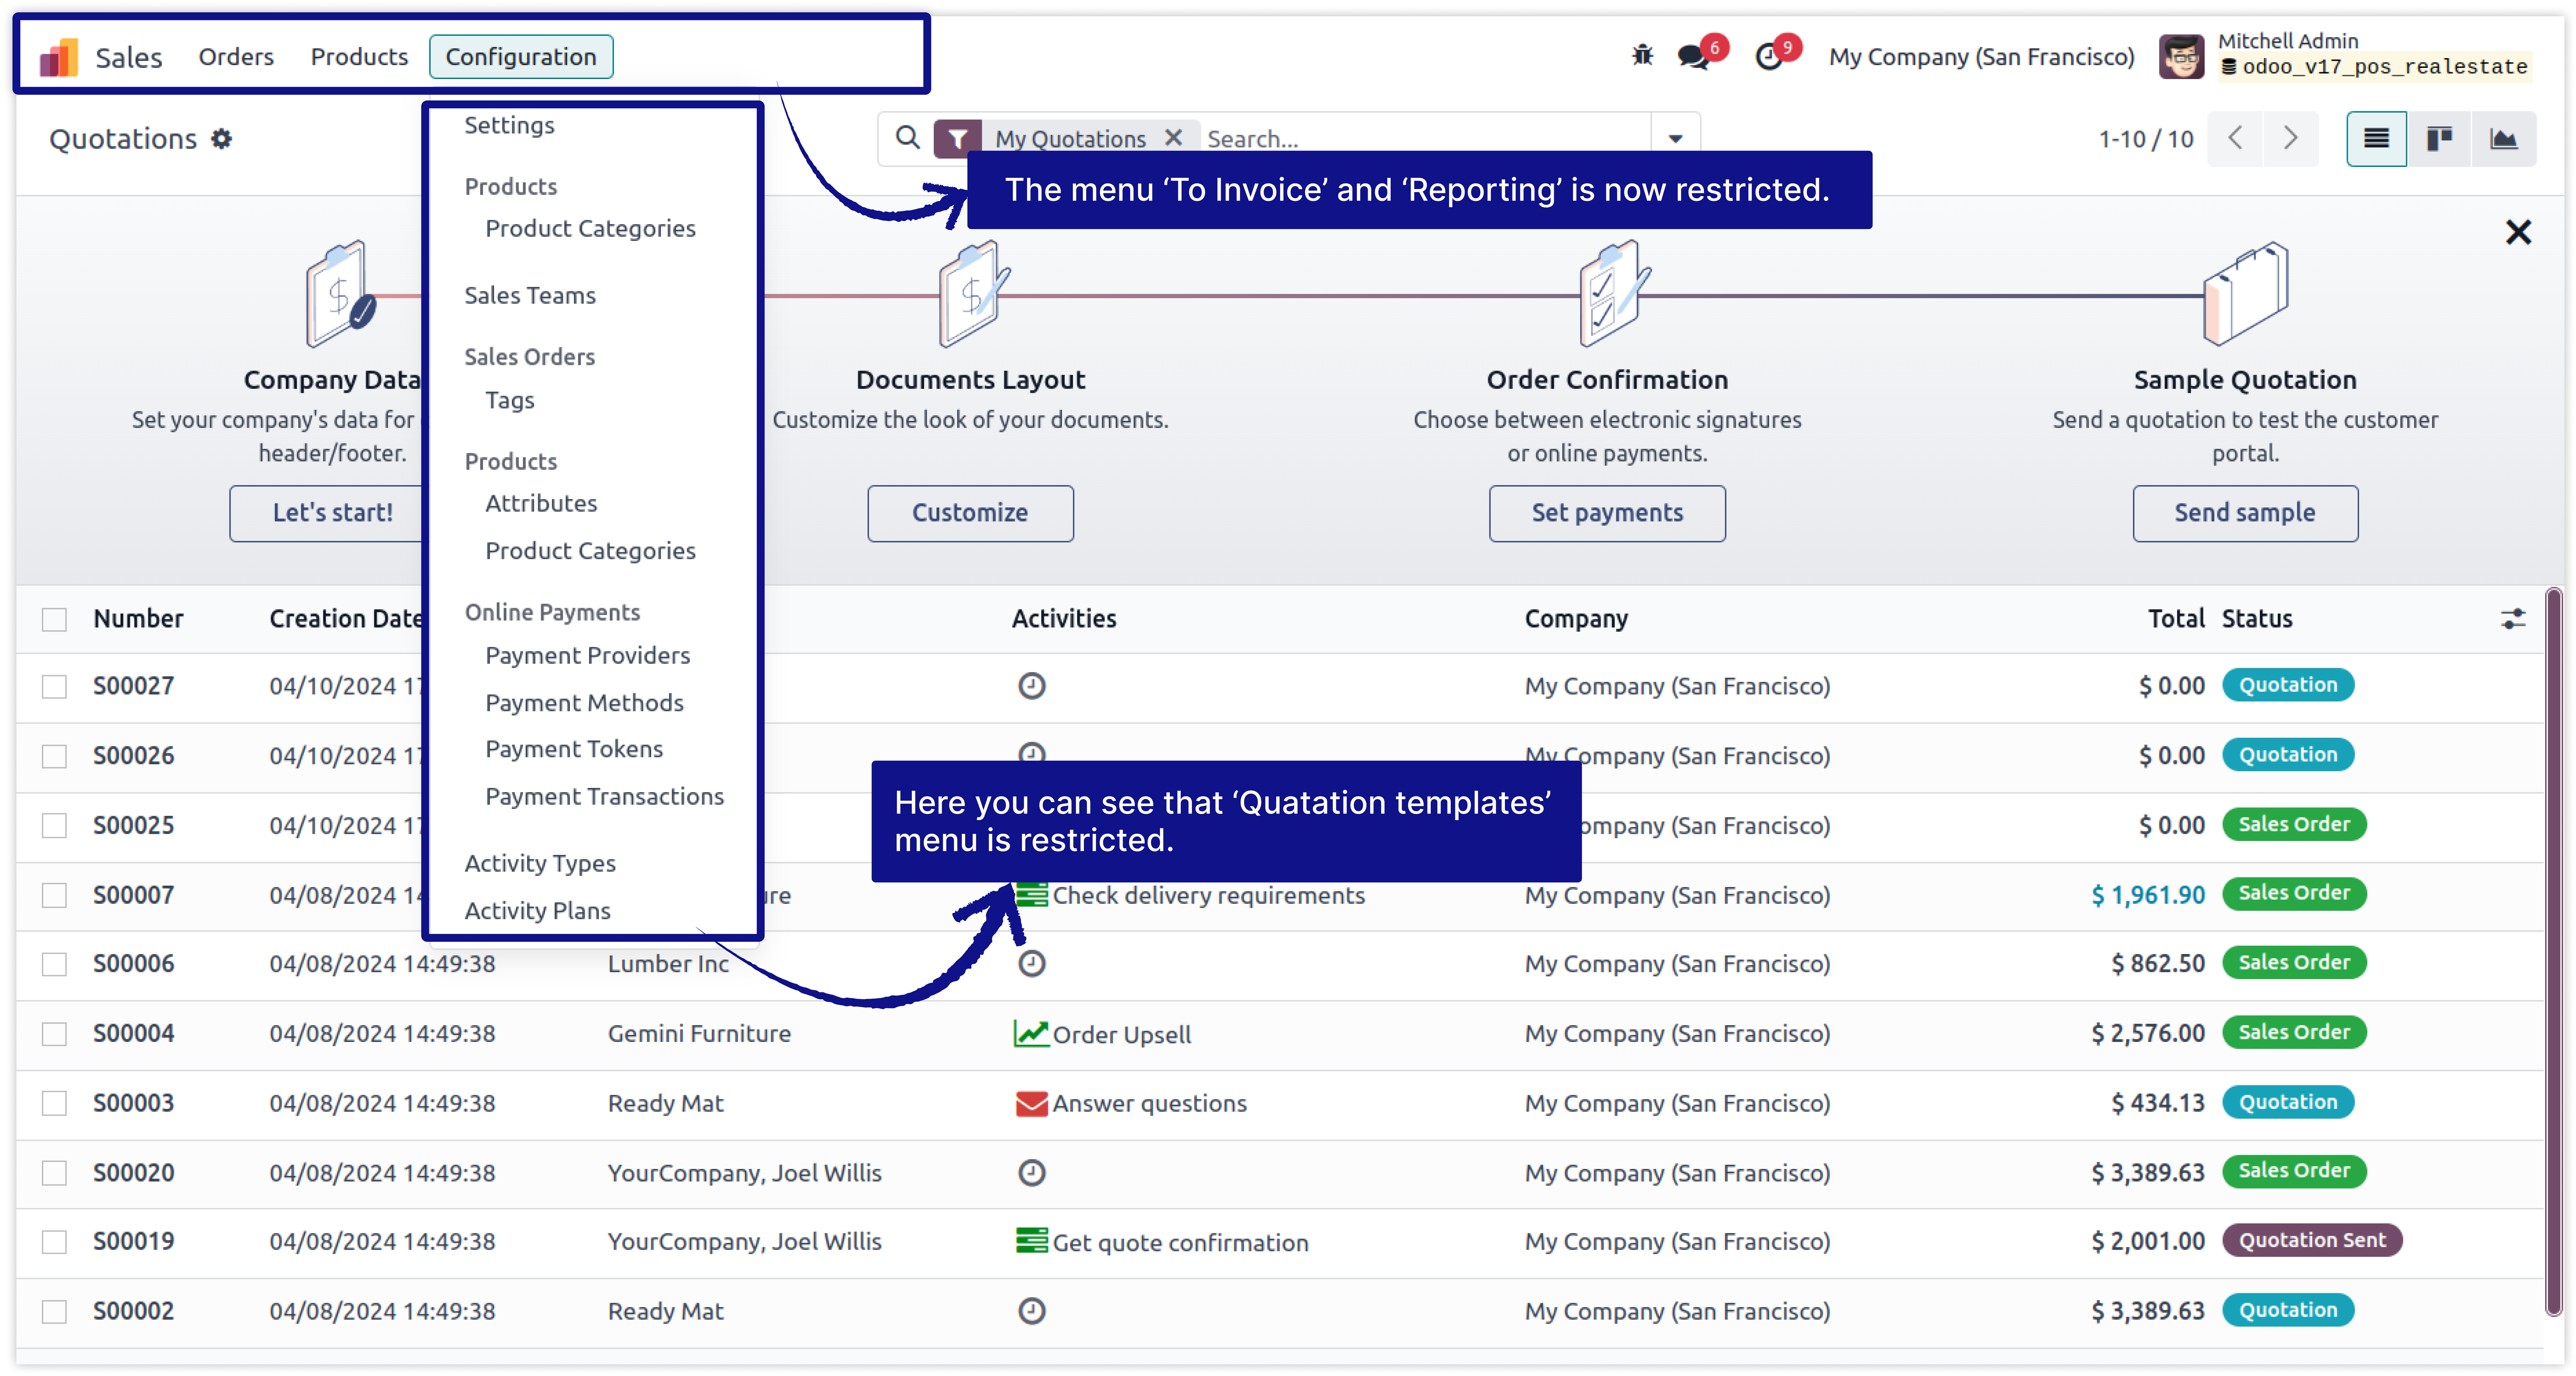
In this rule we have restricted some sales module menus which is To Invoice, Reporting and Quotation Template.
-
Click on image to Zoom out.
-
After applying the rule, You can see that the selected menus are restricted for the Mitchell Admin.
-
Click on image to Zoom out.
Now you can set access rights of the model (read, write, delete, update) and set the domain to access the model's records for any user and from one place.
To set user-wise access rights of model access is only possible through record rules. But here are some limitations to set access by record rule in odoo.
You must have technical knowledge/technical person.
Not possible to create user-wise access right rules.
Does not work in multi-companies.
You need to create separate rules for access model's records and other permissions.
Here is the solution
Simplified Access Management allows you to create user wise model access rights from one place and solutions of all above problems.
No need to have technical knowledge/technical person, Only you have to understand our module features.
You can set user-wise access right of menu/submenus with multi companies.
You can do all things (create, write, delete, update) access right in single rule.
You can set domain to allow access model's records for specific users only.
You can customize rules for base modules as well as third-party modules.
-
First of all you will need to know all about Domain Access Right to make right rules for the users.
-
So, here we have explained all Domain access right features in below image.
-
Click on image to Zoom out.
-
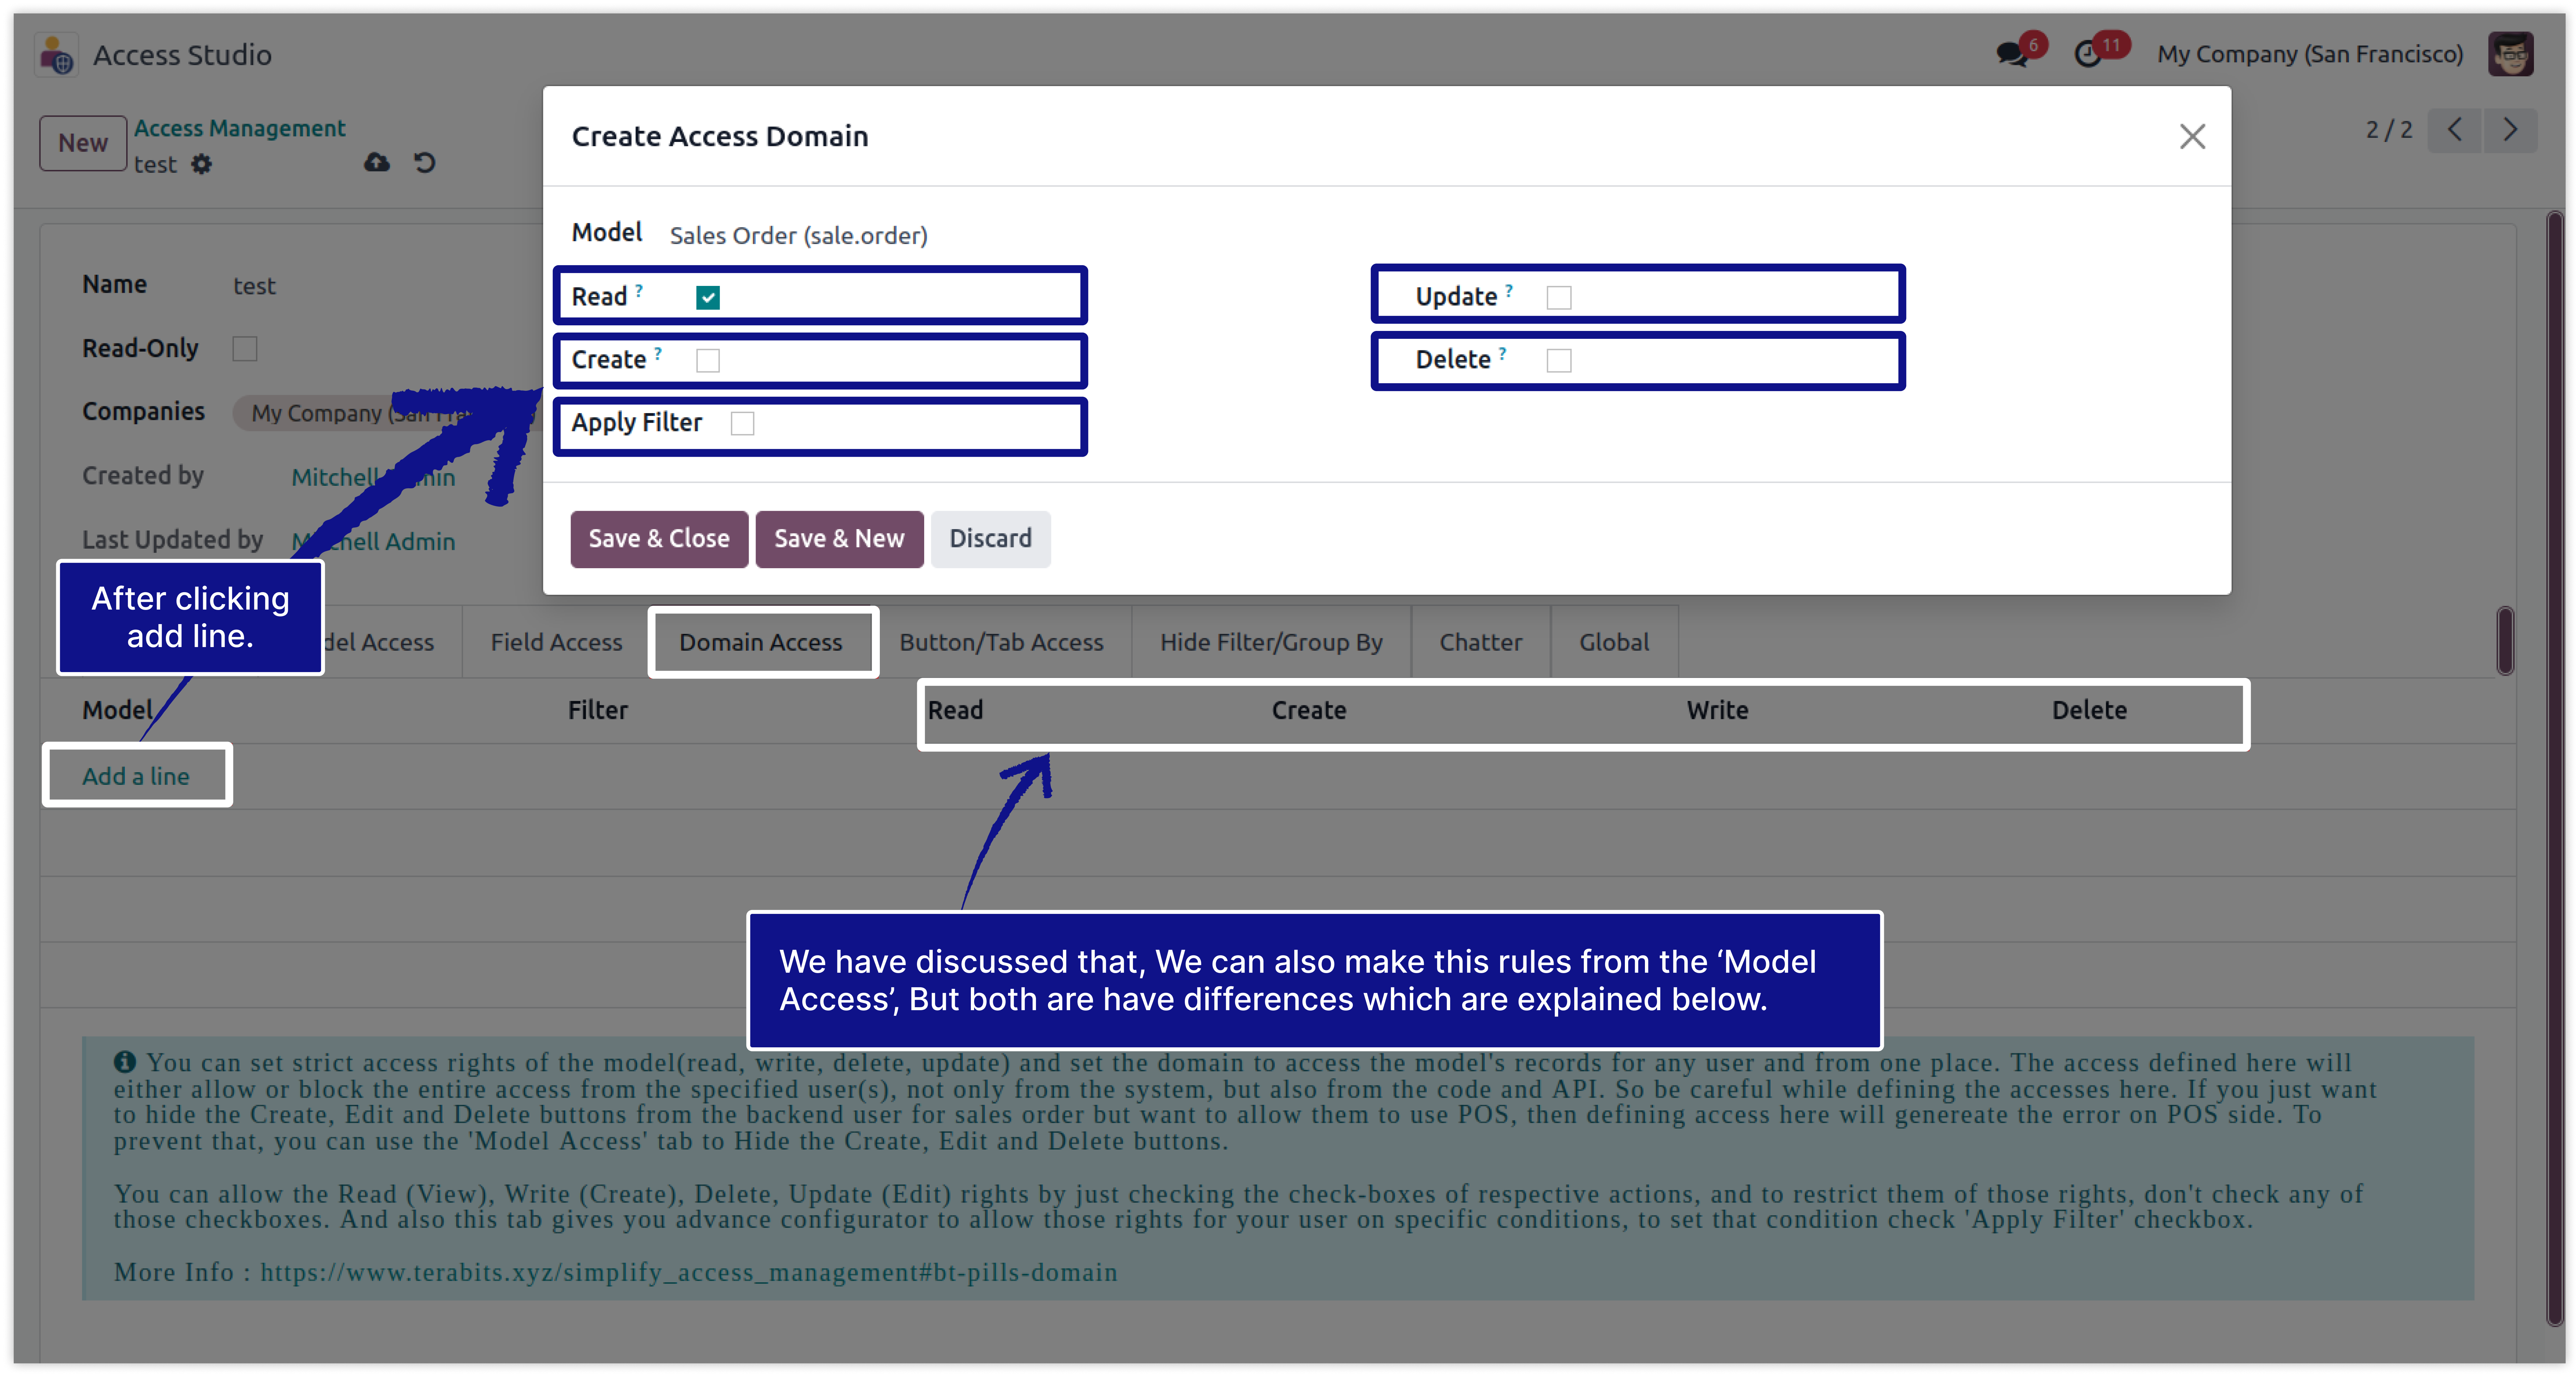
The first field is model selection. Select that model in which you want to set restrictions.
-
Read Access: Read checkbox used to set readonly access of the selected model for the specified users. They will not be able to do anything in the selected model except for reading.
-
Create Access: Create checkbox used to set only 'Create' access of the selected model for the specified users. They will not be able to Edit or Delete record in the selected model.
-
Update Access: Update/Write checkbox used to set 'Write/Update' access of the selected model for the specified users. They will not be able to Create or Delete record in the selected model.
-
Delete Access: Delete checkbox used to set 'Delete' access of the selected model for the specified users. They will not be able to Create record in the selected model.
-
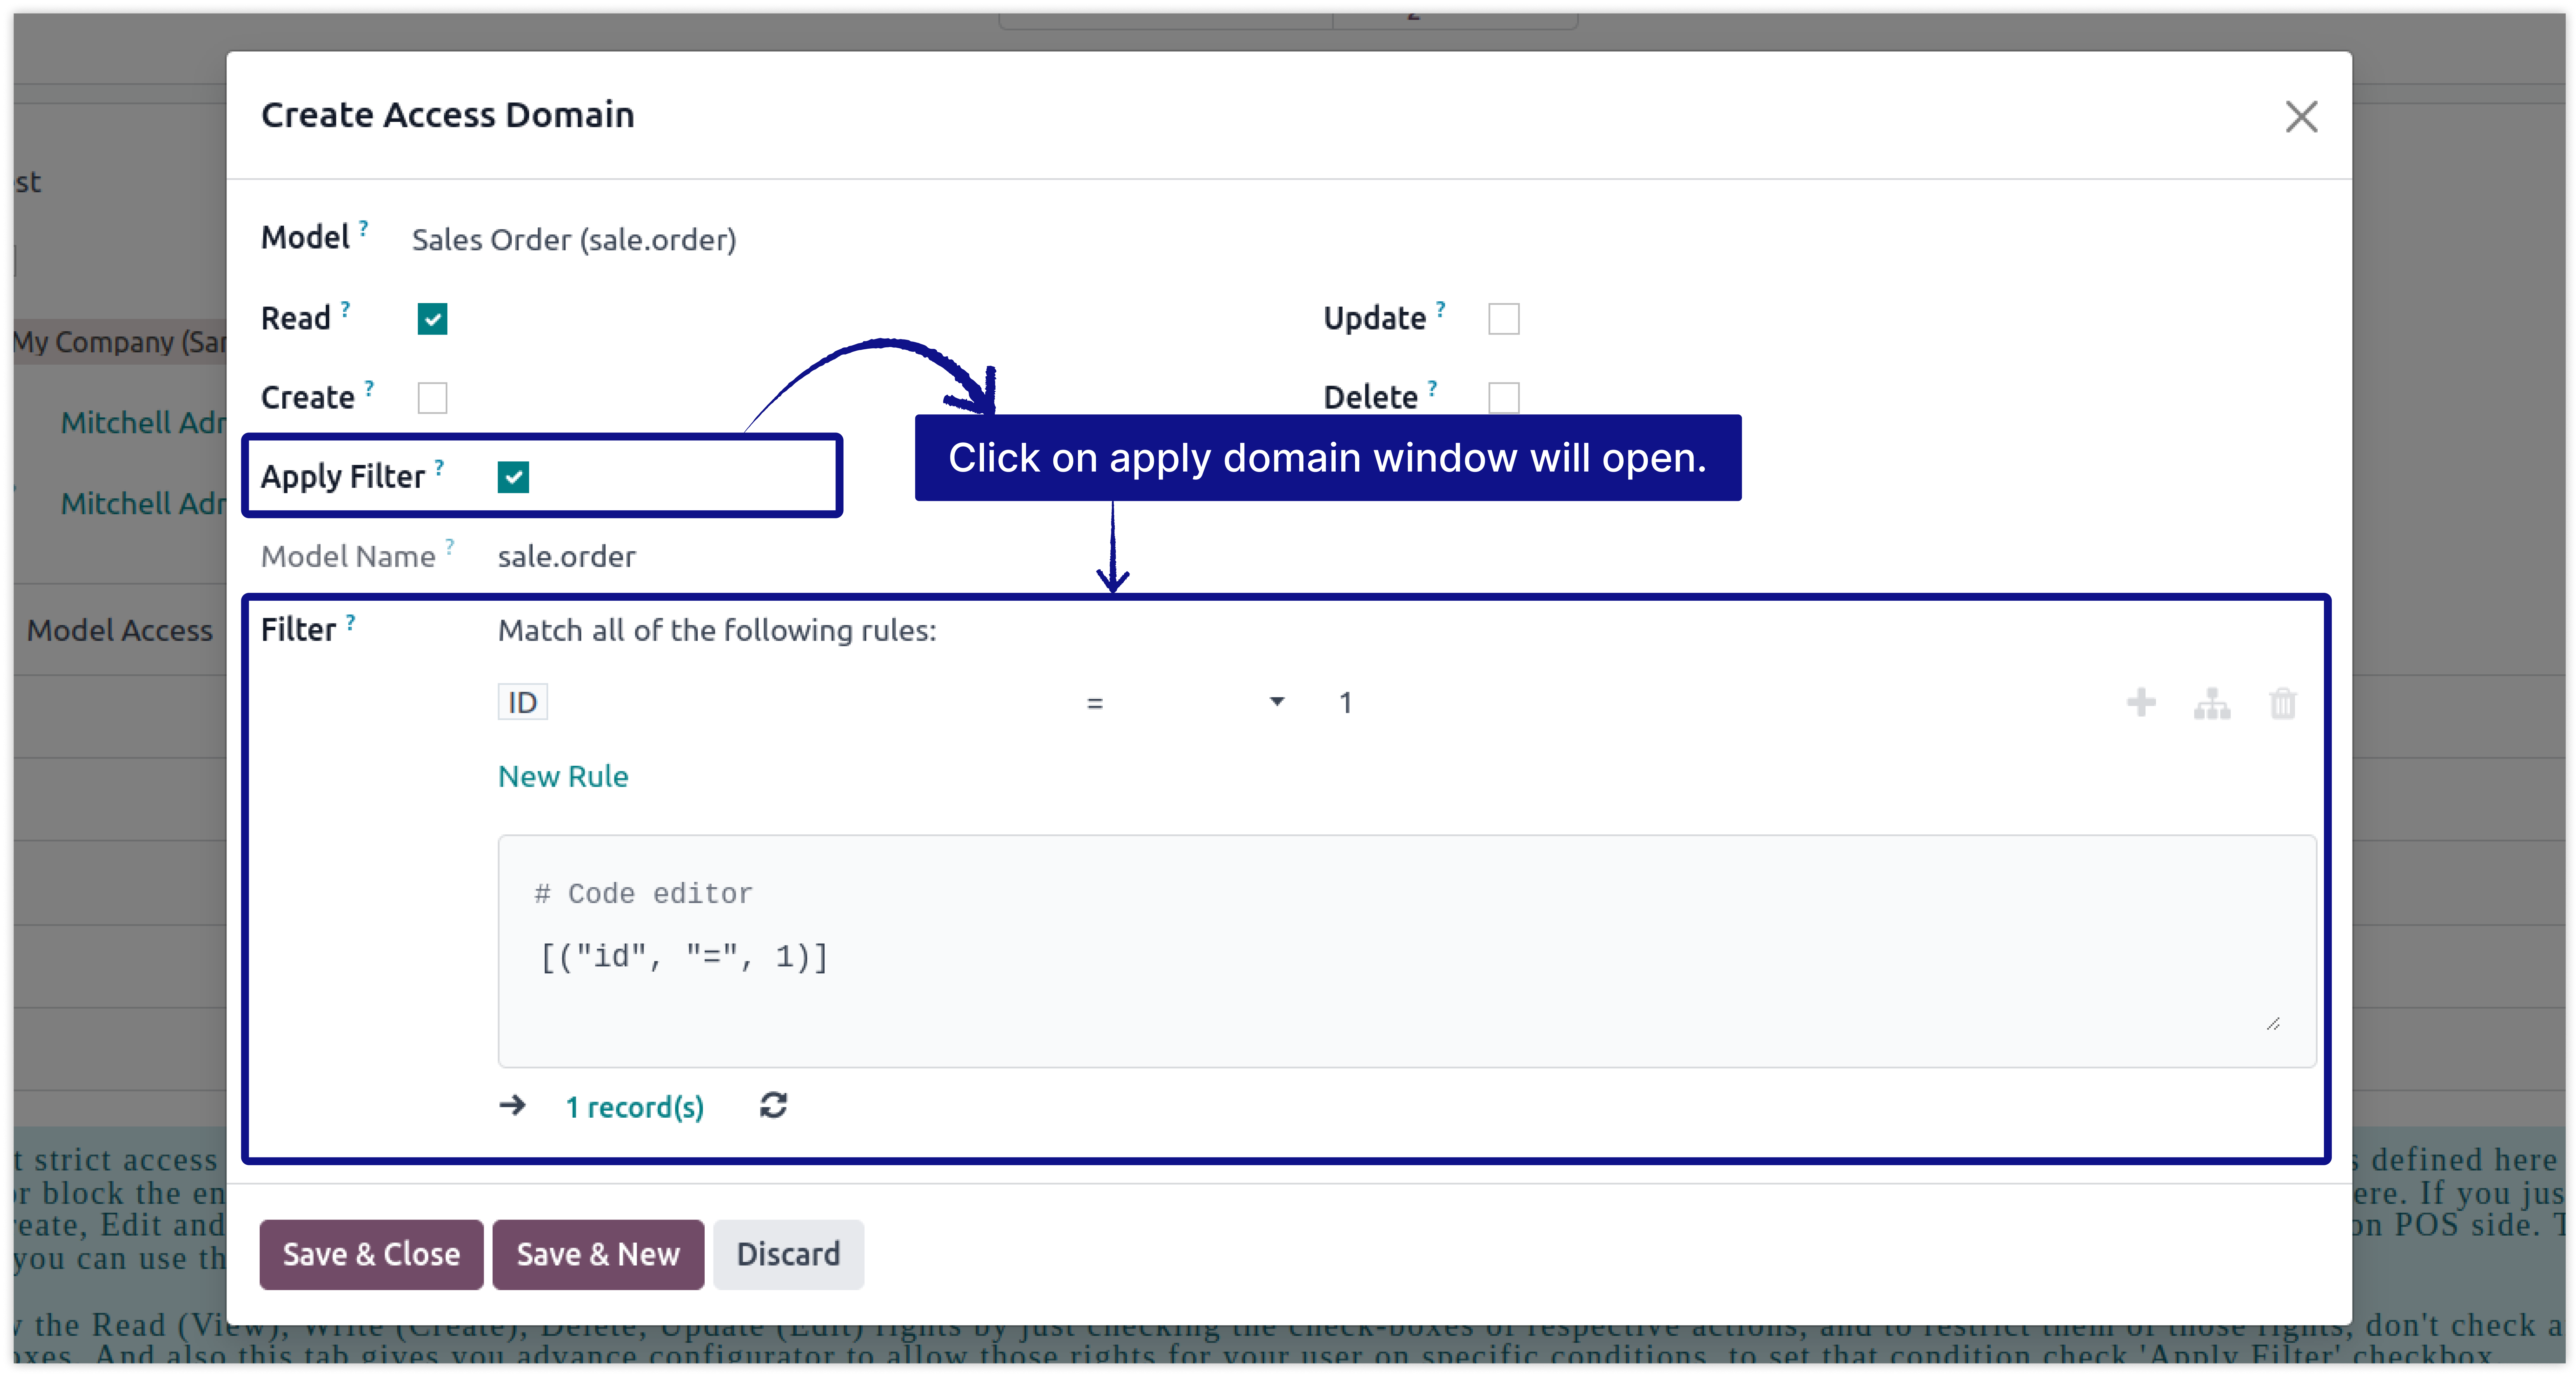
Apply Filter: Apply filter is used to create customized domain rule where we can customize rule by selecting specific fields and records.
-
As displayed above, The 'Model Access' and 'Domain Access' both has the feature to restrict Record Create, Write and Delete. So, What is the difference between them?
Domain Access
While you set restriction by this rule, that means
it will not take whole access from users, it only
hides the button of
Create, Delete, Edit.
But user can do this thing by any backend process.
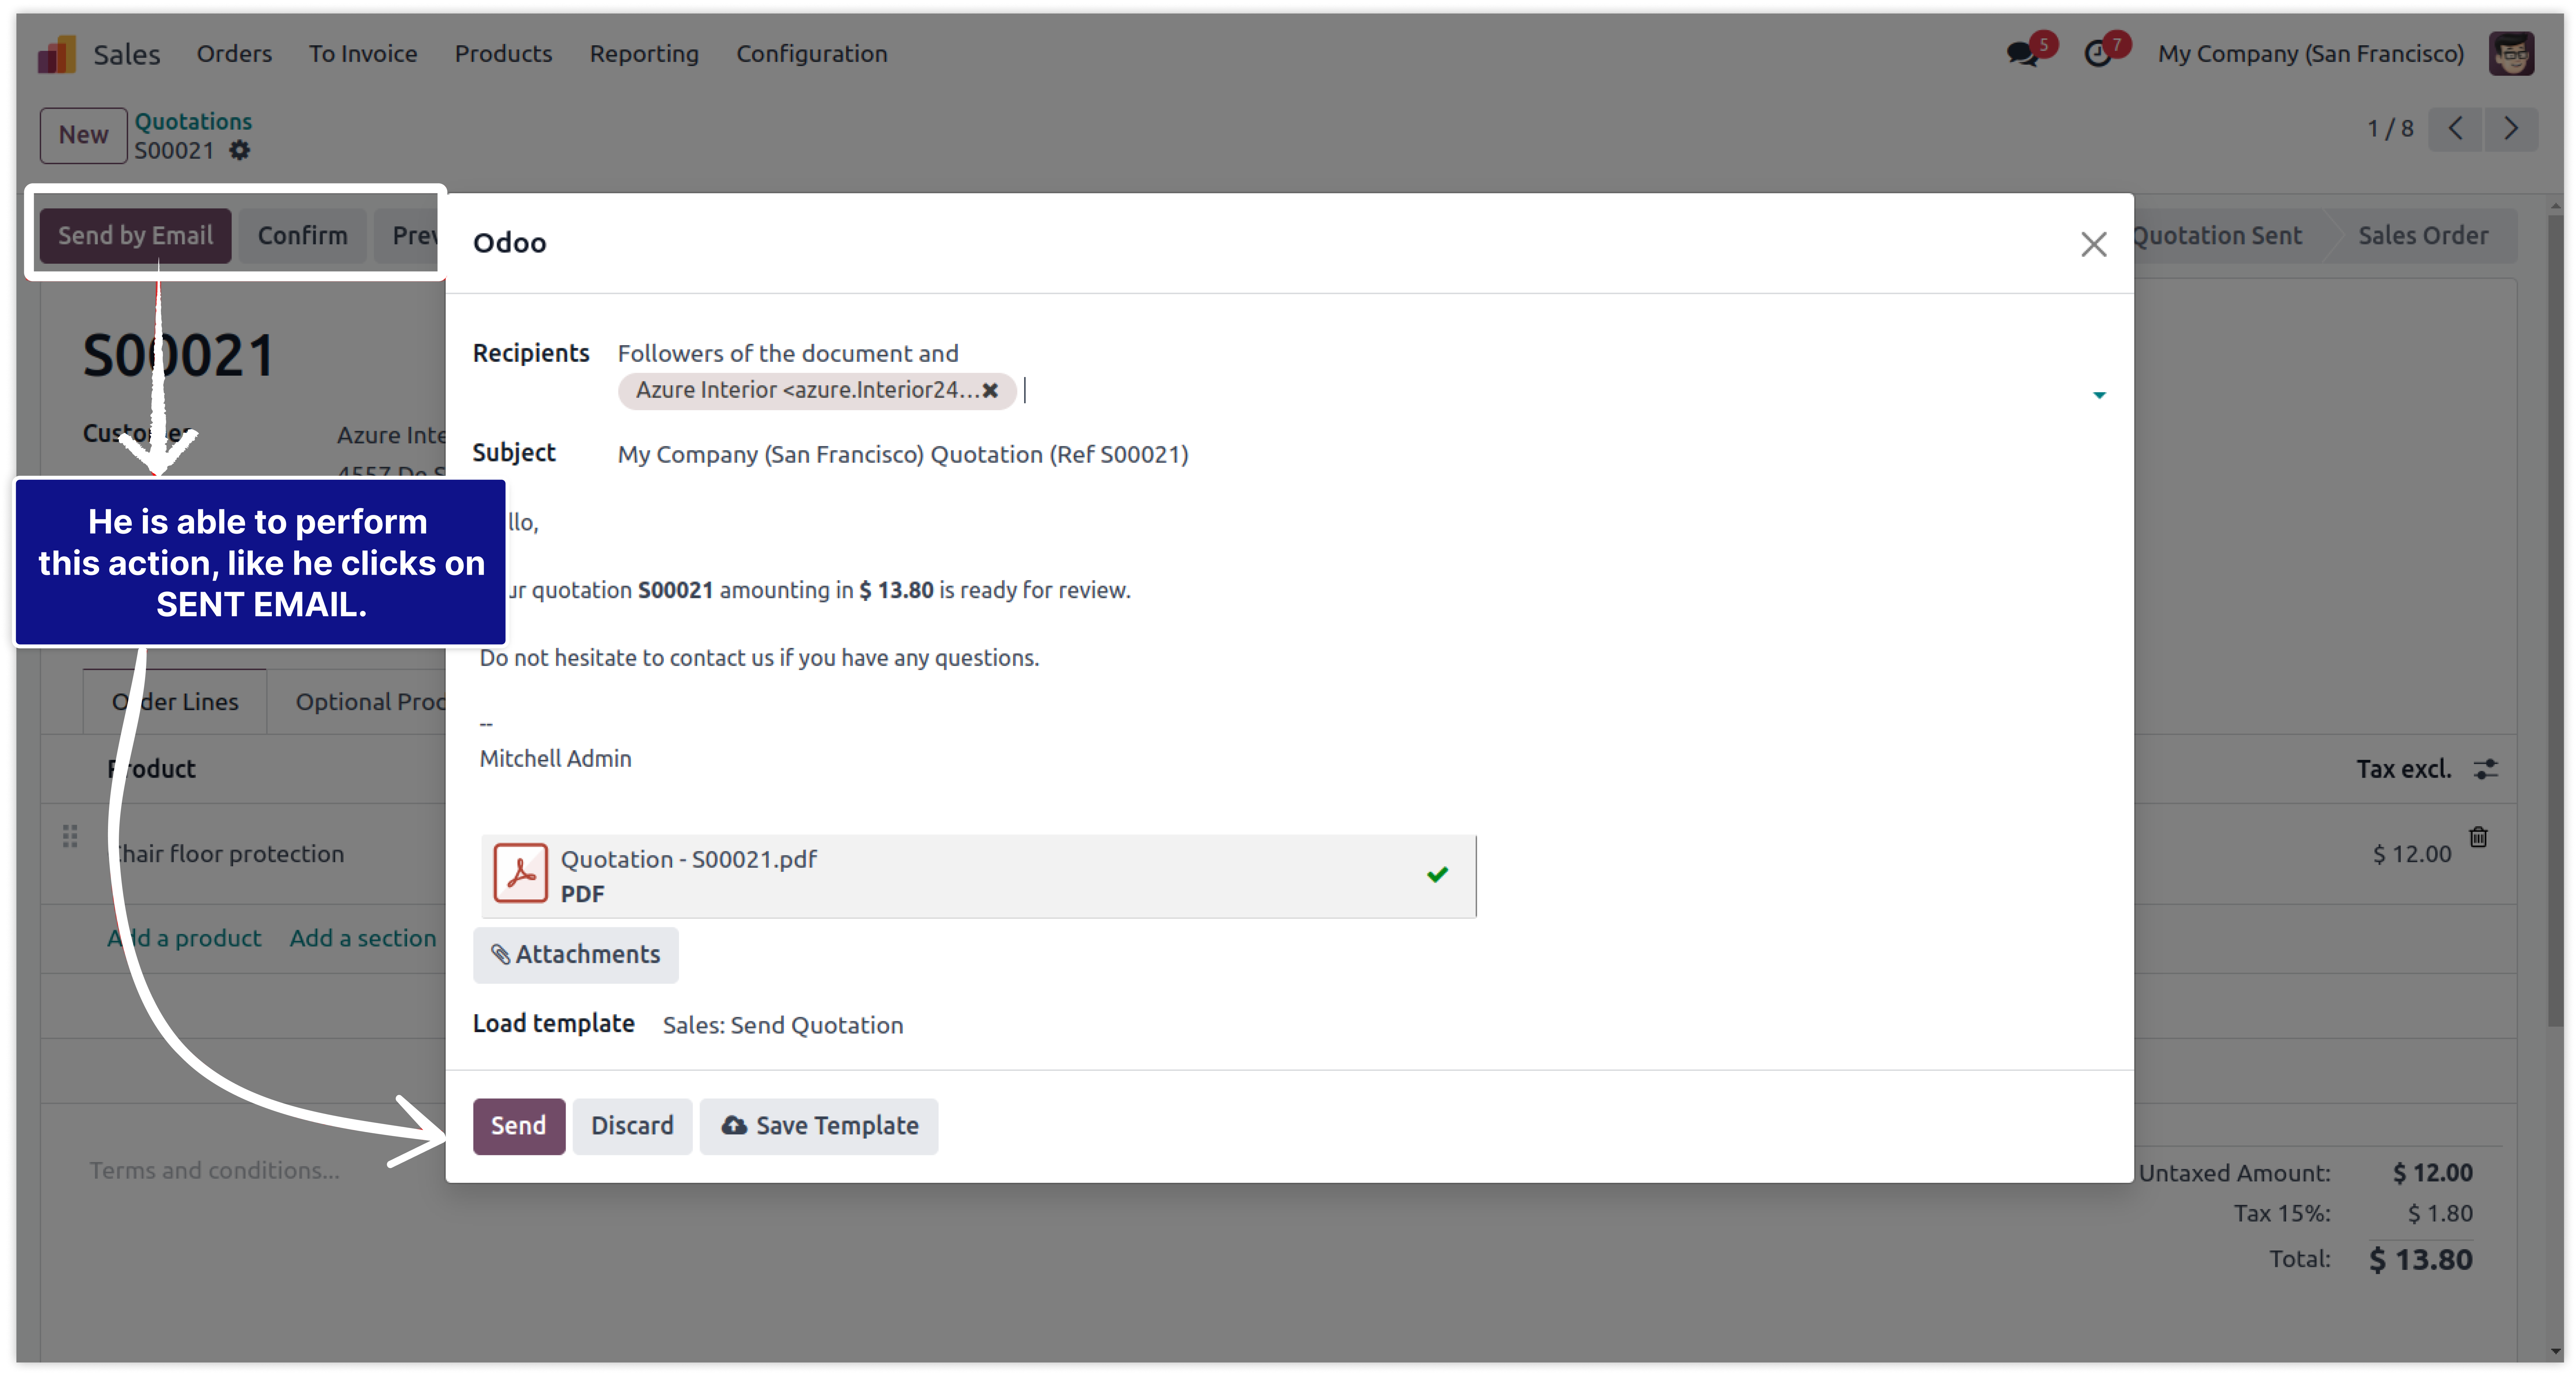
Ex. If we restrict to CREATE an invoice for any user. So they will not be able to create invoices from the invoice model. But they can able to make an invoice from a sale order by the action 'Create Invoice'.
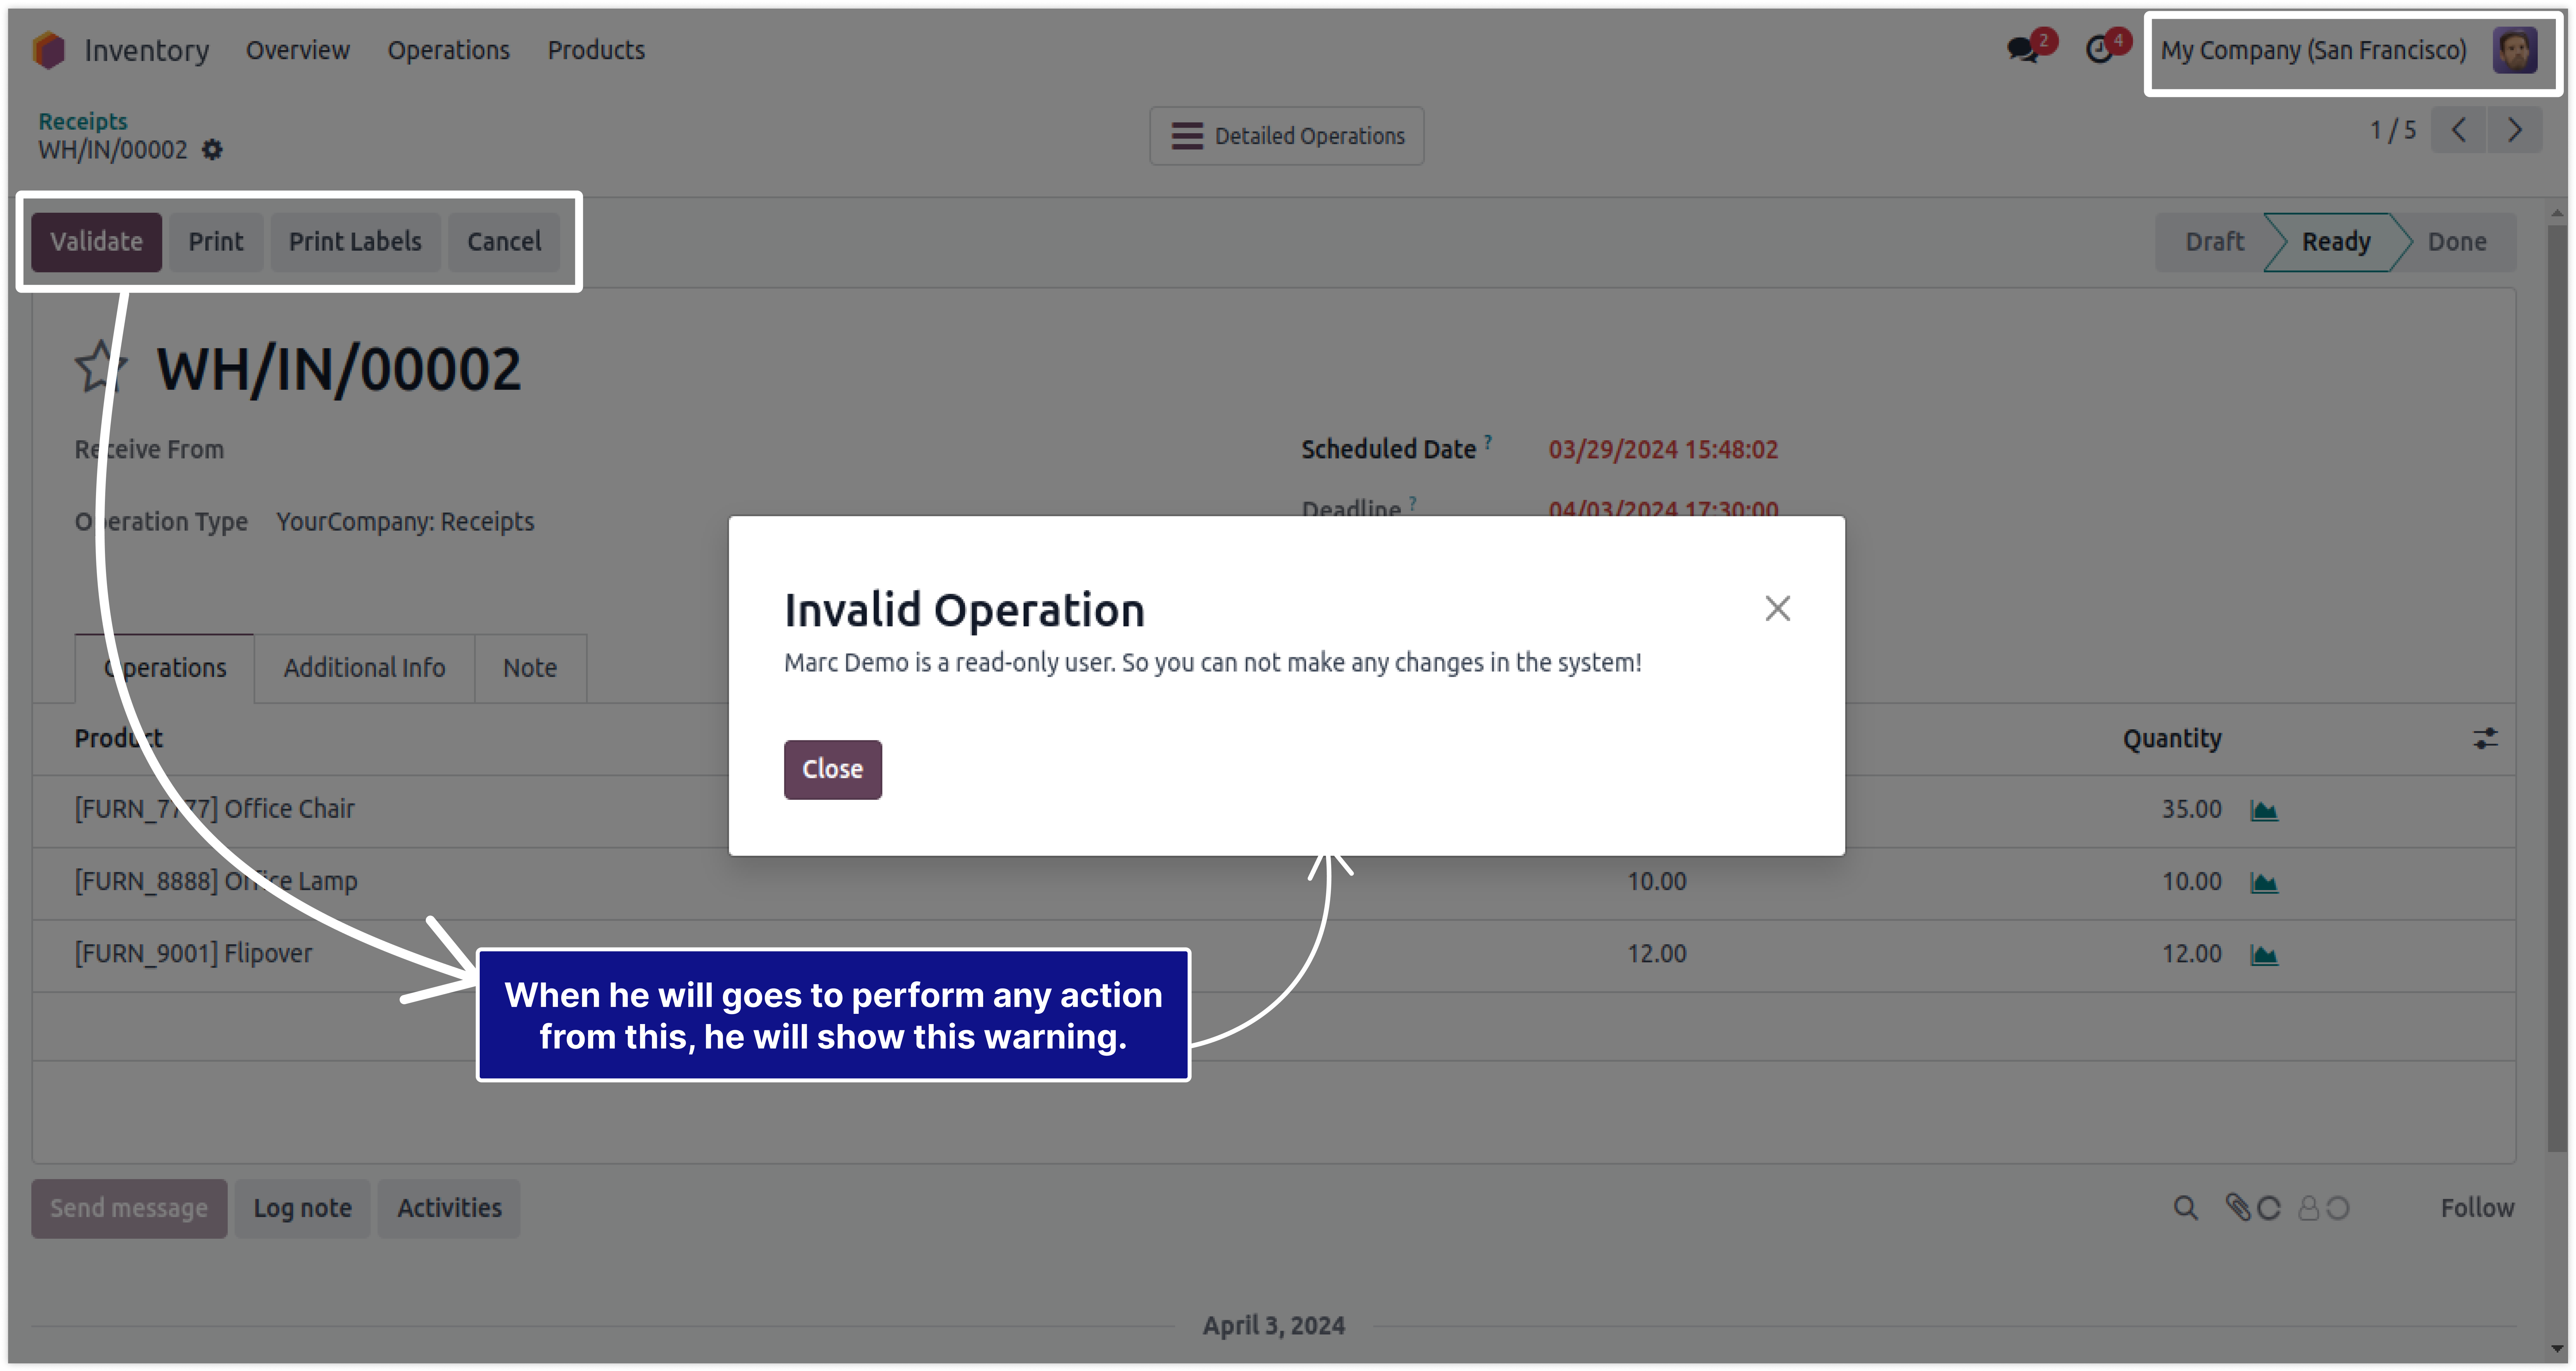
Model Access
While you set restriction by this rule, that means
system will take access from the user. now they will not able to do further things from anywhere.
Ex. If we restrict to CREATE an invoice for any user. So they will not be able to create invoices from anywhere. If they try to create a system will show a warning.
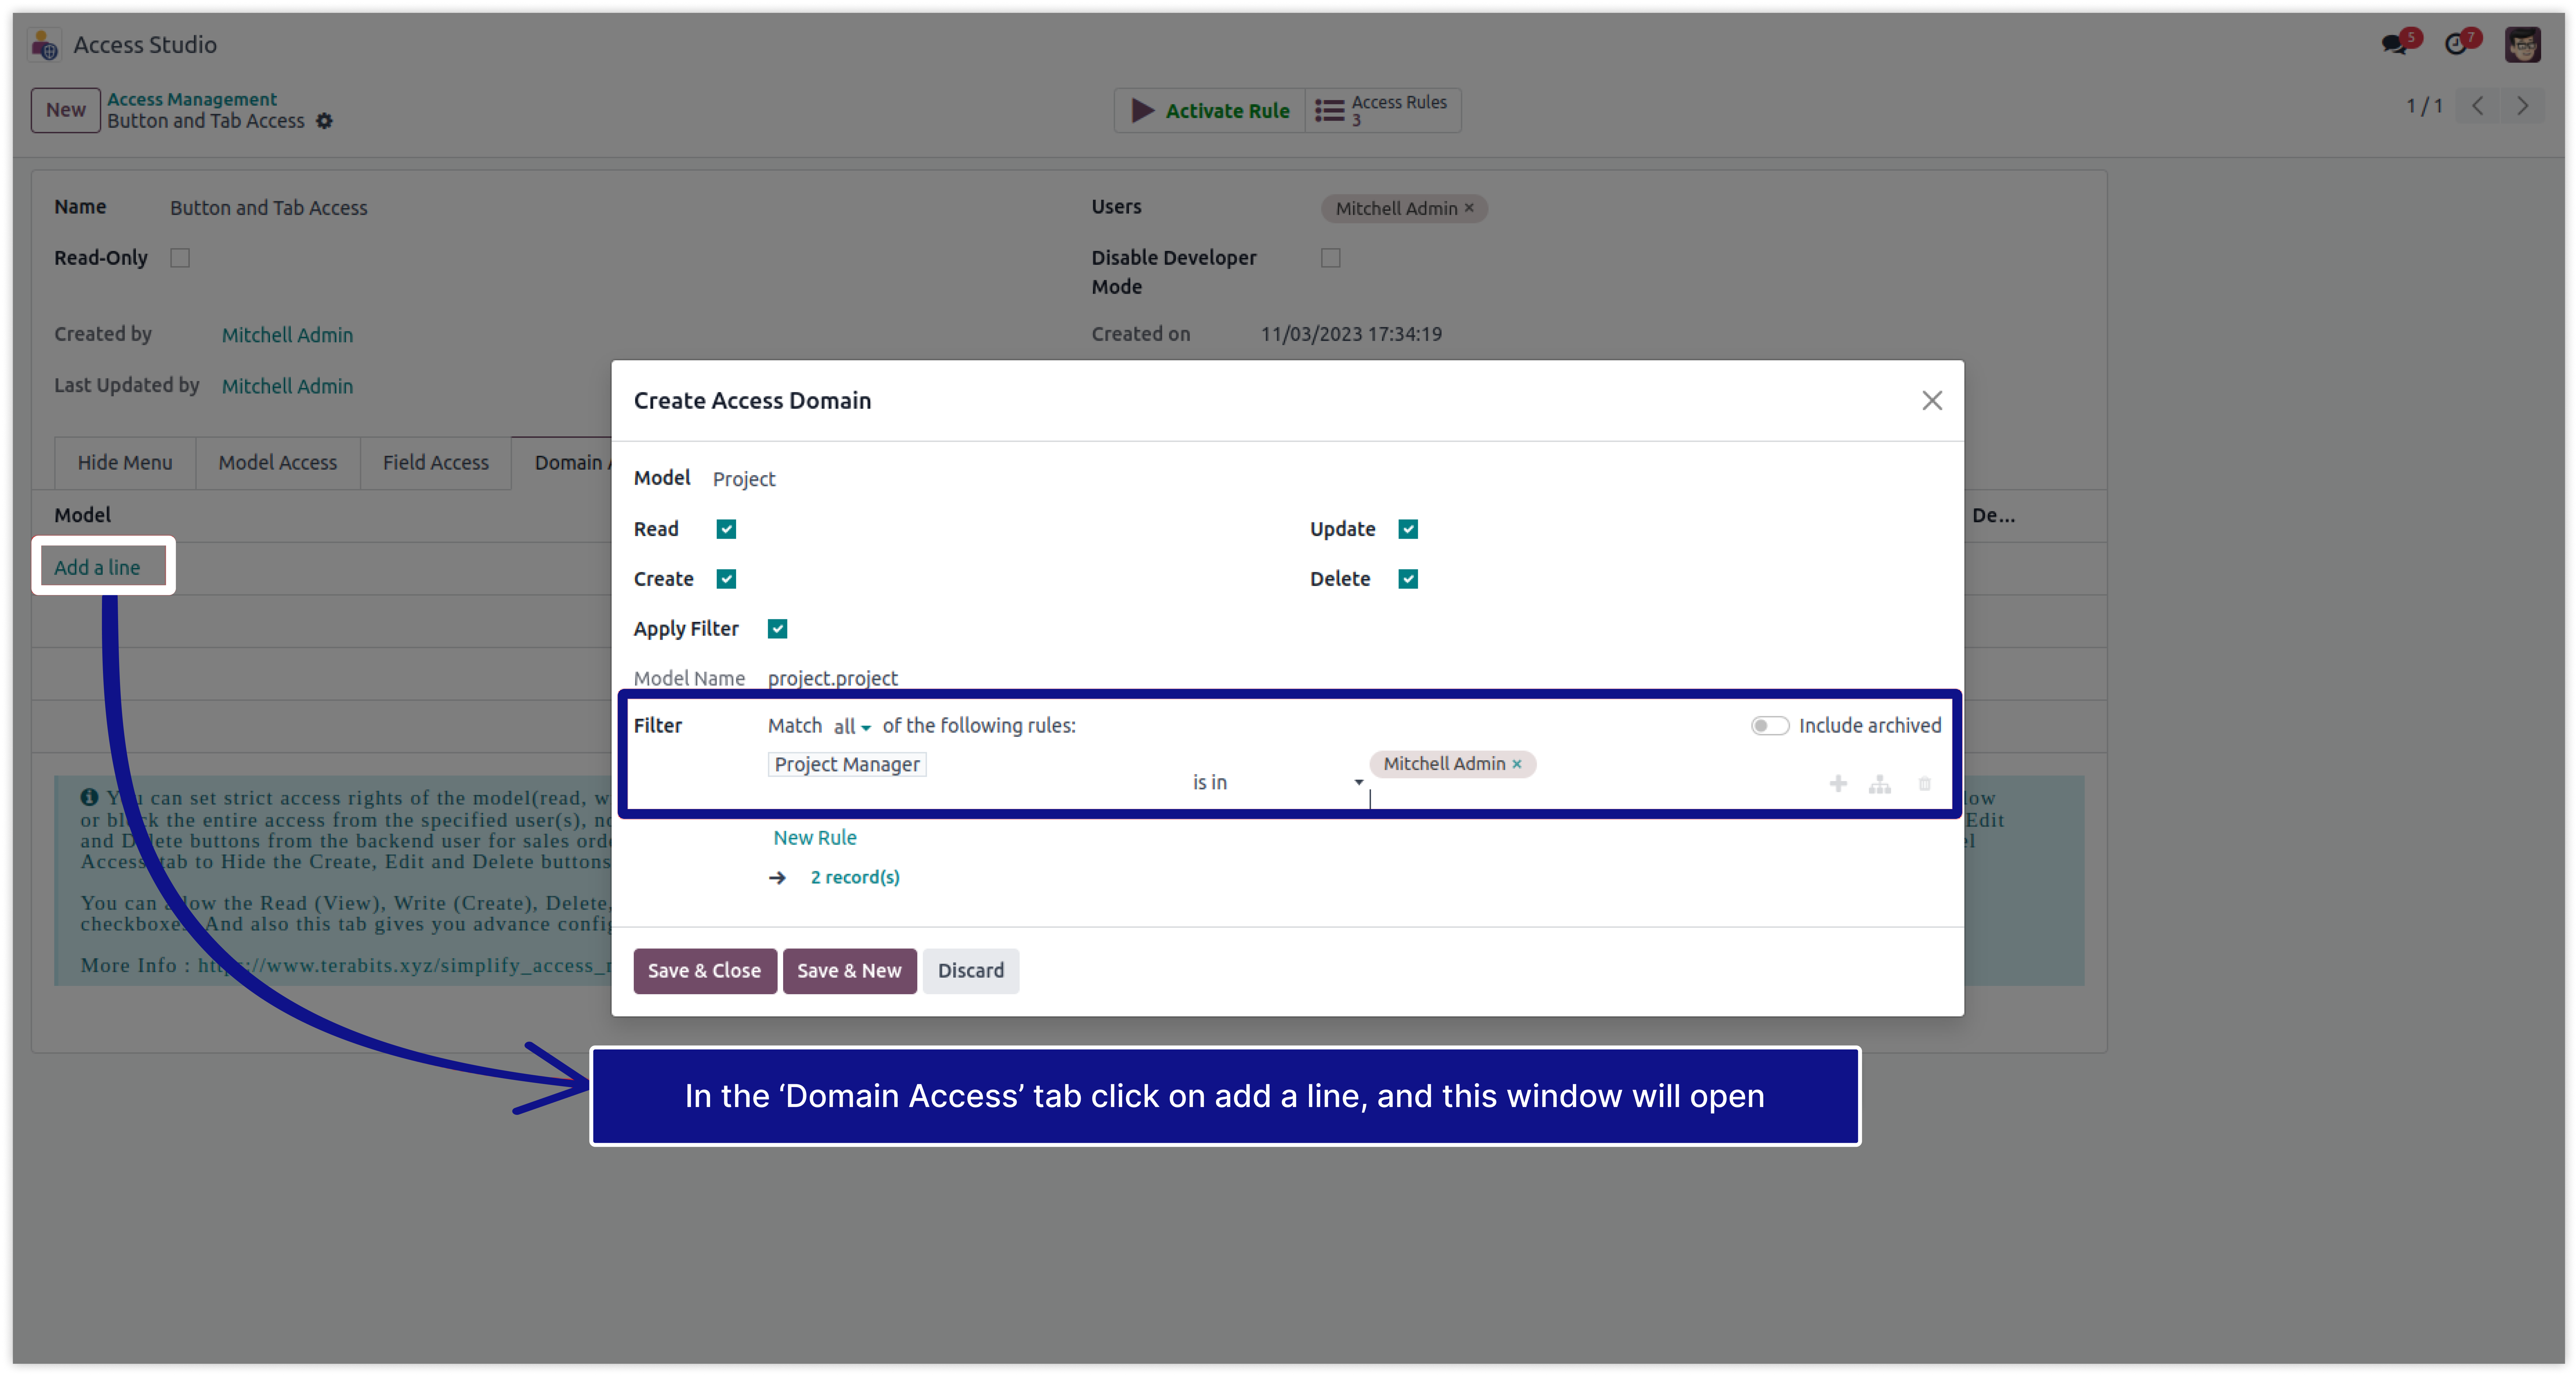
In this example we will create domain access for the model 'Project' and 'Project Task'.
- How to show only those projects to the users in who they are a Project Manager.
- How to show only those tasks to the users to which they are assigned.
-
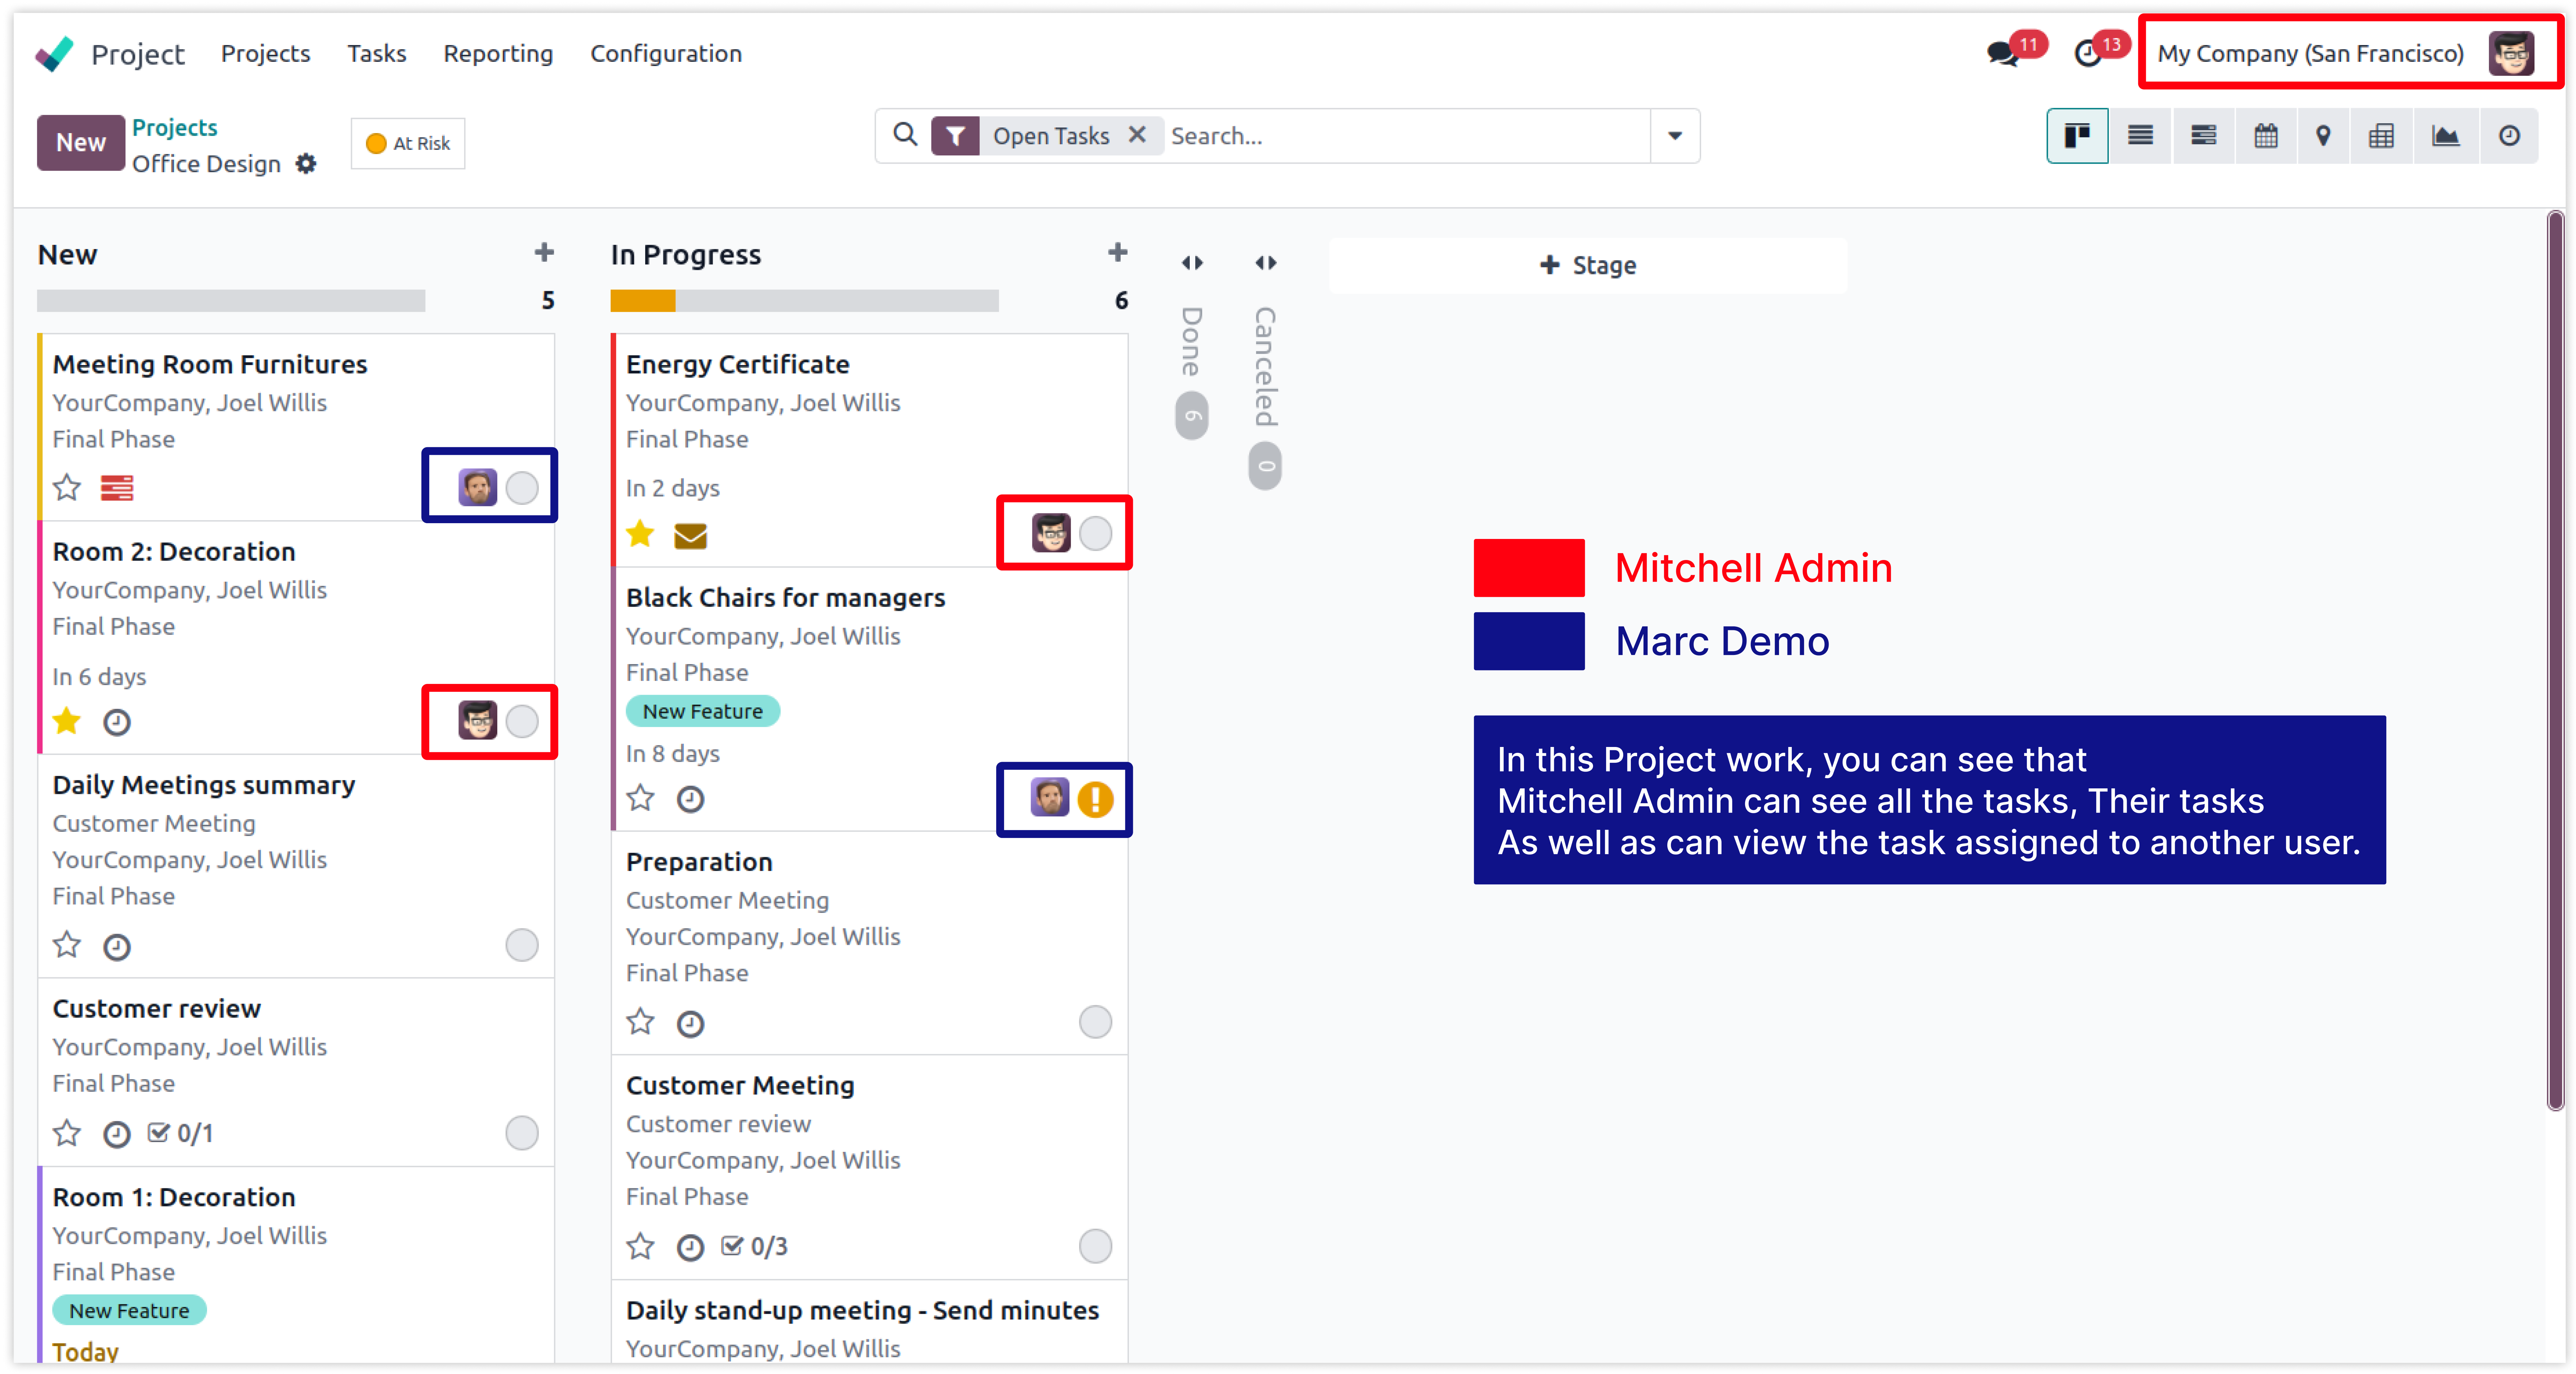
The below Image show that Mitchell Admin can see all the 'Projects' and 'Project Task'.
-
We highlighted his accesses in the below images for the Projects and Tasks.
-
Click on image to Zoom out.

-
Here we created the Domain Access rule for the user Mitchell Admin
-
To display only those PROJECTS in which he is the Project Manager.
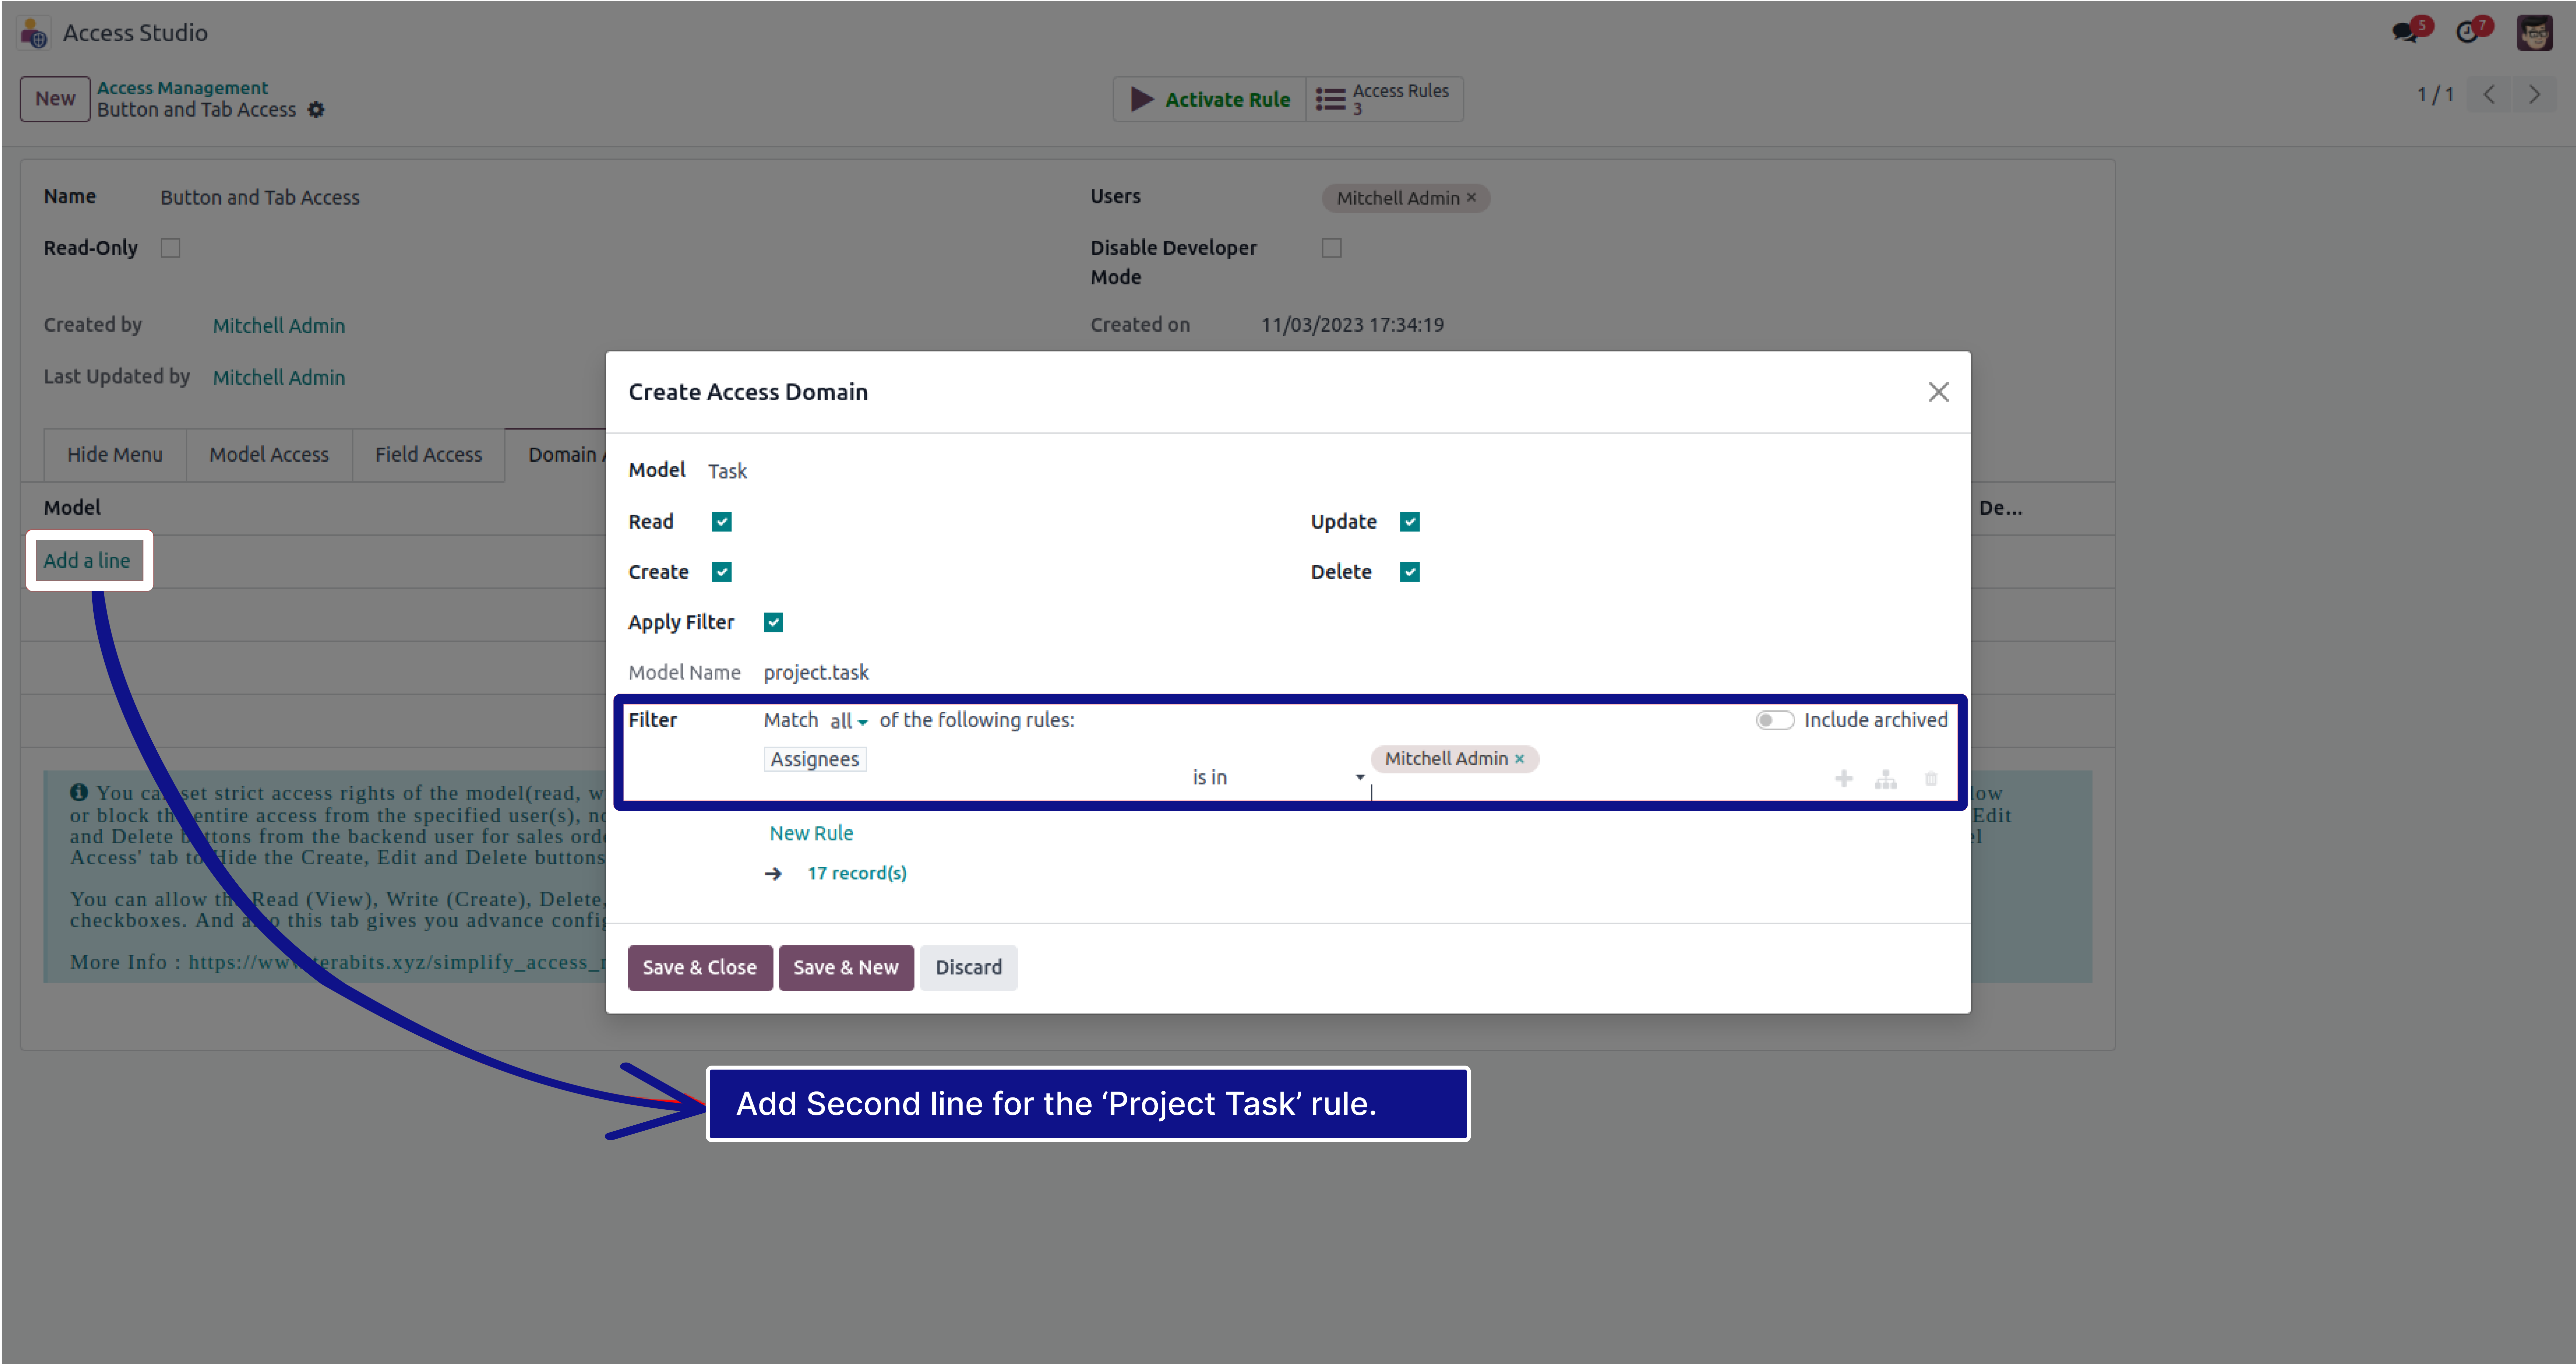
-
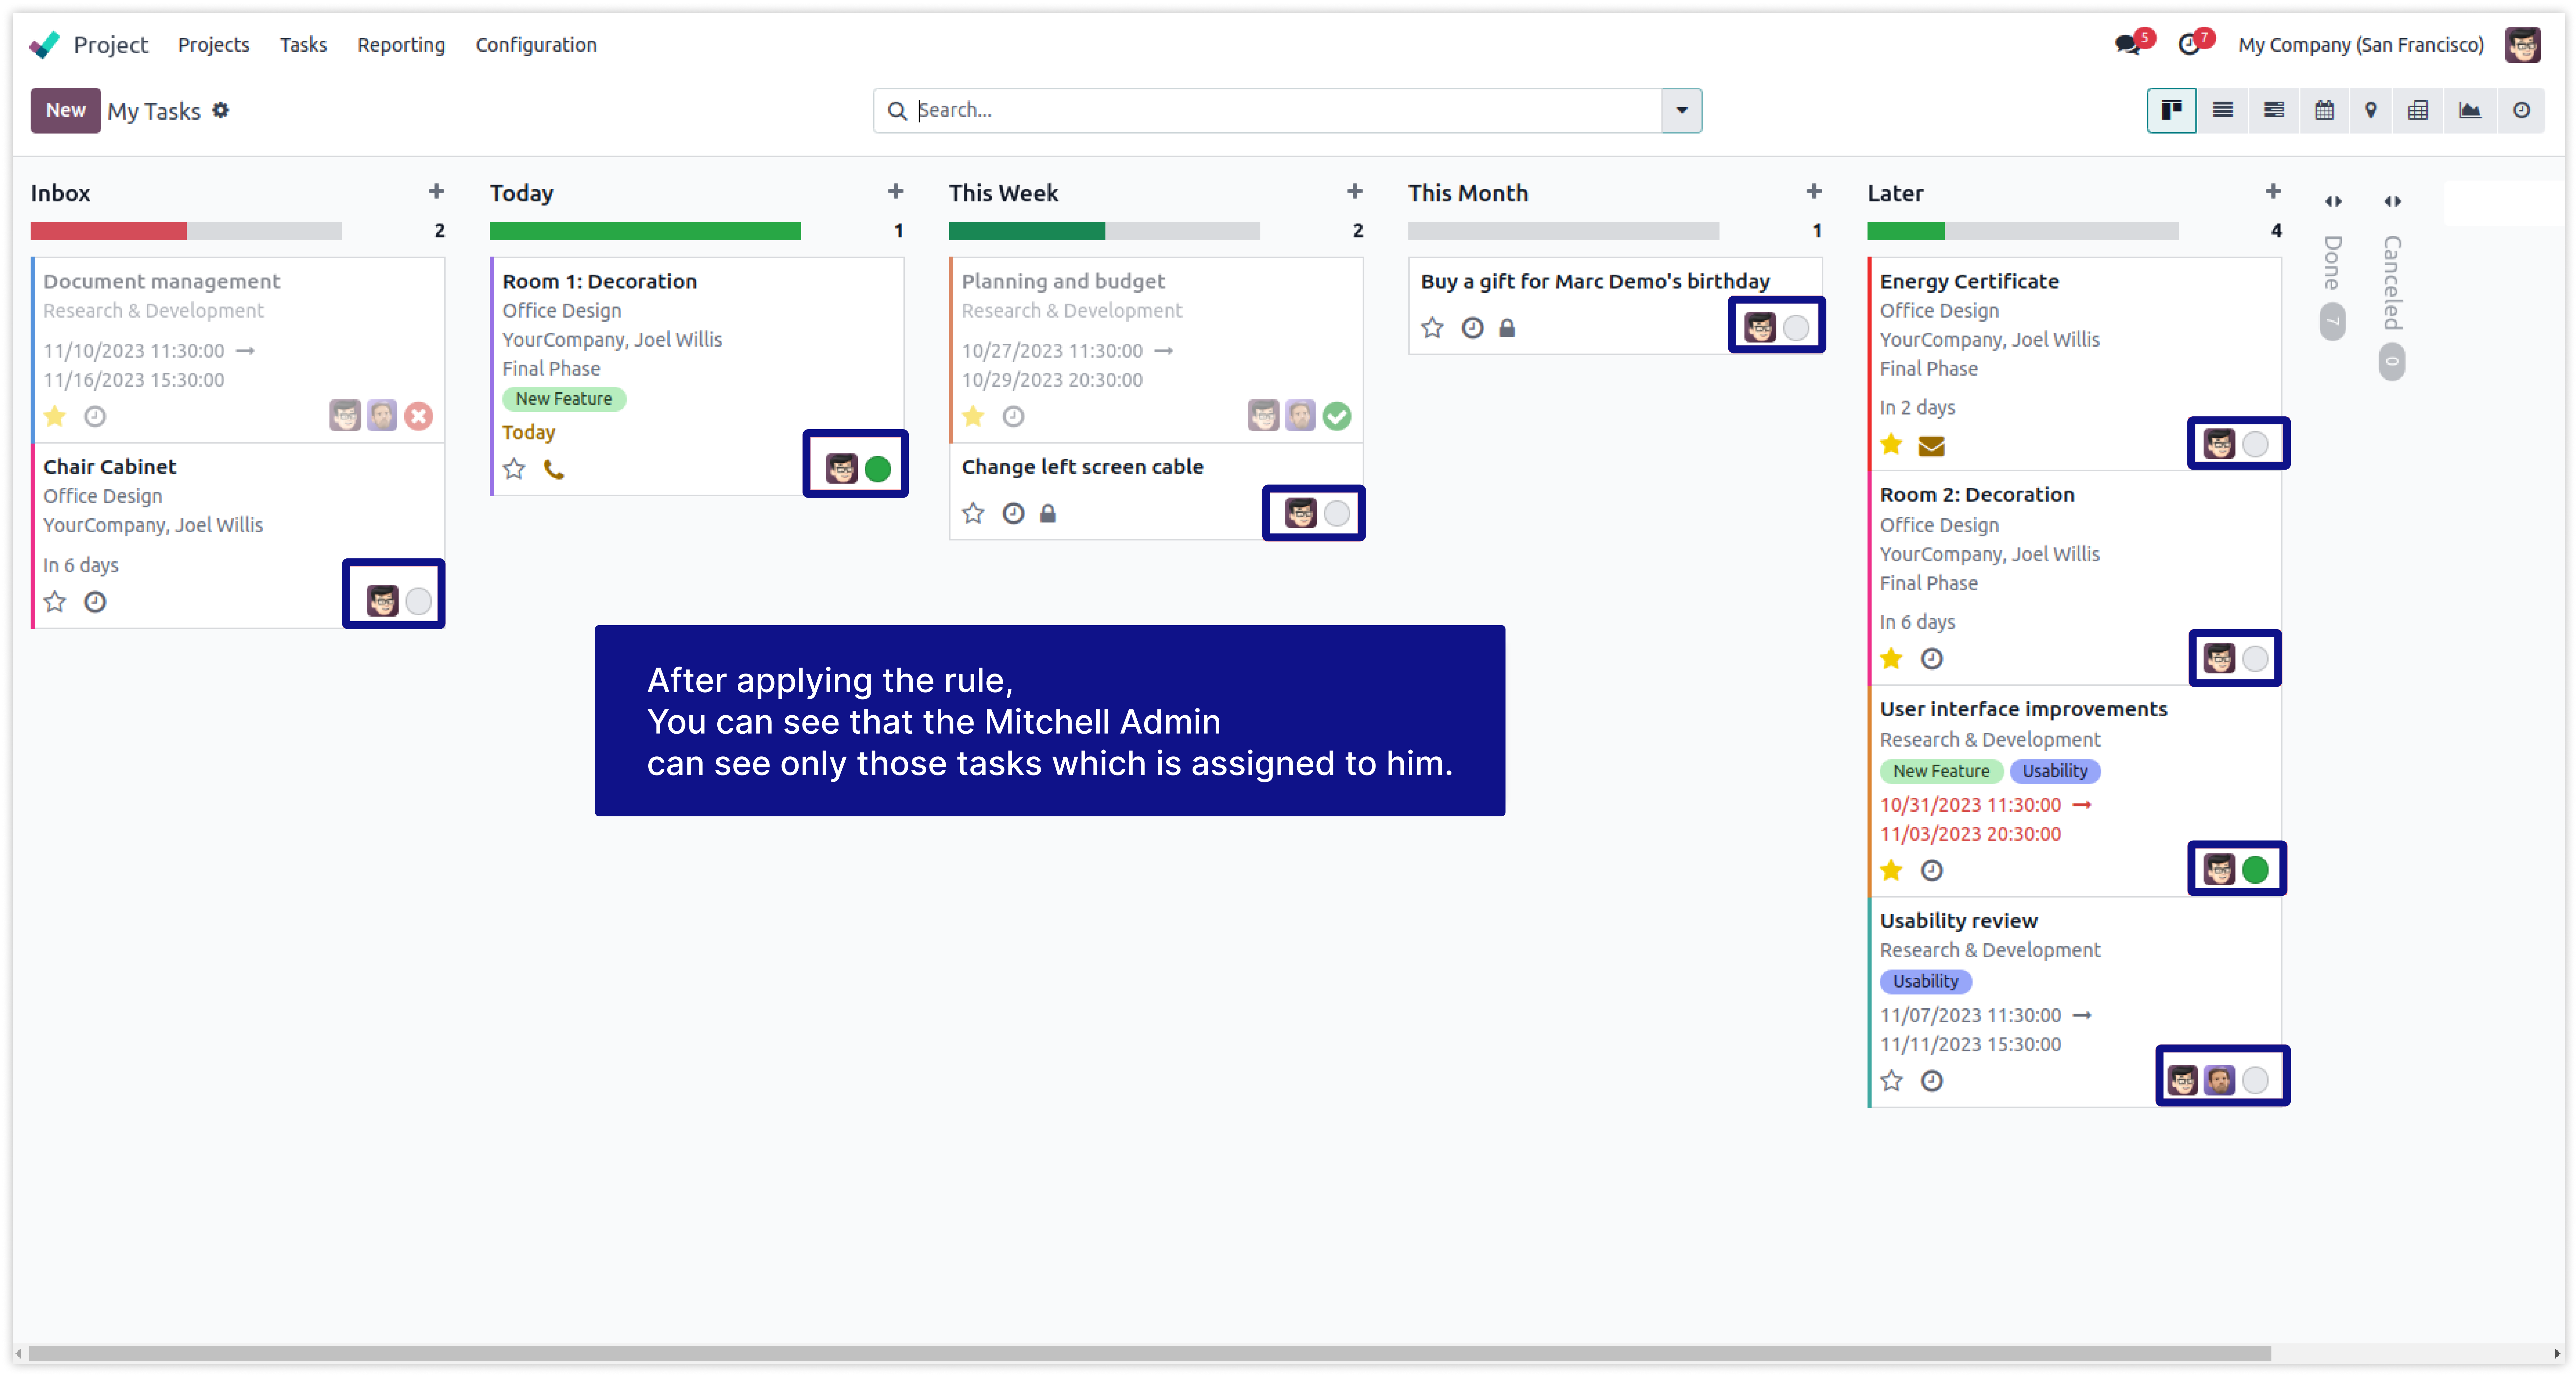
To display only those TASKS which is assigned to him.
-
Click on image to Zoom out.
-
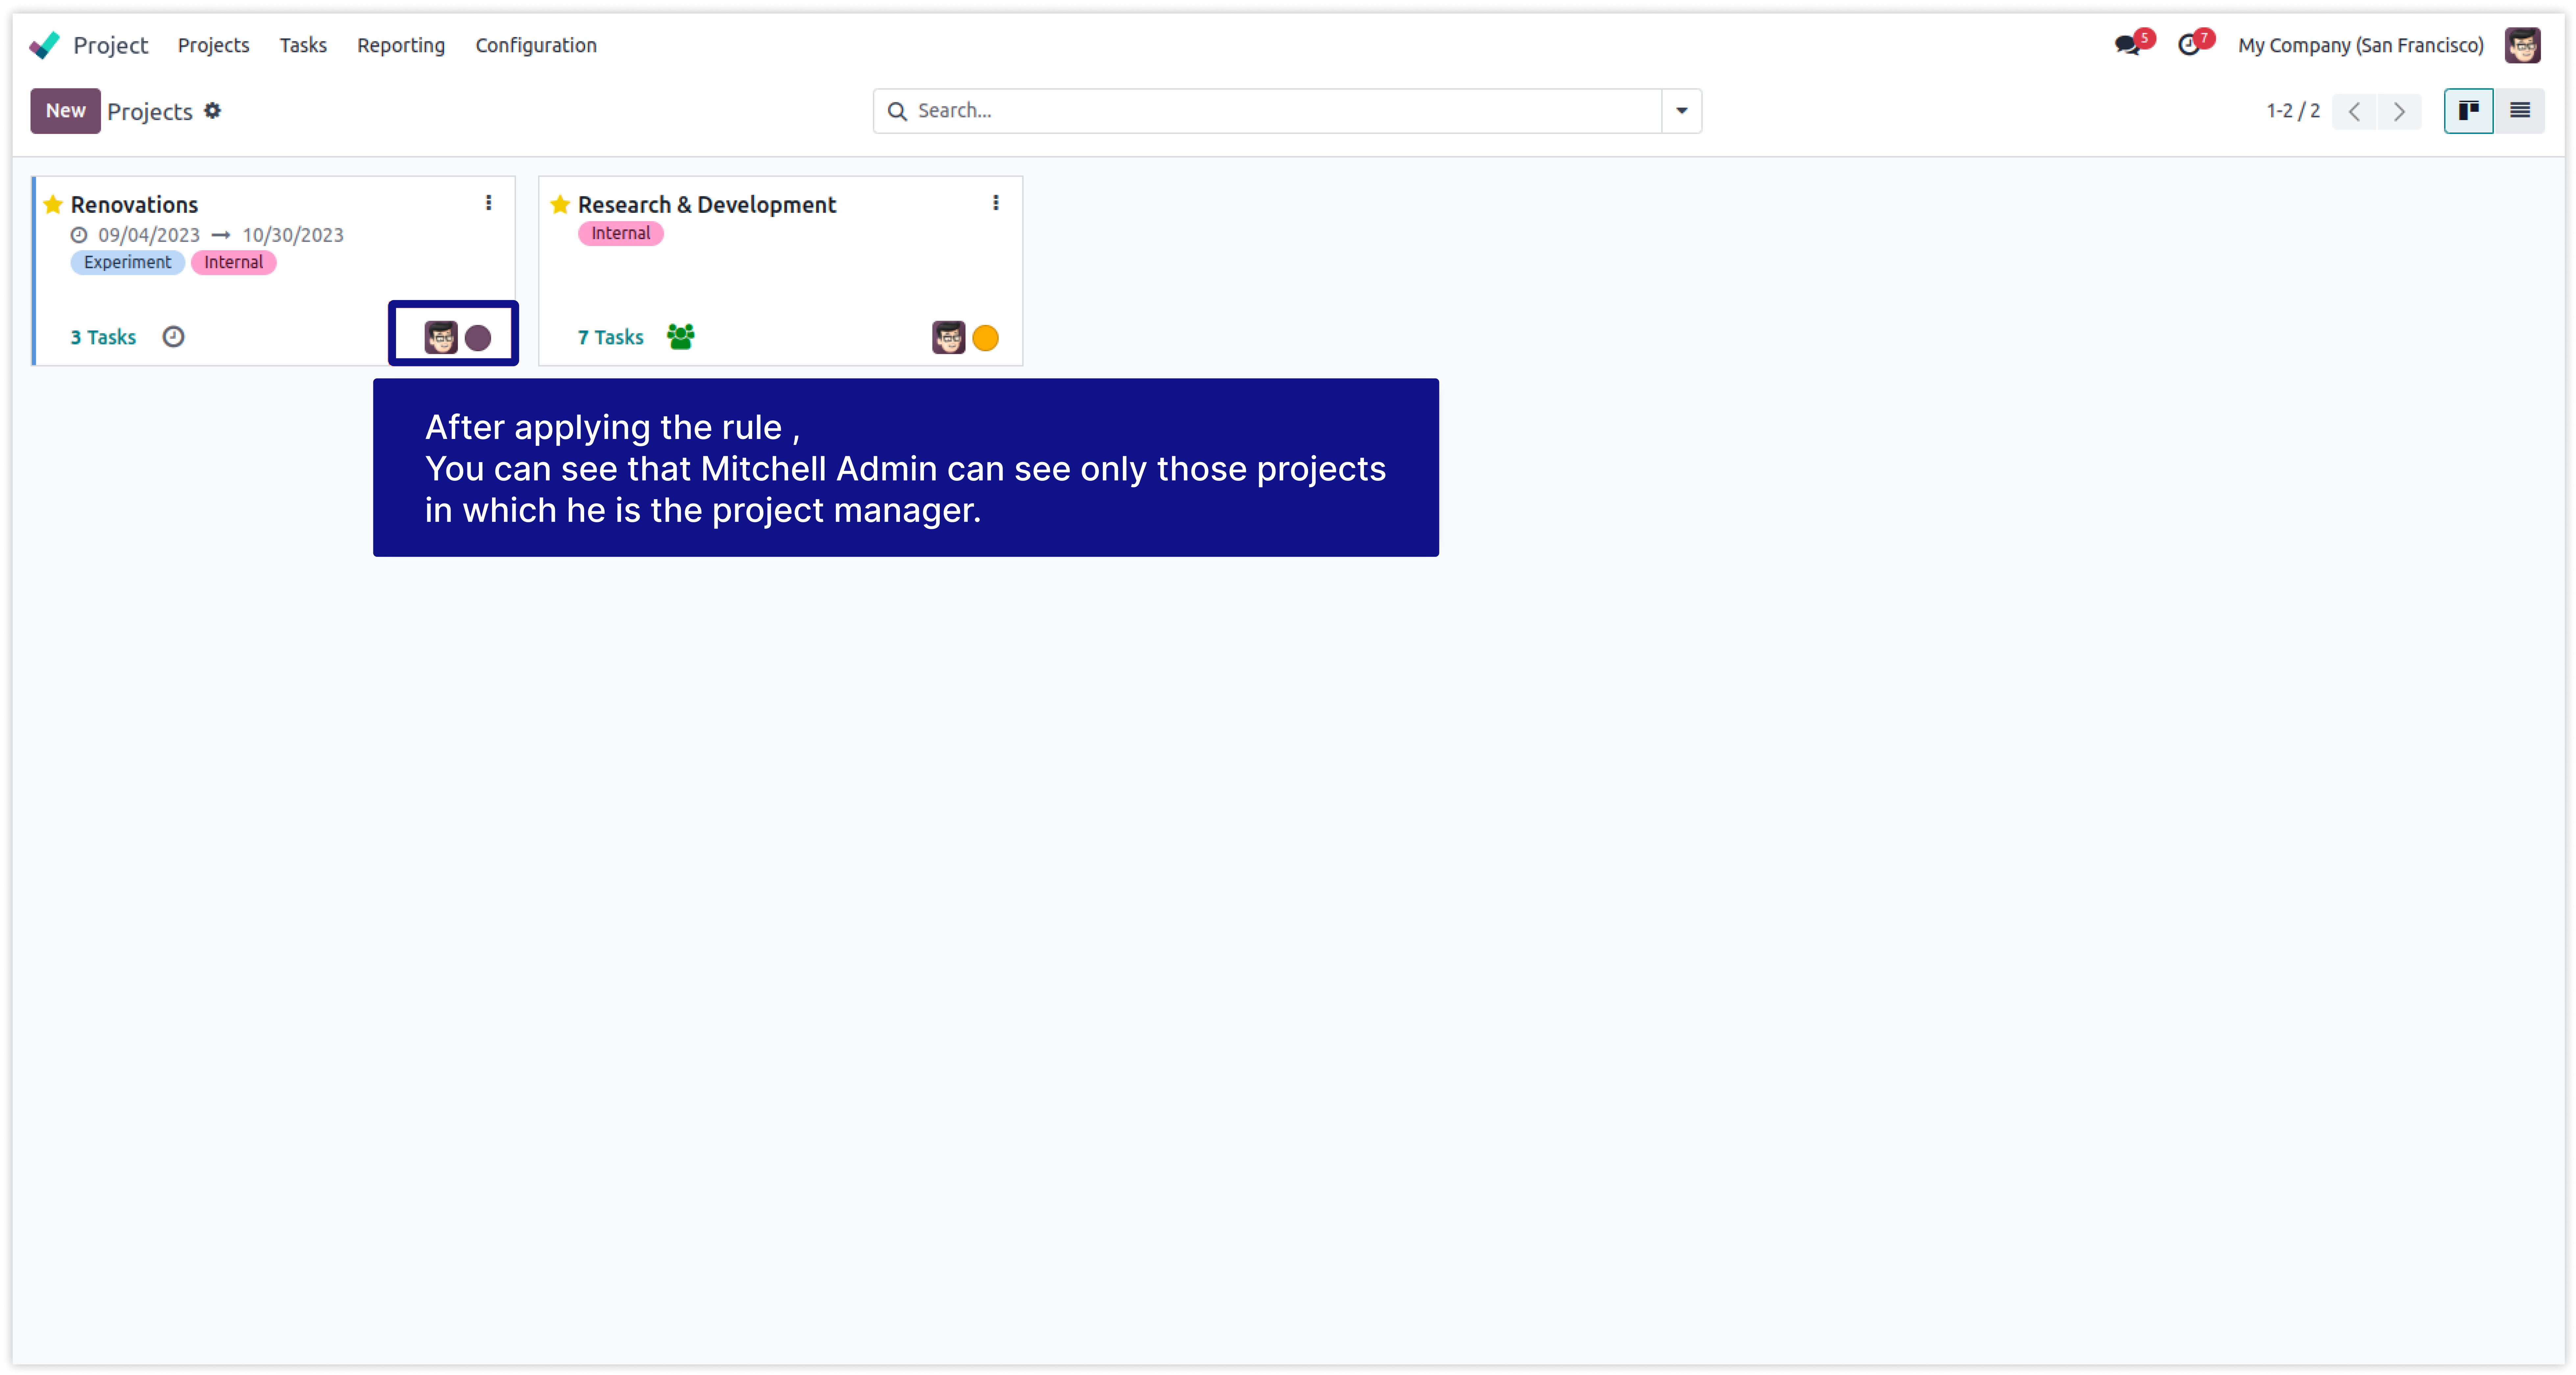
After applying the rule, Below images says that Mitchell Admin is restricted for further things.
-
He can see only those PROJECTS in which he is the Project Manager.
-
He can see only those TASKS which is assigned to him.
-
Click on image to Zoom out.
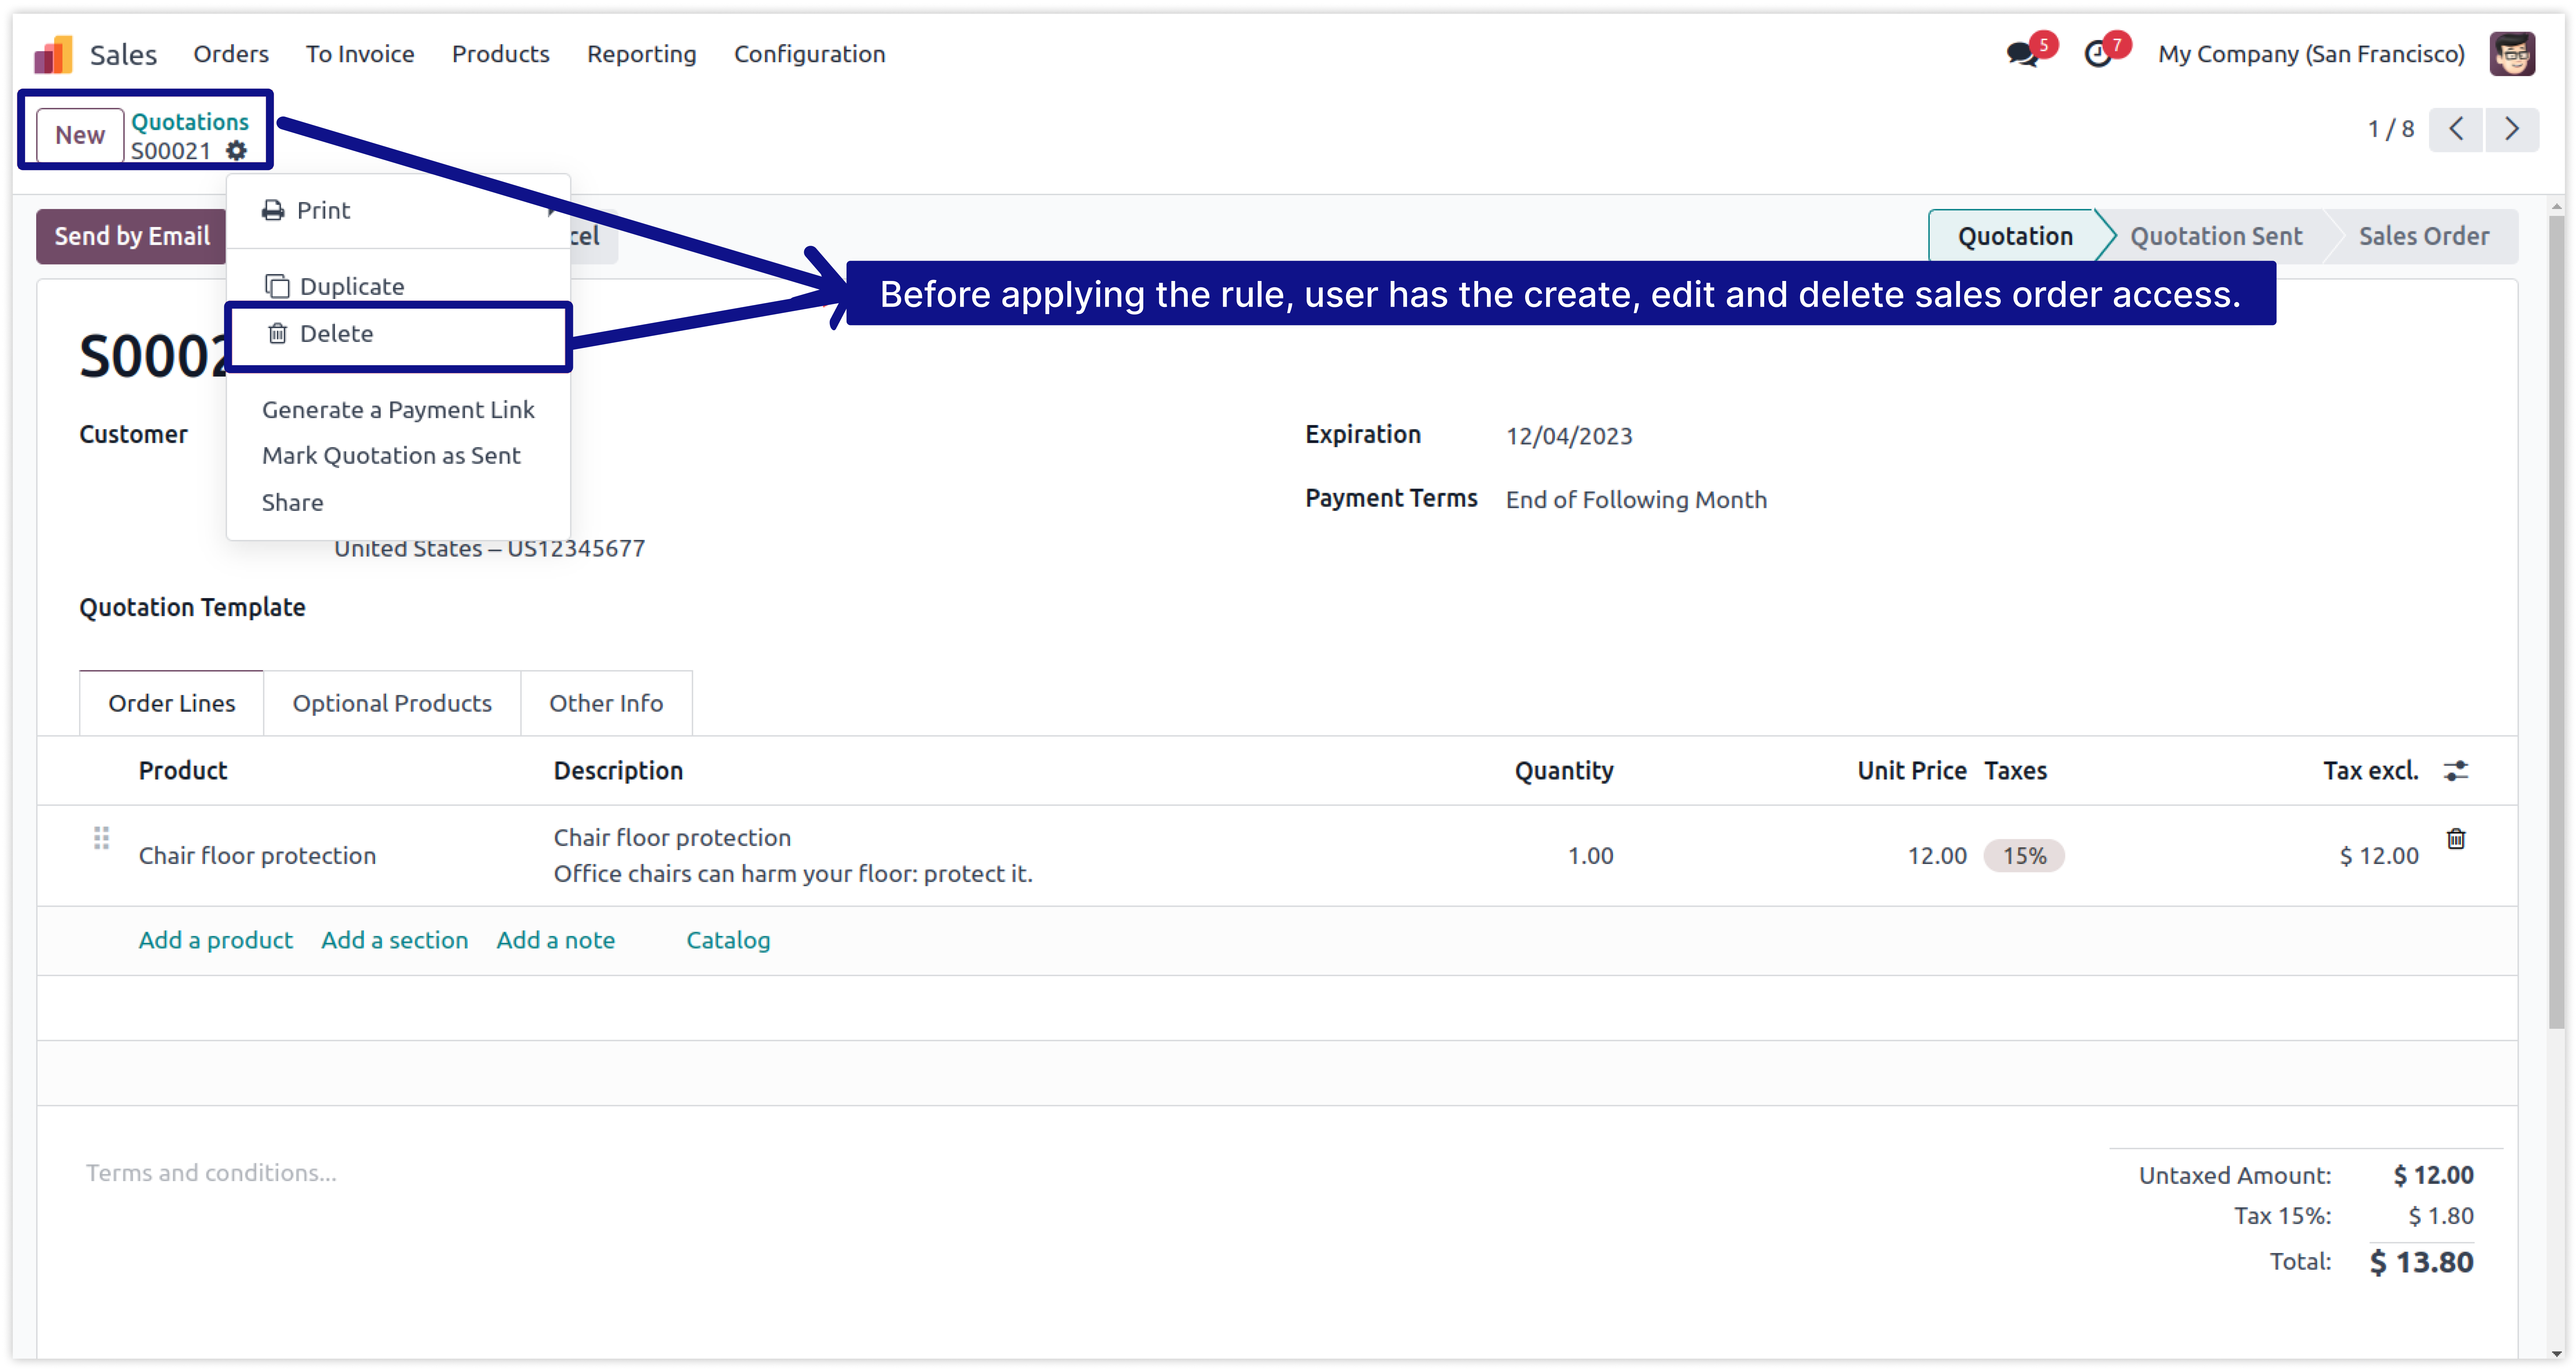
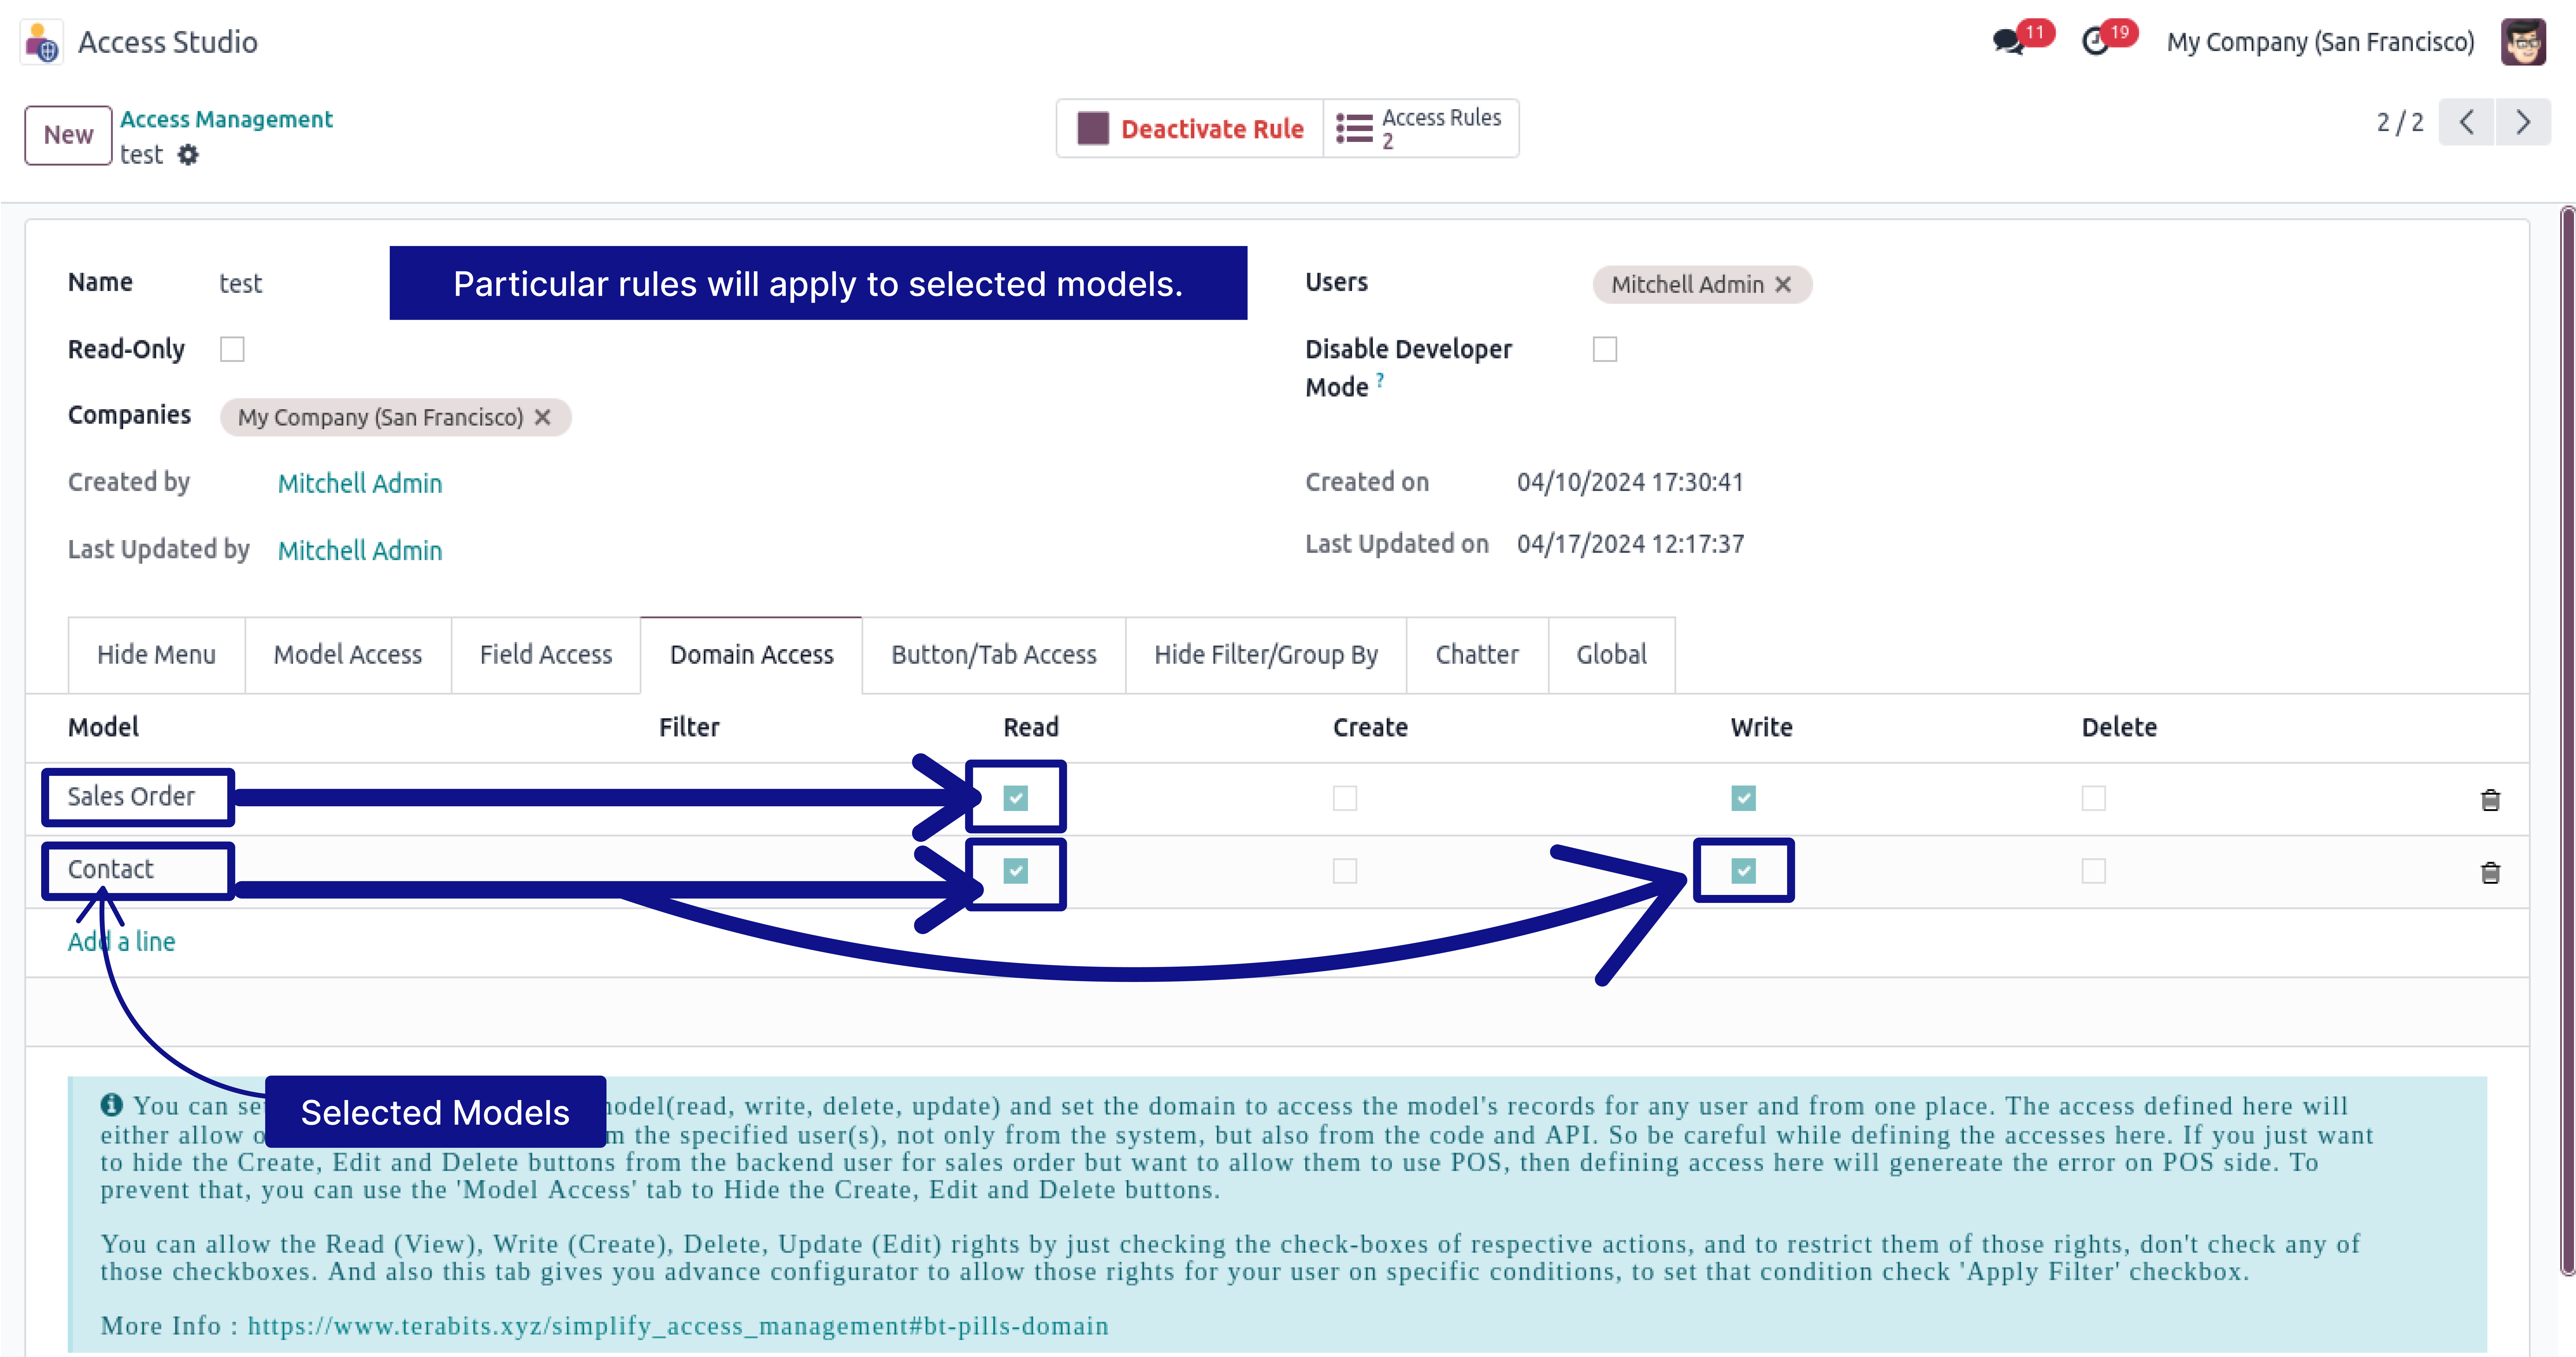
In this example we will create domain access for the model 'Sale Order' and 'Contacts'.
-How to make any user read-only and restrict to CREATE, EDIT, and DELETE access.
-How to give only CREATE access, And restrict to EDIT, DELETE access.
-
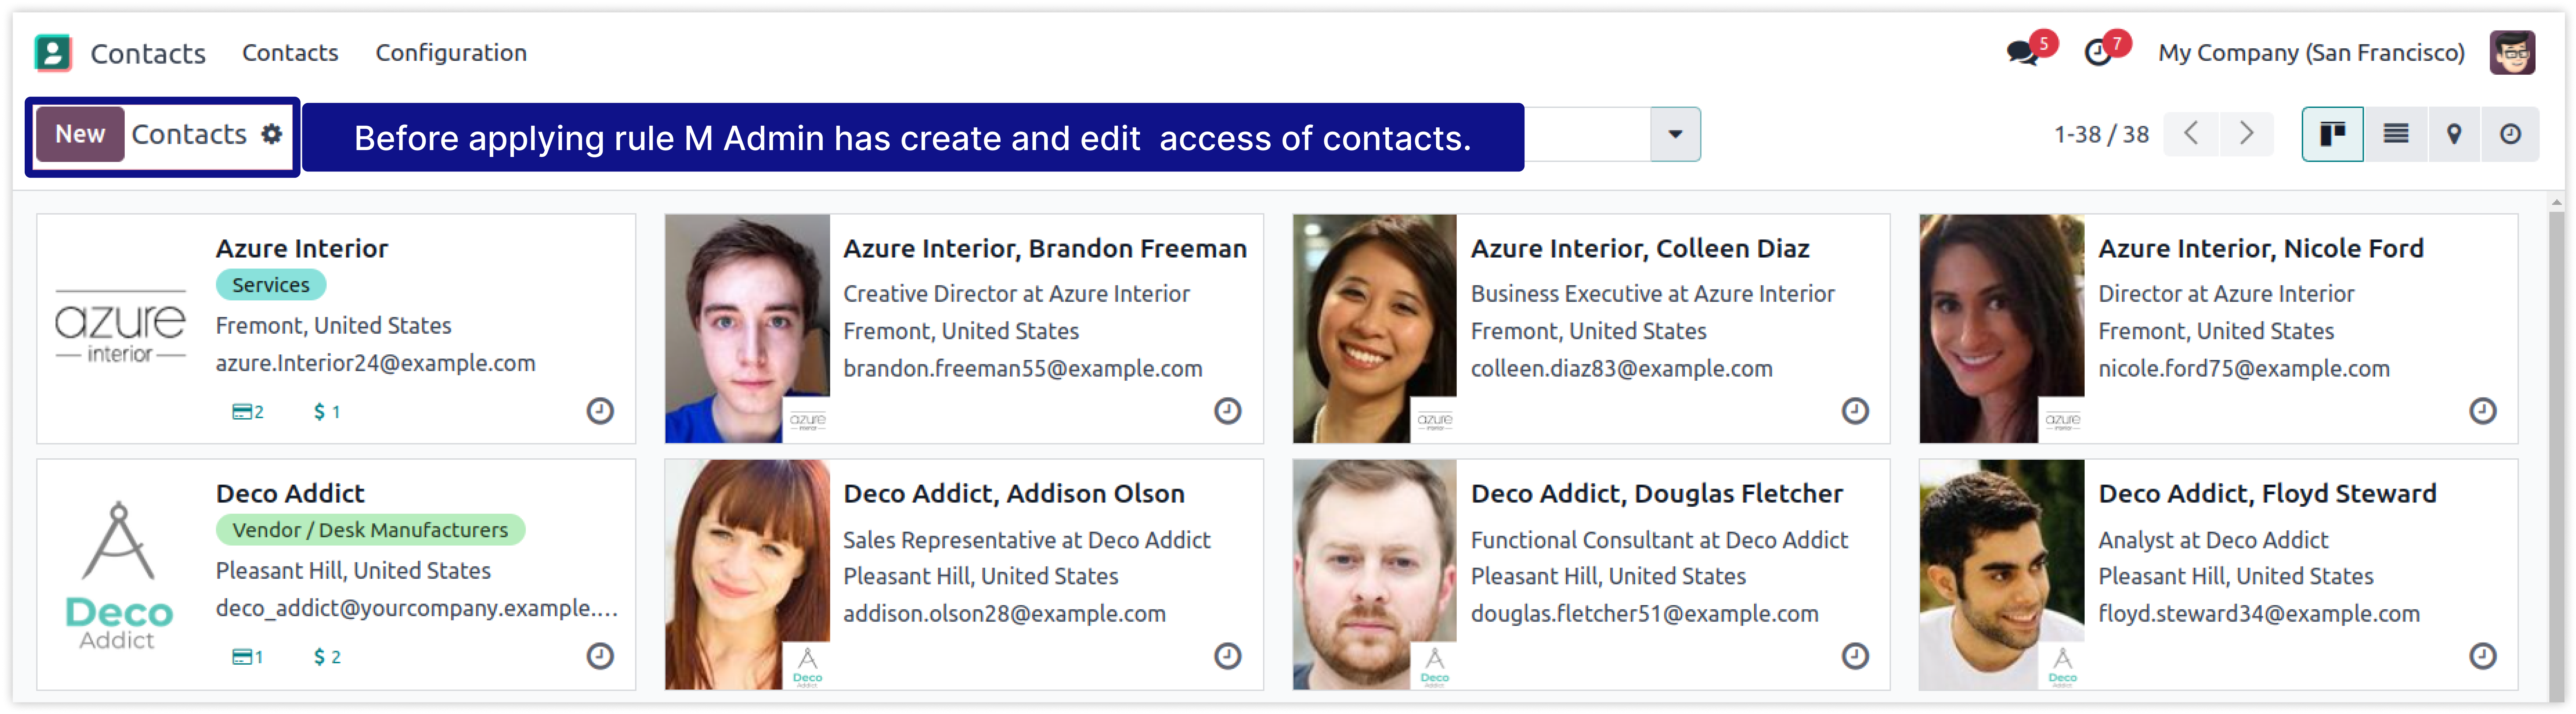
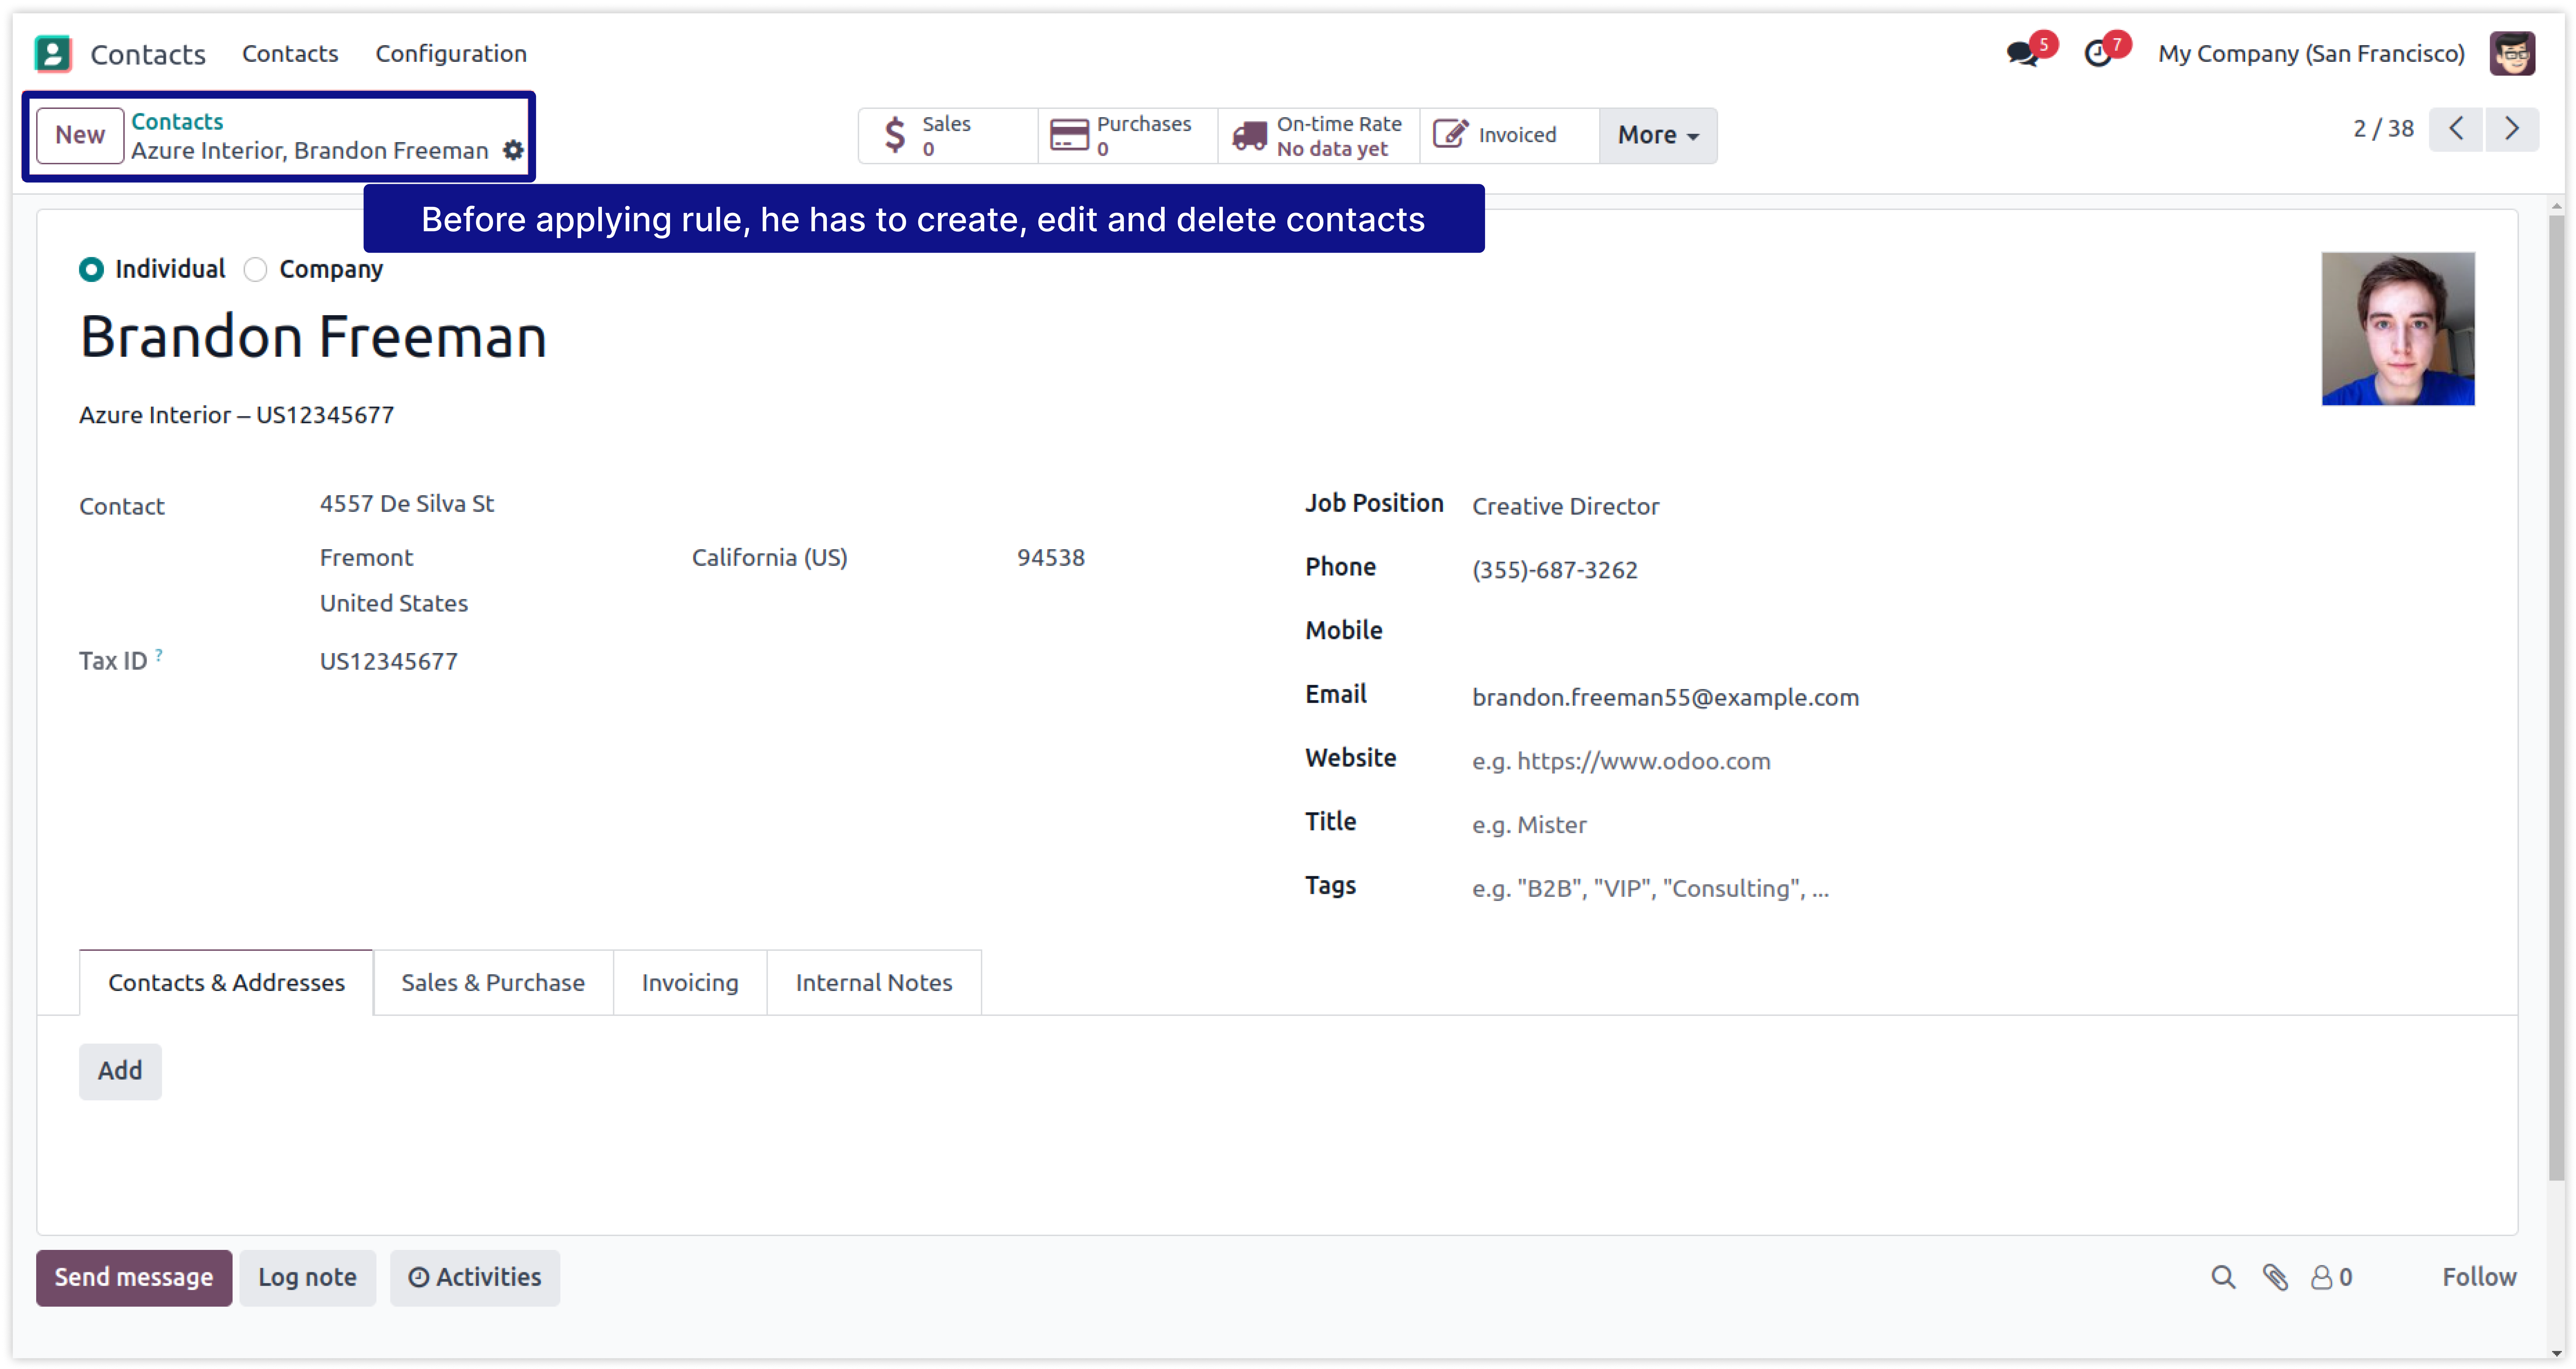
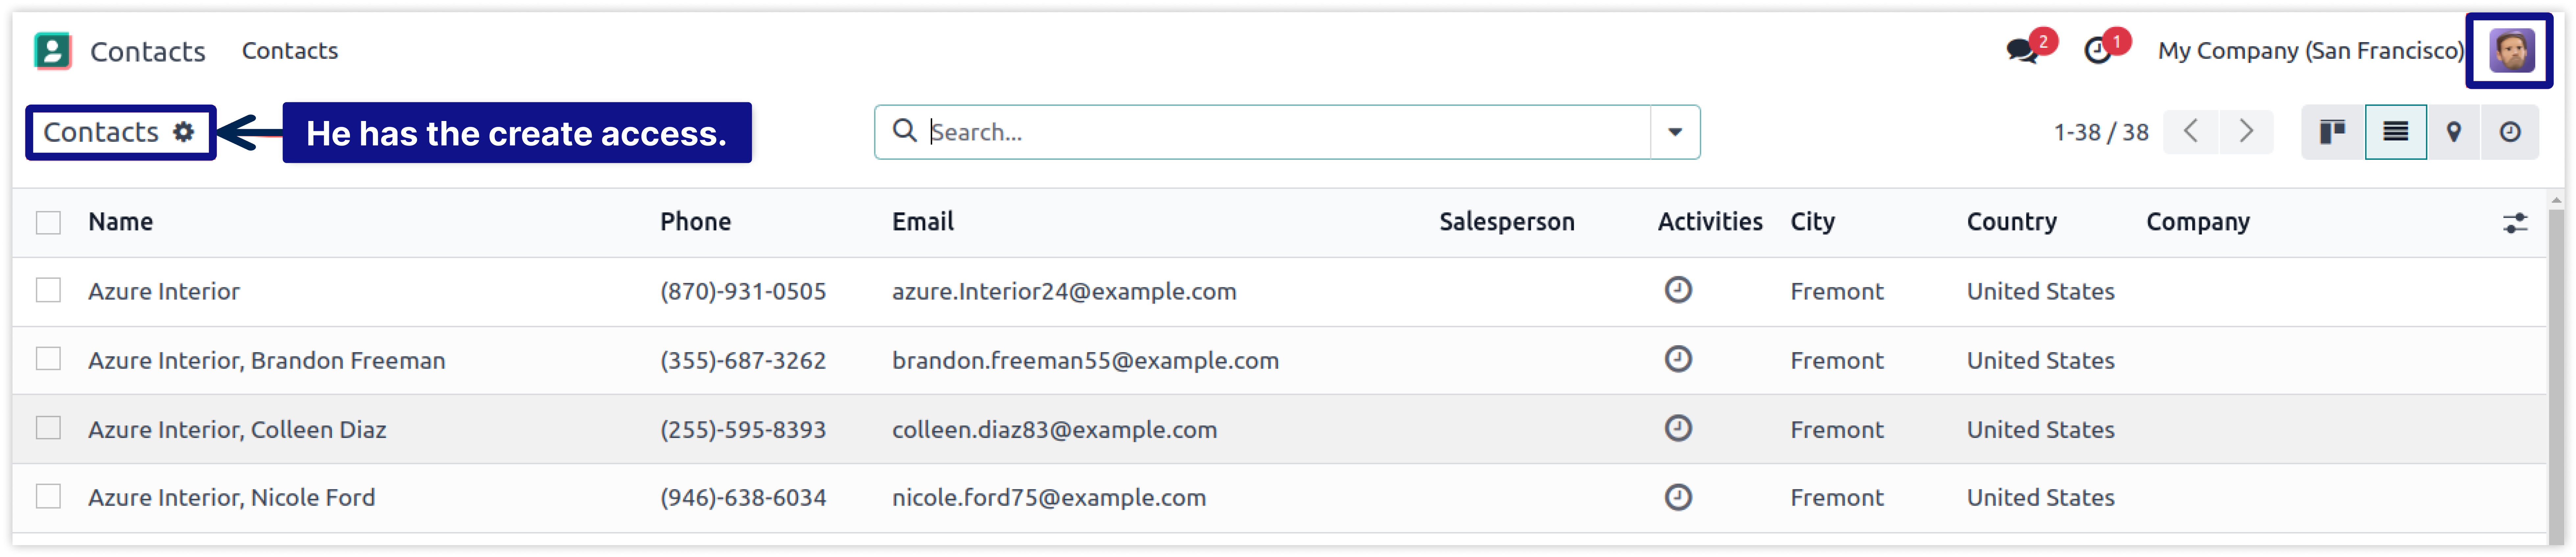
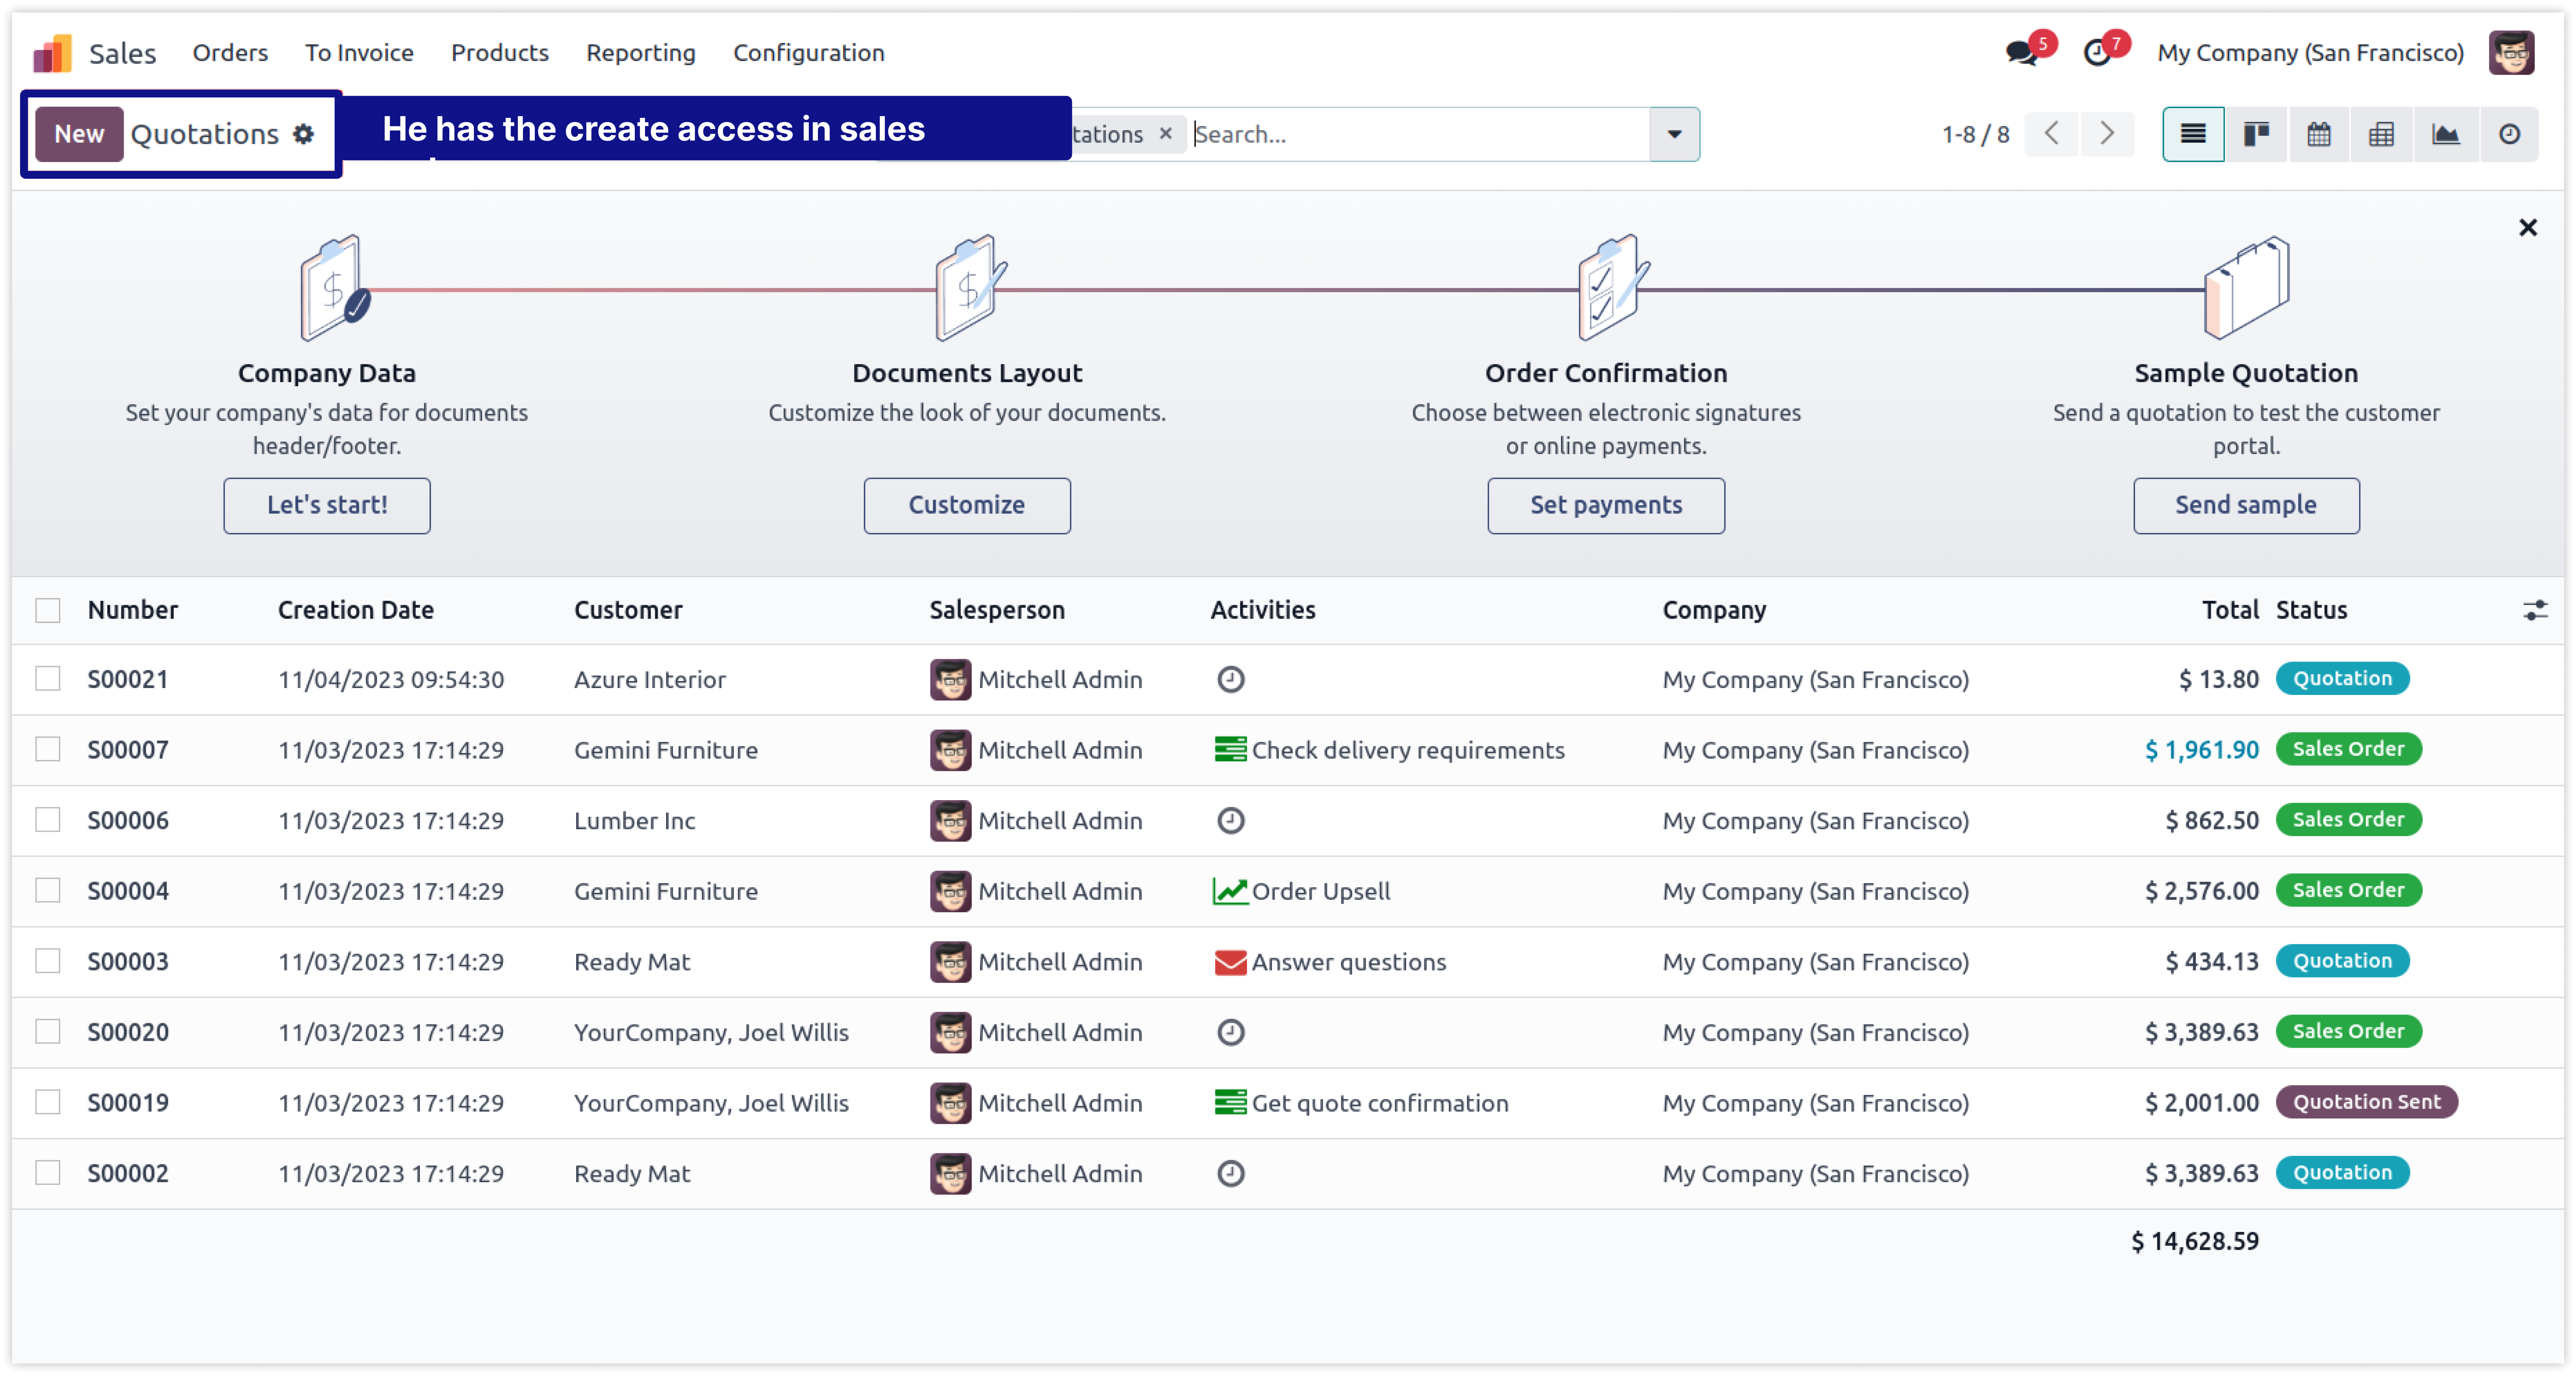
The below Image show that Mitchell Admin has all the access of sale orders and contacts.
-
We highlighted his accesses in the below images for the sale order and contacts model.
-
Click on image to Zoom out.
-
Here we created the rule of menu access of sales module for the user Mitchell Admin.
-
In this rule, we have made Mitchell Admin to read-only for the sale order model. it means restricted to CREATE, EDIT, and DELETE sale order records.
-
Give EDIT access and restrict to CREATE and DELETE contact.
-
Click on image to Zoom out.
-
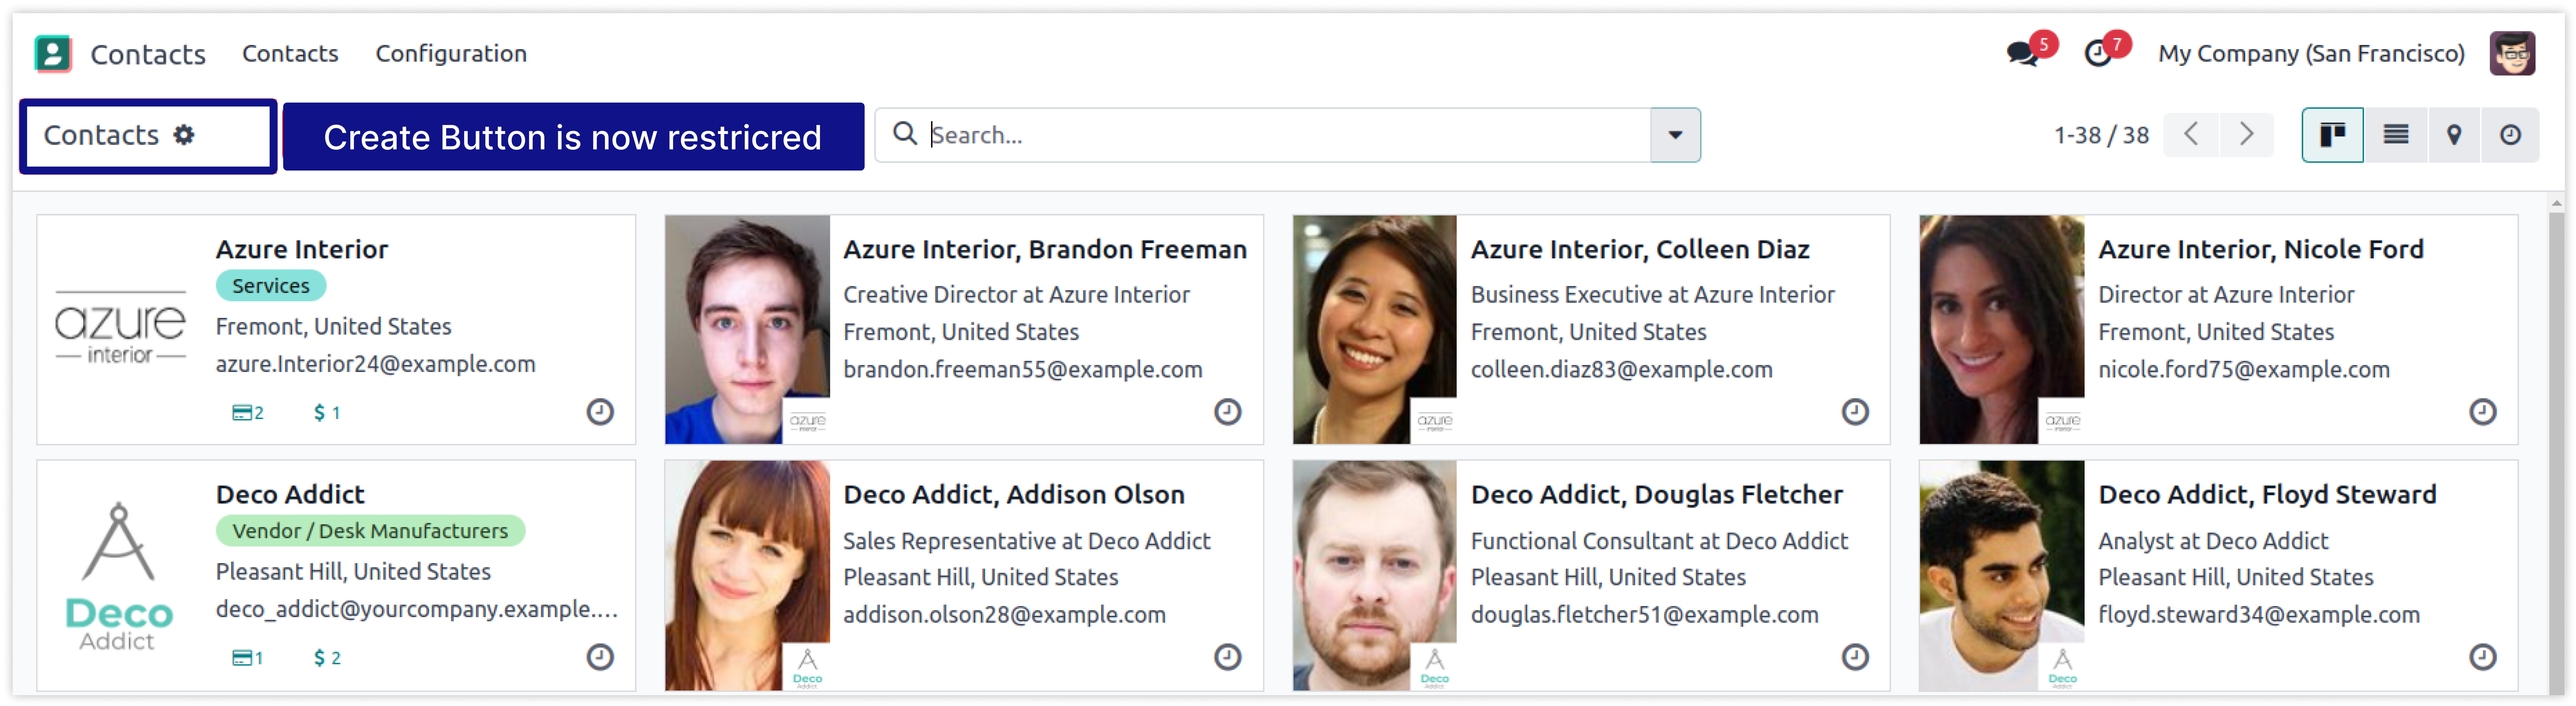
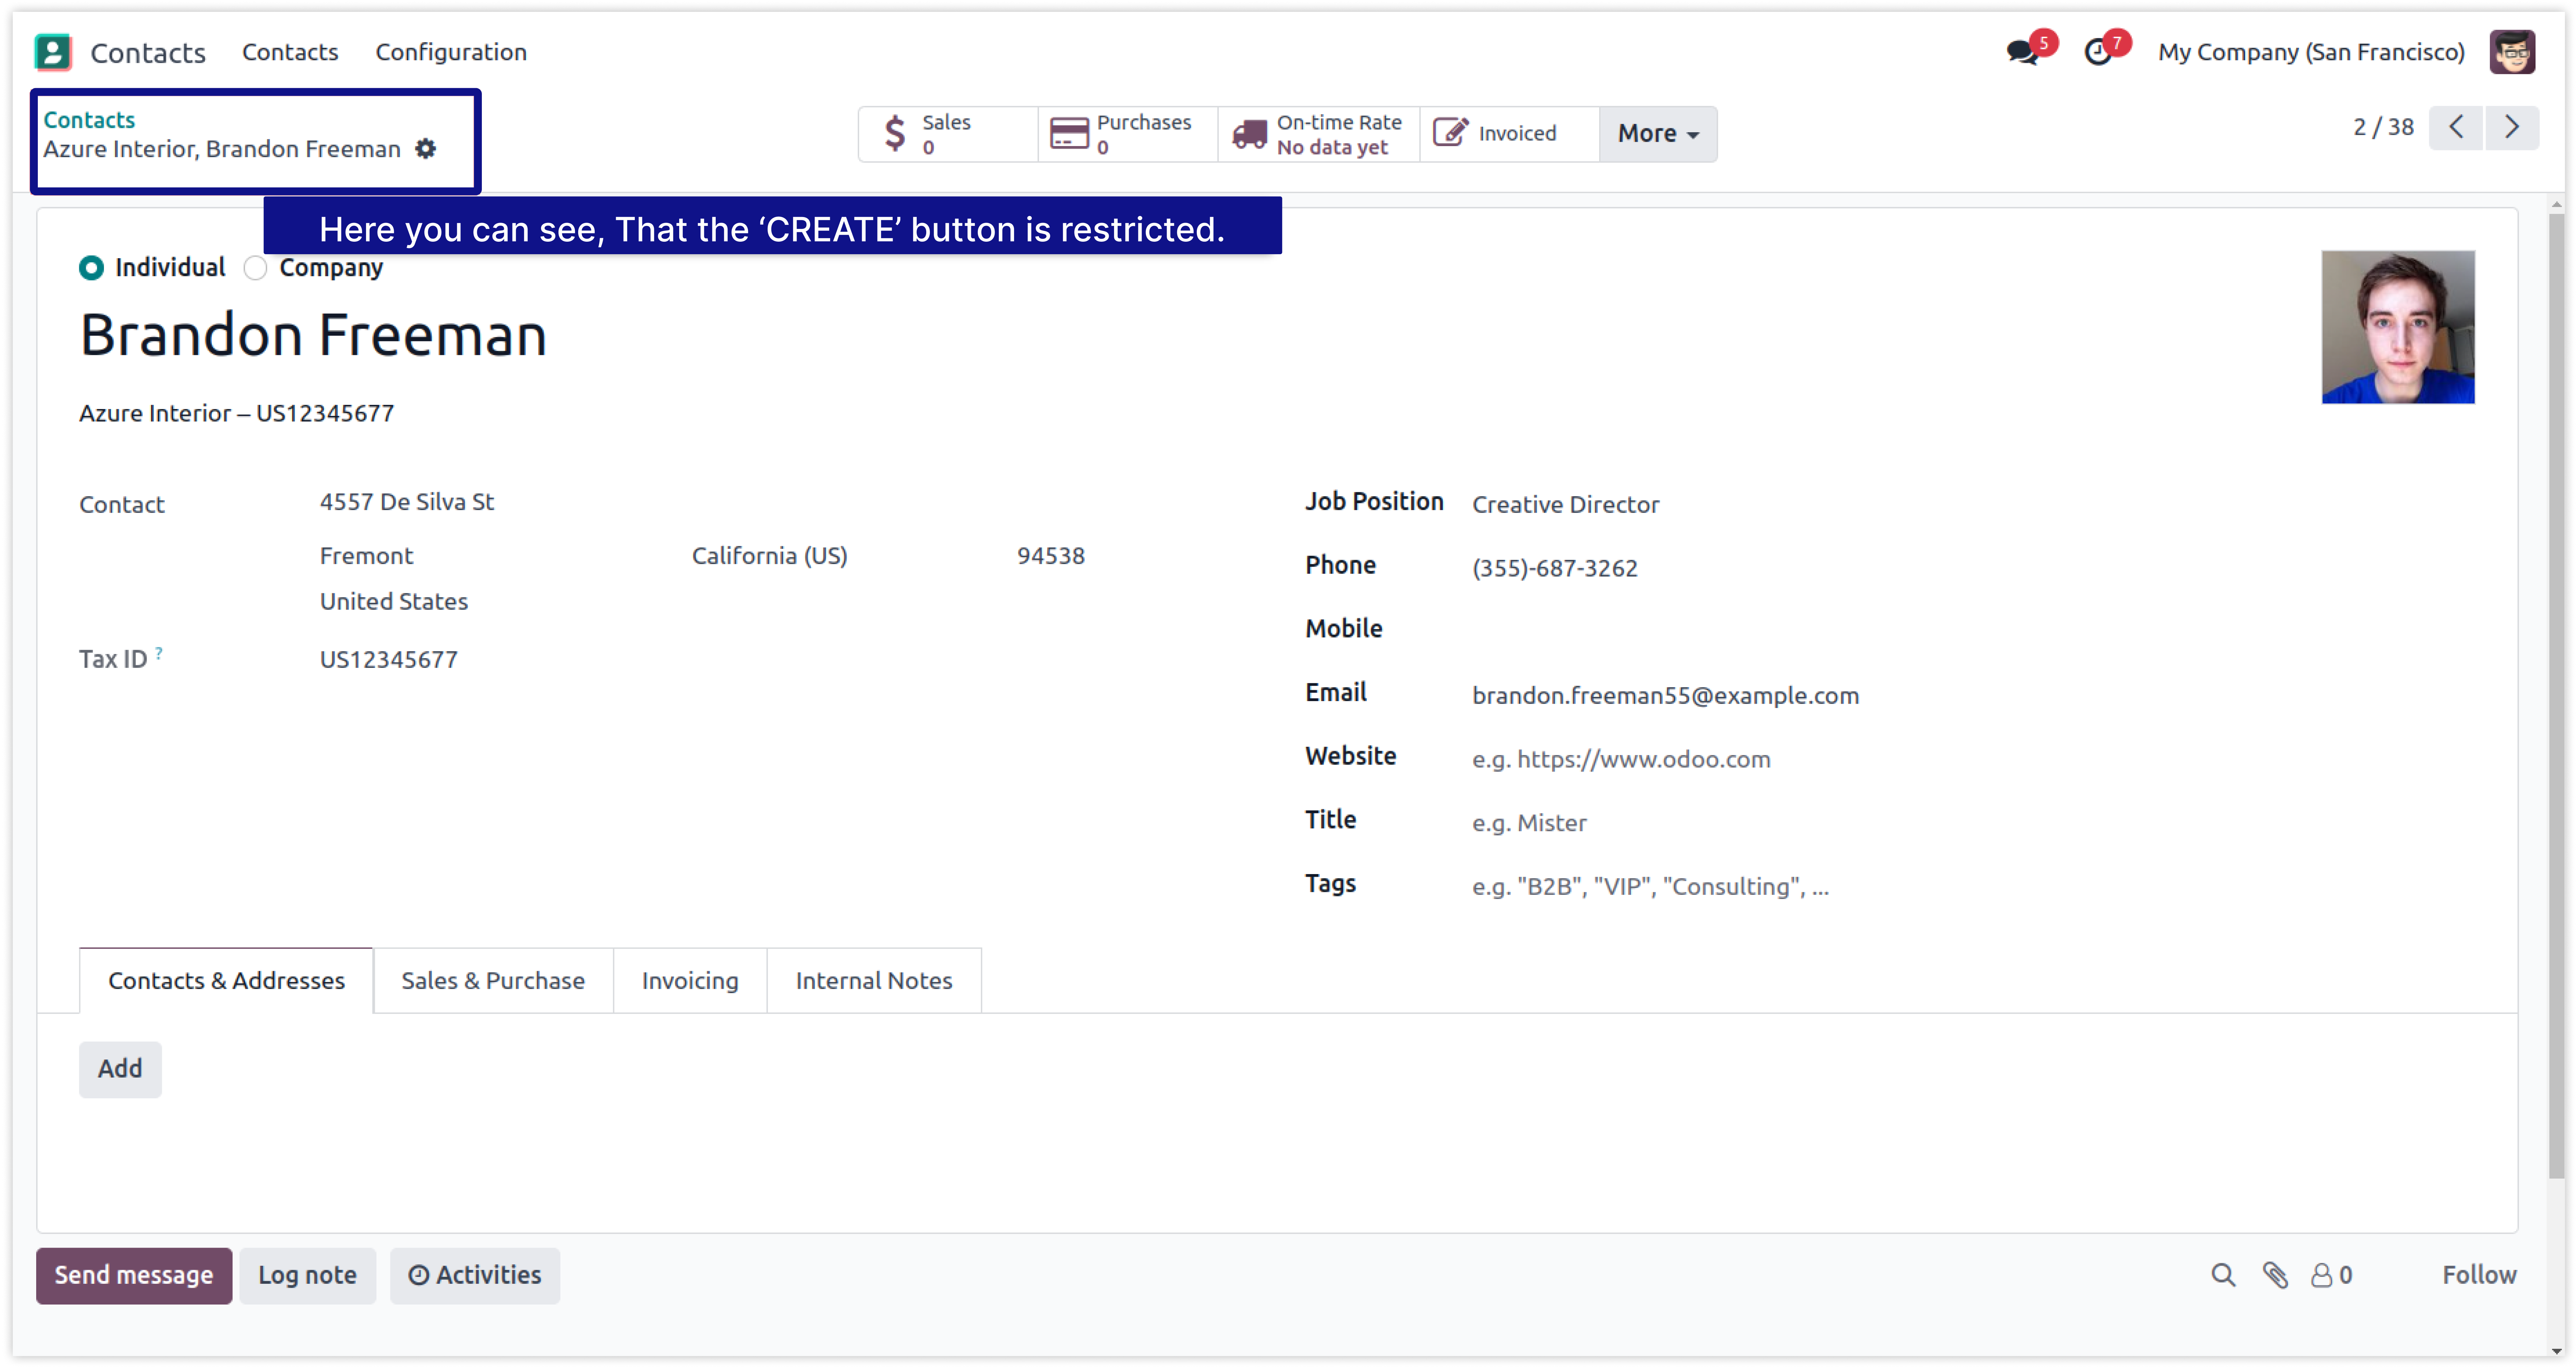
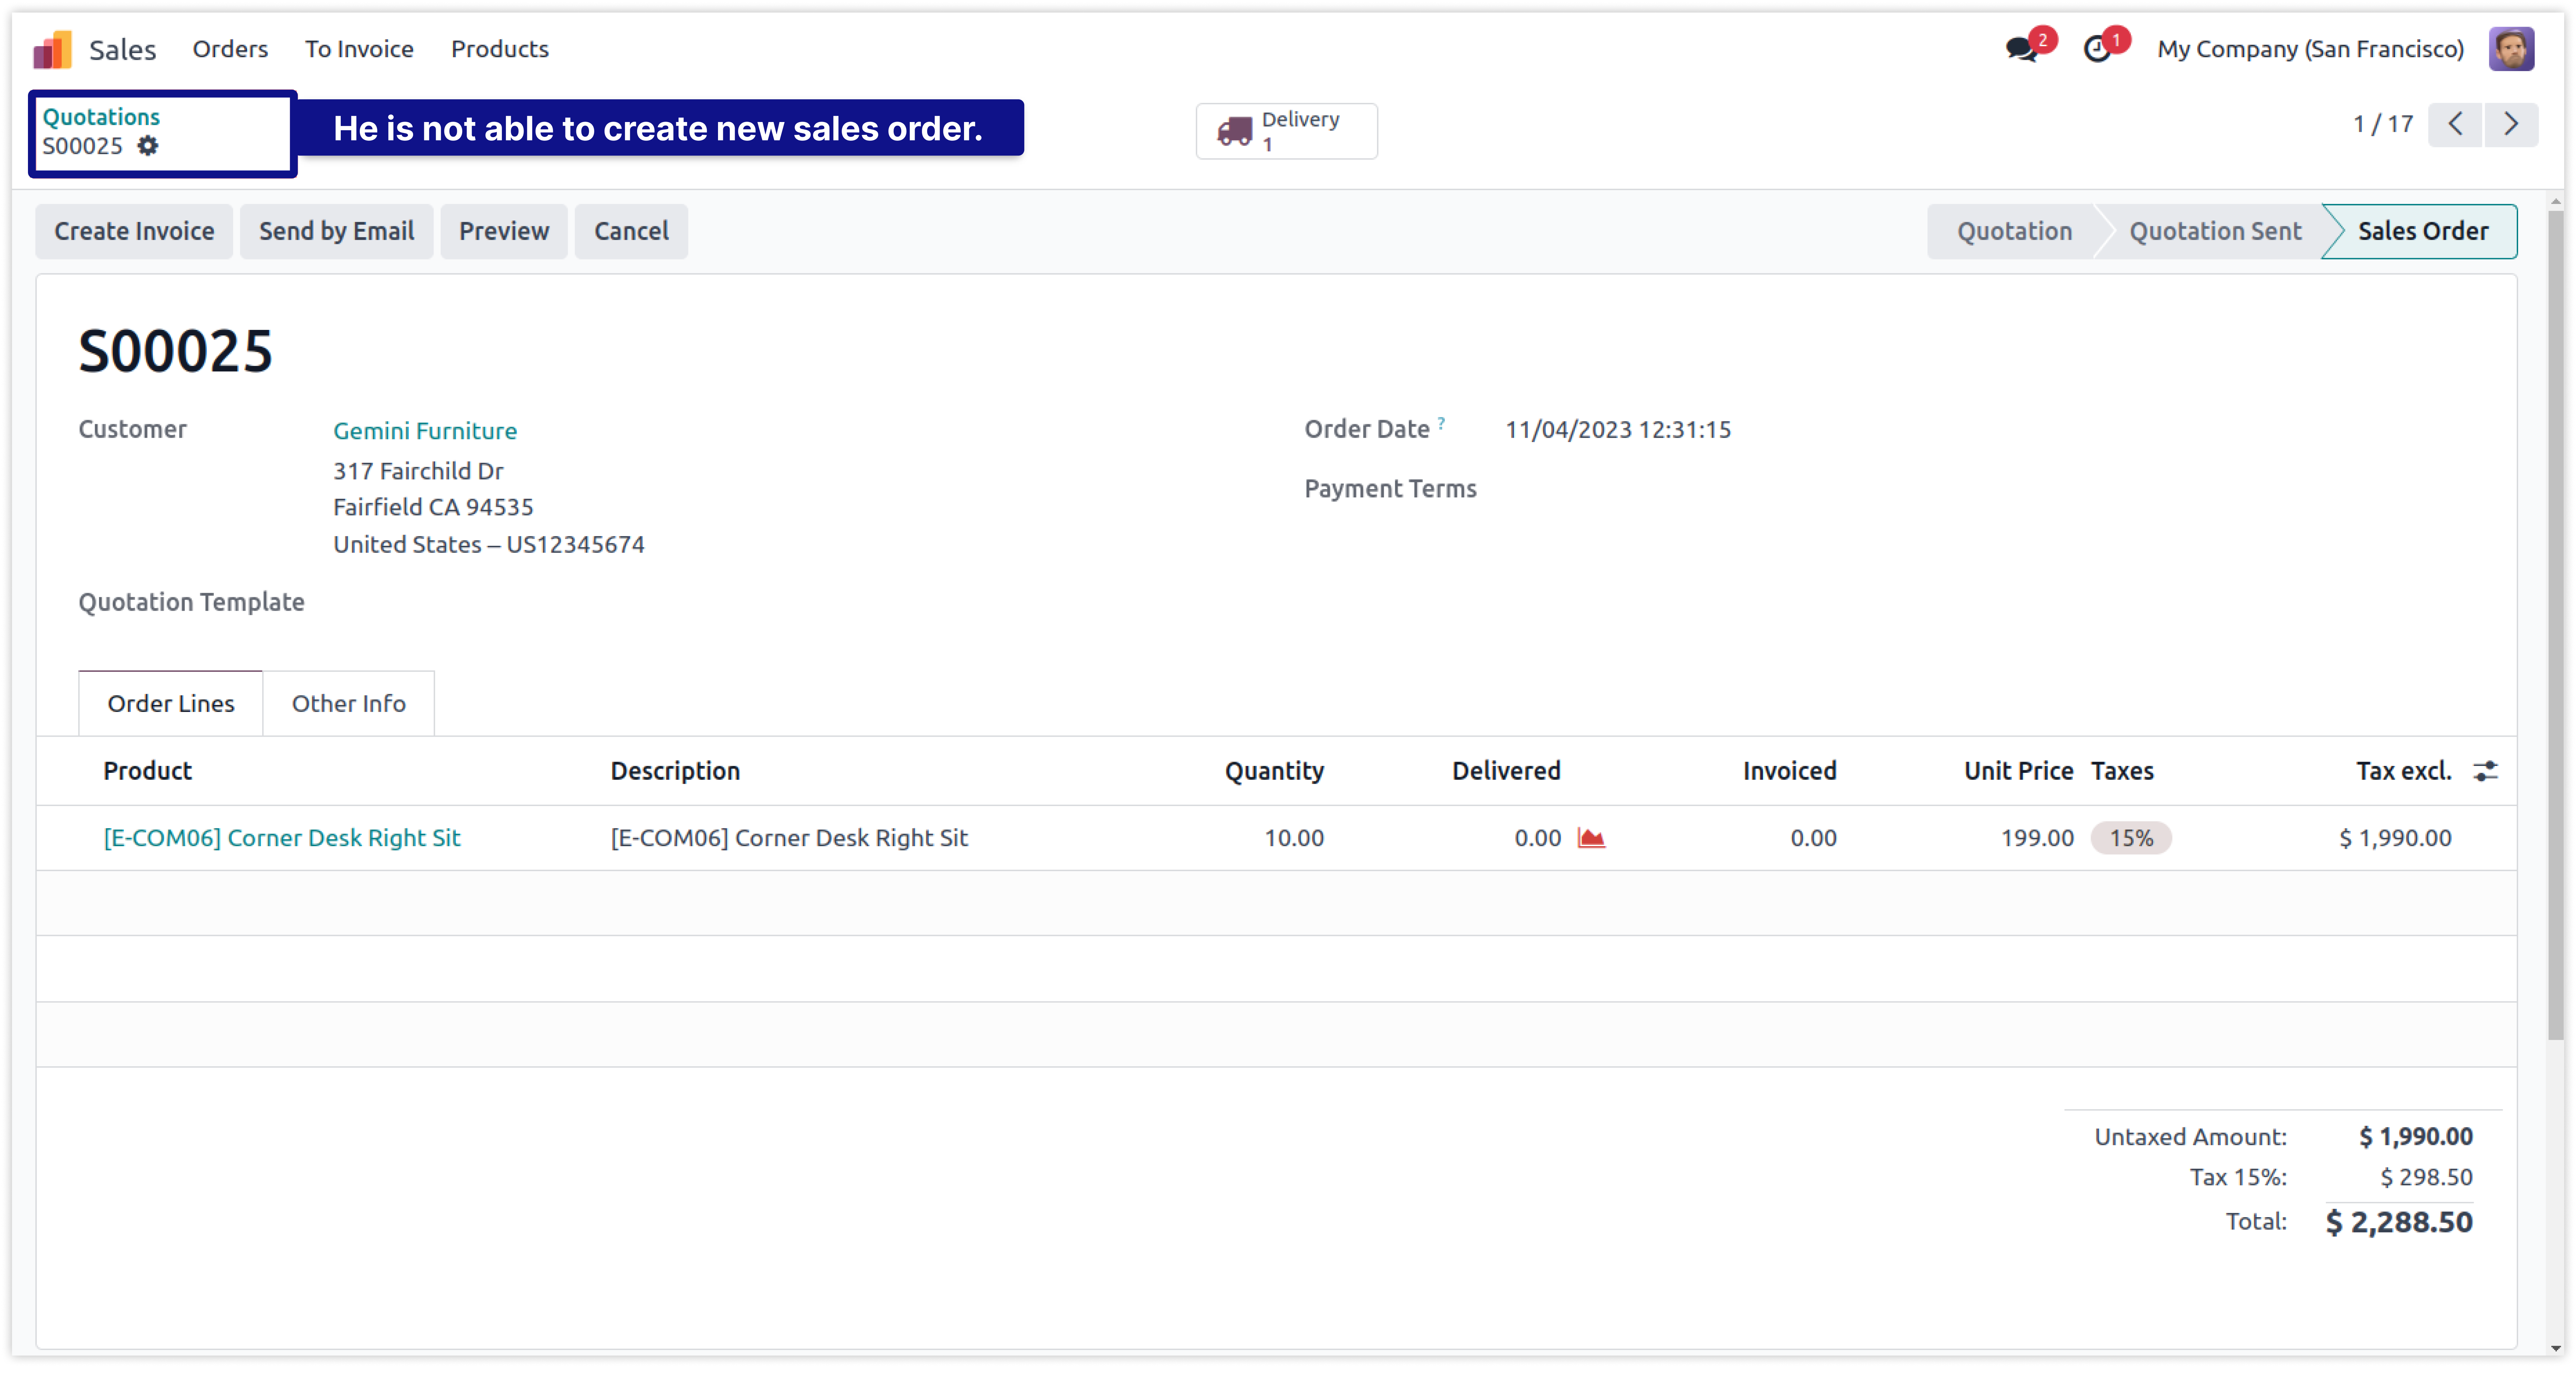
After applying the rule, Below images says that mitchell Admin is now restricted for the further things.
-
Click on image to Zoom out.

Now You can make any user of your system Read-Only by just a single click.
To set any user Read Only is not possible easily in Odoo. Here is some limitations -
You must have technical knowledge/technical person.
Not possible to ser user-wise.
Does not work in multi-companies.
Here is the solution
Simplified Access Management allows you to make any user read-only by on click and solutions of all above problems.
No need to have technical knowledge/technical person, Only you have to understand our module features.
You can set user-wise rule with multi companies.
You can customize rules for base modules as well as third-party modules.
How to setup Read Only's access rights.
Here we have explained example step by step.
-
First of all you will need to know all about Read Only Access to make perfect rules for the users.
-
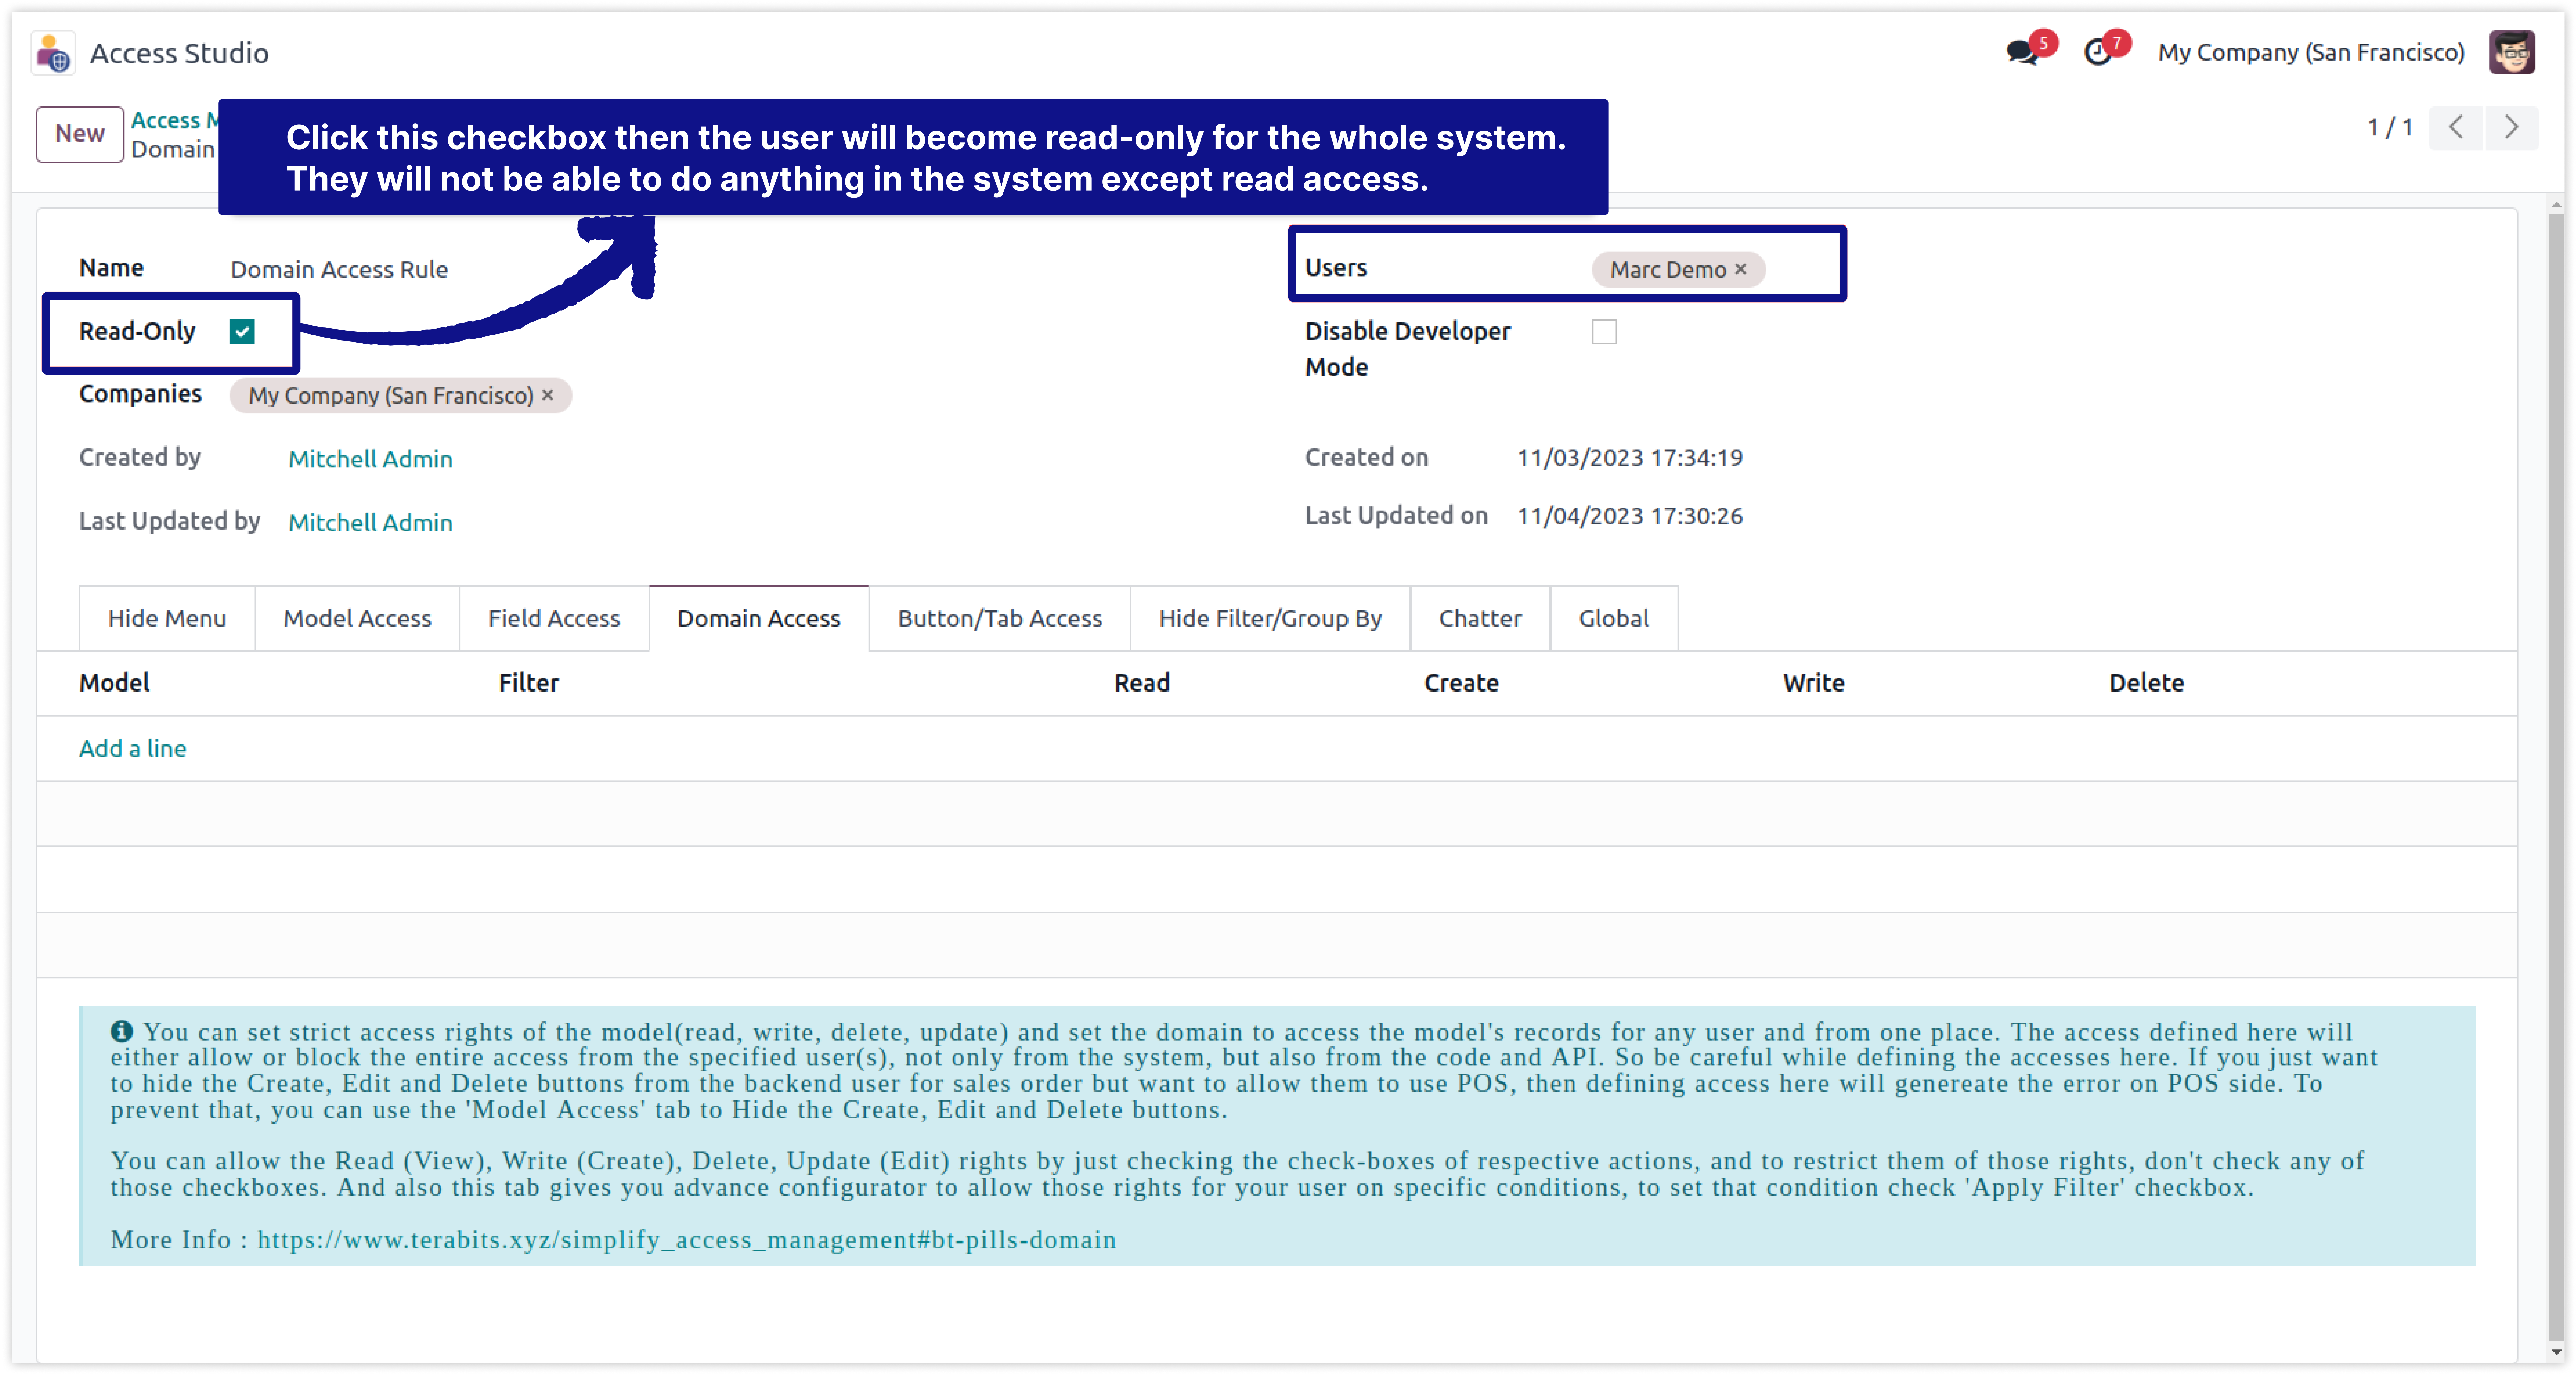
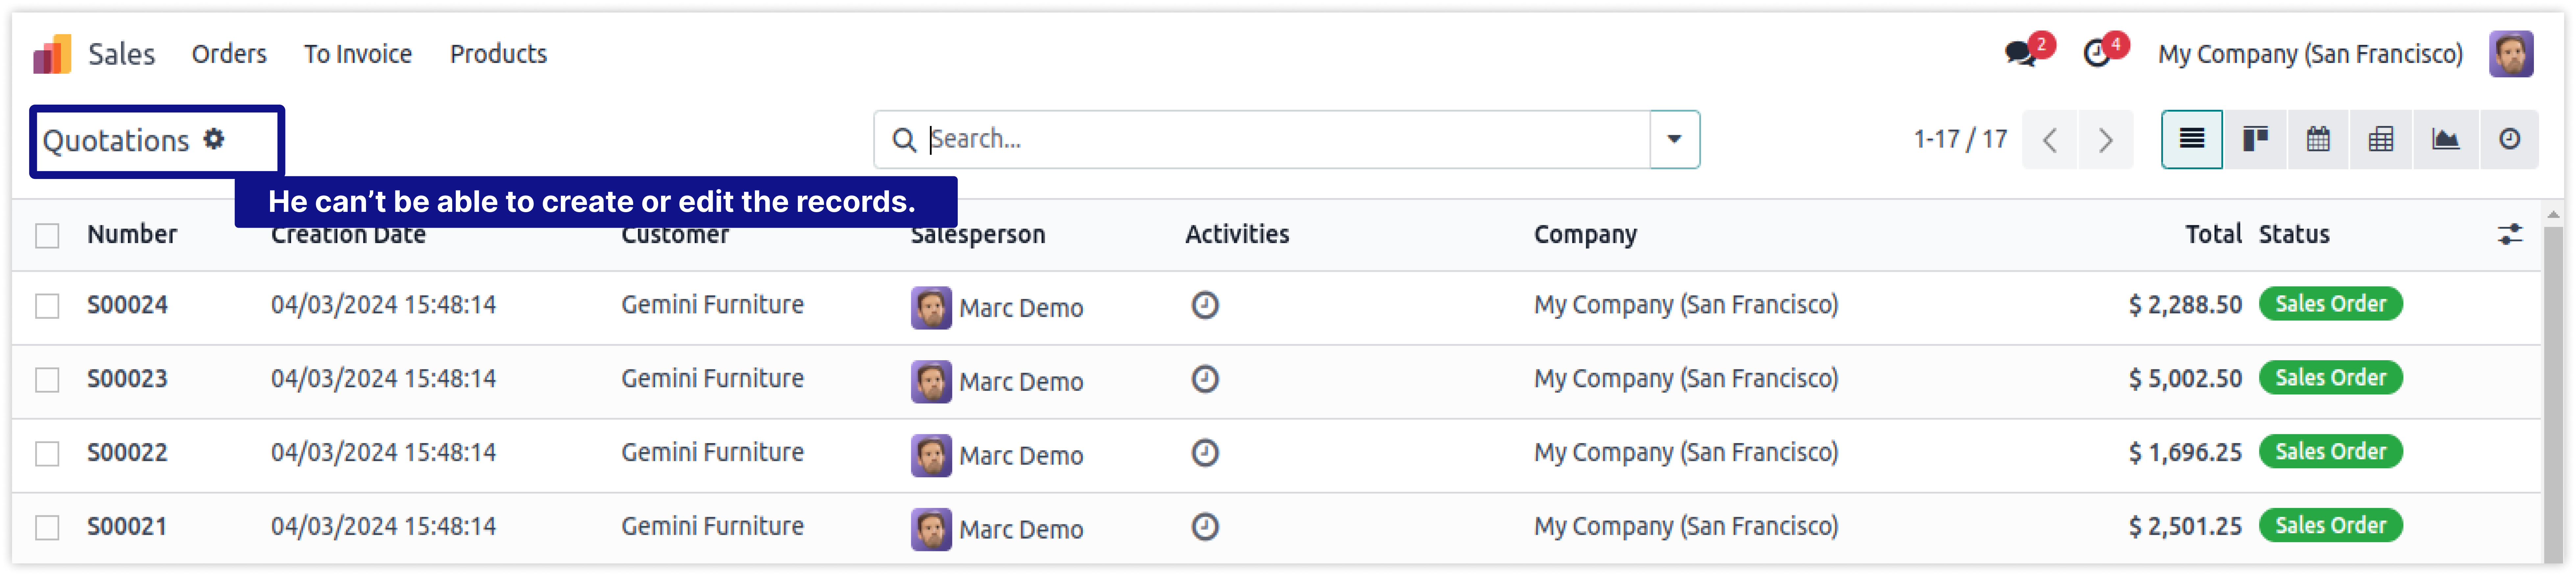
For any users, you make 'Read Only' access those users will only get the access to read data of the system. they can't be able to do Create, Edit, Delete or any other actions in the system.
-
In the below image, we made Read-only access for the user Marc Demo.
-
Click on image to Zoom out.
-
We have created rule Read-only for 'Marc Demo'. Let's see, What happens to him.
-
Click on image to Zoom out.
-
In short, If you want to remove the access and make Read-only any user of your system that can be possible by one click on here.
-
Any actions of the system which perform a database level process. that will not be completed by Read-only users.
Now You can hide/restrict Chatter from the specific users.
To hide or restrict chatter for specific user is not possible in odoo. You can hide it by coding but it will hide from every user.
To hide it by customization to must have technical person.
If you will customize module to hide chatter it will hide from every user.
Here is the solution
Simplified Access Management allows you to hide 'Chatter' for the specific users by just one click.
No need to have technical knowledge/technical person, Only you have to understand our module features.
You can hide it from a selected model and specific user.
You can customize rules for base modules as well as third-party modules.
How to set up Chatter access rights.
Here we have explained some examples step by step.
-
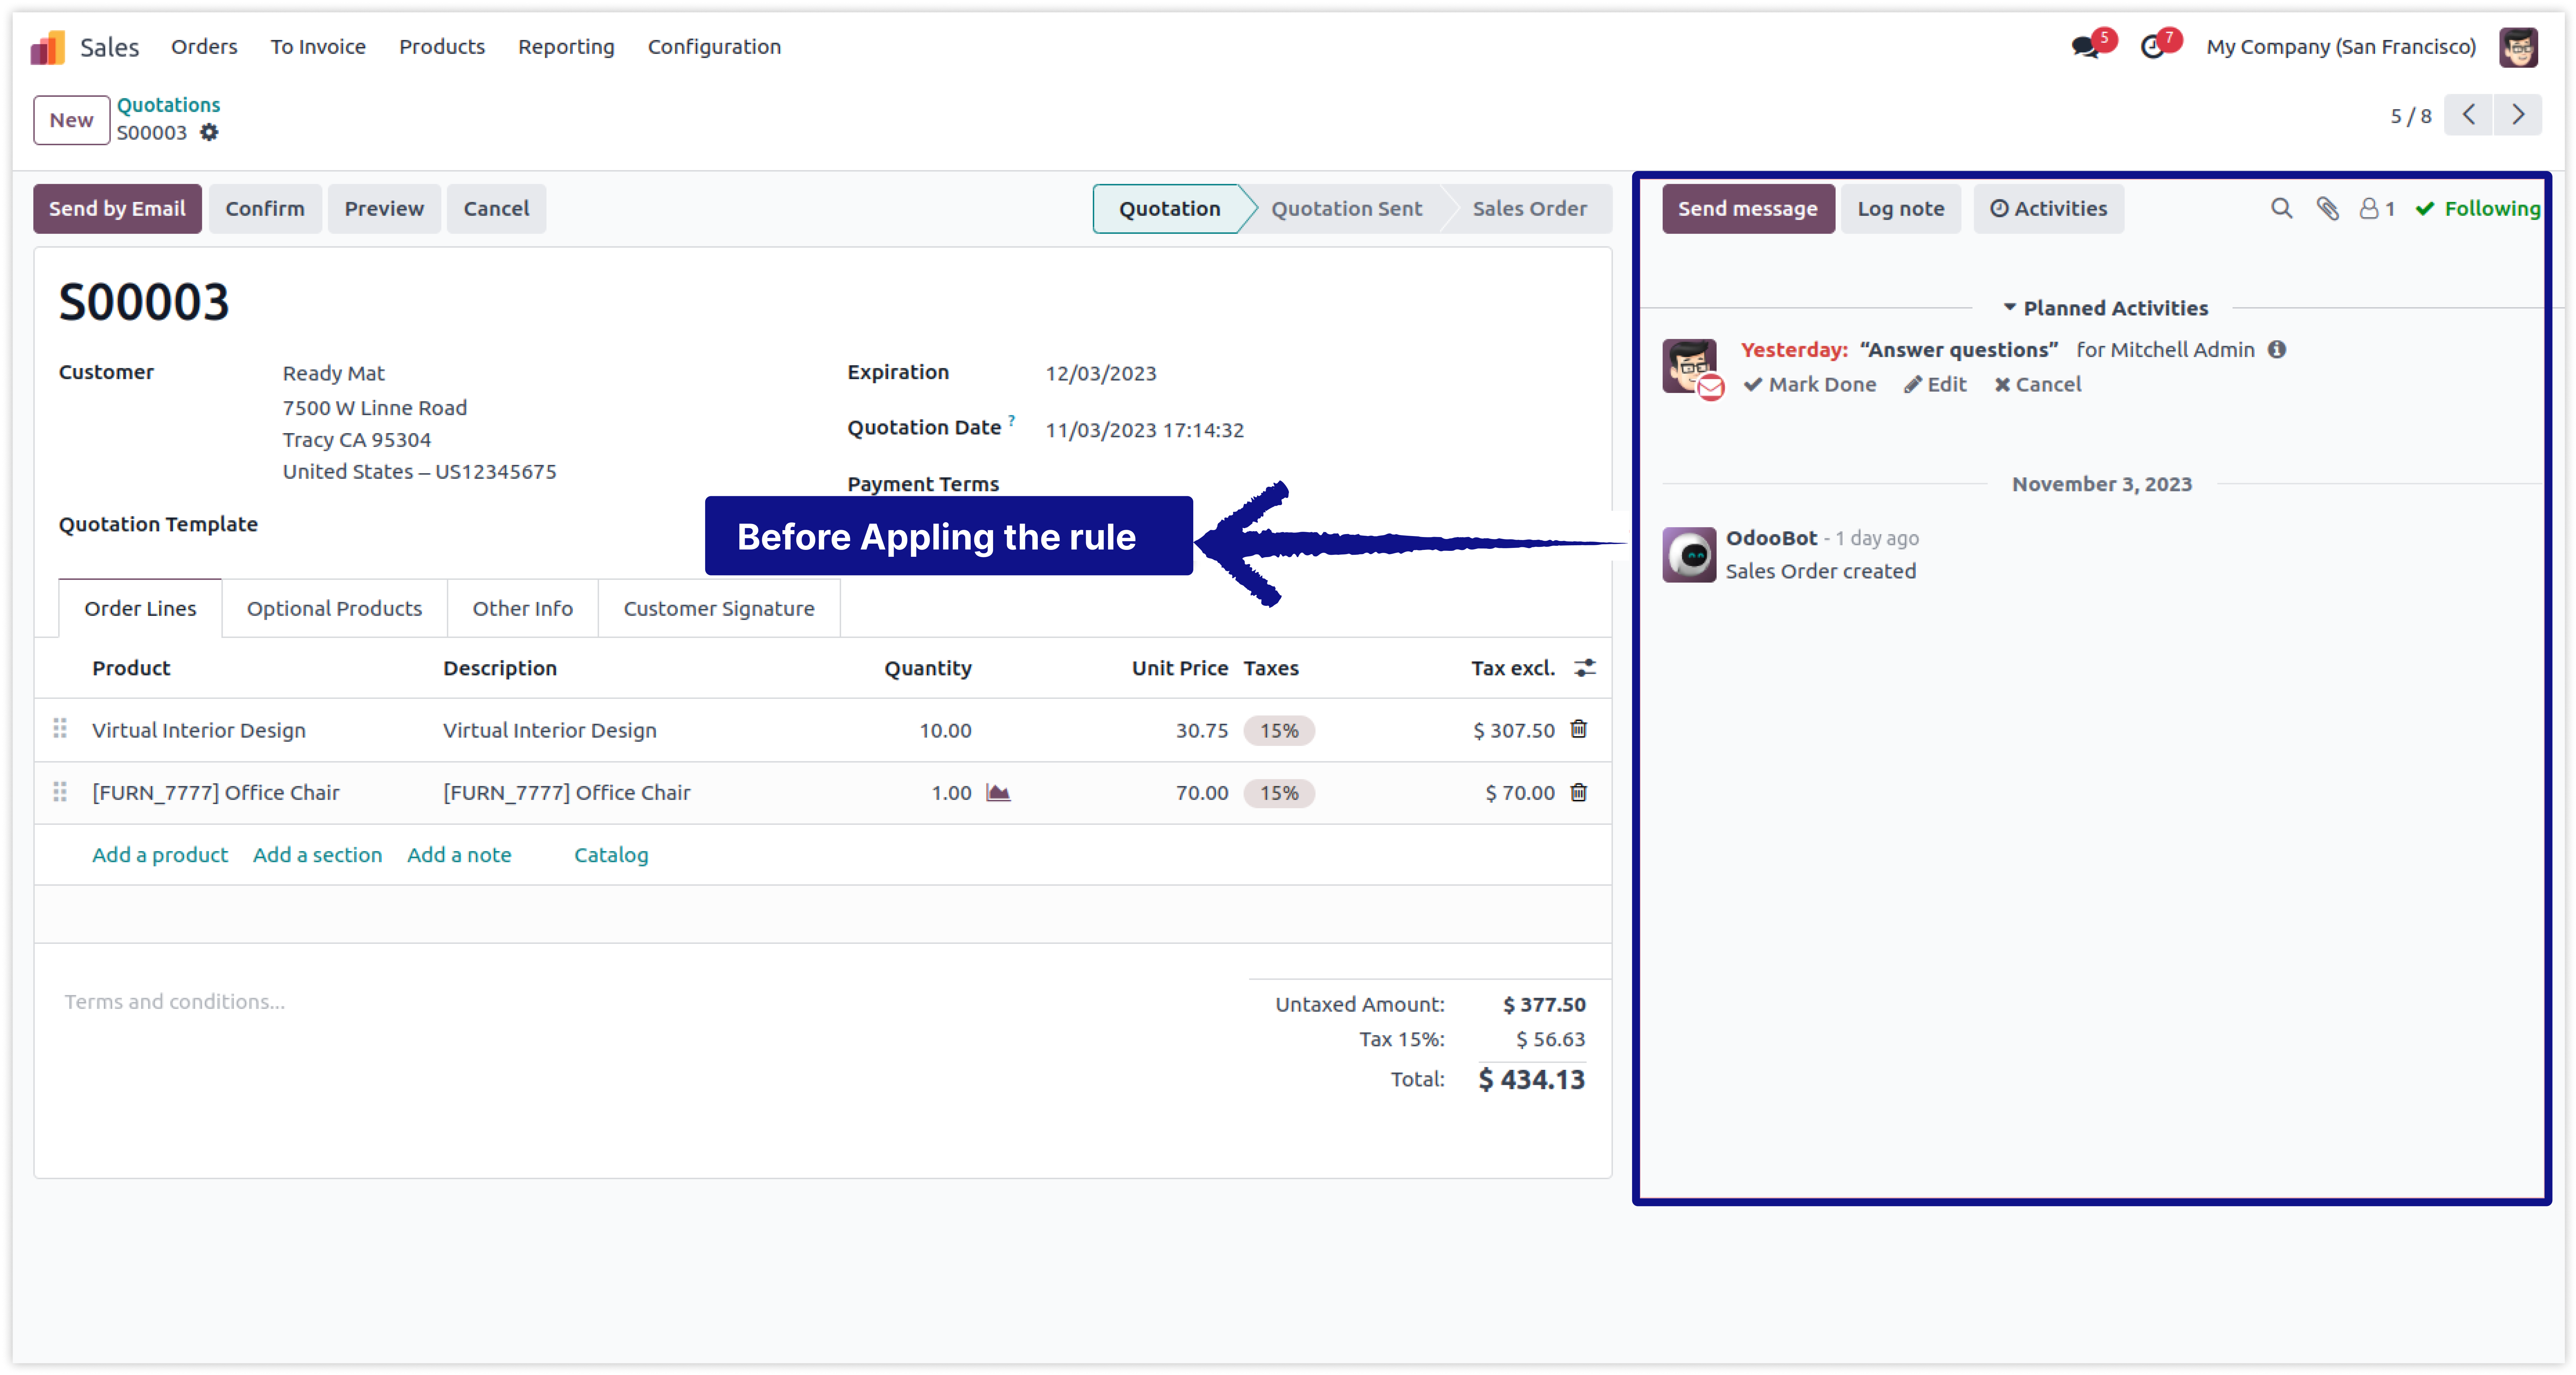
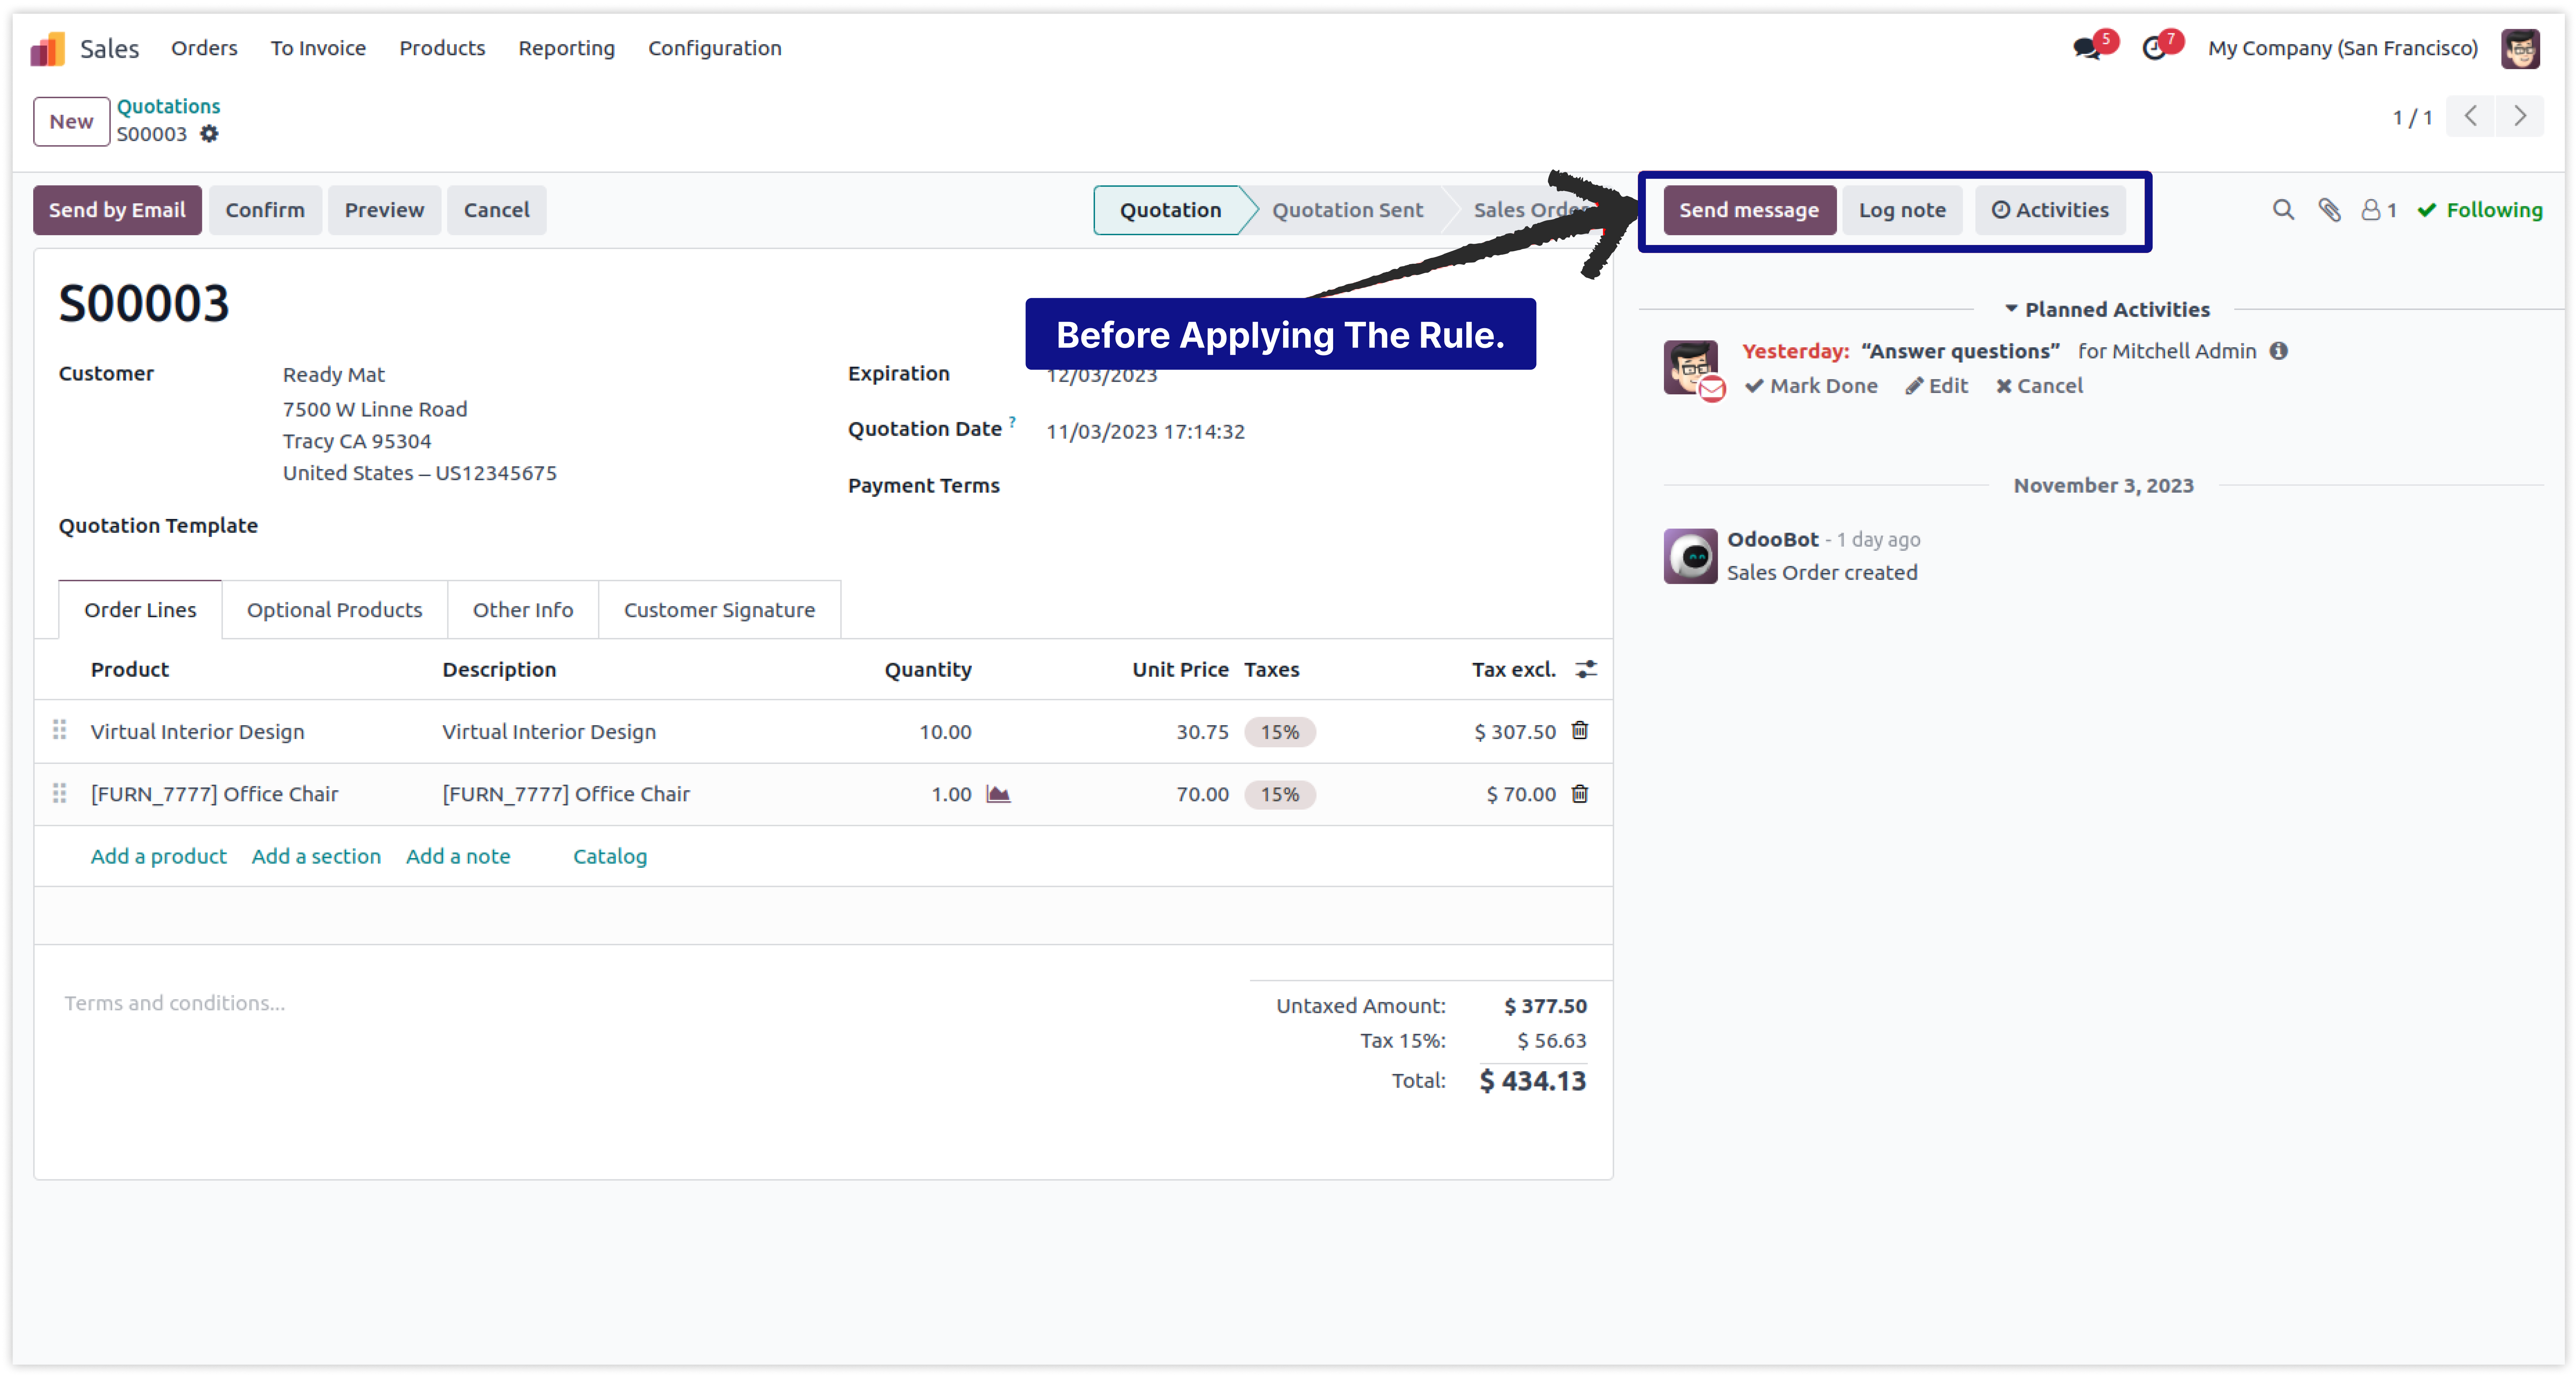
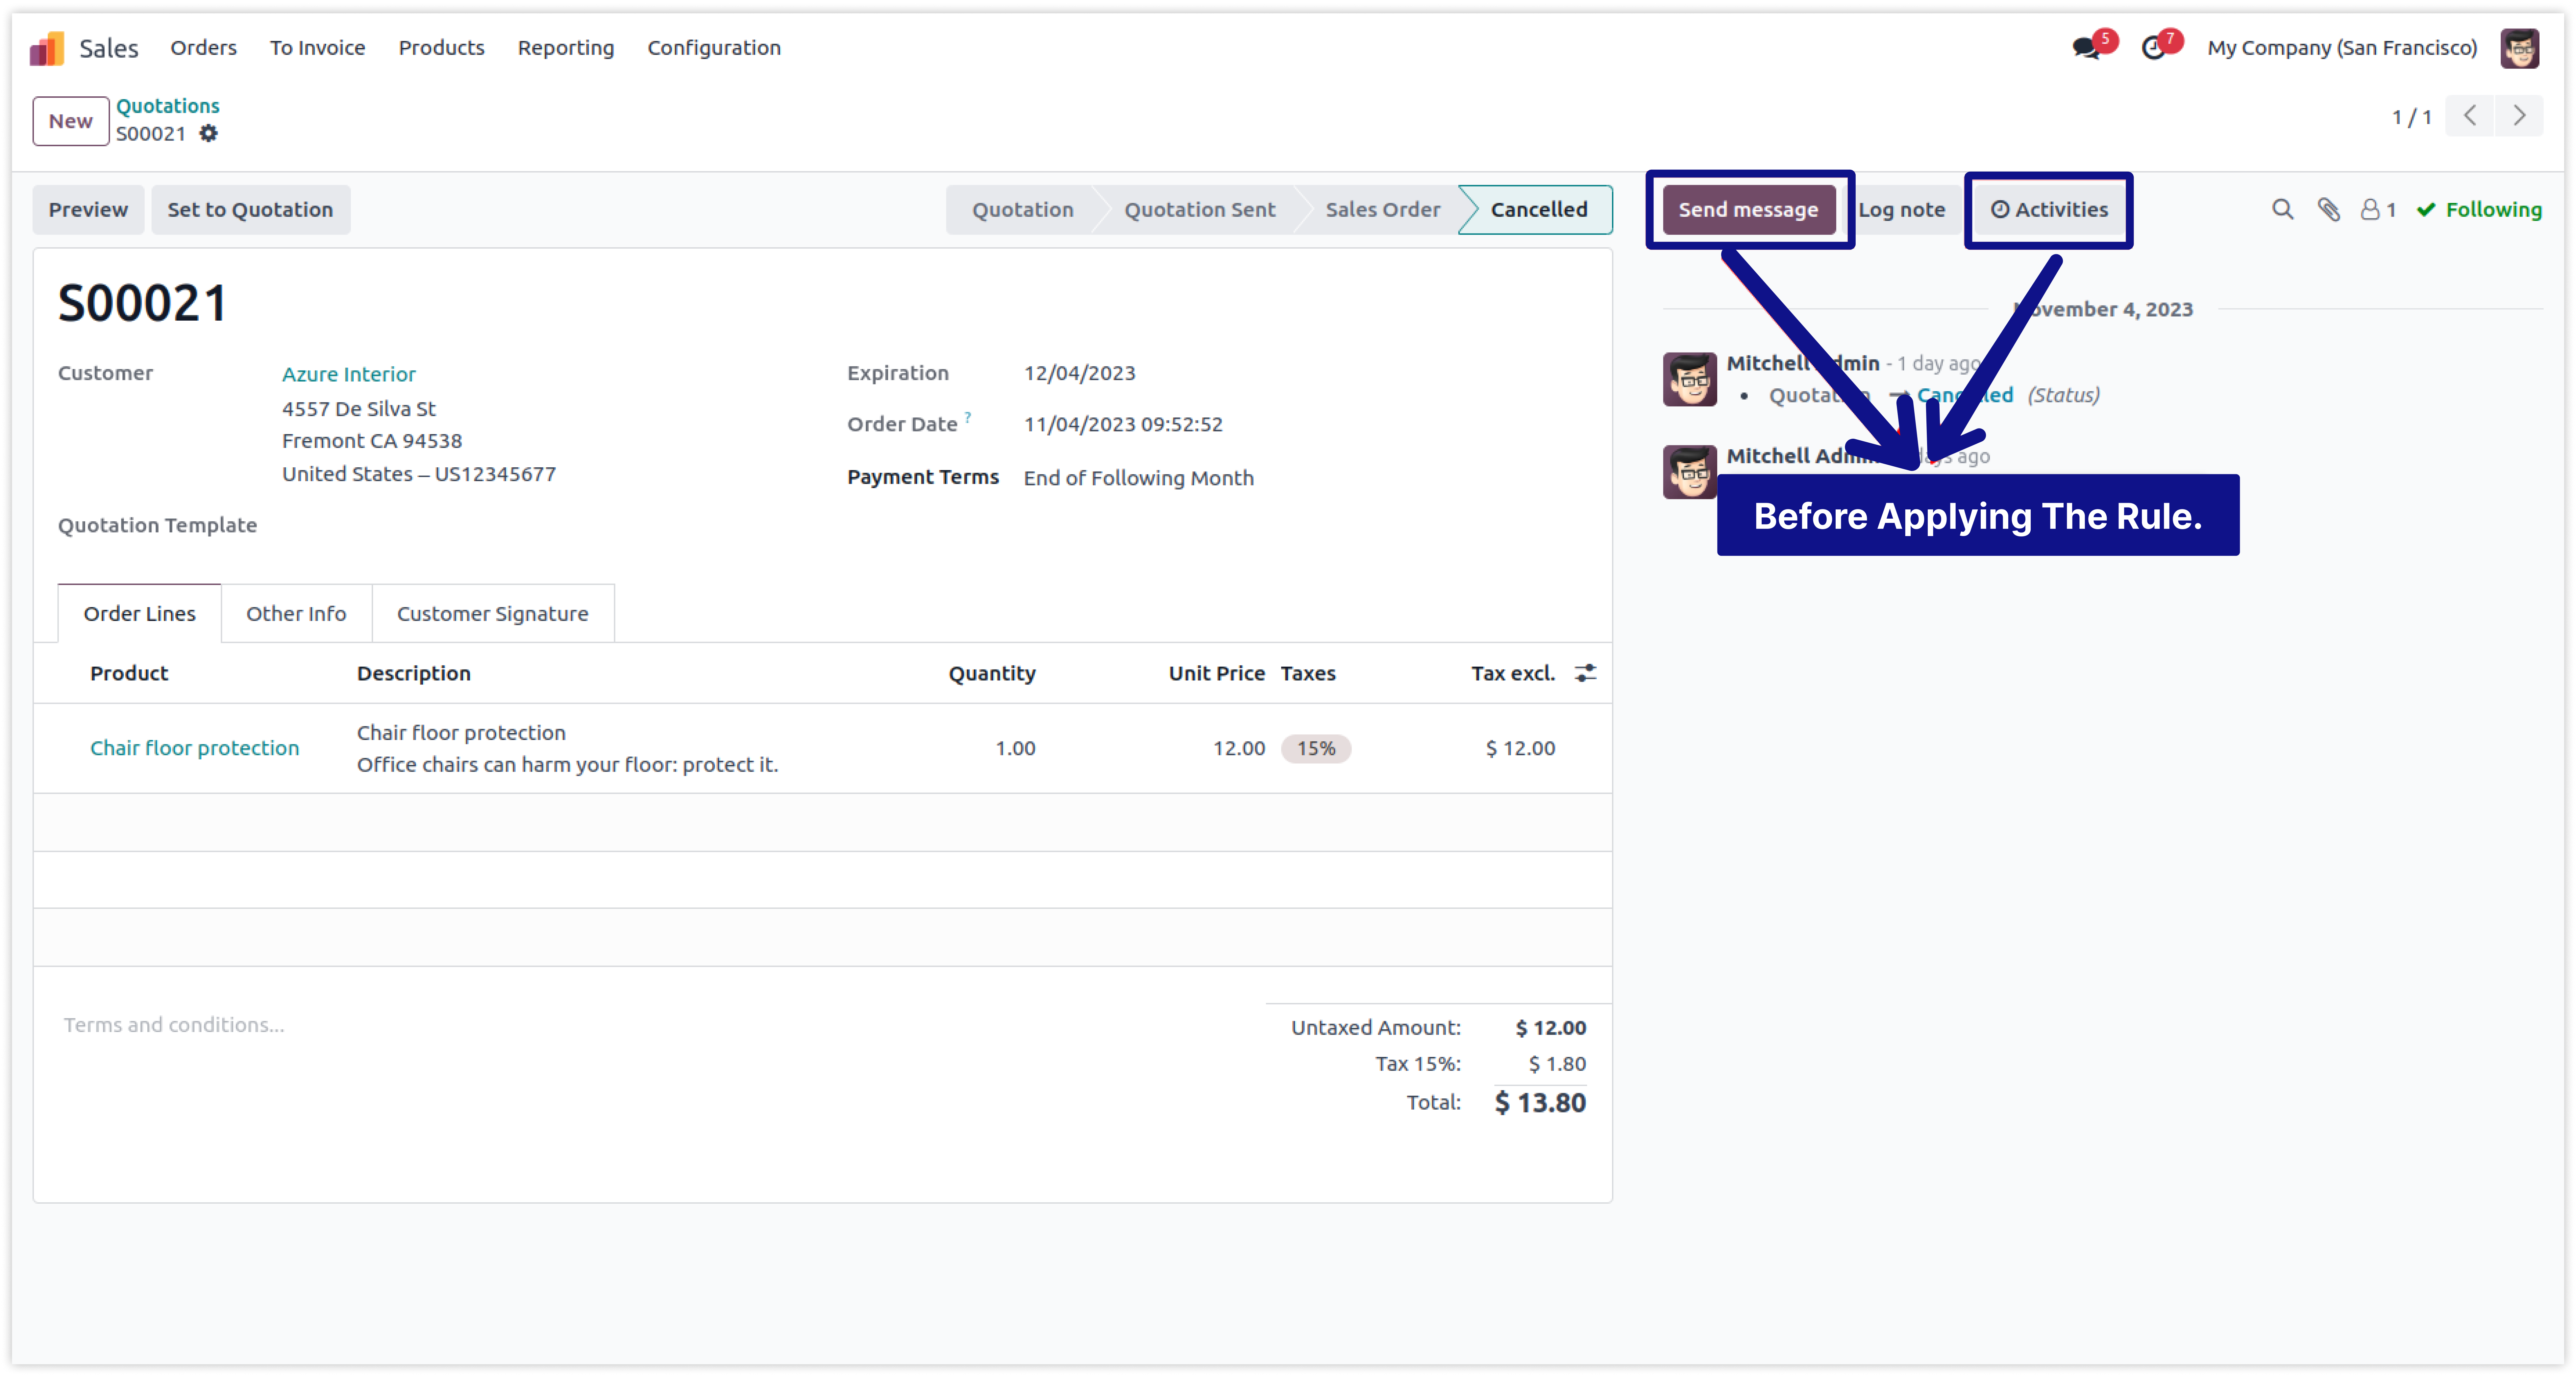
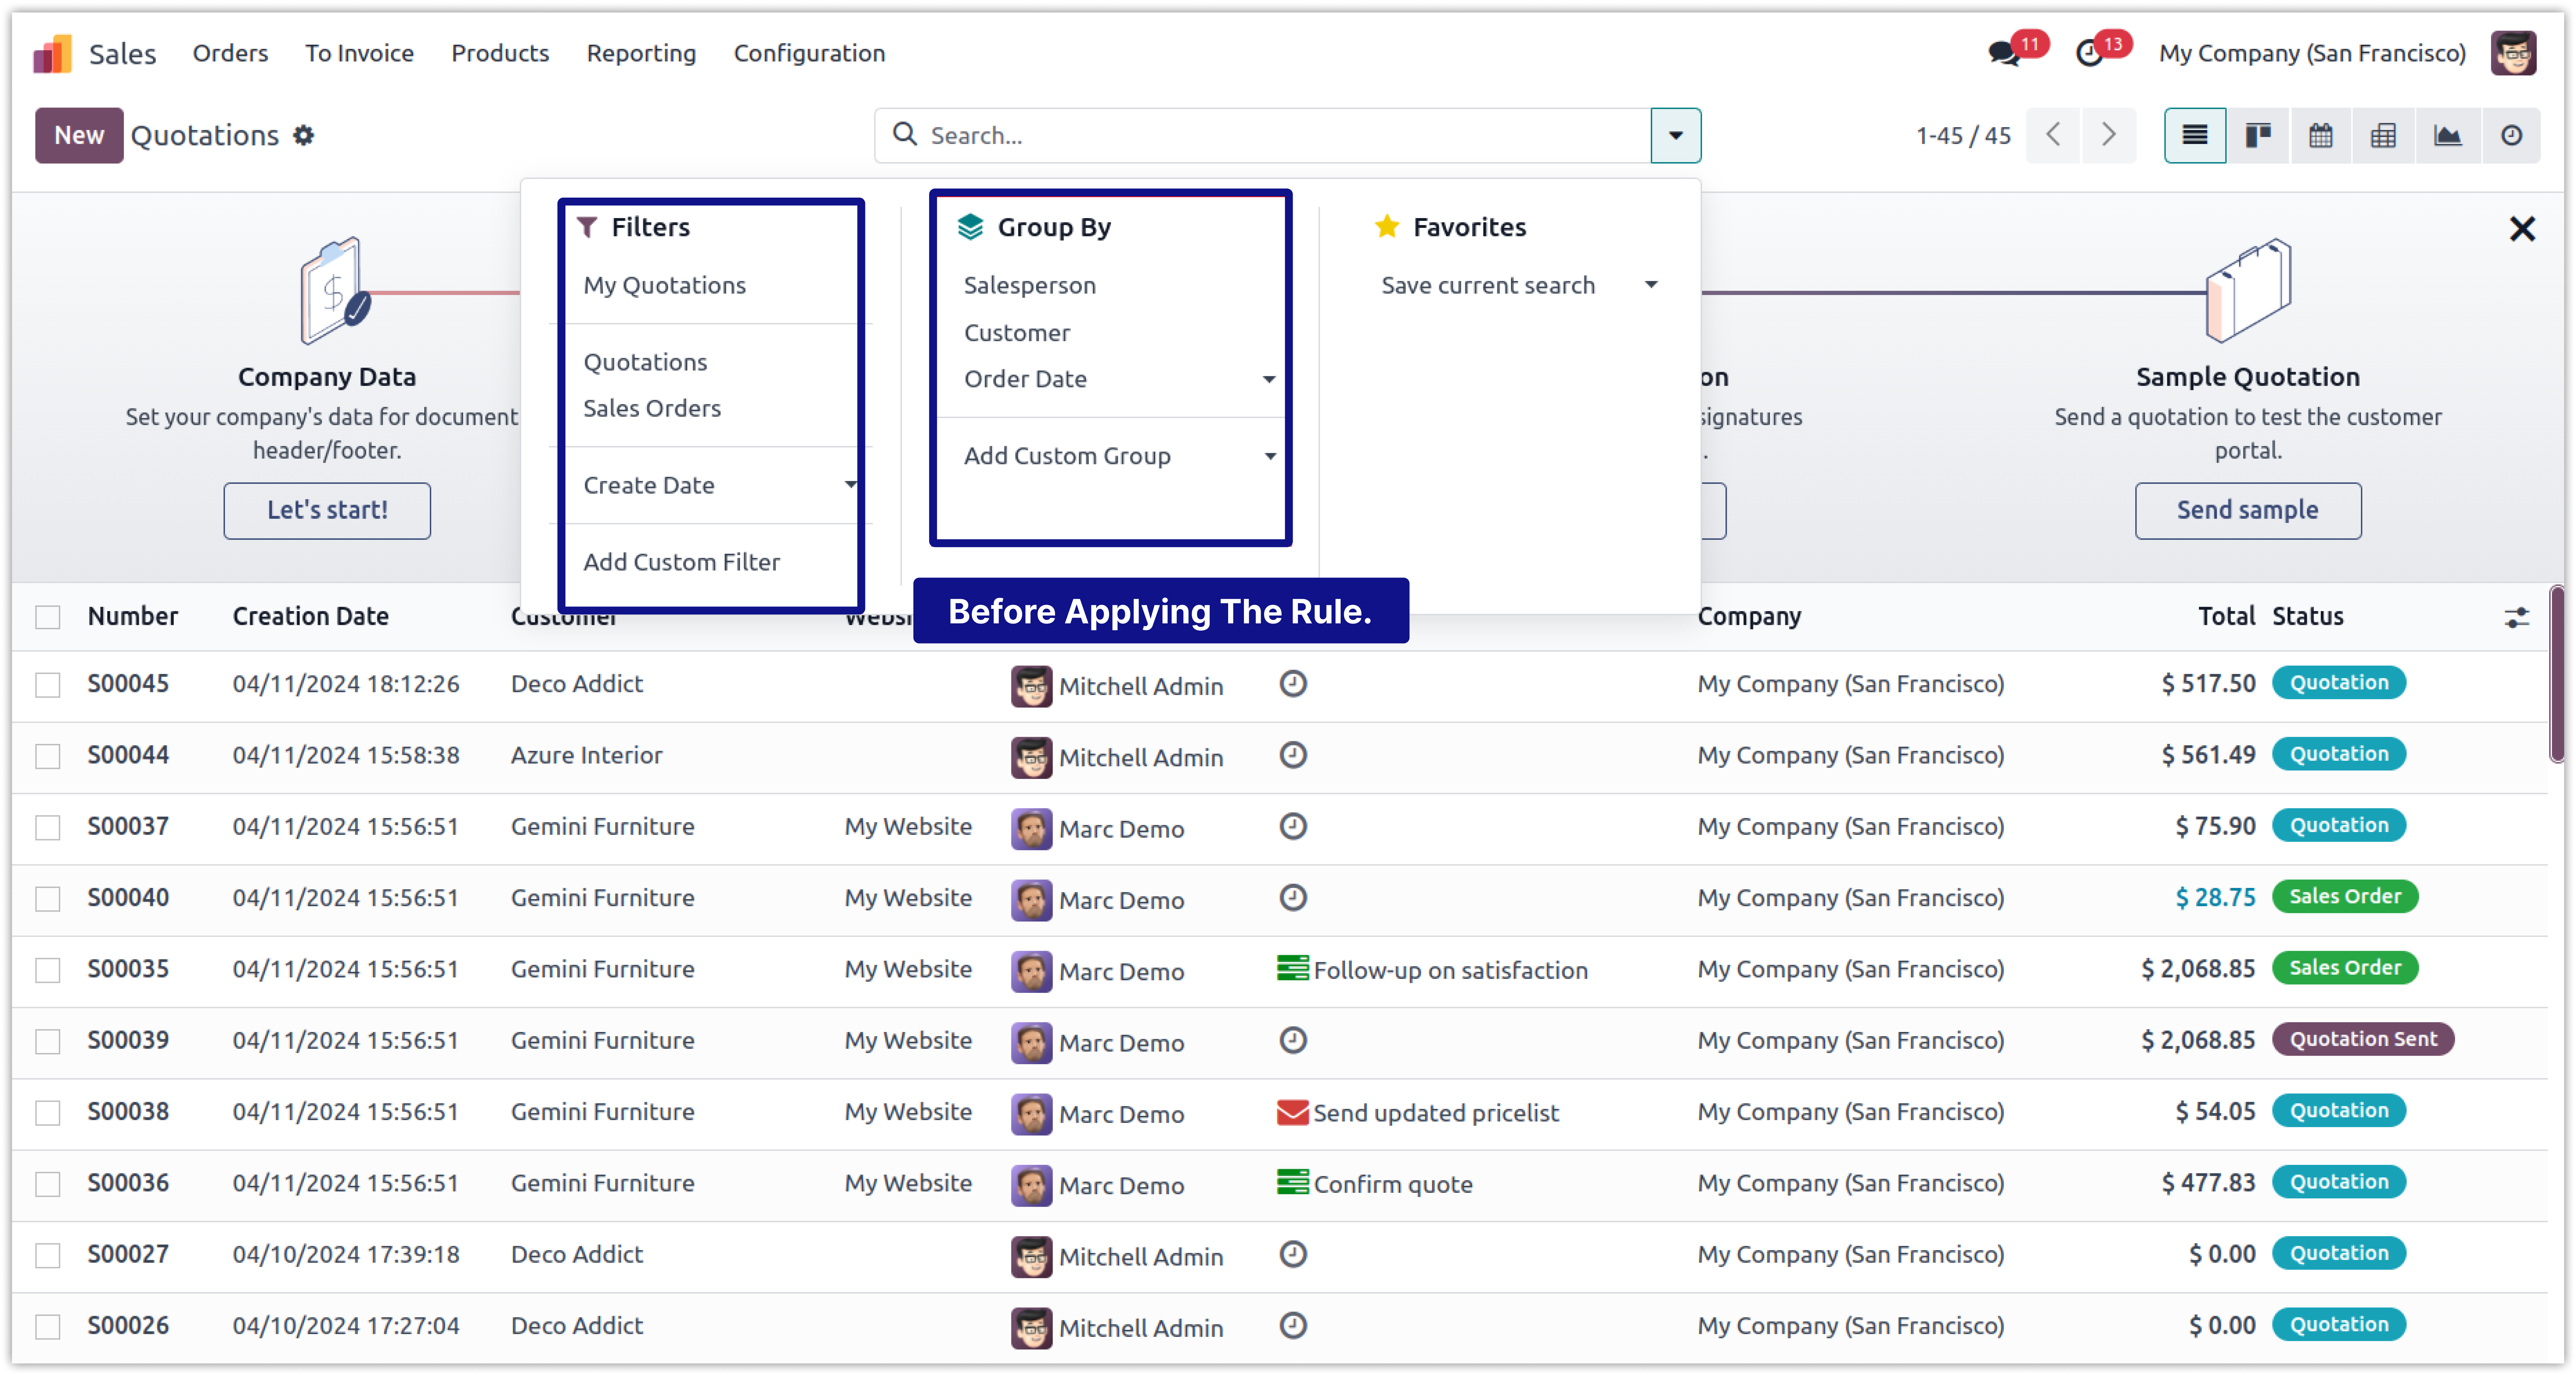
As you can see in the image, the user can see the chatter before applying the rule.
-
Click on image to Zoom out.
-
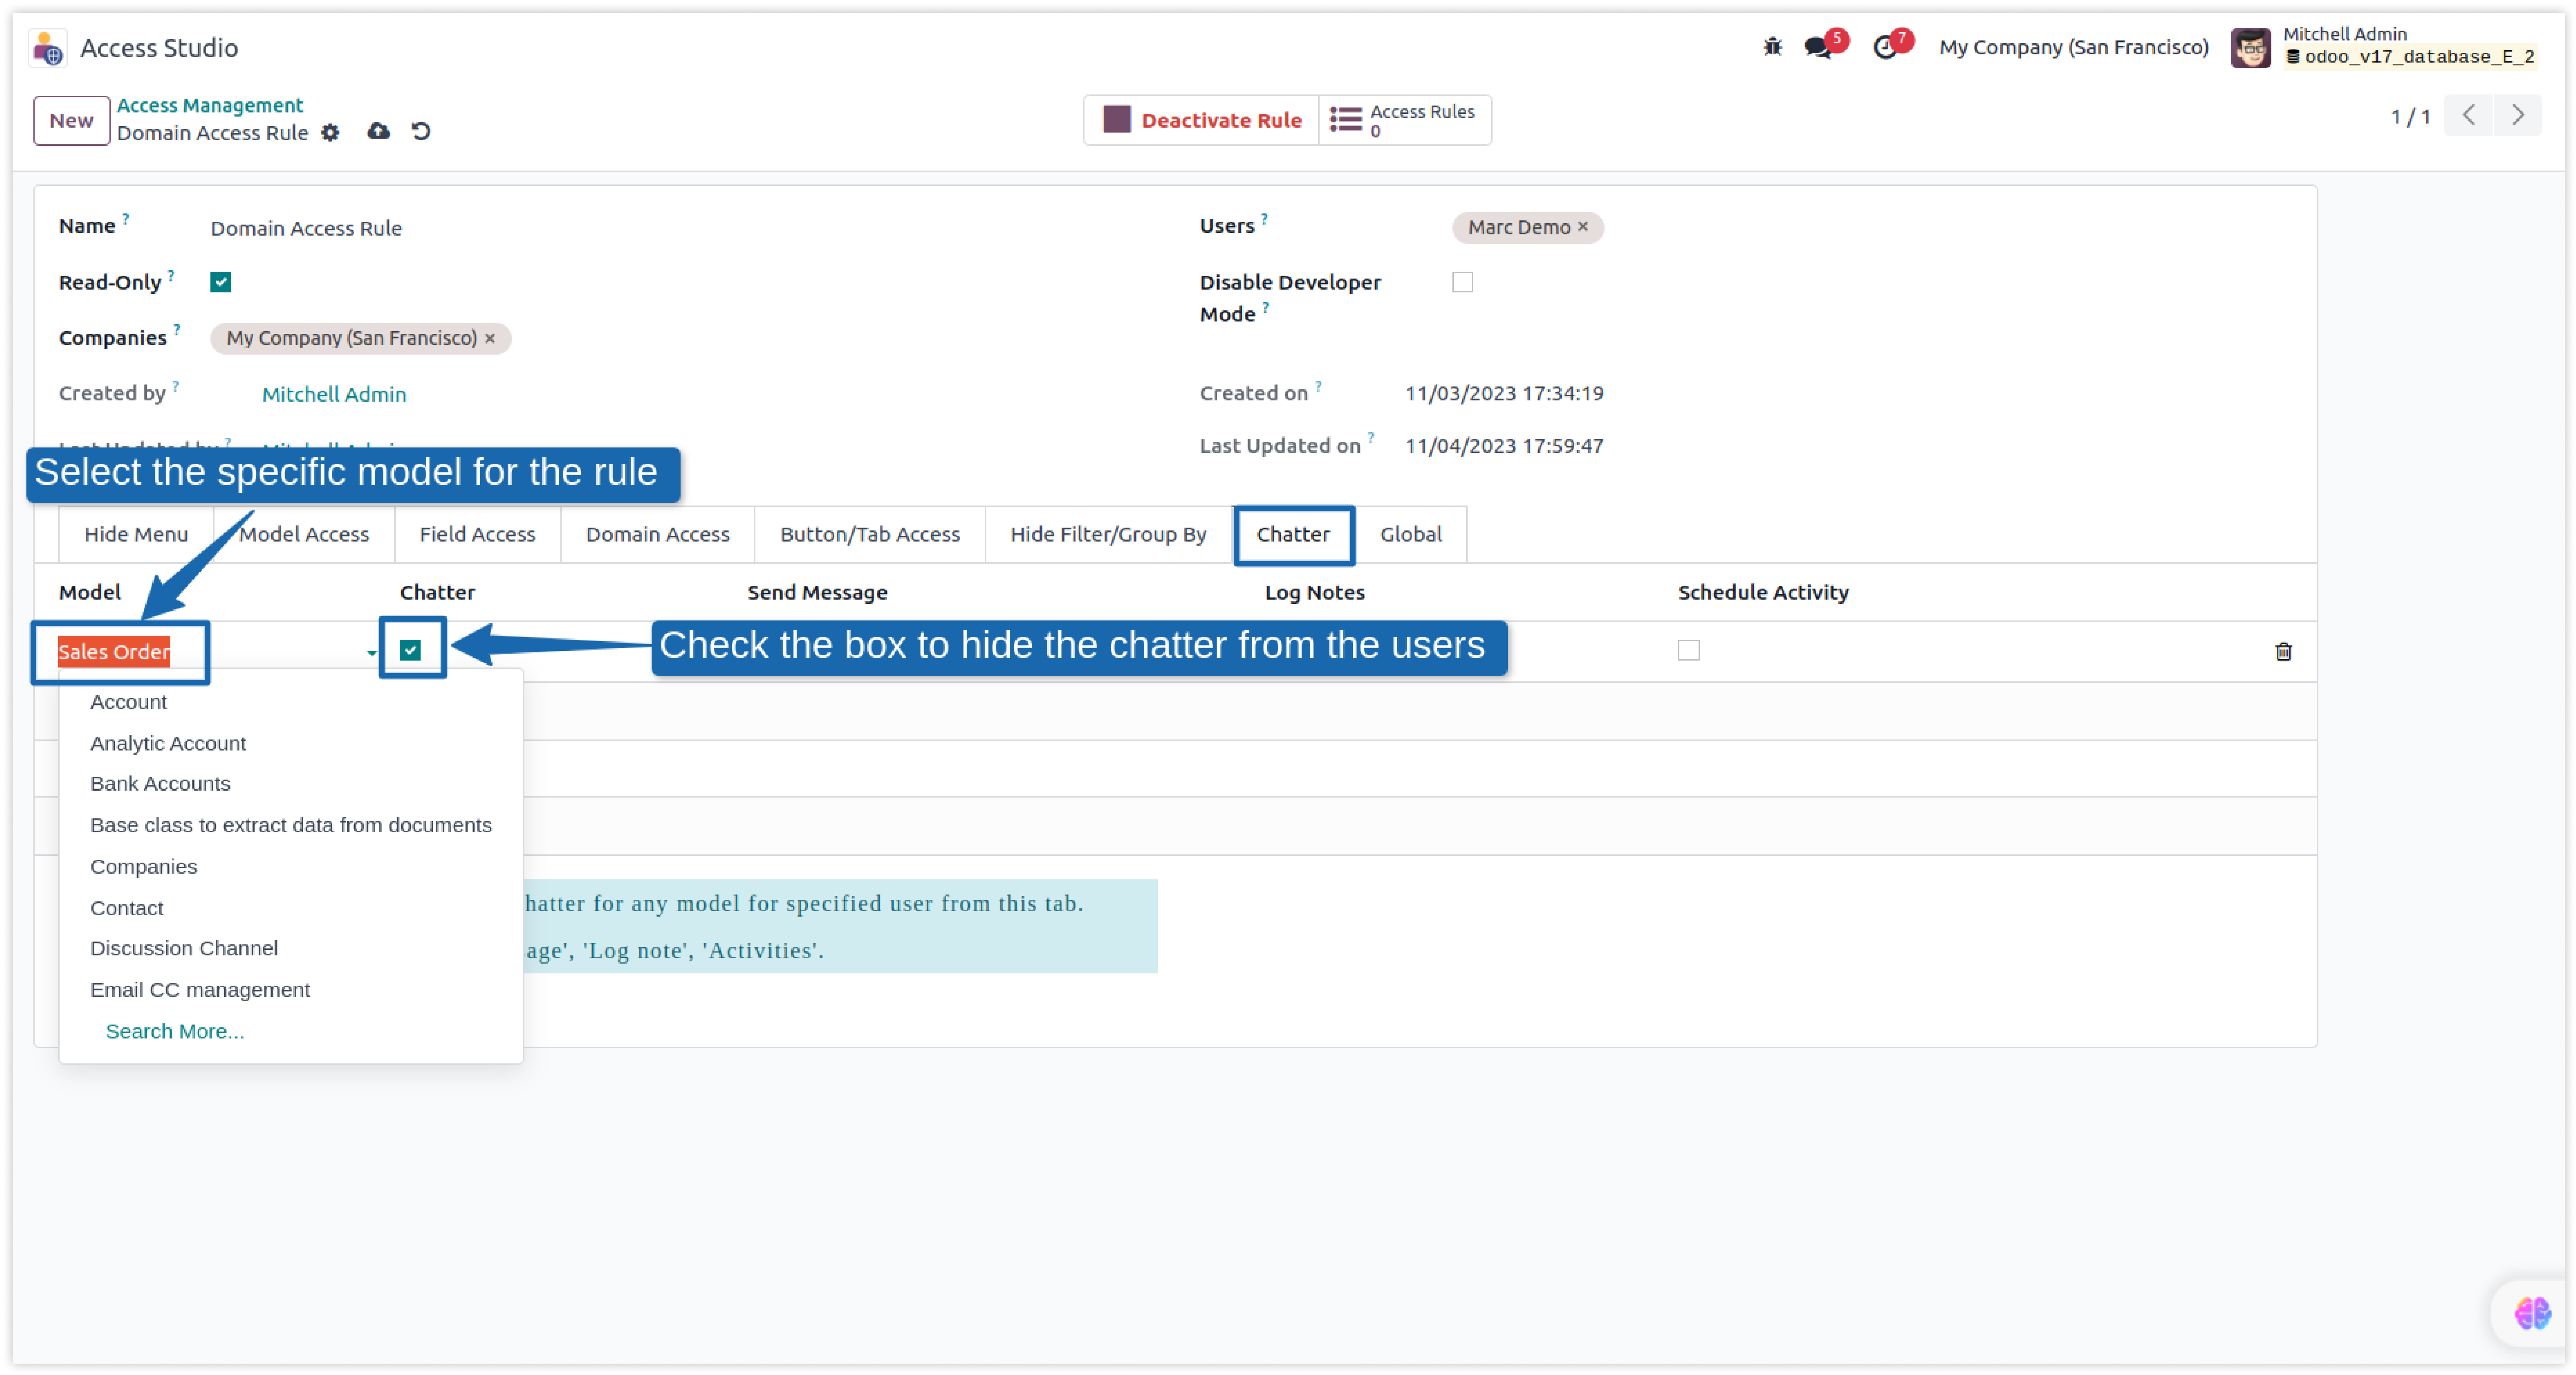
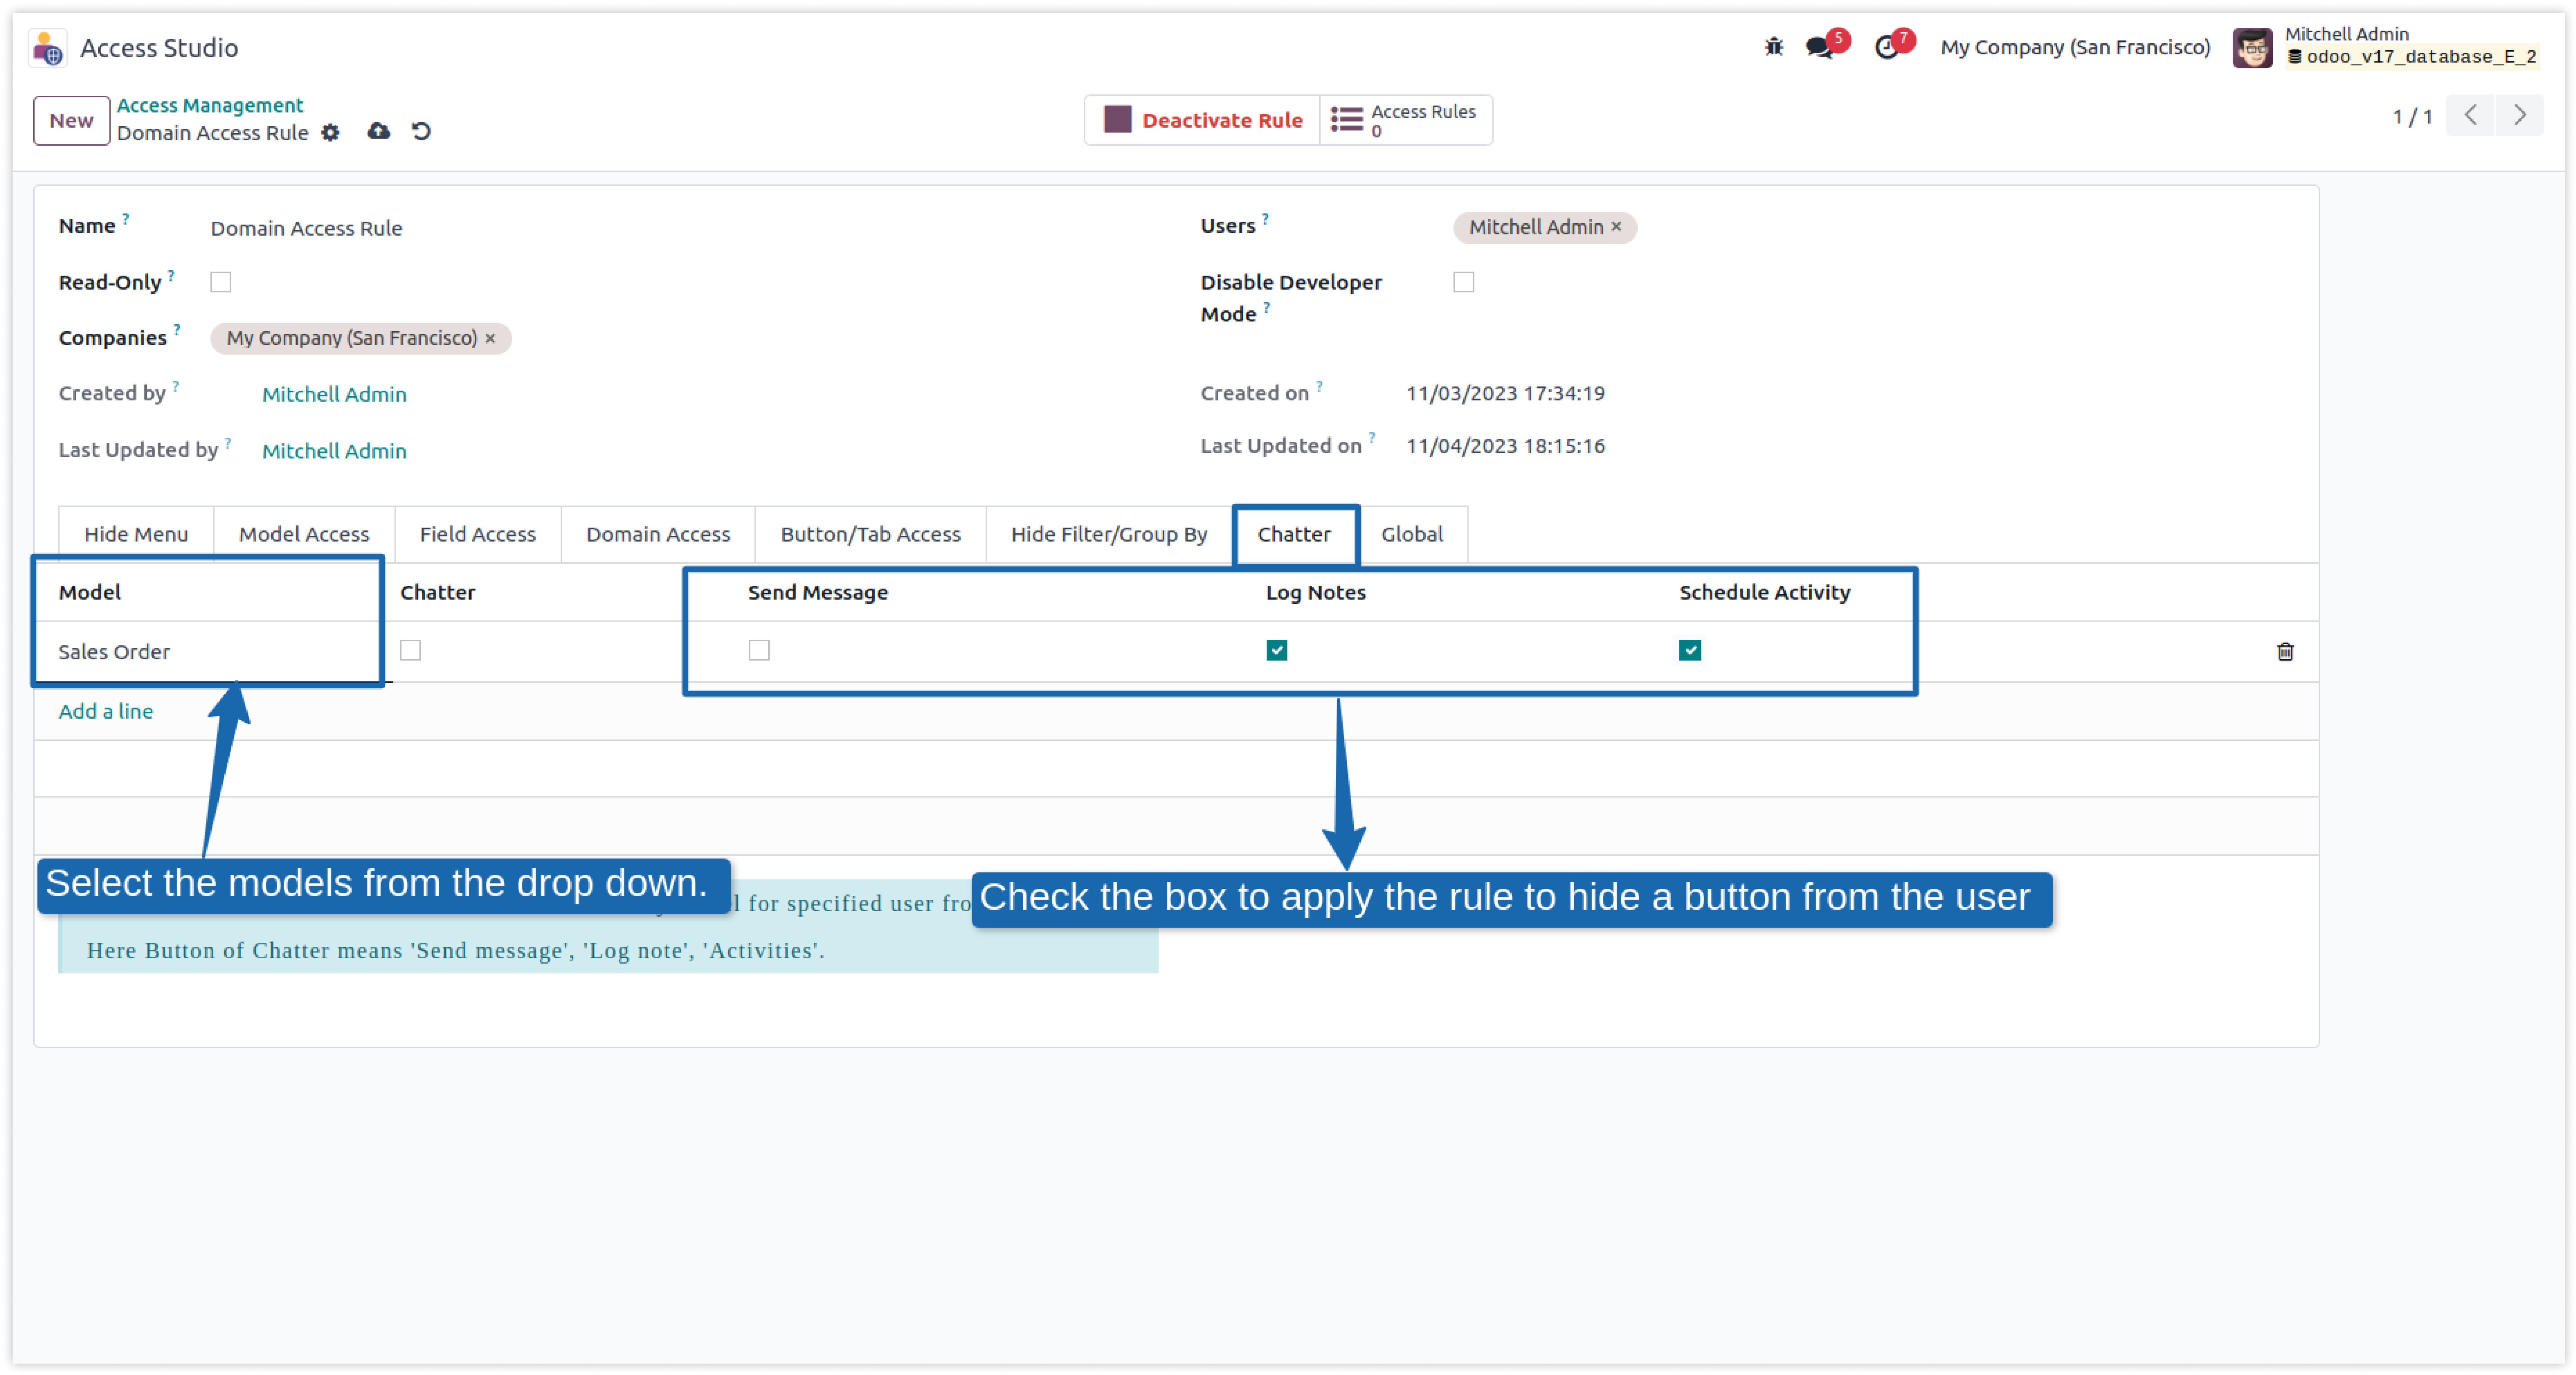
To create the rule, go to the Access Studio app > Access Management > New > Chatter Tab
and create a new rule to hide the chatter. -
Once the rule is created, save it manually.
-
Click on image to Zoom out.
-
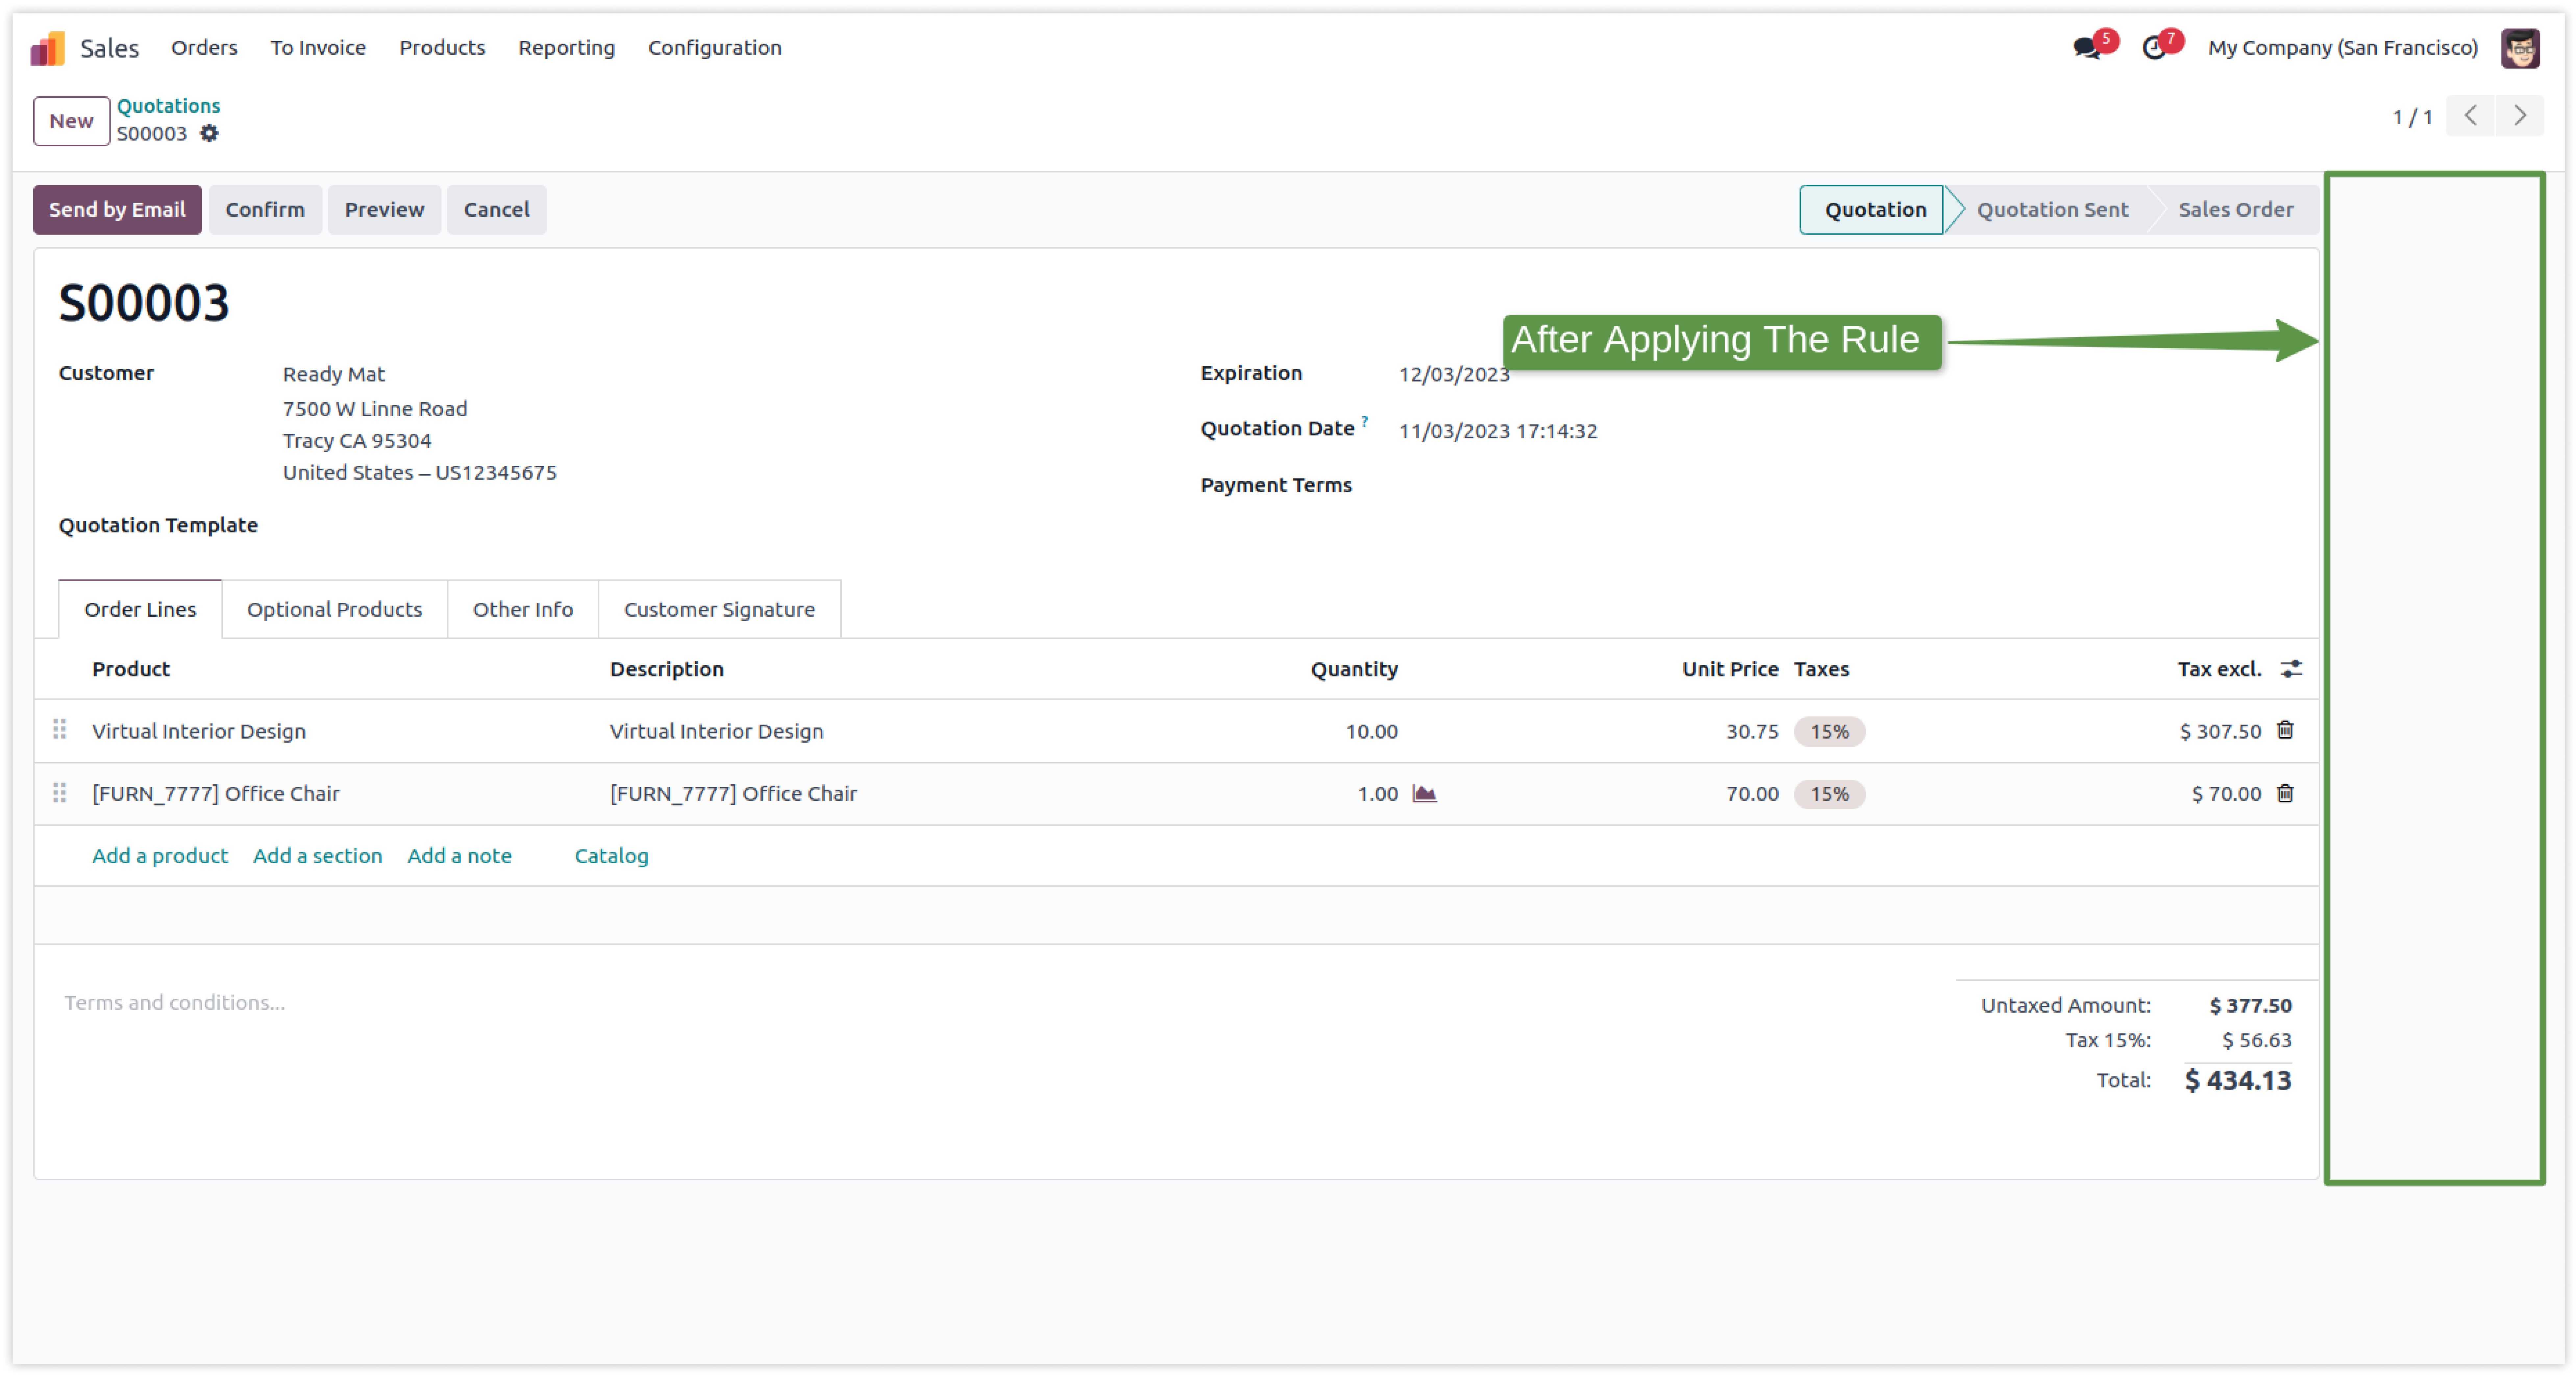
After applying the rule, you can see that Chatter is hidden from the user in the below image.
-
Click on image to Zoom out.
How to restrict chatter's buttons.
-
You can hide the buttons, which are in the chatter.
-
Click on image to Zoom out.
-
Create the rules for hiding the Chat Buttons from the chatter.
-
Click on image to Zoom out.
-
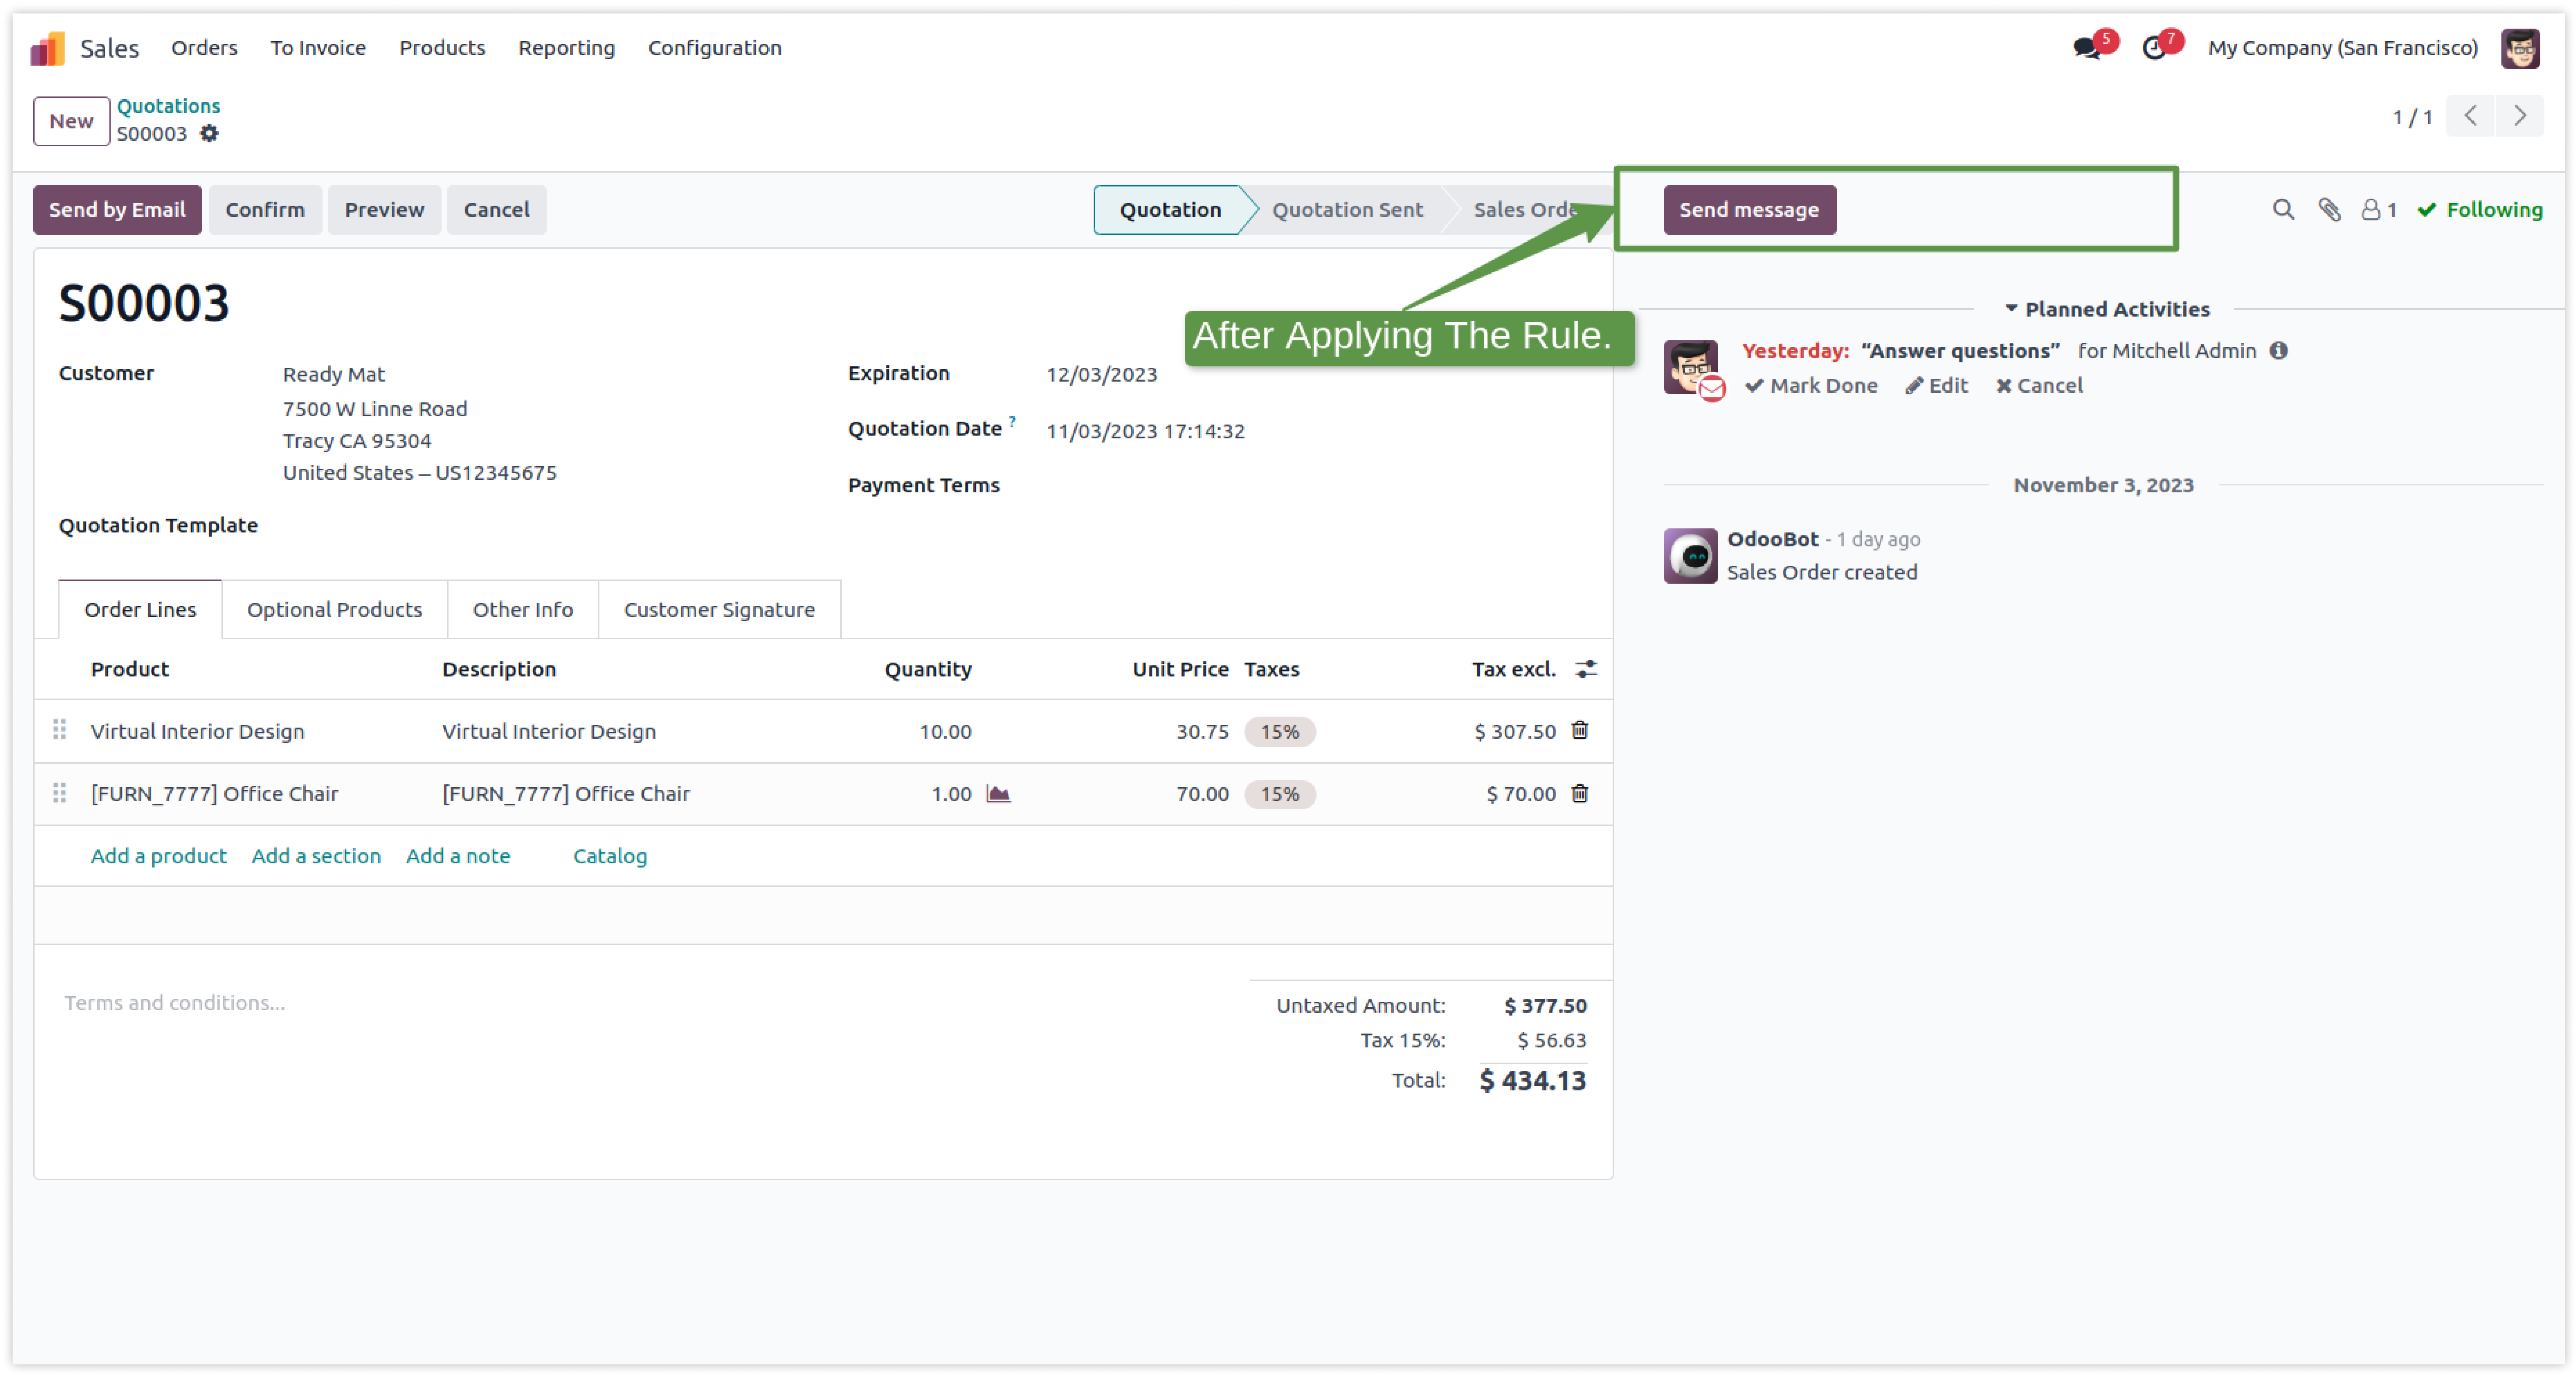
After applying the rules, the user can't see the buttons.
-
Click on image to Zoom out.
Now you can hide/restrict some buttons on all installed modules for specific users.
Hiding or restricting features for a specific user is not possible in Odoo. You can hide it by coding, but it will be hidden from every user.
To hide it through customization, you must have a technical person.
If you customize the module to hide features, it will hide them from every user.
Here is the solution
Simplified Access Management allows you to hide some features from specific users with just one click.
There is no need to have technical knowledge/technical person; you only have to understand our module features.
You can hide it from selected users only.
You can customize rules for base modules as well as third-party modules.
How to setup Global access rights.
Here we have explained some examples step by step.
-
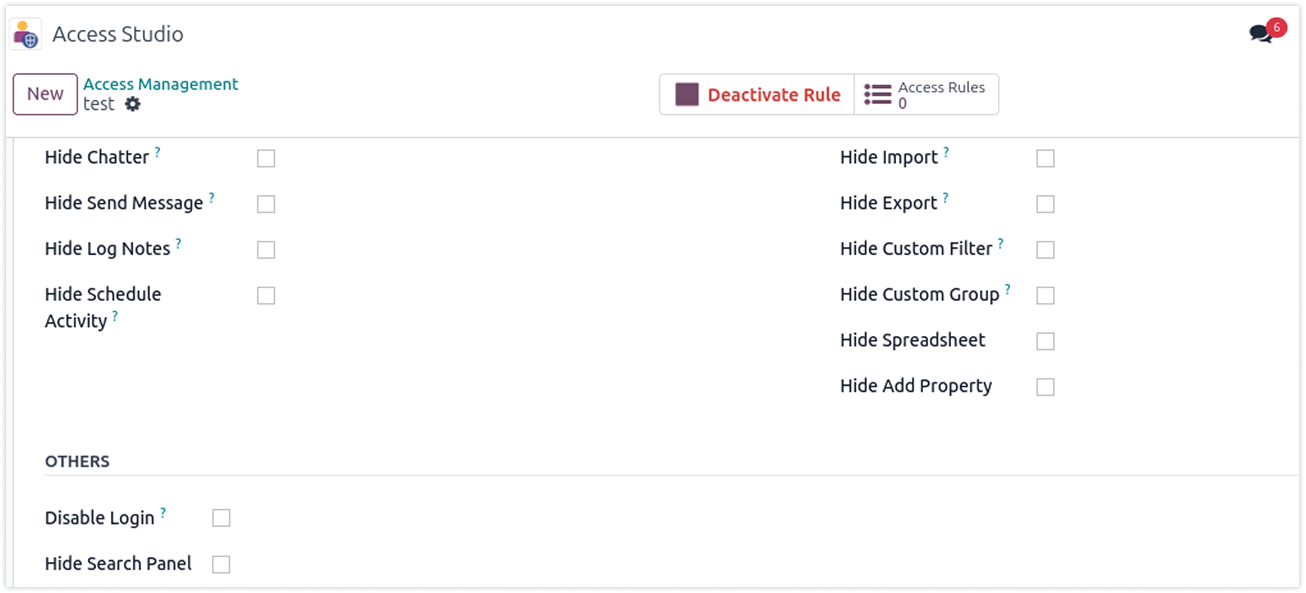
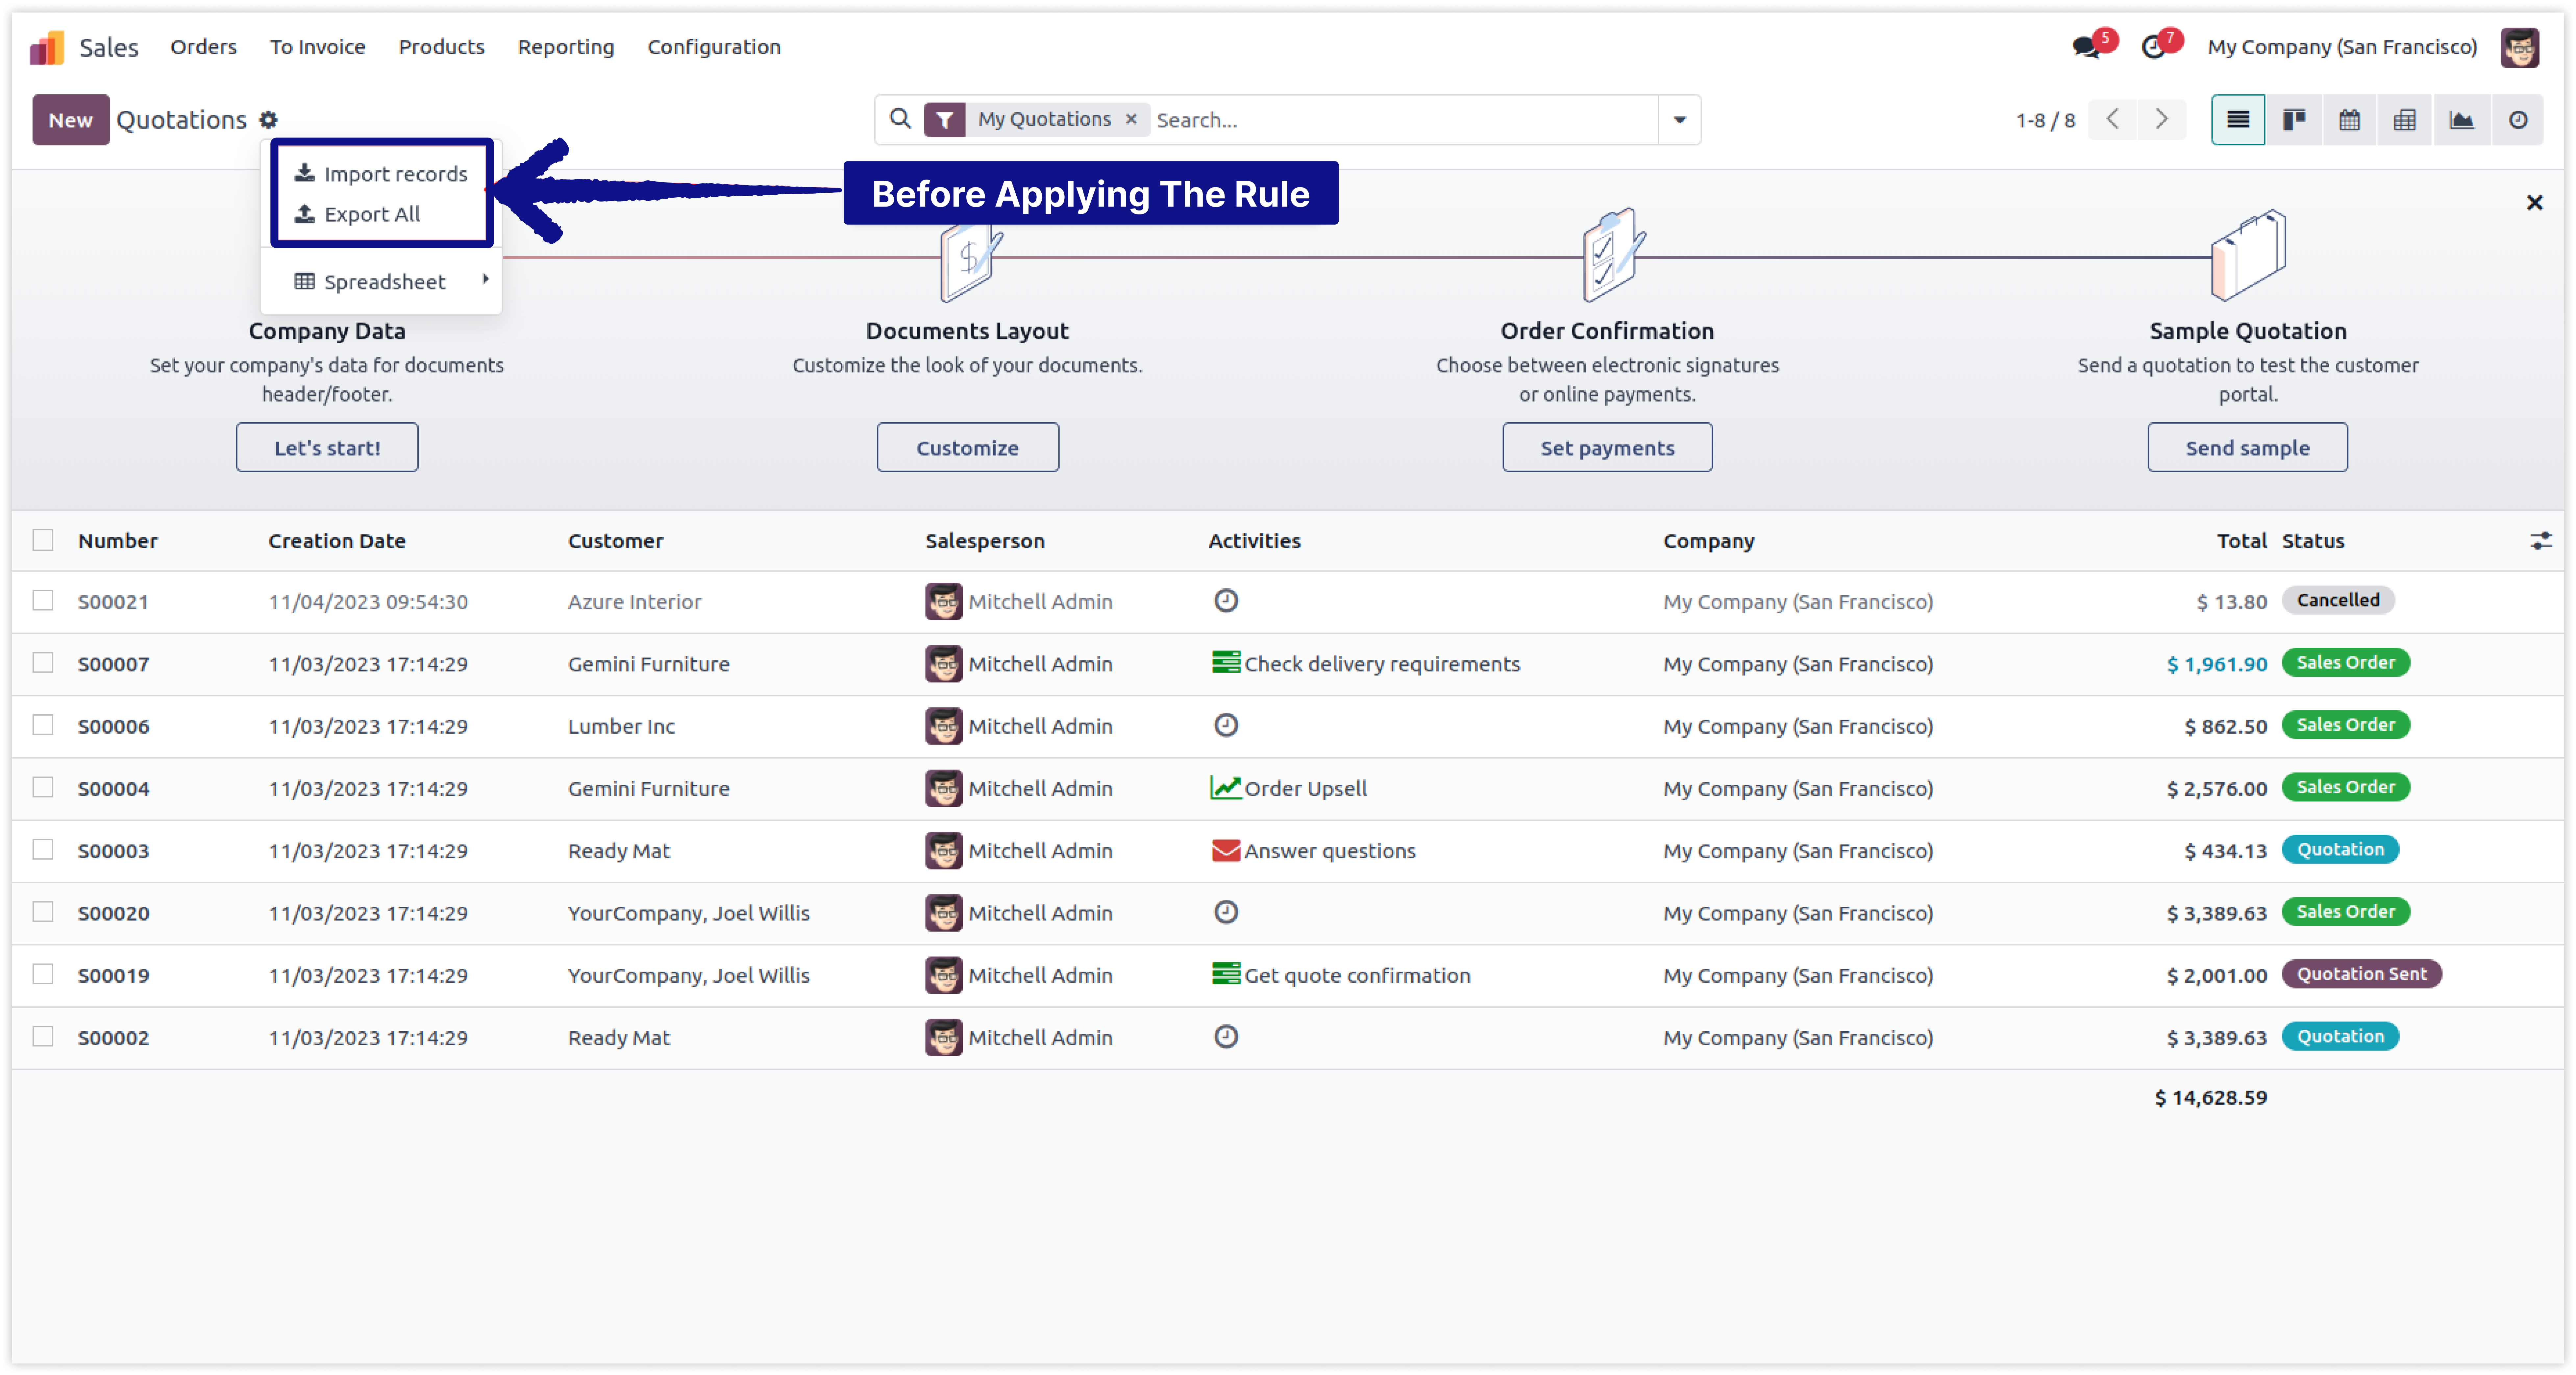
This rule will apply globally. That means when you check the box for any rules on this tab, they will affect every module installed in the database.
-
Check the box to hide the given buttons for all the installed models from the user.
-
E.g., The Sales model
-
Click on image to Zoom out.
-
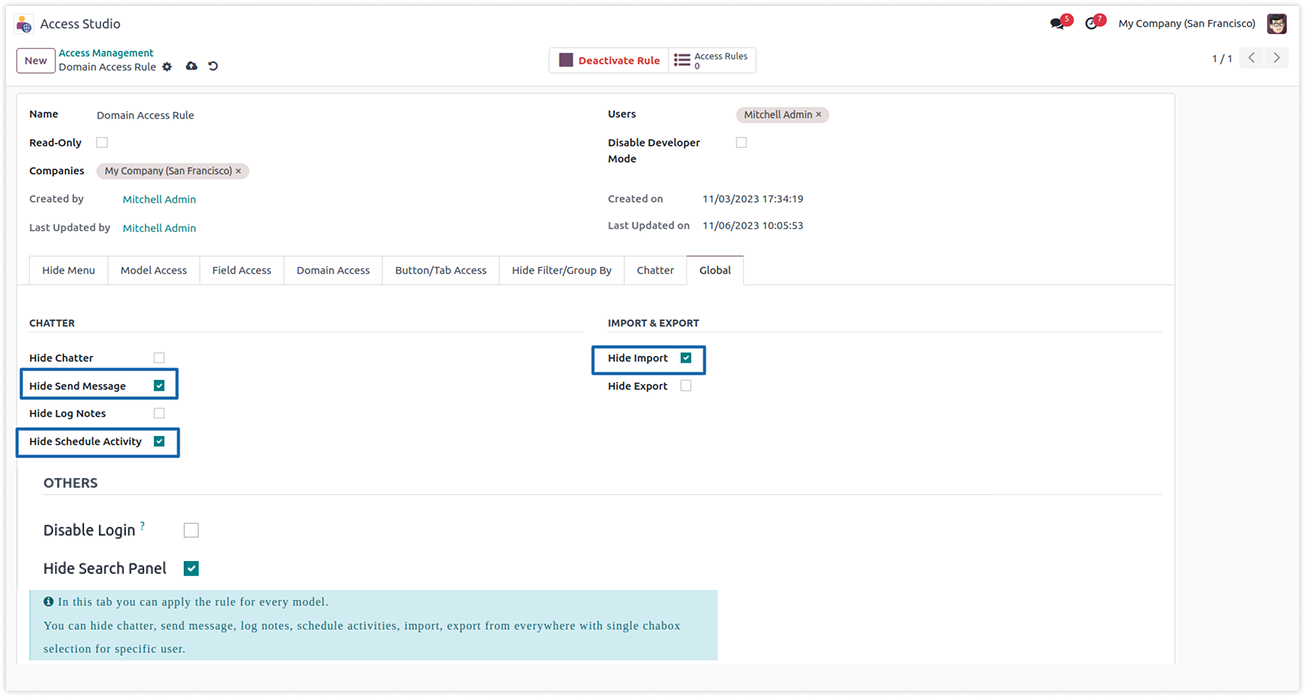
To create the rule, go to the Access Studio app > Access Management > New > Global Tab and create a new rule to hide the given buttons in the global tab.
-
Check the box of the buttons you want to hide from the user.
-
E.g., The Sales model
-
Click on image to Zoom out.
-
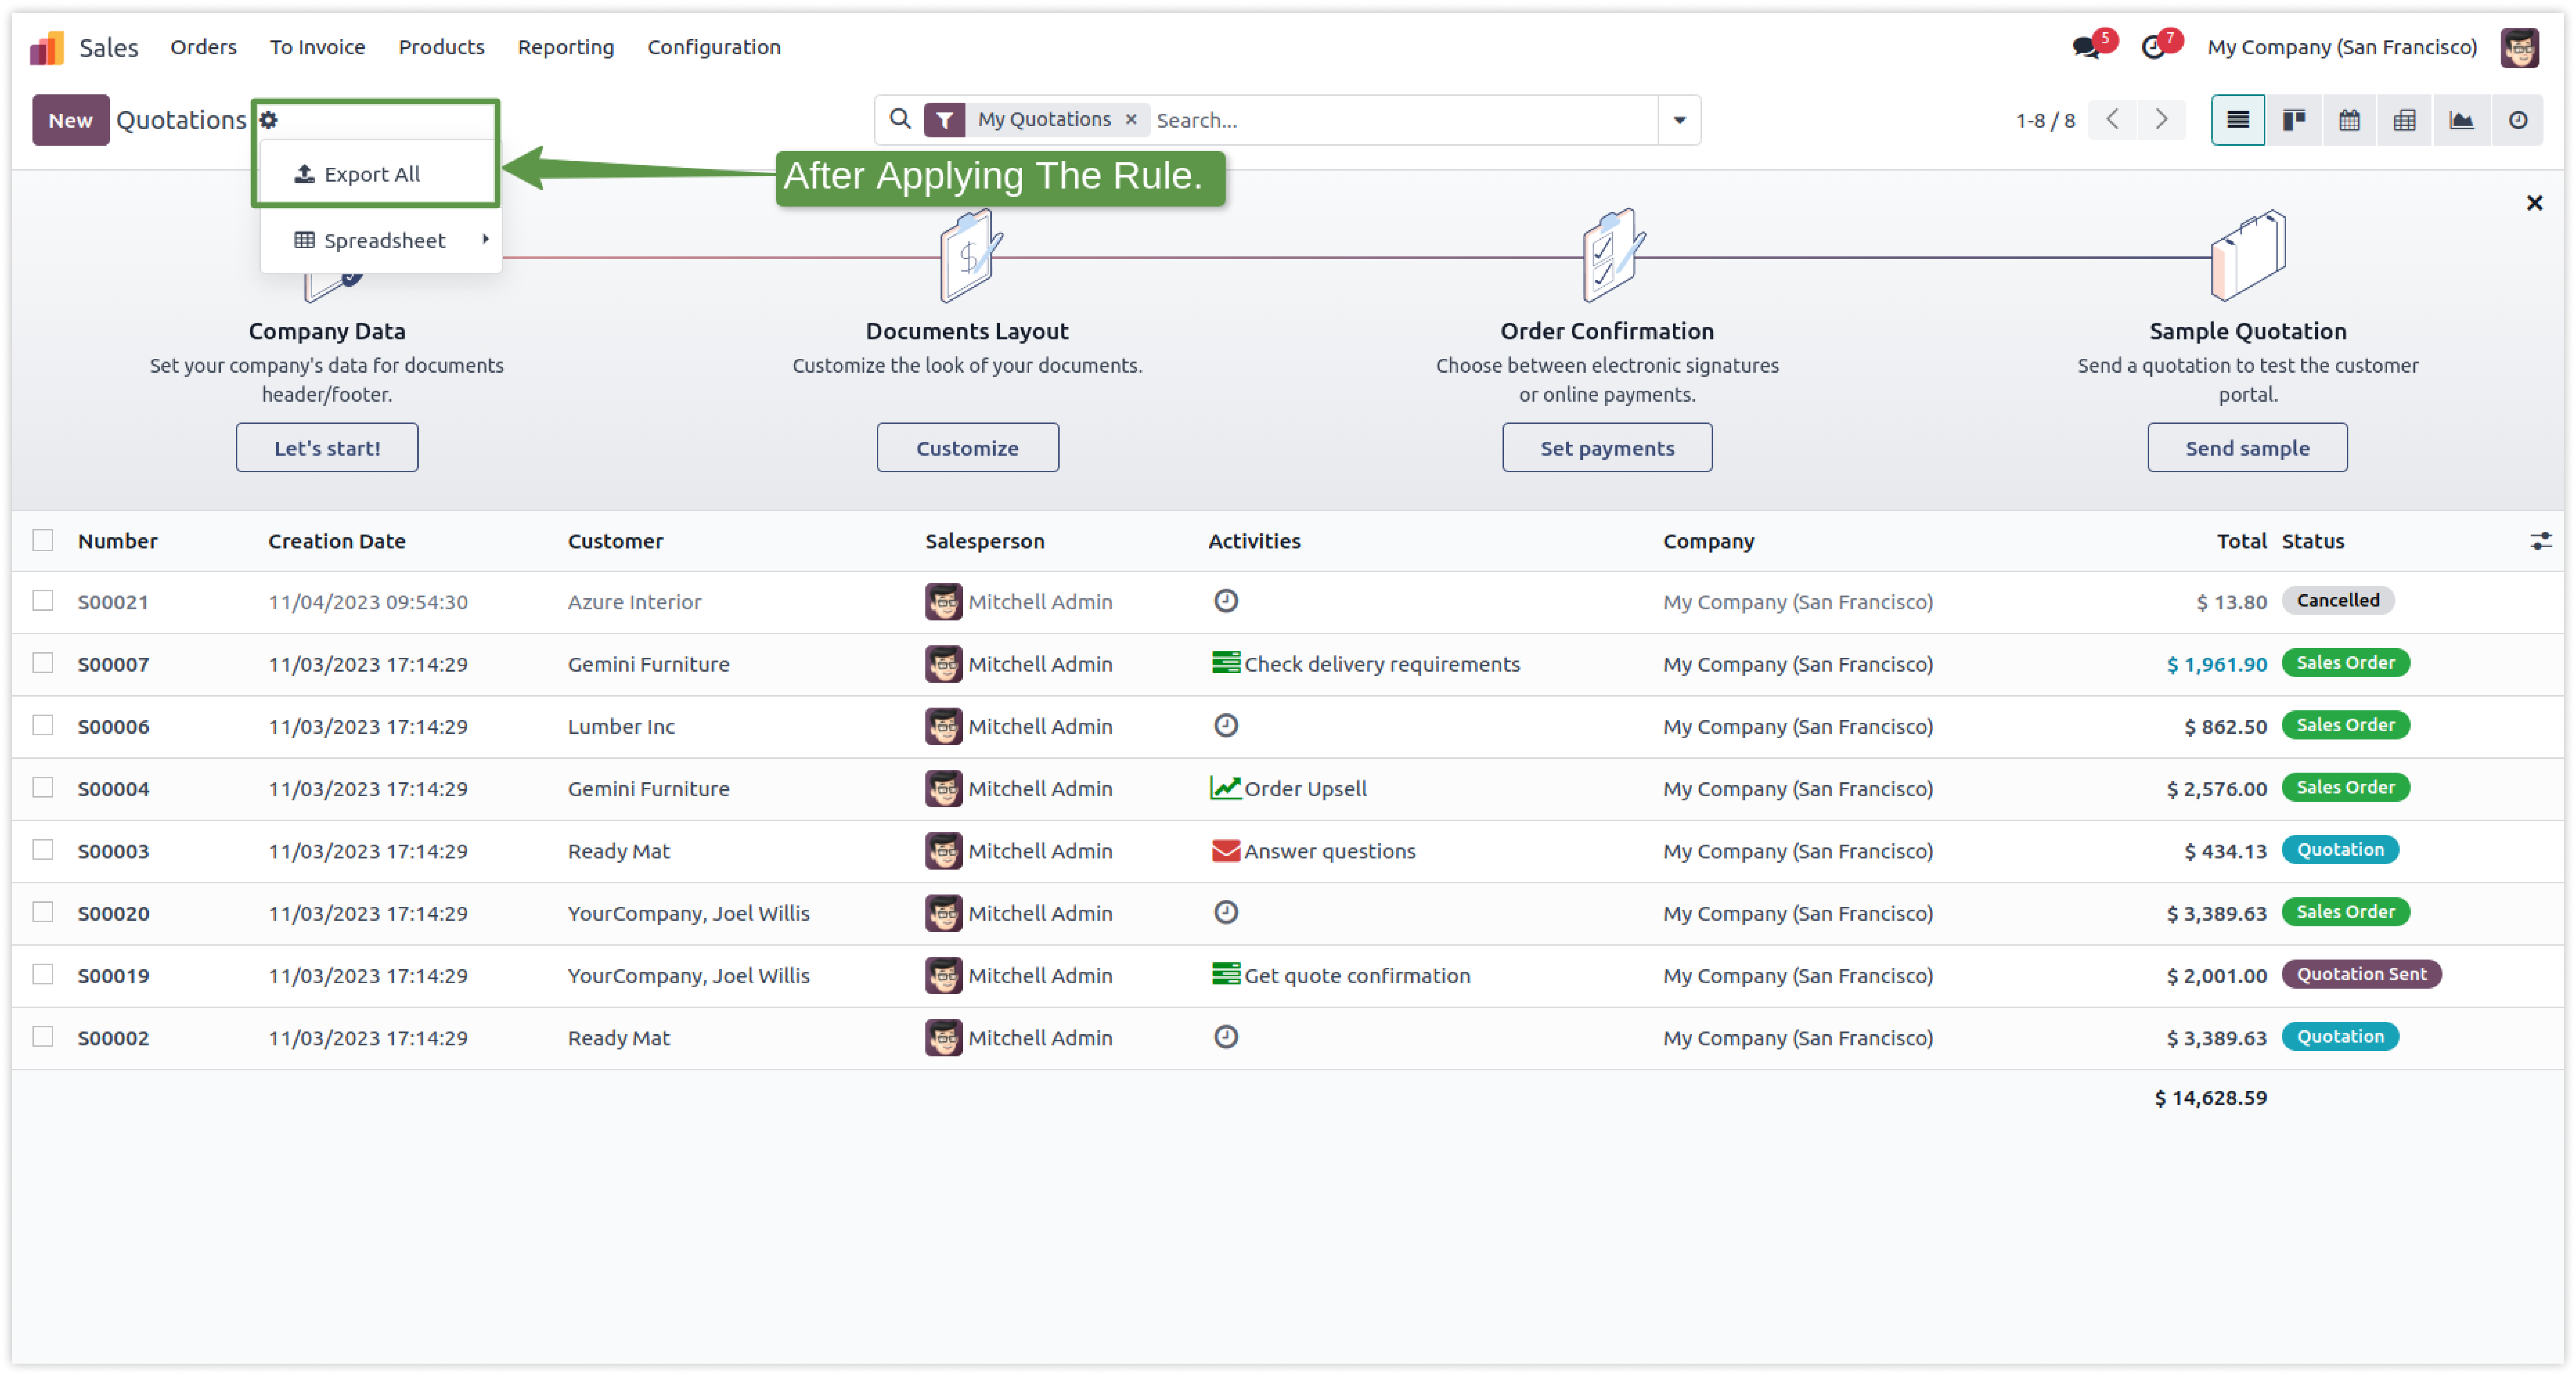
As shown above, selected buttons will be hidden from the user after checking the boxes.
-
Click on image to Zoom out.
Control access by disabling developer mode easily.
To disable developer mode in odoo from specific user is quite technical and long process.
To hide it through customization, you must have a technical person.
If you customize the module to hide features, it will hide them from every user.
Here is the solution
Simplified Access Management allows you to hide some features from specific users with just one click.
There is no need to have technical knowledge/technical person; you only have to understand our module features.
You can hide it from selected users only.
You can customize rules for base modules as well as third-party modules.
How to setup Disable Developer Mode.
Here we have explained some examples step by step.
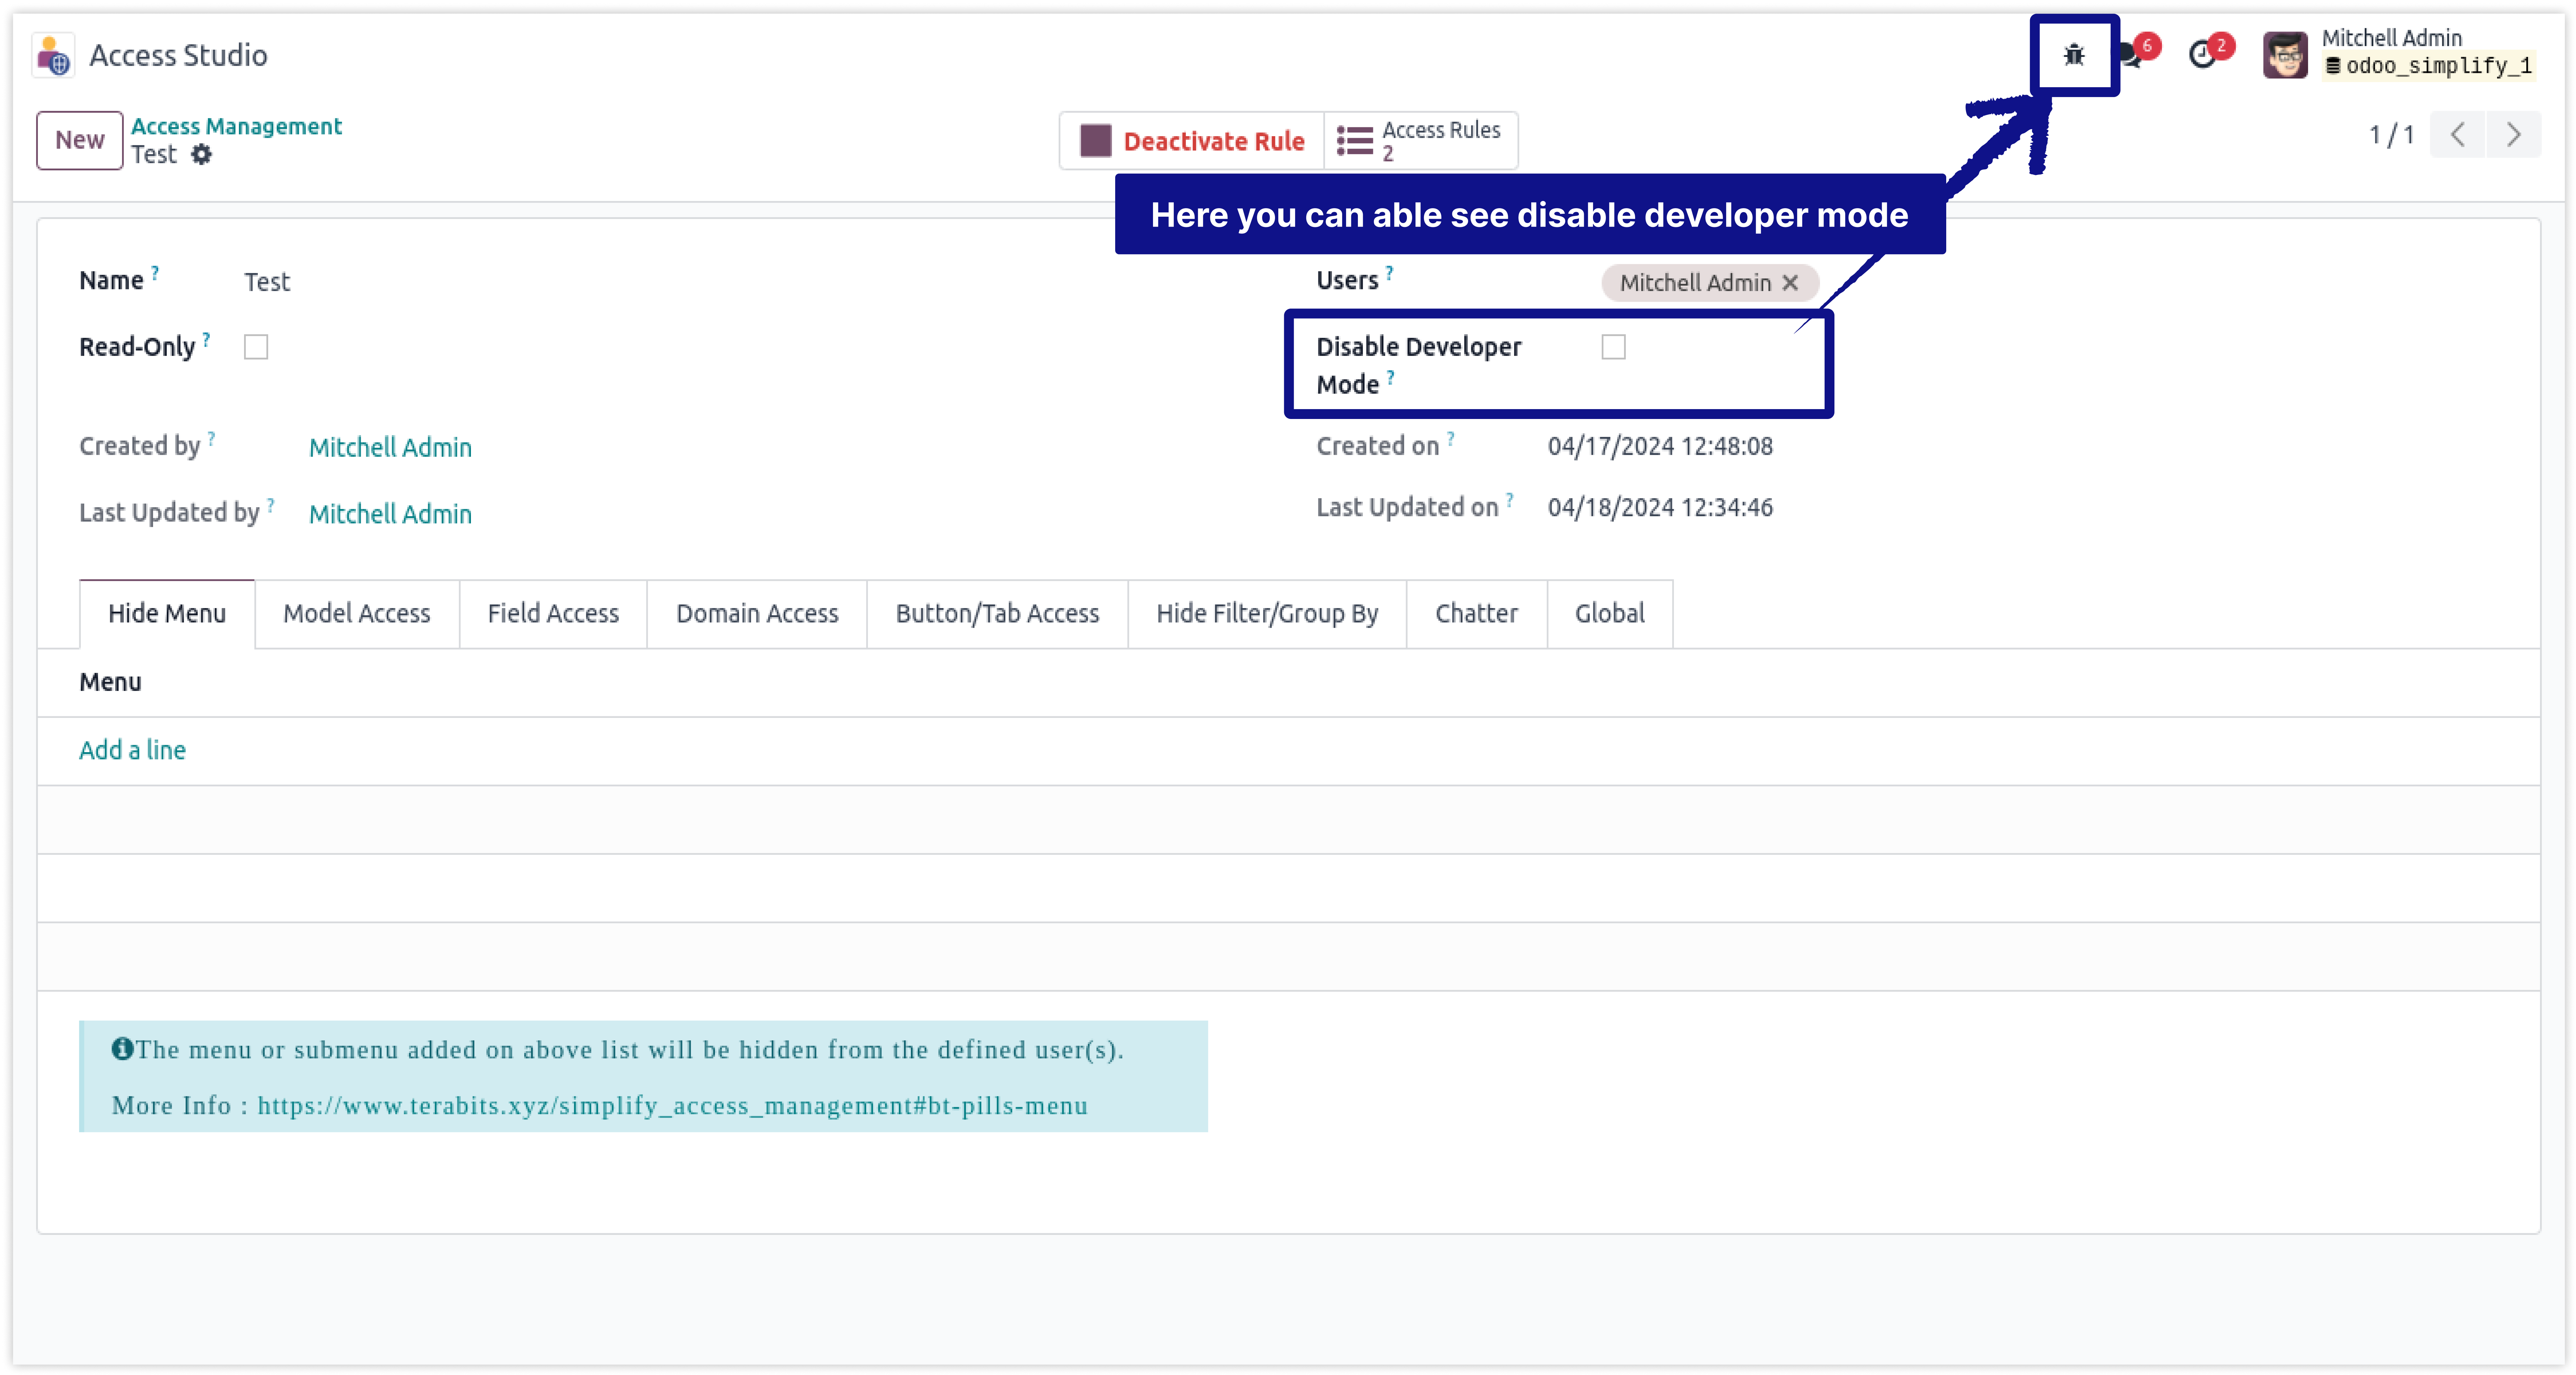
-
Here you can able to see disable developer mode.
-
Click on image to Zoom out.
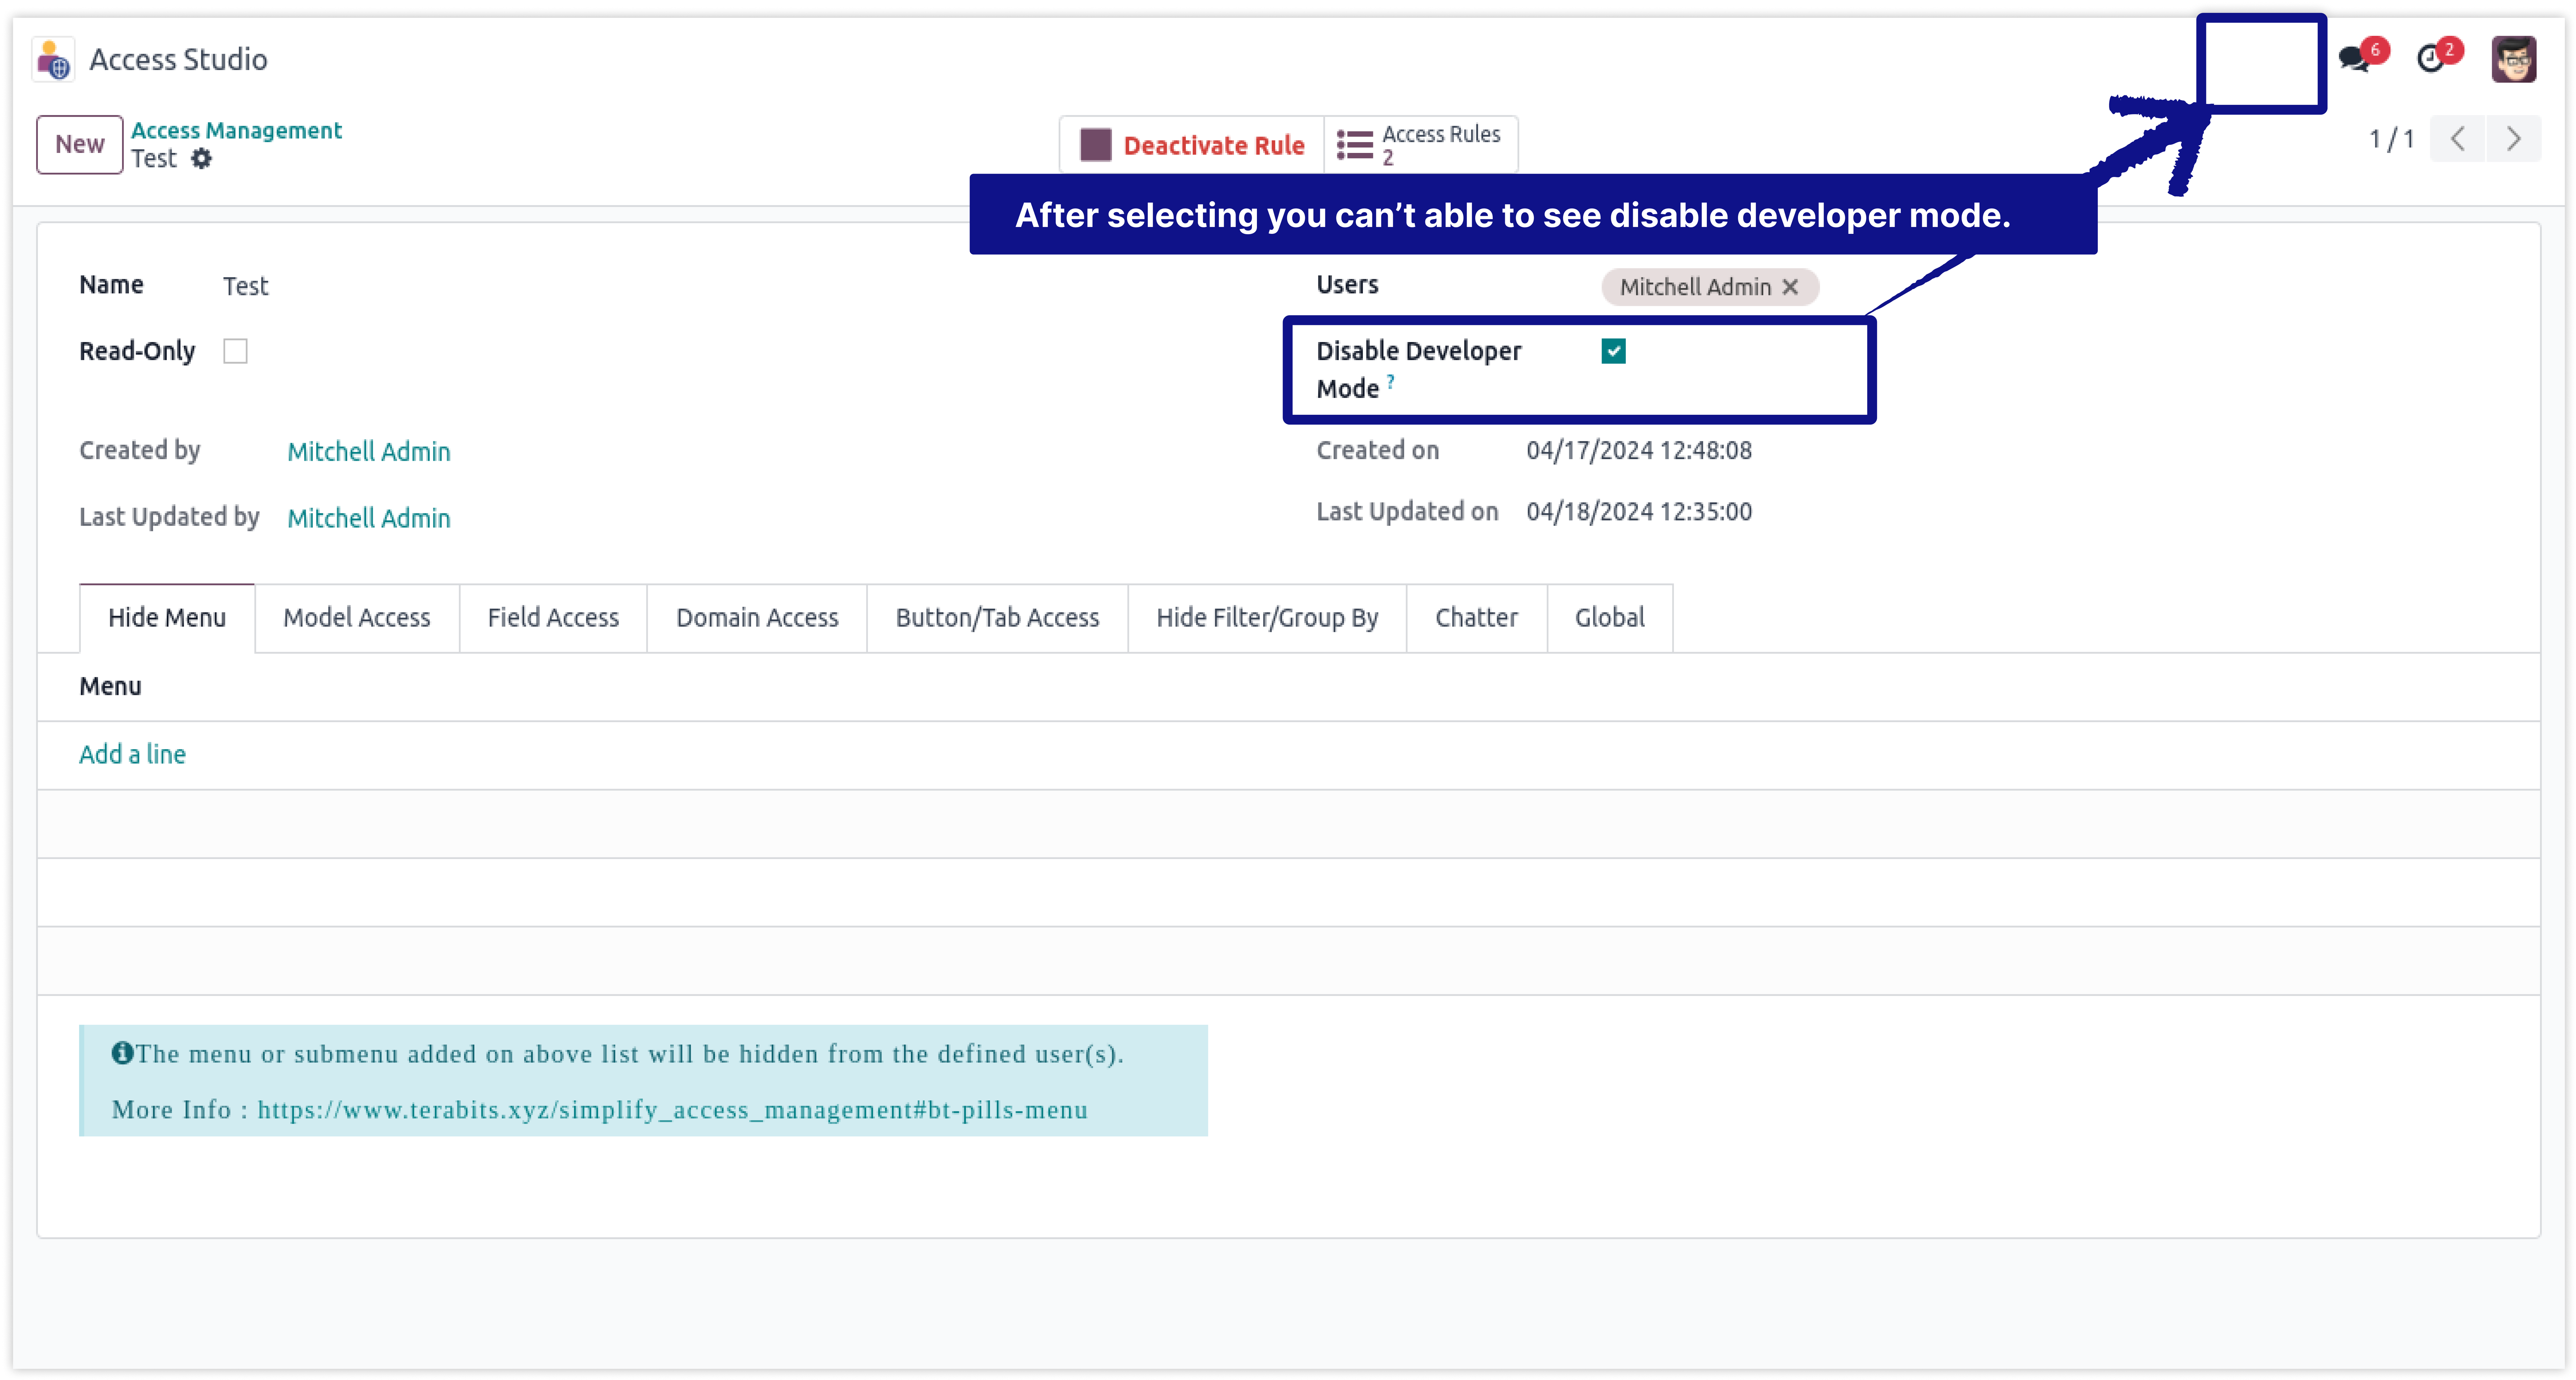
-
You can use this feature to hide disable developer mode in one selection.
-
Click on image to Zoom out.
Now you can hide filters and groups from any model's view.
To disable developer mode in odoo from specific user is quite technical and long process.
To hide it through customization, you must have a technical person.
If you customize the module to hide features, it will hide them from every user.
Here is the solution
Simplified Access Management allows you to hide some features from specific users with just one click.
There is no need to have technical knowledge/technical person; you only have to understand our module features.
You can hide it from selected users only.
You can customize rules for base modules as well as third-party modules.
How to setup Filter & Group access rights.
Here we have explained some examples step by step.
-
With this feature, you can hide any filter and groups from the selected users easily.
-
Click on image to Zoom out.
-
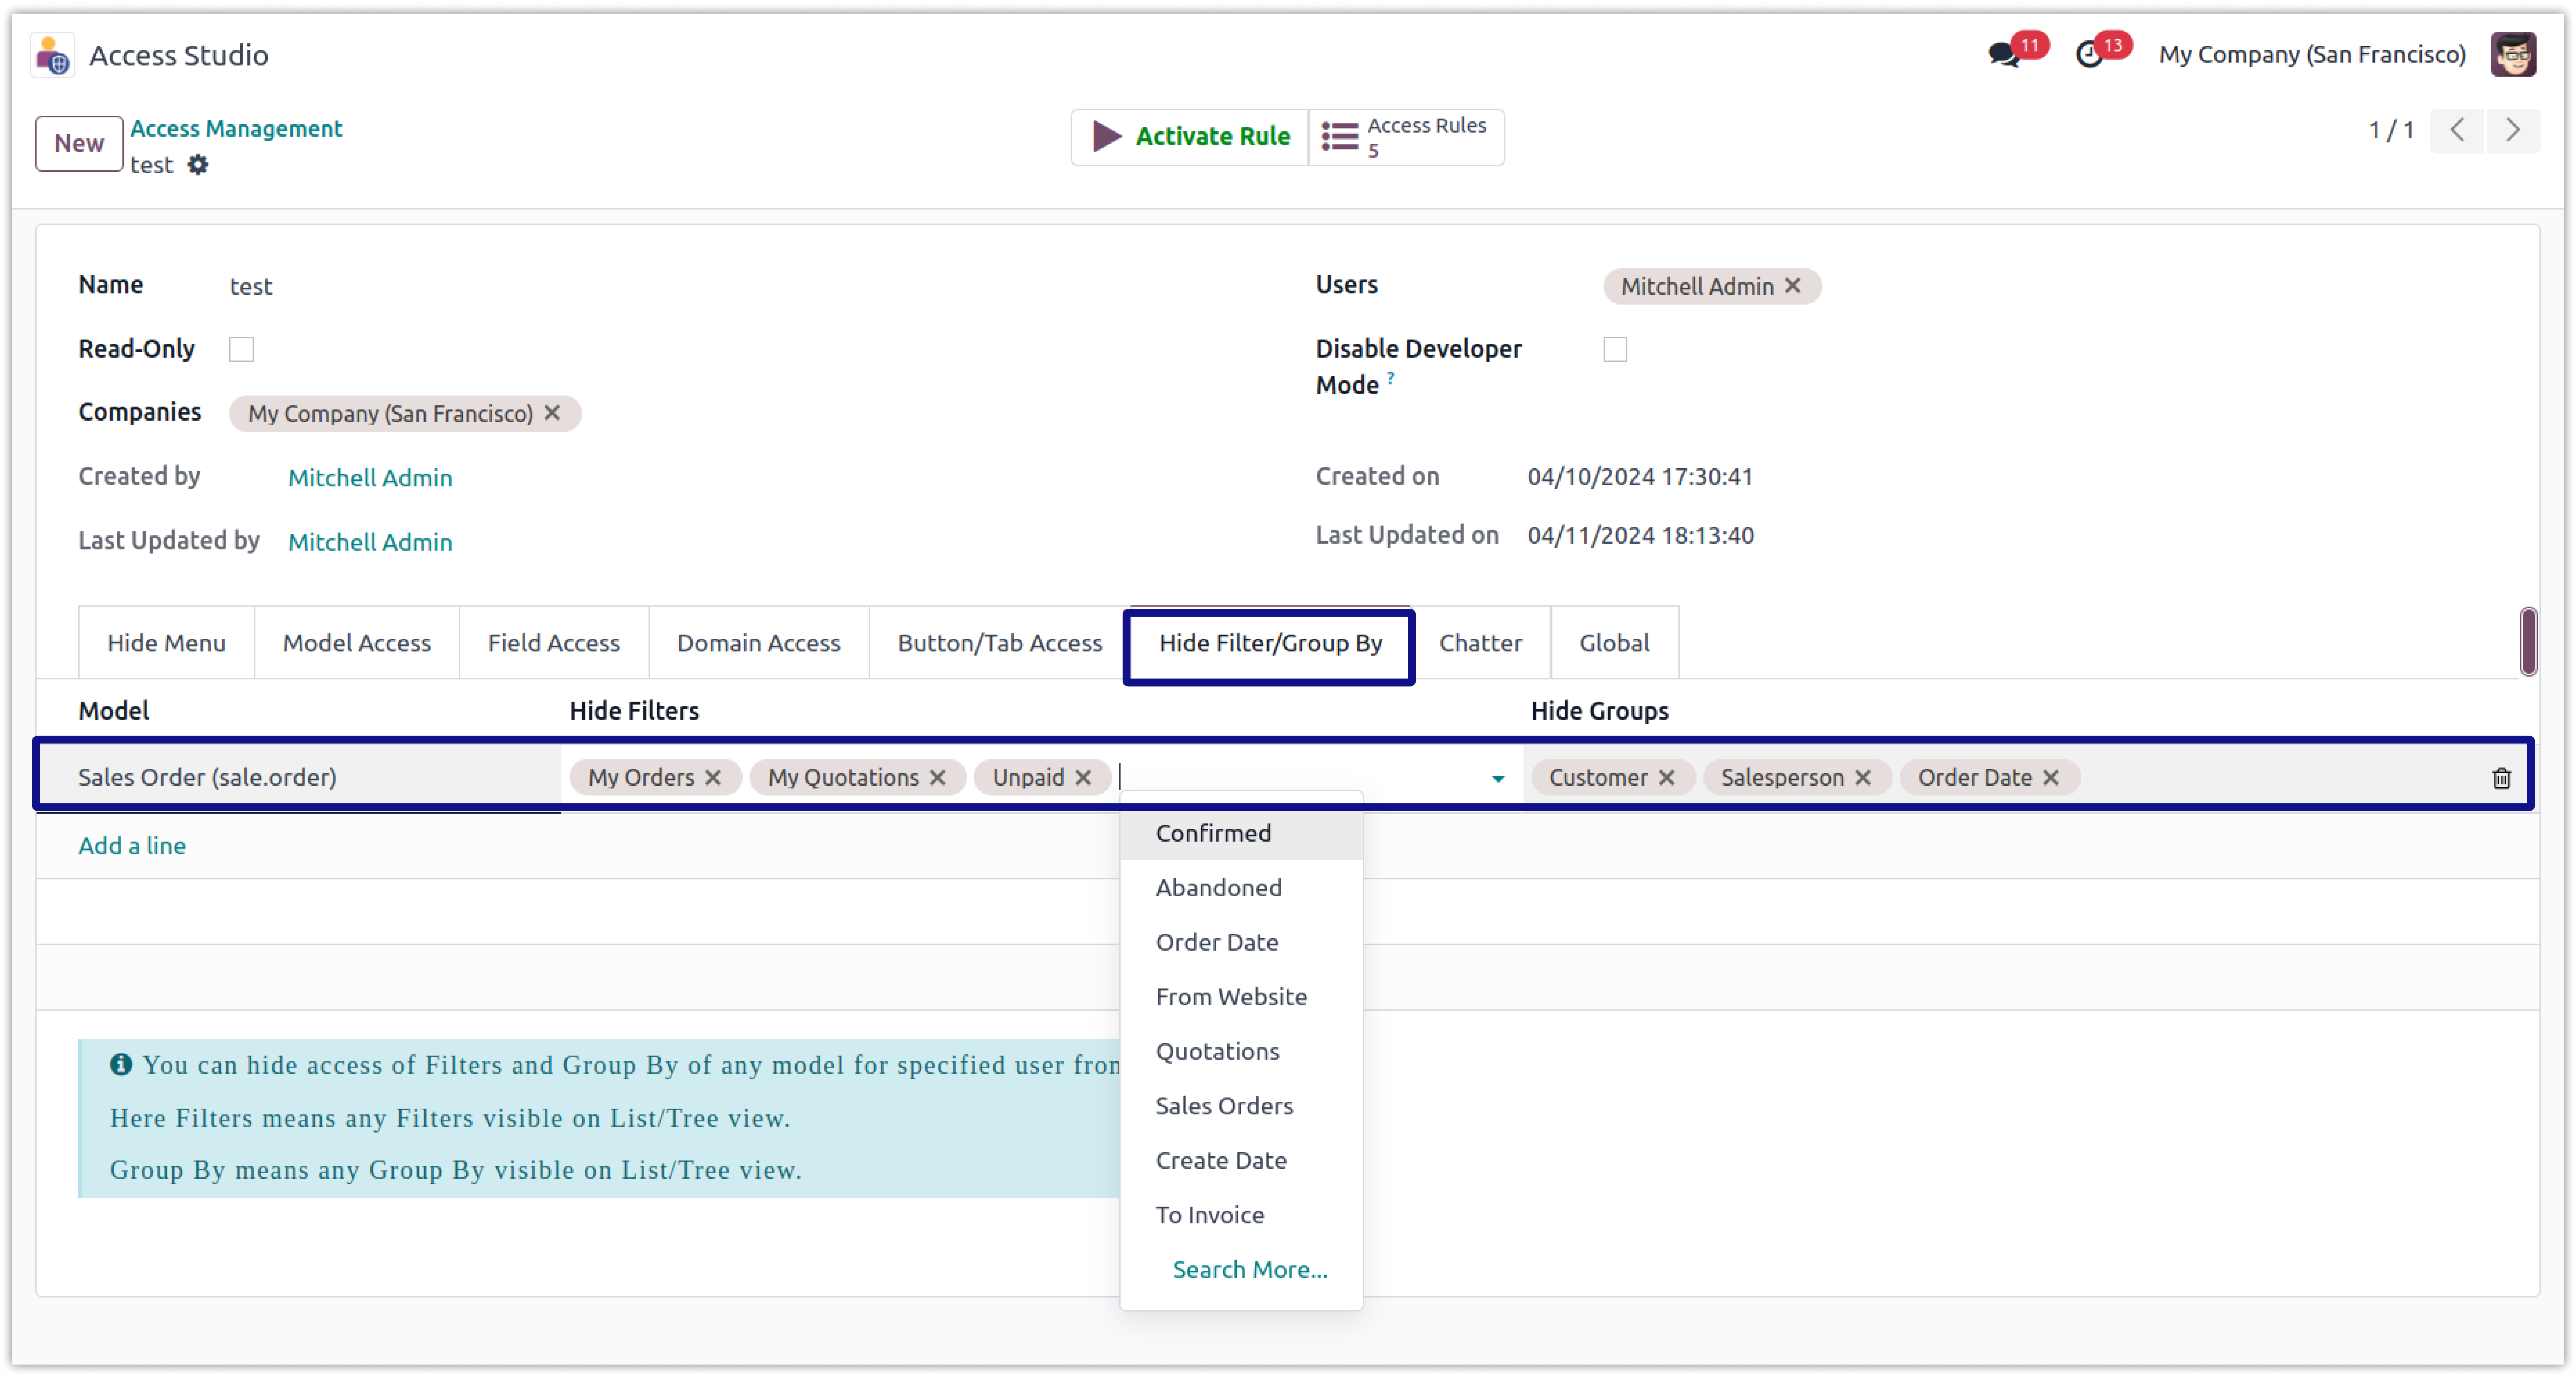
Select the filters or groups from the drop down for a selected model.
-
If you want to hide Filter and Group By option from the page, please select
all the buttons given below them. -
Click on image to Zoom out.
-
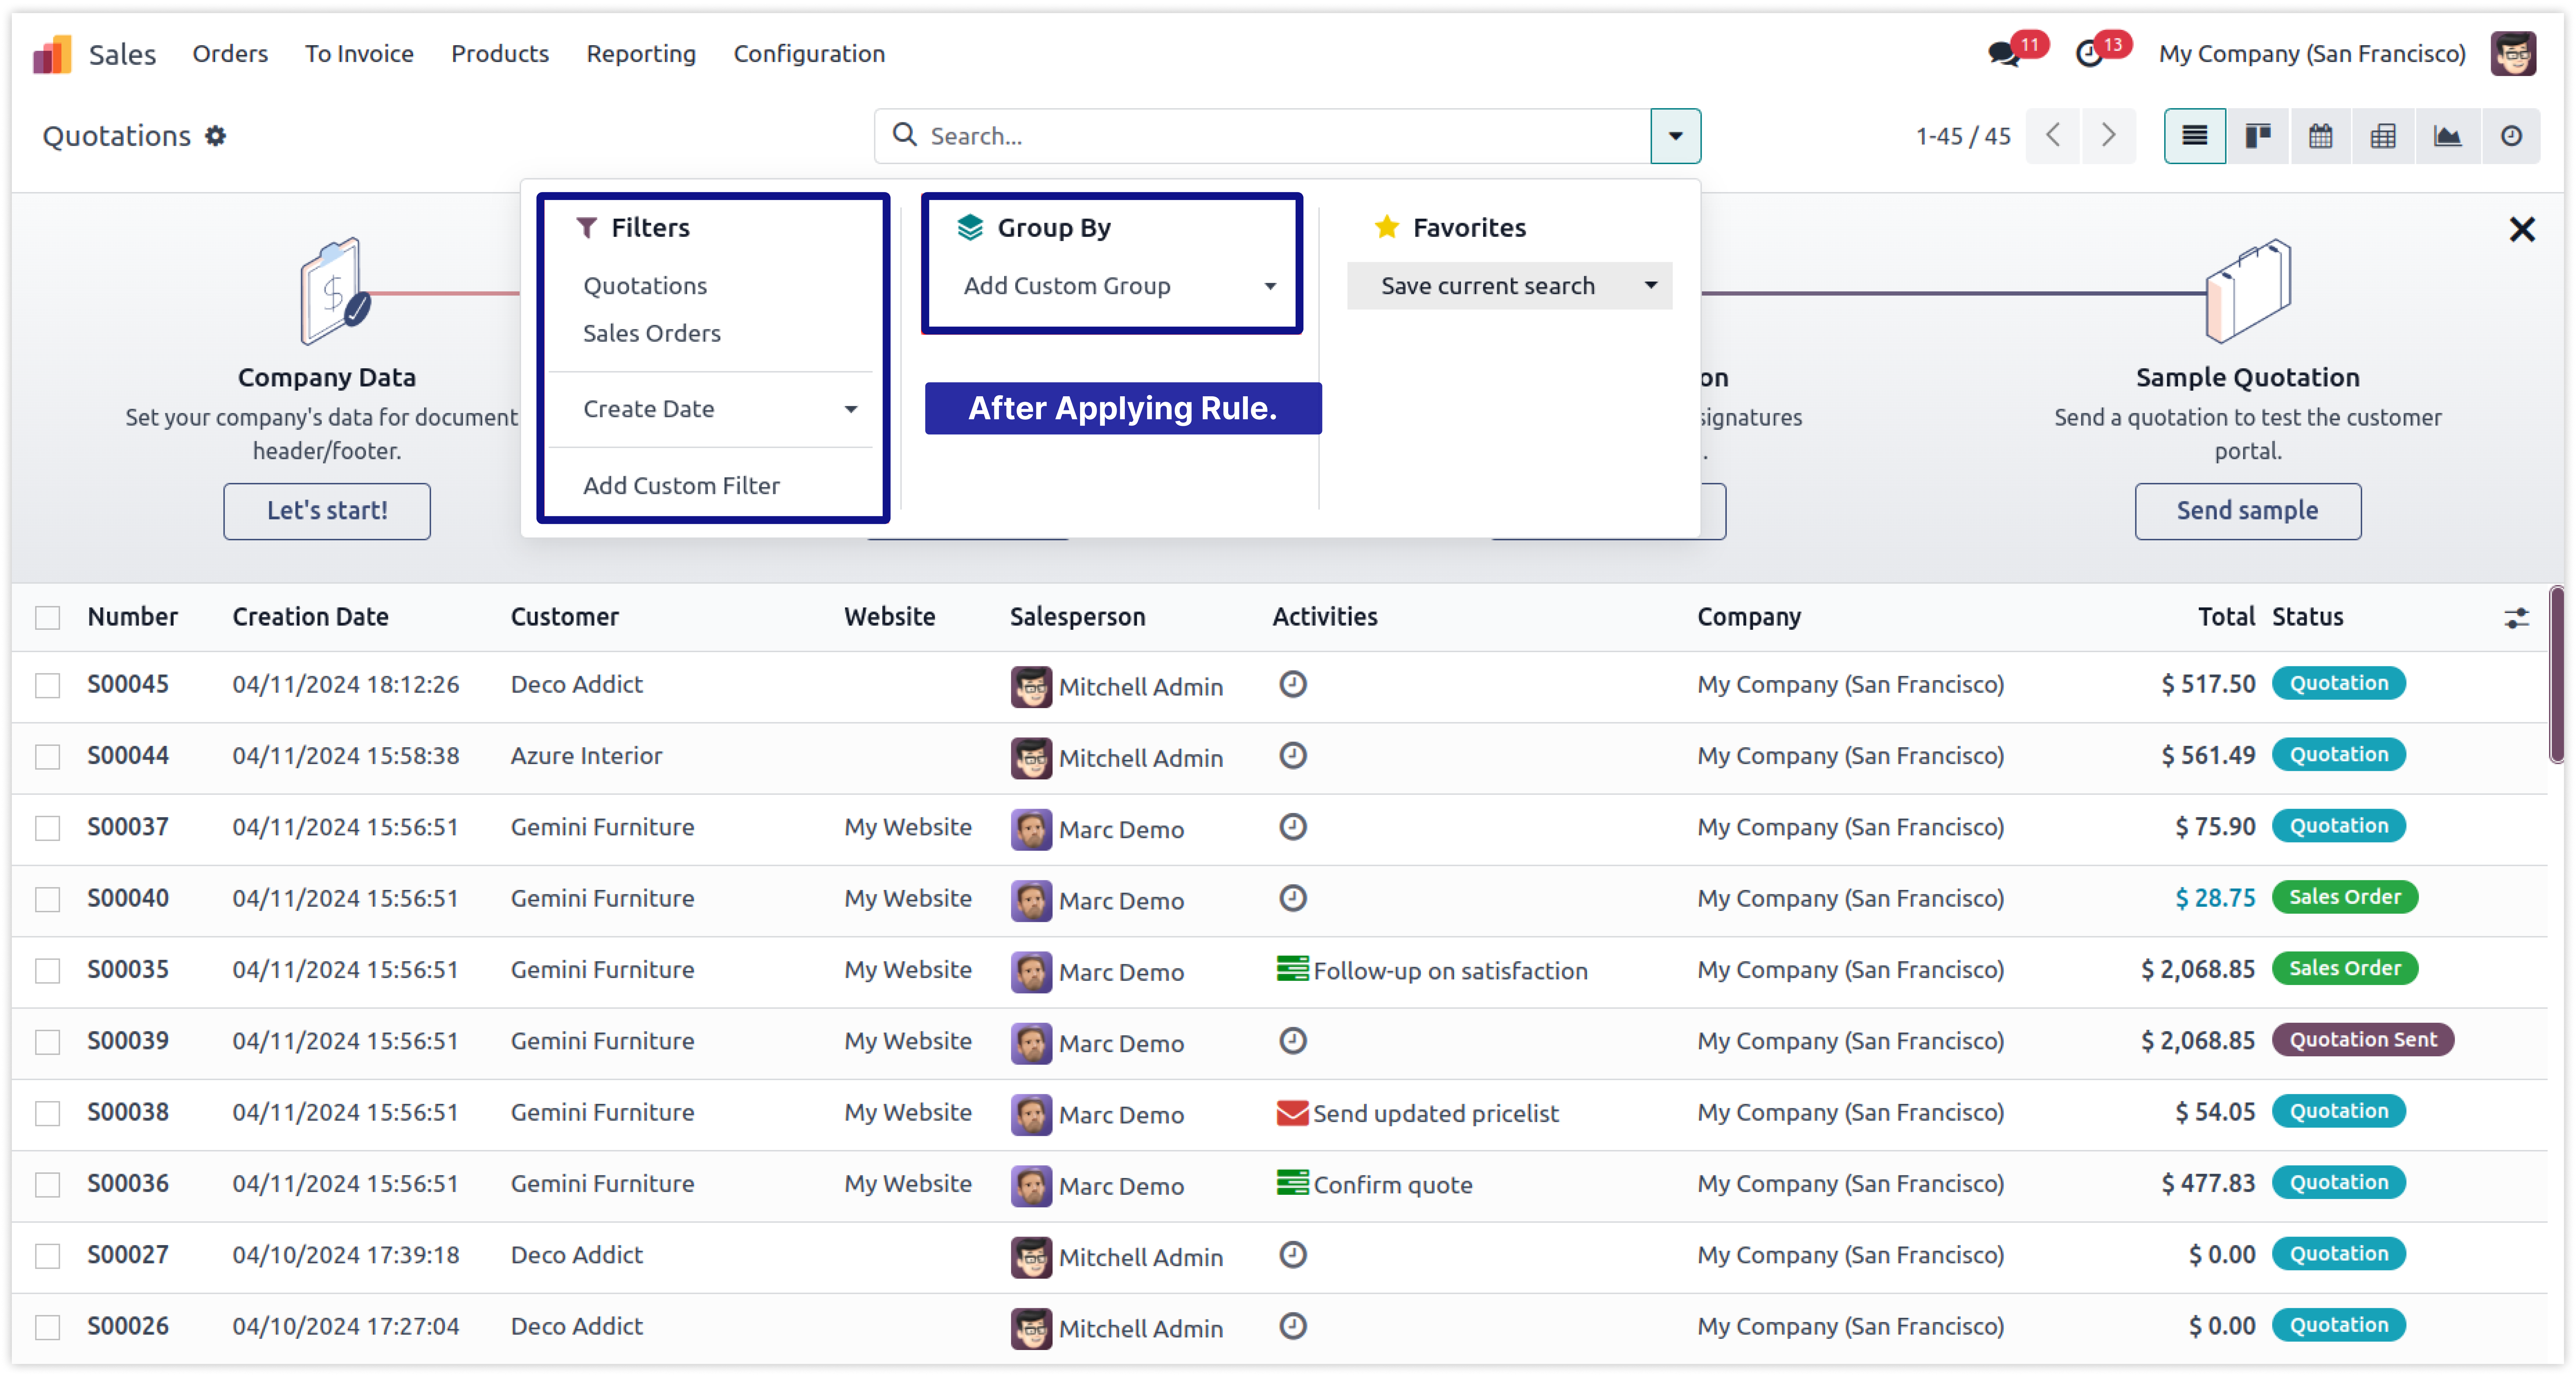
You can see the selected filters and groups are hidden from the defined
users in the screenshot below. -
Click on image to Zoom out.
Important Note:-
- Before upgrading your database to a newer version, uninstall the Simplify Access Management module.
- Skipping this step may cause errors during the upgrade process.
- After the upgrade is complete, you can reinstall the module safely.
Preserving Your Rules:-
- Use the Simplify Import and Export module to export rules from the old database.
- Import these rules into the new database after the upgrade.
Version Compatibility:-
- The Simplify Import and Export module must be installed in both the old and new database versions.
- Odoo only supports importing data between the same versions.
Module Availability:-
- The Simplify Import and Export module is free and available for download from the store.
Important Considerations:-
- Due to differences in names, actions, or fields between Odoo versions, some rules may not be imported successfully.
- Check the logs to identify any failed imports.
- Manually recreate any missing rules if required.